Overview
The first step in creating a process is to define its tasks. In ProcessMaker, a task is a logical group of sequential steps that share a common goal. Tasks can be assigned to different users or groups of users, so that a process can coordinate the activities of different people or groups in an organization.
Note: Remember that for cases to be executed in ProcessMaker, it is mandatory to have a start event assigned to the first task as well as the users/groups that will have the ability to work on the process.
Adding Tasks
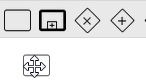
As of version 3.0.1, elements have the Quick Toolbar that appears when an element is selected and can be used to conveniently add the next element in the design, such as an event, gateway, task and sub-process.

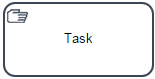
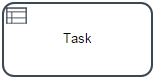
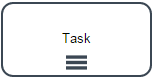
Tasks have the drag & drop property, so to add a new task drag the icon from the toolbox, and without releasing the mouse button, drop it into the Process Map.
By default, tasks are created with the name "Task [number]" starting with the number 1:
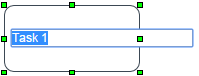
To change the name of a task, right click on the task and select the option "Edit Label":

Another option to change the label of the task is to double click on the task's name to enable the edit mode/editing mode:
Note: If the name of the task is changed while cases are being run, the task name may not be updated correctly in the case lists under the HOME menu.
Connecting Tasks (before version 3.0.1)
When the mouse is hovered over a task, little orange dots appear on the sides:
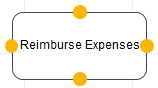
To connect it with another task or element of the Process Map, click on any of the orange dots, and without releasing the button of the mouse, draw the line to the other element until an empty circle appears:
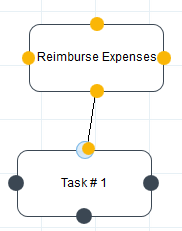
Then drop it to make the connection:
Connecting Tasks (version 3.0.1 and after)
From ProcessMaker 3.0.1 on, the elements added in the Process Map have the Quick Toolbar, which shows designers the next possible elements to be added to the design. To connect a task to another element simply click on it and the following options will be shown.
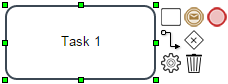
A task can be connected to another task, an intermediate event, an end event, or a gateway. The flow option allows connecting the task to an already added element in the process map, the engine option is the shortcut to view the task properties, and the trash option is the shortcut to remove the task.
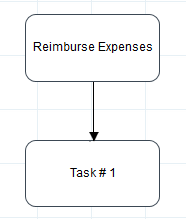
For example, in order to connect the task to another task, just click on the task option and place it in the Process Map.

In the case you already have two tasks set in the Process, click on the task and from the Quick Toolbar choose the connect option. Clicking on it will display a line that represents the connection between tasks. If the connection can be made, the element in the Process will turn green. If not, then it will turn red. In this example, the connection between these two tasks can be done, so, click on the second task to see the arrow that can connect these tasks.

The task context menu is the menu displayed when right clicking on a task.
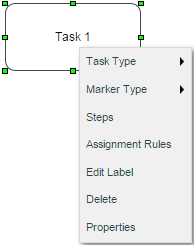
Each of these options are described in the following sections.
Task Types
Task types are intended to model processes that are technically executable. However, only the Empty and Script tasks are supported by the ProcessMaker engine. At the moment, the rest of the task types are merely informative.
To view the available task types, right click on the task and hover the mouse over the Task Type option:
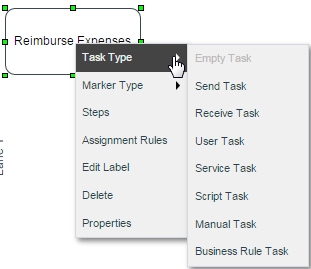
Note: DO NOT change the type of task while there are active cases assigned to that task. If the type of task is changed, the cases might become unreachable.
Empty Task
An empty task is a single action that occurs in a process, e.g. mailing a form.
This type of task is supported by the ProcessMaker engine and the rest of documentation in this page is mostly based in this task.
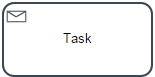
Send Task
A send task is a task that sends a message to another process or lane. The task is completed once the message is sent.

Note: Use this type of task only for design purposes. The ProcessMaker engine manages this task as an empty task.
Receive Task
A receive task indicates that the process is relying on an incoming message from a third party. Upon receiving a message, the task has been performed.
Note: Use this type of task only for design purposes. The ProcessMaker engine manages this task as an empty task.
User Task
- A typical "workflow" task where a human performs the Task with the assistance of a software application.
- The task is scheduled through a task list manager of some sort.
Examples:
- Phone operator updates customer record.
- User changing their password.

Note: Use this task only for design purposes. The ProcessMaker engine manages this task as an empty task.
Service Task
A service task is any task that uses an automated application or web service to complete the task.
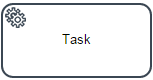
Note: Use this type of task only for design purposes. The ProcessMaker engine manages this task as an empty task.
Script Task
Available Version: 3.0.1
This type of task allows a trigger to be executed when the flow arrives to that task. Some of the characteristics of a script task are the following:
- Script tasks cannot start the flow of the process in the regular way; since a script task does not have assigned users, the process won't be displayed in the New Case option. Nevertheless, script tasks can start the flow of the process if the start event is configured as a web entry.
- When the task is ready to start, the engine will execute the script.
- When the script is completed, the task will also be completed.
After adding a script task to the design, configure it by going to its properties to add the code that will be executed.
In the window that opens, there are two ways to add the trigger that will be executed by the task.
By selecting the trigger from the Title dropdown menu.
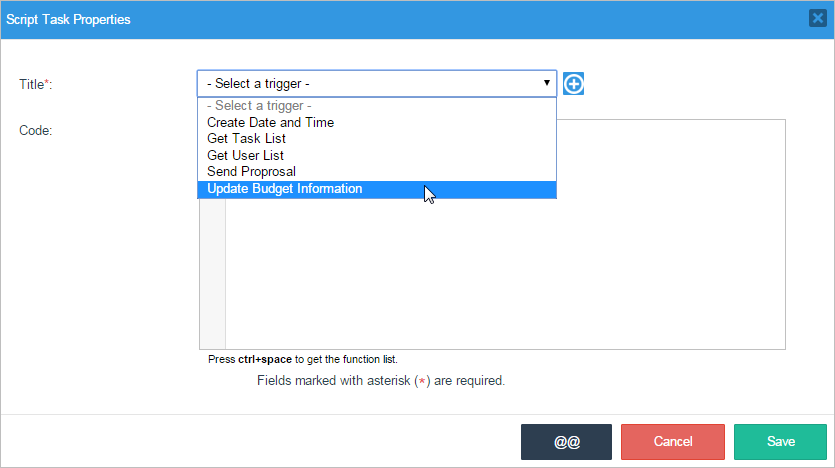
The code added to the trigger will be shown in the Code textarea.
By creating the trigger directly from the window by clicking on the plus symbol (+).
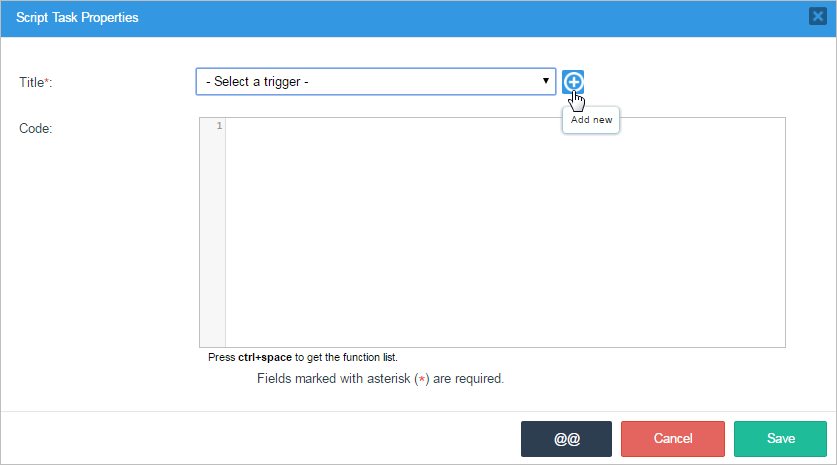
Add the name of the new trigger and the code in the Code textarea.
Save the configuration of the properties of the task that will execute the trigger when running cases.
Note: The system variables that are available during a script task are the variables that were set during the previous normal task in the process, so the value of the @@USR_USERNAME and @@USER_LOGGED variables will be set to the last user who worked on the case. Similarly, @%INDEX will be set to the delegation index of the previous normal task in the process. If the delegation index of the current script task is necessary, then it will be @%INDEX + 1 if the script task follows a normal task, or @%INDEX + 2 for the second script task after a normal task.
Manual Task
A manual task type is used wherever a part of a process has to be executed manually. It can be executed without any outside help or application.
Example:
- A telephone technician installing a telephone at a customer location.
- Loading a truck with product.
Note: Use this type of task only for design purposes. The ProcessMaker engine manages this task as an empty task.
Business Task
Business rule is an explicit type that was added with BPMN 2.0. Business rules are specific types of services maintained by a business working group, rather than an IT group. The rule shape is used to represent the implementation of a business rule.
Note: Use this type of task only for design purposes. The ProcessMaker engine manages this task as an empty task.
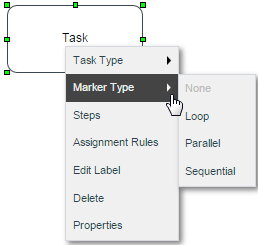
Marker Type
Markers are used to visually distinguish sub-classes of task objects. By default no marker is defined, this is known as none. Besides that, three different types of markers can be defined by right clicking on the task and selecting "Marker Type". Then, select among the three of them:
- Loop
- Parallel
- Sequential
Mark types are merely informative, in future versions their respective functionality will be added.
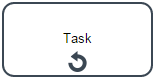
Loop
A loop task will repeat automatically until a defined condition is accomplished. People with a programming background will recognize this marker as repeat-until (or while-do)
Note: Use this type of marker in the task only for design purposes. The ProcessMaker engine manages this task as an empty task.
Parallel
A parallel task or multiple instance task is a task that happens multiple times. For instance, if different areas in a company need to approve and sign a document.
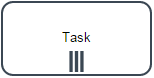
As of version 3.0.1.4, this kind of execution is supported by the ProcessMaker engine. When the task is marked as parallel, the task will be routed in parallel to all the users/groups assigned in the task. The flow continues to the next task only after all users assigned to the instances of the task have finished their execution.
The parallel marker is available for the following types of tasks:
- Empty
- User
- Manual
- Use the PMFUserList() function in a trigger or the userList() web service or the GET /users endpoint in an external script.
- Do a search in the
USERS.USR_UIDfield in thewf_workspacedatabase, which is namedwf_workflowby default. - Run cases in Debug Mode with tasks assigned to the users and copy the value of the
USER_LOGGEDsystem variable. - Before a step is executed (i.e., DynaForms, Input Documents and Output Documents).
- After a step is executed.
- Before a user is assigned (designated) to work on the next task is the process.
- Before a case routes to the next task in the process.
- After a case routes to the next task in the process.
- Condition. A condition can also be added to determine whether the trigger should fire or not. This condition is also written with PHP code. For more information, see Using Conditions
- Edit Open the trigger editor to edit the code.
- Remove Remove the trigger from the step.
- Script Task
- Sub-process
- Actions By Email
- Intermediate Email Event
- Start Timer Event
- Start Timer Event + Intermediate Email Event
- For the user currently logged-in, use the
@@USER_LOGGEDsystem variable. For example, if the Value Based Assignment variable is@@NextUser, and it is set to the same user designated to work on the current task, then the following trigger code can be used:@@NextUser = @@USER_LOGGED;Note: The variable for Value Based Assignment can not be a system variable such as
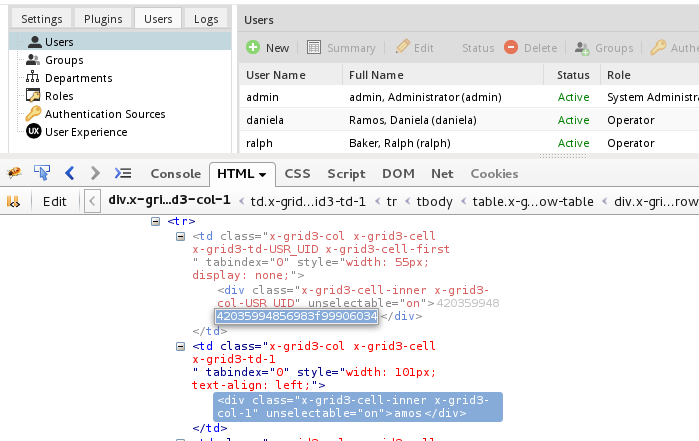
@@USER_LOGGED, but the value of a system variable can be assigned to the variable for Value Based Assignment in a trigger as shown in this example. - To get the unique ID of a particular user, go to Admin > Users > Users to see the list of available users. Then, press Ctrl + U to view the HTML source code, or use a code inspector such as Chrome Developer Tools, Firebug or the Firefox Debugger. In the table of users, the first cell in each row is hidden and contains a DIV with the user's unique ID.
- The MySQL command line, a graphical interface such as PhpMyAdmin, or the executeQuery() function in a trigger can be used to obtain the unique ID in the wf_WORKSPACE.USERS.USR_UID field in the MySQL database. Alternatively, the user's ID can be more easily found in the USER_LOGGED system variable when running a case with the debugger.

- A dropdown or suggest box can use an SQL query or a prior trigger to populate a list of available users assigned to the task and allow the user to select one. See the examples below.
- Time: Required Field. Time elapsed since the case was routed and sent to the unassigned folder. It is not possible to use decimal numbers.
- Time Unit: Time unit expressed in hours and minutes.
- Trigger to execute: Required Field. Choose the trigger that will be fired. If this trigger will send a notification, don't forget to enable email notifications to have notifications working properly. In order to send notifications at the correct time, the server running ProcessMaker will have to be configured to execute a
Scheduled Taskif using Windows, or a cron job if using Linux/UNIX. - Execute Trigger It indicates if the trigger will be executed Once or Every time scheduled by cron.
- Once: No matter what the content of the trigger is, it will be executed just once.
- Every time scheduled by cron: The trigger will be executed depending on the cron configuration.
- For a single user:
@@selfServicePool = "24856313956e88484e20548051901710"; //unique ID of a user
- For the members of a group:
@@selfServicePool = "75310693956e884c026c941010229288"; //unique ID of a group
- For an array of users and/or groups:
@@selfServicePool = array(
"24856313956e88484e20548051901710", //unique ID of a user
"75310693956e884c026c941010229288", //unique ID of a group
"34300353256e8849a610e70014939032", //unique ID of a user
@@USER_LOGGED //unique ID of the current logged-in user
); - Have the PM_REASSIGNCASE permission in their role
- Have the process permissions to open the case
- Have a Process Supervisor permission to manage cases
- There are temporary or part time employees that are not always available to work on the task, so they should only be assigned to the task when available. A manager or the normally assigned users could reassign the case to the temporary employee when at work.
- The workload for employees often changes, so a manager needs to decide which employees are best able to handle the cases. The task is assigned to the manager by default and he/she then looks at the workload and reassigns the case to one on the employees who have ad hoc assignment to the task.
- The normally assigned users generally handle the task, but there may be special cases which can only be handled by a manager. Do an ad hoc assignment of the manager to the task and give all the normally assigned users the PM_REASSIGNCASE permission. When a special case arises, they can reassign the case to the manager to handle it.
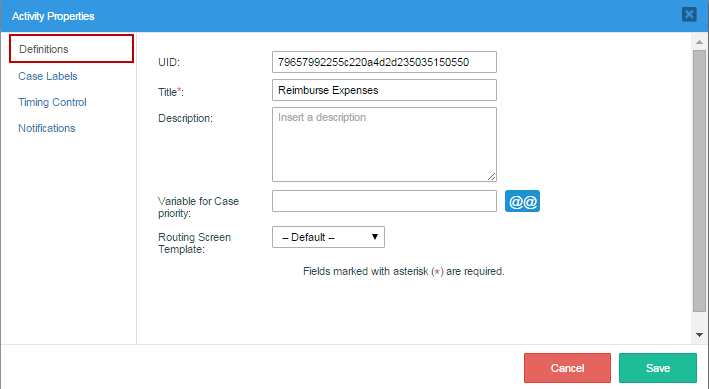
- UID. A 32 character hexadecimal number that uniquely identifies the task. The UID cannot be edited.
- Title. Required field. The title or label of a task, which is displayed on the Process Map. It is recommended to use verb-noun combinations in the title, such as "Claim Process" or"Review Application".
- Description. Give a brief description to the task. It is recommended to describe what work is done and who will be assigned to that work.
Variable for Case priority. A variable or fixed integer that determines the priority of a task. The priority of a case can be between 1 and 5:
-
- 5 Very High
- 4 High
- 3 Normal
- 2 Low
- 1 Very Low
-
@@ Use the @@ button to select either case or system variables.
By default, the priority of cases is determined by a system variable named @@SYS_CASE_PRIORITY, which has a default value of 3 (Normal priority), but that value can be changed by setting the value of @@SYS_CASE_PRIORITY in a trigger (or in a Dynaform field named "SYS_CASE_PRIORITY"). However, the case priority can be determined by a custom case variable. For instance, the case variable @@approvalTaskPriority could be used and its value could be set in a trigger that examines the case data and determines the appropriate value. Likewise, its value could be set in a Dynaform dropdown box named "approvalTaskPriority", which allows the user to select the appropriate priority. If the cases of this task should always have a fixed priority, then enter an integer between 1 and 5.
The cases in the Inbox list are ordered by their priority, so priority 1 cases appear at the top of the list and priority 5 cases appear at the bottom.
- Routing Screen Template. Process designers can personalize the screen template that is shown to the user when completing a task and routing to the next task or sub-process in the process. Each task may have its own routing screen template.
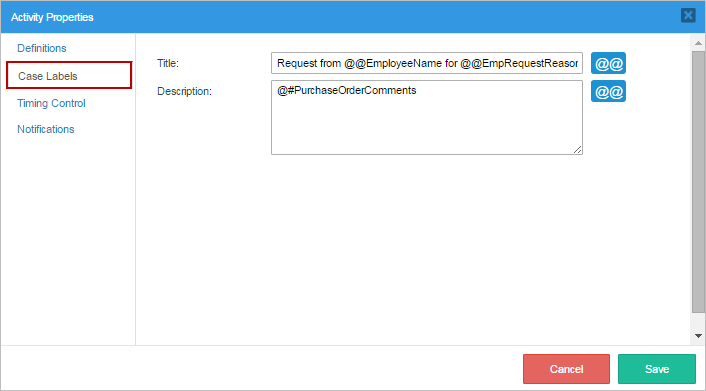
Title. By default, the title of a case is its case number, such as
#45. In this field, titles can be assigned to cases as well as variables, and can be inserted inside the title. Use the [ @@ ] button to view which variables are available and to insert them into the title.Warning: When searching for cases using the Advanced Search option, cases that are currently on a parallel task will only display ONE of the case labels of one of the parallel tasks in the search results. Therefore, it is not recommended to use different case titles in the configuration of the case labels of parallel tasks.
Description. In this field, descriptions can be assigned to the case. Use the [ @@ ] button to view the list of available variables and insert them in the description.
Allow user defined timing control: This option allows the user assigned to the previous task in the process to manually define the time scheduled for the next task when a case is routed. If this option is checked, when the case is about to be routed to the next task the following fields will be displayed:
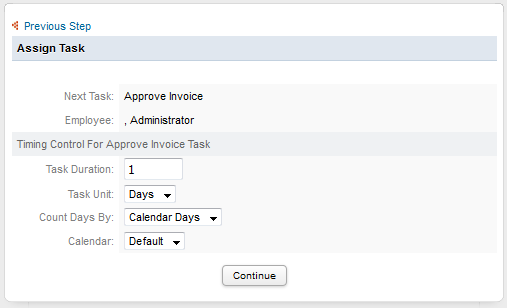
Task duration: An integer defining the duration of the task. Negative and decimal numbers are not allowed.
Time unit: The unit of time, which can be hours or days.
Counts days by: The duration of the task, which can be counted in work days (Monday through Friday) or calendar days.
Calendar: Select the calendar that the task duration will be based on. If no custom calendars have been created, then the "Default" calendar will automatically be selected; otherwise select one from the list.
Get the latest Delegation Date (from the server)
Convert the Delegation date to the next user timeZone
Calculate the Due Date base in Default Calendar
Convert to Due Date to UTC timezone
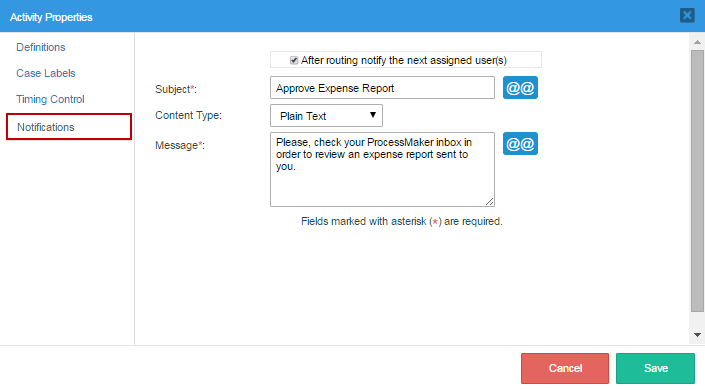
Subject: Include the subject of the email message.
Content Type: Choose the content type, which can be either Plain Text or an HTML template.
- Plain Text: If this option was selected, a message field will appear where the text for the email message can be entered with no formatting.
- HTML Template: If this option was selected, a template field will appear to select an email template. Choose an email template that was previously created, or upload a new HTML template file using the Process File Manager.
Message: Write the content of the email.
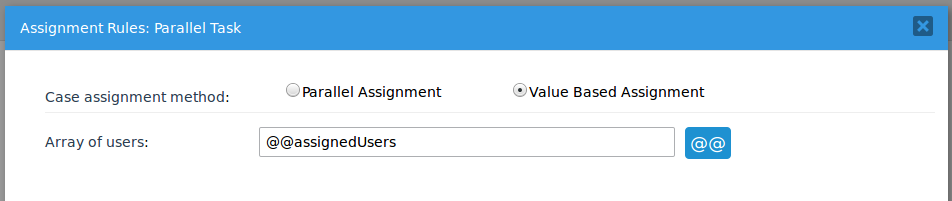
For this type of task, the assignment rules change so tasks only have two options to route the task "in parallel": Parallel Assignment and Value Based Assignment. Each user assigned to a parallel task works on a different instance of the task. All the instances are created at once, so all the assigned users can work on their instances of the task at the same time.
Parallel Assignment
Select this option to add users and/or groups to the Assigned Users list. The users in this list will do the task in "parallel", which means that each user in the list can do the task at the same time.

When running cases, the routing window will show the list of users assigned to the task.
The flow will continue to the next elements in the process after all users assigned to the parallel task have routed the case.
Value Based Assignment
Note: There are some issues with this type of assignment. If you have any problems please report it at http://bugs.processmaker.com/
Select this option to allow a variable that specifies which users will be assigned to work on instances of the parallel task. The value of this variable is an array of the unique IDs of the users to be assigned to the parallel task. These unique IDs can be obtained in the following ways:
Example:
An array variable is created in the process named "assignedUsers". This variable is set in the Array of Users box for Value Based Assignment in the Assignment Rules for the parallel task.
Then, the following trigger is executed before assignment in the previous task in the process to set the value of the @=assignedUsers variable:
@@assignedUsers = array(
"00000000000000000000000000000001", //ID of admin
"153839111564b98d5e35983081025138" //ID of Mary Jones
);
Note: DO NOT use a system variable as the variable for the assigned users in a parallel task. For example, do NOT use the @@USER_LOGGED system variable.
Note: When running cases, if the message "Invalid Task Assignment method for Next Task" is shown, it means that the configuration of the parallel task has not been saved correctly. To solve this issue, please re-save the configuration of the task to solve this issue.
Sequential
A sequential task allows users to execute code sequentially using a script.
Note: Use this type of marker in the task only for design purposes. The ProcessMaker engine manages this task as an empty task.
Steps
In ProcessMaker a step is a piece of work that forms a clearly defined action within a task. A step can be a manual action, such as filling out a DynaForm or uploading a Word document to use it as an Input Document, or it can be an automated workflow action. There are 5 types of steps in ProcessMaker: DynaForms, Input Documents, Output Documents, Triggers, and external.
To view the steps assigned to the task or assign new steps to the task, select the "Steps" option from the task menu:
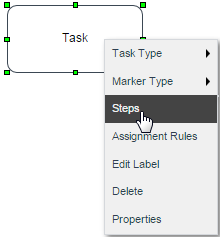
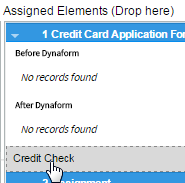
A modal window opens where the list of elements available within the process are listed in the "Available Elements" panel. These elements are organized according to their category into "Triggers", "DynaForms", "Input Documents", "Output Documents" and "Externals". On the other hand, the elements already assigned to the task are listed inside the "Assigned Elements" panel. This panel has three sections to distinguish the execution of these elements as the task is running in a case.
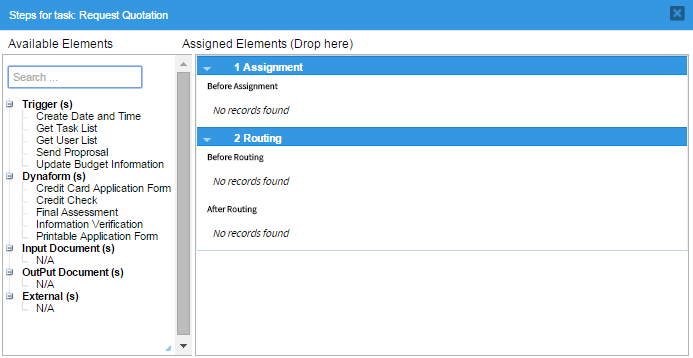
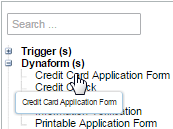
This panel has a "Search" field where it is possible to directly search for an element by just entering its name into this field. This is very helpful when there are several elements and looking for them among the list becomes exhausting. All matches are listed below as the text is entered.
The DynaForms, Input and Output Documents must be assigned in the first blank space of the panel. To add a step to the task, one of the elements listed in the "Available Elements" panel must be added in this section. Remember that the execution of the elements assigned in this panel when running a case of this task depends on the order the elements are arranged in this section of the panel.
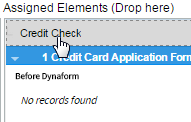
To add a step to the task, go to the list of "Available Elements", grab an element by its name, and take it to the first blank space of the "Assigned Elements" panel without releasing the button of the mouse. If the element is the first to be added, a gray section is immediately marked and the element will be added regardless of where it is dropped. A flash message is shown at the top of the panel indicating that the step was assigned correctly.
For example, if a DynaForm is the element to be added to the steps of the task:
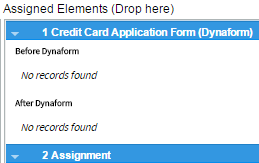
Take into account that after a DynaForm, Input Document or Output Document has been assigned, it will no longer be listed in the "Available Elements" panel. After assigning the first element to the steps of the task, the next steps to be added can be arranged before or after the steps already assigned. To do this, follow the same procedure explained before, but before dropping the element drag it above or below any of the elements already added.
The number assigned to the step is related to the position of the step in the list of steps assigned to the task. The number also indicates the position of the step in the execution of the task when running a case. The name of the step also includes the type of element added and the name of the element.
Take into account that after arranging the steps inside the panel, it is possible to re-arrange them by dragging the step above or below another element and dropping it into its new position.
Managing the Steps of a Task
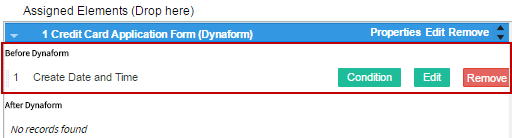
After assigning the steps to the task they can be edited (according to the element), removed or have their properties changed when running a case. The options to do that are in the right-hand corner of the step.

Properties: Select this option to add the View or Edit property to the step. It is also possible to add a condition for each step. This condition is a PHP expression.
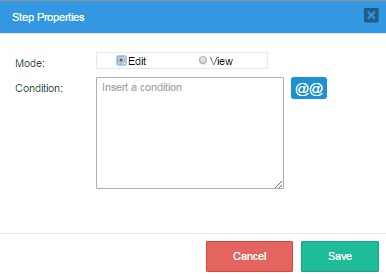
The step will only be executed if the condition evaluates to True. Remember that in PHP, an expression is True if evaluates to a non-zero value, so: -10, 10.23, "10", and "hello" are all True.
While "", 0, and "0" are all False. Variables can be used in the expression, allowing the process to check different factors when deciding whether to execute a step or not.
For more information, see Using Conditions.
Note: The "Mode" option is only available for DynaForm steps in the task.
Edit: Select this option to open the DynaForm designer editor, the trigger editor, or to edit the configuration of the Input or Output document.
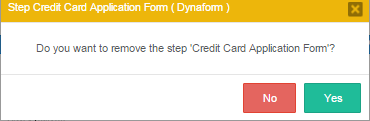
Remove Select this option to remove the element from the steps of the task. In the message box that opens, click on "Delete" to remove the element or click on "Cancel" to close the box and return to the previous list.
Assigning Triggers to a Task
A trigger is a piece of PHP code that can be inserted into a task and triggered at specific points during the executions of a case:
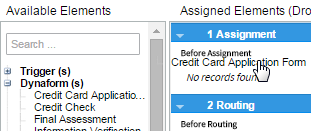
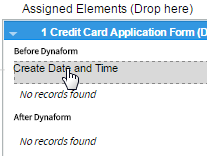
Remember that the triggers must have already been created inside the process. To assign them to a step, go to the Triggers section inside the "Available Elements" panel and grab the trigger that will be assigned without releasing the cursor of the mouse. Take it where the trigger will be executed. Notice that when each step is expanded, there are two sections: "Before (DynaForm, Input Document, Output Document)" and "After (DynaForm, Input Document, Output Document)". In the "Assignment" section, steps can only be placed "Before Assignment", and in the "Routing" section, triggers can be assigned either "Before" or "After Routing". To learn when to set a trigger and how to work with them check this documentation.
A flash message indicates that the assignment has been successful. Unlike the assignment of DynaForms, Input Documents or Output Documents, triggers are still available even after an instance of the trigger has already been assigned to a step of the task. Each one of the triggers already assigned has three buttons to customize the execution of the trigger in the step. These buttons are the following:
Also move the triggers already assigned among the steps of the task by just dragging and dropping them into a new position.
Note: It is not recommended to delete a step while running cases because it can cause errors and prevent the case from completing. If it is necessary to edit a process that is being used in production, make a copy of the process and edit the new version of the process.
Assignment Rules
The assignment of users that will work on the task and the way these users will be assigned to it is defined by the configuration of the "Assignment Rules" of the tasks. Right click on the task then click on "Assignment Rules".
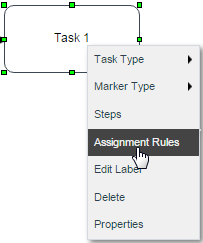
The user assignment window is the following:
After creating tasks for a process, user(s) and/or user group(s) need to be assigned to those tasks. Generally it is better to assign tasks to groups rather than individual users, even if there is only one user in the group. The user assignments will be lost whenever a process is exported, but the group assignments aren't lost. After importing a process, it is easier to assign users to groups in ProcessMaker, rather than having to go through all the tasks, manually assigning users. For instance, if your organization has a chief financial officer named Sally Barnes, then create a group called "Chief Financial Officer" and assign Sally Barnes as its member. If the chief financial officer for your organization changes or you need to export all your processes to another server, all you will need to do afterwards is assign a user to the group "Chief Financial Officer", rather than re-edit all your processes.
Note: DO NOT change the assignment rule of a task while there are cases running. If trying to do that, the following message is shown:
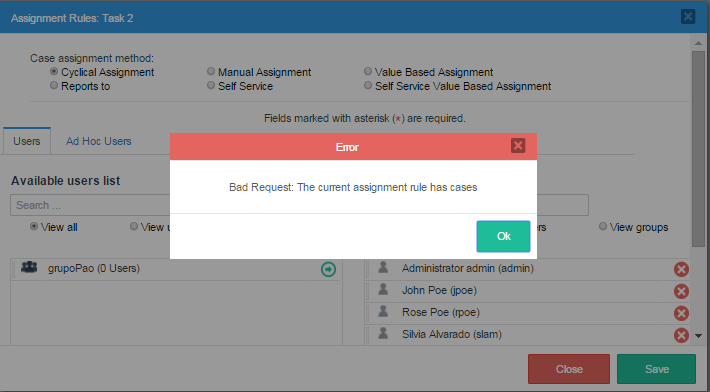
Wait until all cases end to change the assignment rule of any task in the process.
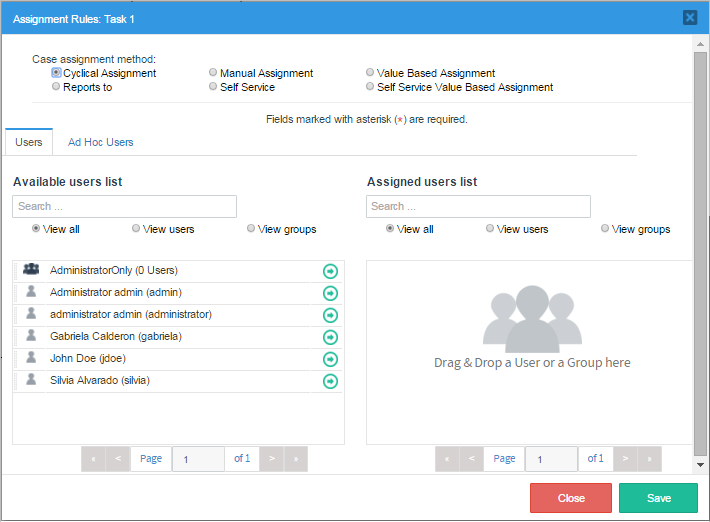
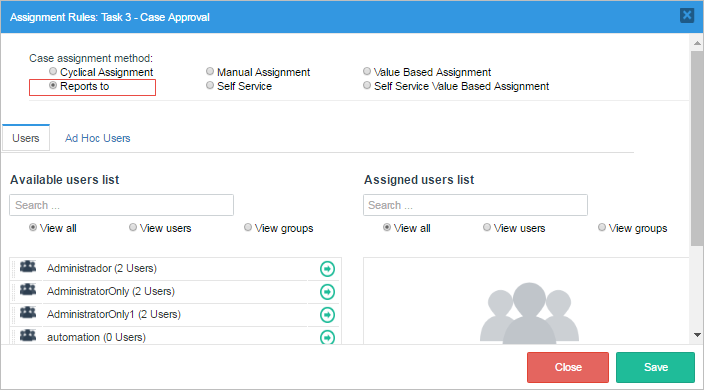
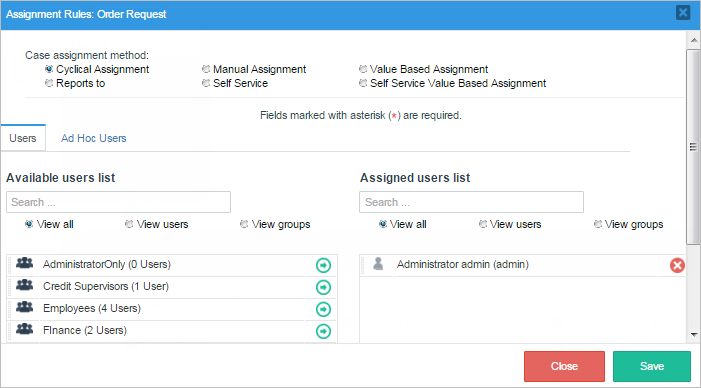
Users Tab
The first section of the window contains the assignment method options that determine which users will be assigned to the current task (these methods are explained below). To select the assignment method, simply select it from the radio button group.
The second section contains the list of users and groups available in ProcessMaker to be assigned to the task. The first panel is the "Available user list" where the available ProcessMaker groups and users are listed, ready to be assigned to the task. The second panel is the "Assigned user list" that lists the users and groups of users already assigned to the task.
To assign a group or user to the task click on the -> arrow as shown in the image below:
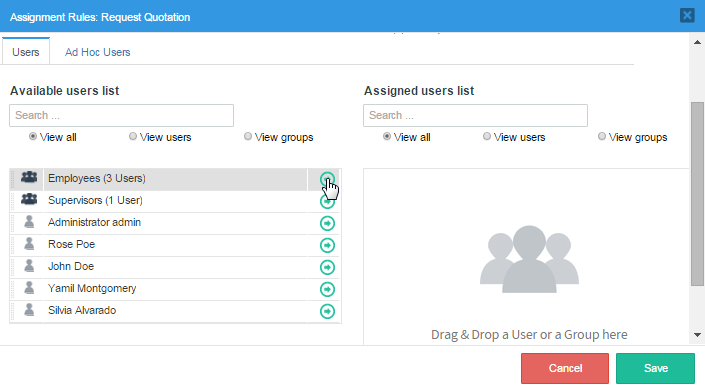
This window also has the drag and drop property to assign users and groups to the task. Thus, simply drag the name of the user or group from the "Available user list" and drop it in the "Assigned user list" panel.
If the list of users and groups is very large, use the filters in the panel to find a specific user or group, or to filter the list according to a given criteria (also select one of the options "View all", "View users", or "View groups" to filter the list).

To remove an already assigned user or group from the "Assigned user list" panel, click on the X icon at the right side of the name of the group or user, or simply drag and drop it back in the "Available user list".
To explain the assignment methods, let's use the Process "Purchase Request" as an example:

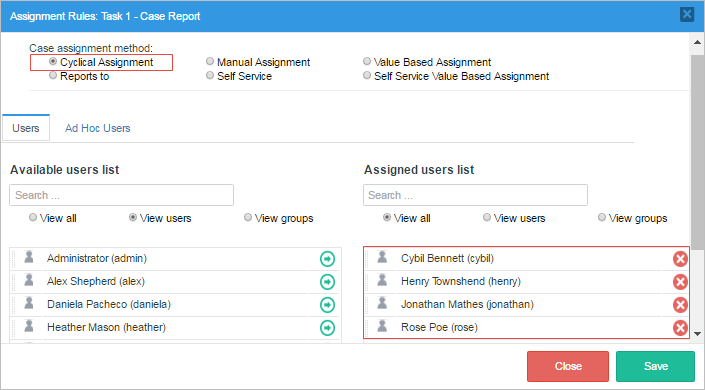
Cyclical Assignment
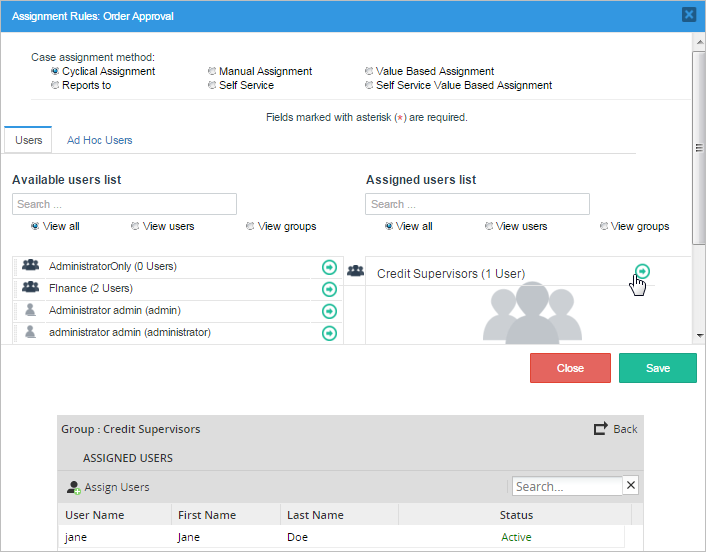
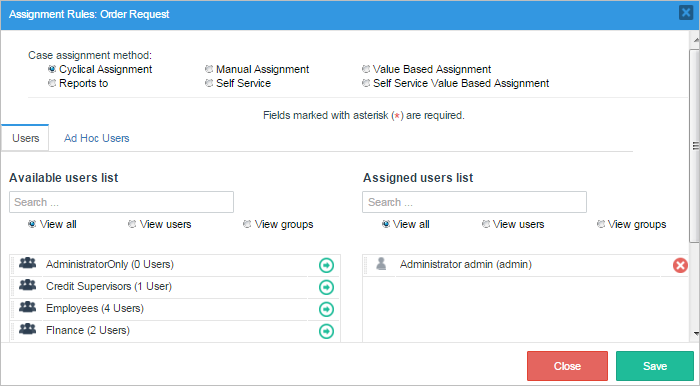
Cyclical Assignment is the default type of assignment where the task is assigned to a particular user by selecting that user from the pool of available users using the round-robin pattern. In this example, right click on the task "Order approval" and then select "Assignment Rules". A new window will open where the properties to assign rules to this particular task is shown. In "Case assignment method" click on the "Cyclical Assignment" radio button and also assign a user/users to work on the task. In this case, the "Credit Supervisor" Jane Doe will be in charge of this task.
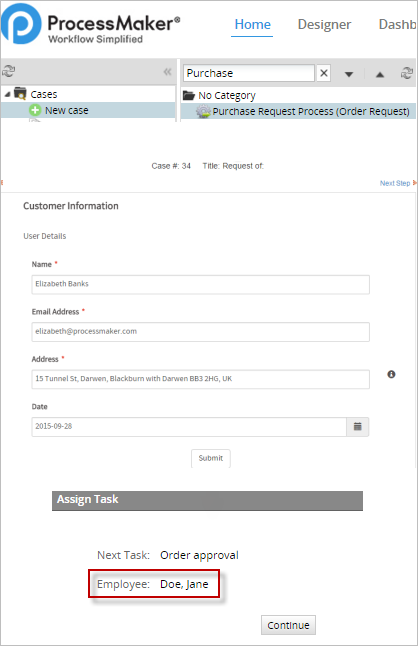
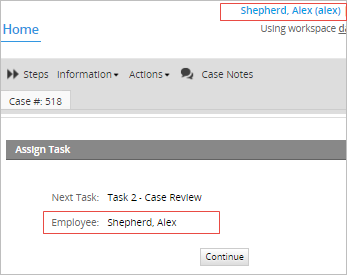
To test the assignment of the user go to "Home" > "New Case" and double click on "Purchase Request". The first Dynaform assigned to that task will open, fill it with the necessary information and click on submit. The next step will show who is in charge of the next task, which is "Order approval" in this case. The person in charge is the "Credit Supervisor", or Jane Doe as seen in the image below.
Manual Assignment
With the manual assignment rule, the user who completes the previous task in the process will manually select the user that will be working on the next task in the process.
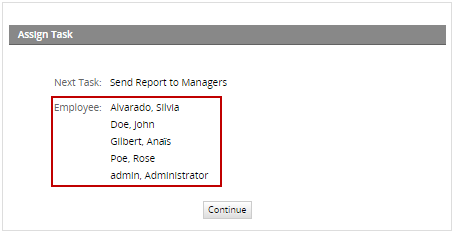
For example, in the "Order approval" task, click on "Manual Assignment" and add the amount of people that can work on this task to the users list. In this case we added four employees to the case; click on save to finish this step.
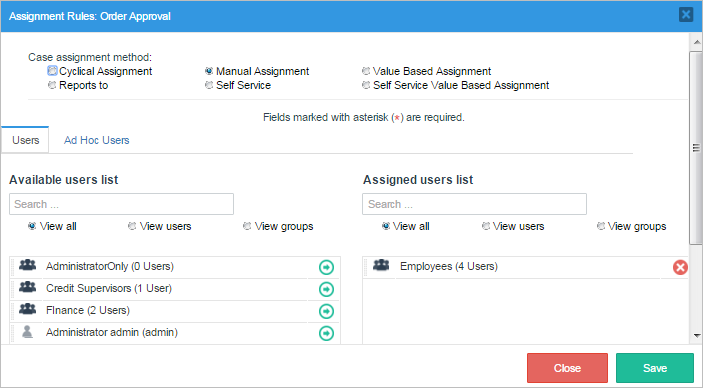
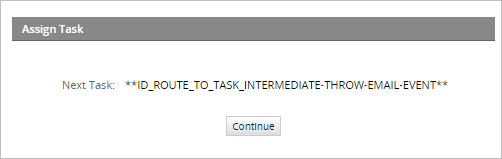
As seen in the image below, the task now has the option to be worked on by anyone inside the group "Employee". Choose the user that will be working on the "Order approval" task from the dropdown and then click on continue.

Manual Assignment - Known Issues
Please pay attention to the following known issues before choosing this type of task assignment.
Assignment Form is not displayed
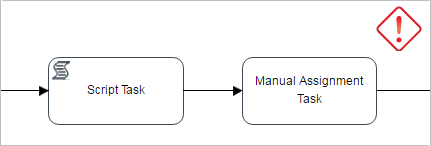
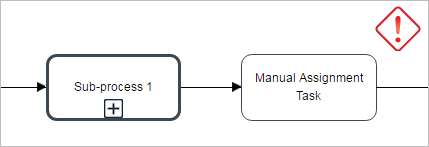
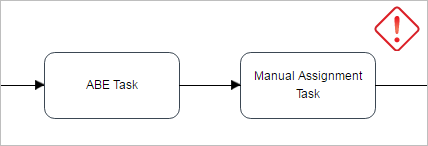
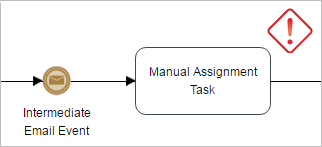
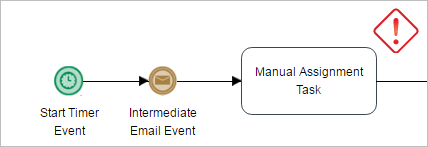
In these cases the assignment form that is displayed when the case is routed to a Manual Assignment task is NOT being displayed when the previous task is one of the following types:
Since a manual assignment task does not have users assigned by default, an error message will be displayed:
Or the following message:

Workaround
To avoid the intermediate email event, script task and sub-process issues consider the following workaround:
In the task before the Intermediate Email event / Script task / Sub-Process, add a variable to select the assigned user of the Manual Assignment task. Then, change the assignment type of the Manual task from "Manual Assignment" to "Value based assignment" and provide the variable defined previously.
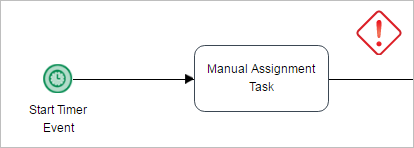
Failed:ID NO USERS
In the following cases it is impossible for the Cron Script to initiate a case.
Since a manual assignment task does not have users assigned by default, an error will be displayed and the case won't be created.
To initiate a case with the Start Timer Event the initial task must have users assigned.
Web Entry
In the process design shown in the image below the start event is configured as a web entry followed by a task with manual assignment.
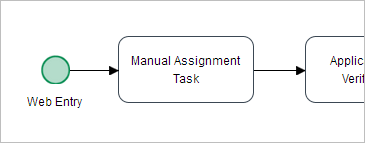
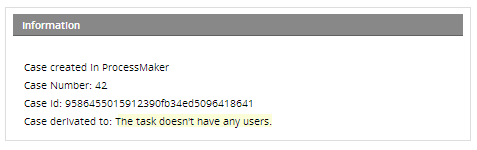
This process design is NOT supported by ProcessMaker. After the user has completed the Dynaform assigned to the web entry, the information message will inform the user that the next task doesn't have any users assigned.
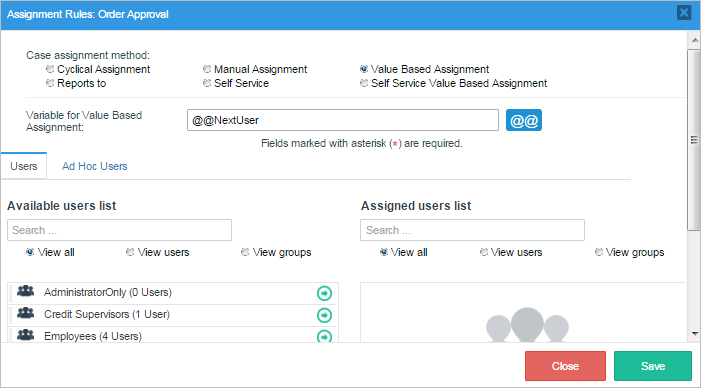
Value Based Assignment
Select this option to use a variable to specify a single user who will be designated to work on the task. Any variable can be used to designate the user, but this variable must be set by a DynaForm field in a prior task or by a trigger that is executed at any point before assignment in the previous task. The variable for Value Based Assignment must be set to the unique ID of a user in the task's assignment pool.
For example, the following trigger sets the user for the next task based on whether the @#amount is greater than or less than 500.00:
@@NextUser = '089f76dfe59c13408500f0f852435ac7'; //UID of Ralph Baker
}
else {
@@NextUser = '4b50c5a36630d3906475c945ed999051'; //UID of Amos Batto
}
Note: The unique ID of a user can can be obtained in the following ways:
The user designated by the variable to work on the task must also be assigned to the task. If the user is not in the list of users assigned to the task, then the following error message will appear when the user tries to open the case:

Remember that the variable used by Value Based Assignment should be set at some point before assignment in the previous task. For example, if using Value Based Assignment in the "Process Complaint" task in the following process, then the variable must be set before assignment or some earlier point in the "Enter Complaint" task.

If the first task in the process uses Value Based Assignment, then ProcessMaker will ignore its variable and assign the first task to the user who initiated the case. If the case is created with PMFNewCase(), PMFNewCaseImpersonate(), newCase() web service, newCaseImpersonate() web service, POST /cases endpoint, or POST /cases/impersonate endpoint, then it will also ignore the Value Based Assignment and be assigned to the user specified by the function/web service/REST endpoint.
However, the variable for Value Based Assignment will be used to designate the user to work on the initial task if the process is used as a subprocess in another process. The variable needs to be set in the master case and be one of the variables passed to the subprocess case.
The user who starts the case will be assigned to the initial task in the case, but if the process loops back to the initial task, then the variable for Value Based Assignment will be used to designate the user for any subsequent passes through the task.
For example, in the following process, the "Enter Complaint" task uses Value Based Assignment and its variable is @@FirstUser. The user who starts the case will be designated to work on the "Enter Complaint" task when the case starts. However, if the process loops around and sends the case back to the "Enter Complaint" task a second time, then Value Based Assignment will be used.

If it is necessary to send the case back to the same user who started the case, then create a trigger that is set to fire during the "Enter Complaint" task, which saves the current user to the @@FirstUser variable:
The "Enter Complaint" task will be reassigned to the initial user who started the case in all the subsequent passes through the task.
Note 1: To record the user who started the case, then set the above trigger to fire before the first step in the first task. To record which user finished the first task (because the case could have been reassigned to another user), then set the above trigger to fire before assignment in the first task.
Note 2: It is also possible to use the Cases::loadCase() method to look up which user was assigned to a task, but it is not recommended because the delegation index doesn't always refer to the same task. The delegation index in a case will be incremented each time the case is reassigned to another user. A delegation index of 2 might be the second task in the process or it might be the first task which was reassigned to another user.
Reports To
The "Reports To" assignment rule takes into account your organization's structure (organization chart) as represented by ProcessMaker Departments. It selects the supervisor/manager of the user who completed the previous task in the process to work on the current task. This is a useful option when the process requires that the supervisor review the work of the people in his/her department. If a supervisor for a sub department completes the previous task, then "Reports To" will automatically select the supervisor in the parent department to work on the current task. In this way, tasks can be passed up the chain of command in an organization.
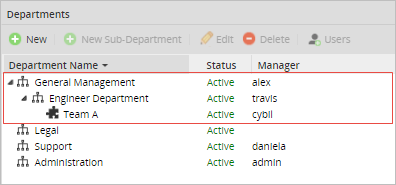
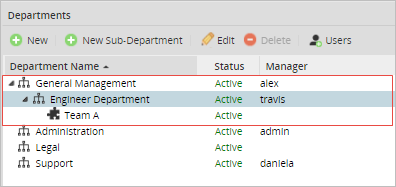
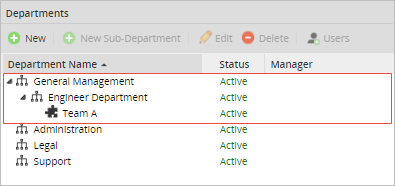
For the next examples, the following part of a organization's structure will be used.
Along with the following part of the process "Case Report Process".
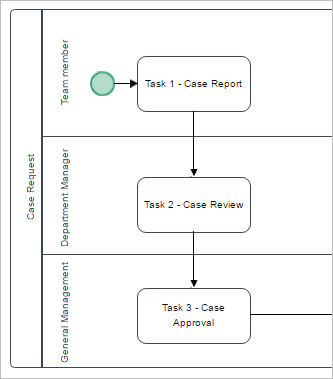
The structure has the following departments, managers and users.
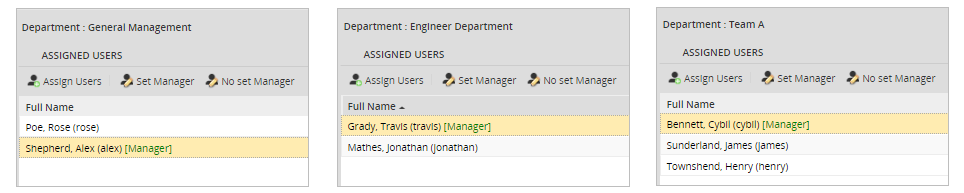
Right click on the task "Task 1 - Case Report" and select "Assignment Rules". For this task use a "Cyclical Assignment", which will have four users: Cybil (Team A manager), Henry (Team A member), Jonathan (Engineer Department member) and Rose (General Management member).
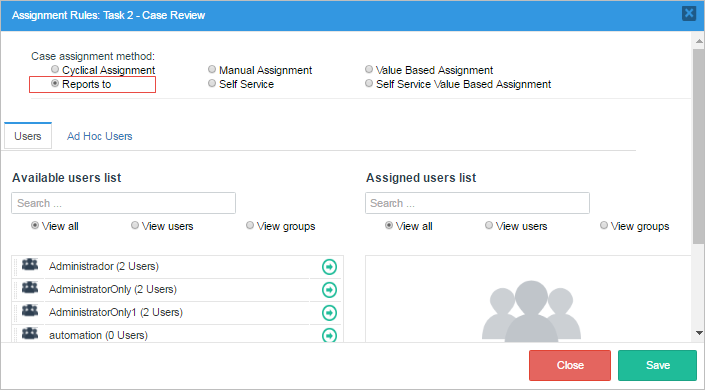
For the second task "Task 2 - Case Review", right click on it and select "Assignment Rules". This time choose "Reports to" as the assignment method.
For the third task "Task 3 - Case Approval" also select "Reports to" as the assignment method.
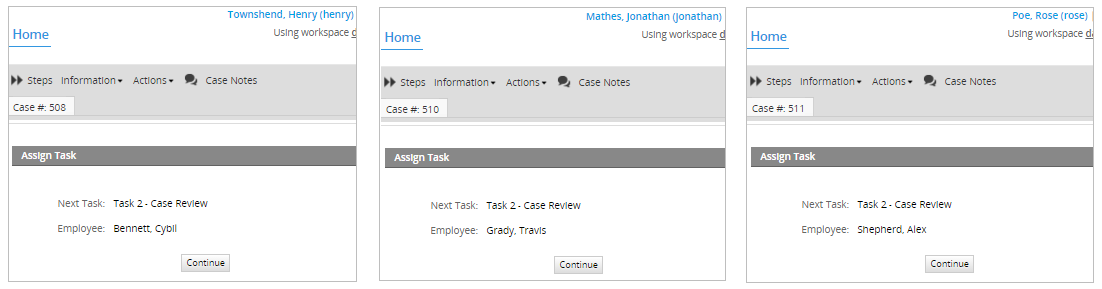
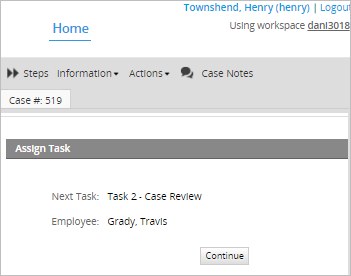
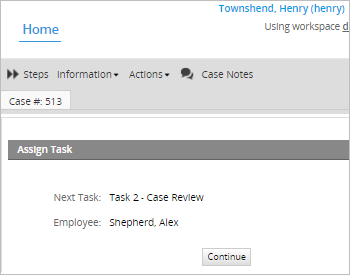
In this example, the users "Henry", "Jonathan" and "Rose" work in different departments. Each one of these departments has a different manager. To test the "Reports to" assignment rule, first login with the user "Henry" and go to Home > New Case and double click on the process "Case Report Process" to start a case. Submit the first task and the next user will be assigned to the manager of the "Team A" department. According to the structure of this specific organization, the manager is the user "Cybil" so she is the one chosen for the next task. When logging in with the user "Jonathan", the next user will be the user "Travis", who is the manager of the "Engineer Department". For the user "Rose", who is a member of the "General Management" department, the case will be assigned to the manager named "Alex".
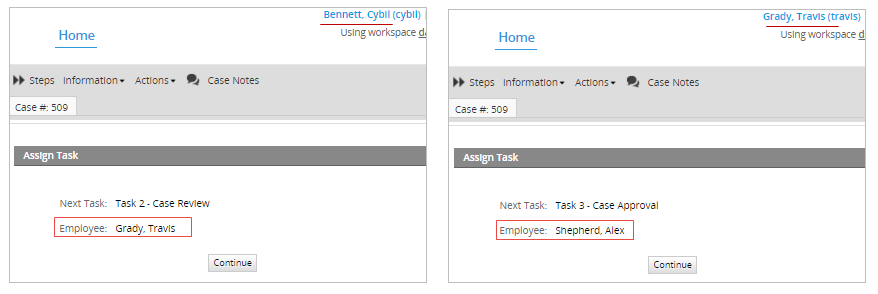
Additionally, if a manager of a sub-department completes the first task, then the second task that was assigned with the "Reports to" method will automatically select the manager of the next level sub-department. In this example, the users "Cybil", "Travis" and "Alex" are managers. Therefore, if the user "Cybil", who is a manager, completes the task "Task 1 - Case Report", the second task "Task 2 - Case Review" will be assigned to the manager of the "Engineer department" named "Travis". Then, if the user "Travis" completes the "Task 2 - Case Review", the third task "Case Approval" will be assigned to the manager of the next higher department, the "General Management" manager named "Alex".
ProcessMaker stores this information in the USR_REPORTS_TO field in the wf_<workspace>.USERS table.
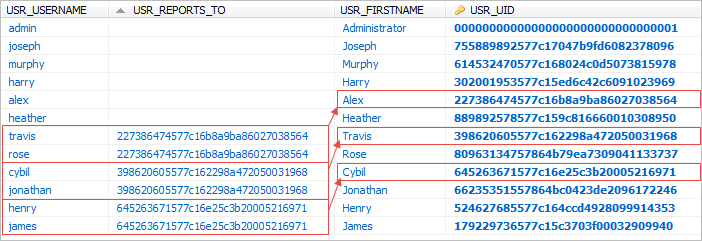
Note: From ProcessMaker 3.0.1.8 on, the field USR_REPORTS_TO of the wf_<workspace>.USERS table is empty whenever the user is the highest member of their department structure, this includes sub-departments.
![]()
Take this change into consideration whenever accessing table values through scripts, triggers, etc. The following code retrieves the UID of the user currently logged-in, taking the empty field into consideration.
$data = executeQuery("Select USR_REPORTS_TO from USERS where USR_UID = '$uid'");
@@supervisor = $data[1]['USR_REPORTS_TO'];
if ($data[1]['USR_REPORTS_TO']==""){
@@supervisor = @@USER_LOGGED;
}
If the field USR_REPORTS_TO is empty, ProcessMaker will use the UID of the current user. Please see the special case No higher department.
Special Cases
Sub-Department without Manager
If a sub-department does not have a member assigned as manager, then the next task will be assigned to the manager of the next level sub-department/department. Following the previous example, in this case the user "Cybil" is no longer manager of the Team A sub-department.
Therefore, when a case is opened and the first task is completed by one of the members (either "James" or "Henry") of "Team A", the second task will be assigned to the manager of the "Engineer Department" named "Travis".
If the next sub-department does not have a manager assigned, the next task will be assigned to the next department in the structure with a manager assigned.
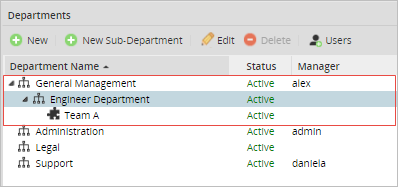
If a member of the "Team A" department initiates a case (in this case, the user "Henry") the second task will be assigned to "Alex", the manager of the "General Management" department.
Manager with an Inactive/Vacation status
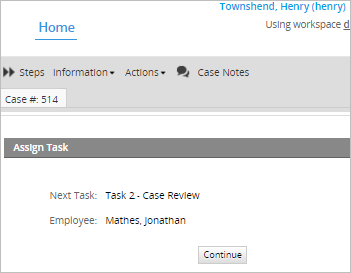
In this special case, the manager's status is either Inactive or Vacation. Therefore, the next task will be assigned to the user assigned as the Manager's "Replaced by". For example, if the manager "Travis" is on vacation.
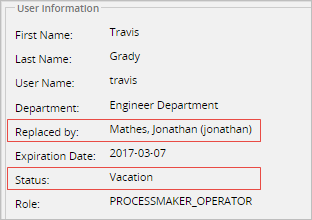
The tasks that were assigned to him will be redirected to the user assigned in his "Replaced by" configuration. In this case, the user named "Jonathan".
Departments without managers
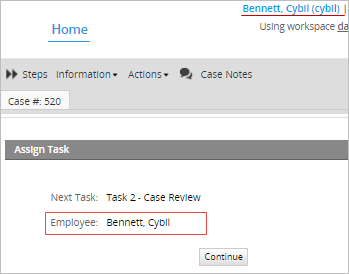
If the organization's structure does not have any user assigned as manager, the "Report to" method will assign the task to the same user that completed the previous task.
In this example, if the user "Cybil" completes the first task of the process, the second task will be assigned to her, too, since there is no supervisor or manager assigned in neither of the departments.
No higher department
When starting a case with the highest member of the top level department (the user "Alex" in this example), the next task will be assigned to the same manager who completed the previous task.
Self Service
The Self Service assignment rule allows any user from the pool of assigned users to claim the case and work on the task. In other words, the user will have the power to assign themself to work on the task. Self Service can be used to reduce congestion in the workflow, especially when the users can best judge their capacity to take on new cases.
To assign this kind of rule, go to the process and right click on it, then select "Assignment Rules". Click on the "Self Service" option.

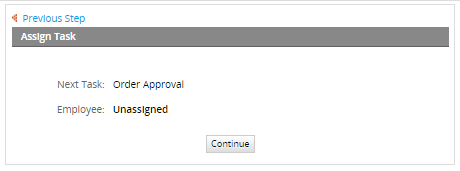
For testing purposes go to "Home" > "New Case" and double click on "Purchase Request Process". Fill out the Customer Information form and submit it. For the next task, the assignment will be listed as "Unassigned", which means that anyone can claim the case to complete the task, including the previous user.
Setting a time limit to claim a case
When a case uses a Self Service or Self Service Value Based Assignment assignment rule, any user from the pool who is assigned to the task with this rule defined can claim the case. In previous versions, if nobody claims the case it will remain in the unassigned folder forgotten by the users, or the users may not know that they have a case to claim.
To avoid this conflict, a time limit should be added that allows users to configure how much time the case will remain in the Unassigned folder. If the time limit is surpassed, a Trigger will be executed automatically. For instance, that trigger could send a notification that would indicate there is a case to claim, and it could route the case, etc. The trigger will execute while the case remains in the unassigned folder; configure the trigger if it is only required to be executed once.
When the Self Service option is chosen inside Assignment Rules, a new option will be enabled:
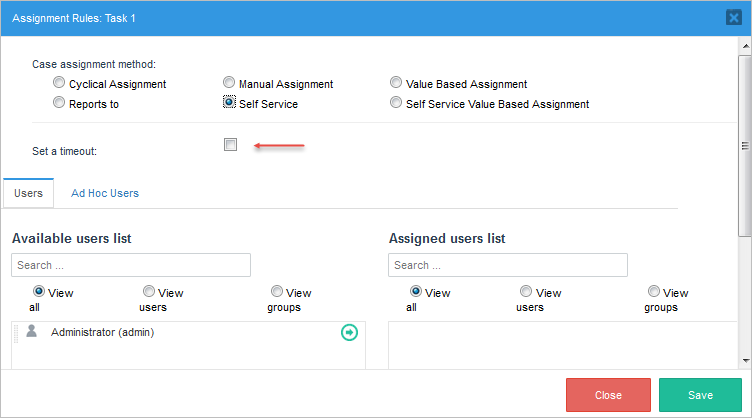
When theSet a Timeout option is enabled, the user may configure the time limit for claiming the case. Once this option is selected, the parameters to set time are displayed:
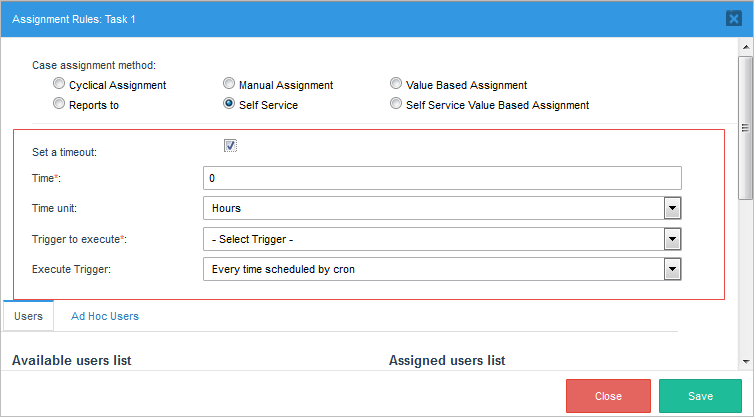
Where:
For more information, see Timeout Triggers for Self Service Tasks.
Self Service Value Based Assignment
Self Service Value Based Assignment is similar to Self Service, but uses a variable to specify which of the users assigned to the task can claim the case. The variable can be set to the unique ID of a single user, a single group of users or an array of users and/or groups. In this way, the users who are allowed to claim the case can be set dynamically.
Note: Make sure to use ONE variable for each task set with this type of assignment rule, in order to NOT overwrite the value of the variable.
This assignment rule also has the option of Setting the time limit to claim a case.
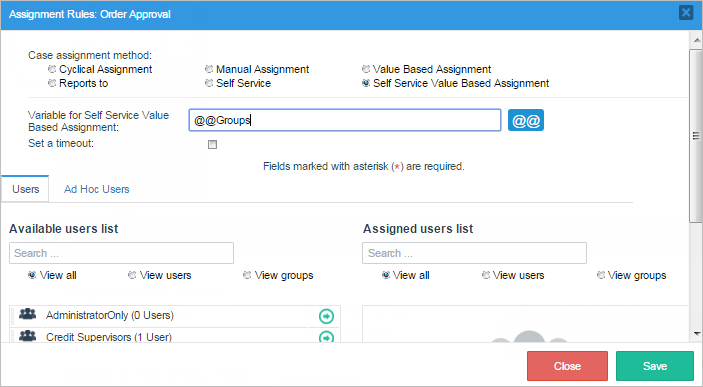
Any variable can be used for Self Service Value Based Assignment, but this variable must be set by a DynaForm field in a previous task or by a trigger that is executed at any point before assignment in the previous task. For example, if the variable used for Self Service Value Based Assignment is named @@selfServicePool, then it can be set in the following ways:
For more ways to get the unique IDs of users, see Value Based Assignment above. The unique IDs of groups can be found by using the following SQL query to look it up in the wf_WORKSPACE database:
Remember that the variable used by Self Service Value Based Assignment should be set at some point before assignment in the previous task. For example, if using Self Service Value Based Assignment in the "Process Complaint" task in the following process, then the variable must be set before assignment or some earlier point in the "Enter Complaint" task.
If the first task in the process uses Self Service Value Based Assignment, then ProcessMaker will ignore its variable and assign the first task to the user who initiated the case. If the case is created with PMFNewCase(), PMFNewCaseImpersonate(), newCase() web service, newCaseImpersonate() web service, POST /cases endpoint, or POST /cases/impersonate endpoint, then it will also ignore the Self Service Value Based Assignment and be assigned to the user specified by the function/web service/REST endpoint.
However, the variable for Self Service Value Based Assignment will be used if the process is used as a subprocess in another process. The variable needs to be set in the master case and be one of the variables passed to the subprocess case.
The user who starts the case will be assigned to the initial task in the case, but if the process loops back to the initial task, then the variable for Self Service Value Based Assignment will be used for any subsequent passes through the task.
For example, in the following process, the "Enter Complaint" task uses Self Service Value Based Assignment. The user who starts the case will be designated to work on the "Enter Complaint" task when the case starts. However, if the process loops around and sends the case back to the "Enter Complaint" task a second time, then Self Service Value Based Assignment will be used.
Ad Hoc Users
Note: Before ProcessMaker 3.0.1.7, Ad Hoc Users could start cases when they were assigned to the first task of a process. As of ProcessMaker 3.0.1.8, this behavior is no longer available.
Ad hoc assignment of users/groups to tasks makes those users/groups available to be reassigned to the task, but these users/groups are not assigned by default to the task when it starts. A user can manually assign a task to a member of an ad hoc user/group under the following conditions:
Ad hoc assignment can be useful in a number of situations. For example:
Ad hoc assignment can also be used for automatic review of the task by another user after it has been completed by the normally assigned user.
Depending on which version of ProcessMaker you are, see one of the following sections:
Before 3.0.1.7
To assign Ad hoc users, click on the Ad Hoc tab and assign the ad hoc users/groups as explained before in the Users tab. Take into account that when users are assigned in this window, it is not necessary to have any additional configuration to set Ad Hoc users.
During the execution of a case and in the task where the Ad Hoc assignment was set, go to the Actions Menu and choose the option Ad Hoc Assignment:
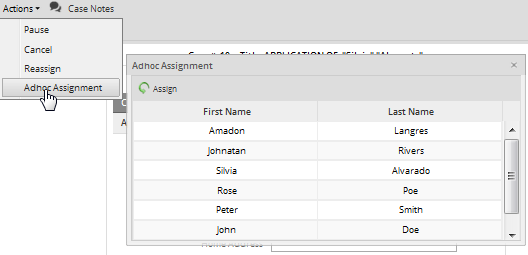
Choose one user from the list and click on Assign. After the normally assigned user completes the task, the case will automatically be reassigned to one of the ad hoc users to review the steps in the task and verify that it was done correctly.
After 3.0.1.7
To assign ad hoc users, do the following steps:
1. On the Designer tab, double click the process.
2. Select the task that you want to assign an ad hoc users/groups by right clicking on the task and select the Assignment Rules.
3. Switch to the Ad Hoc Users tab and assign the users.
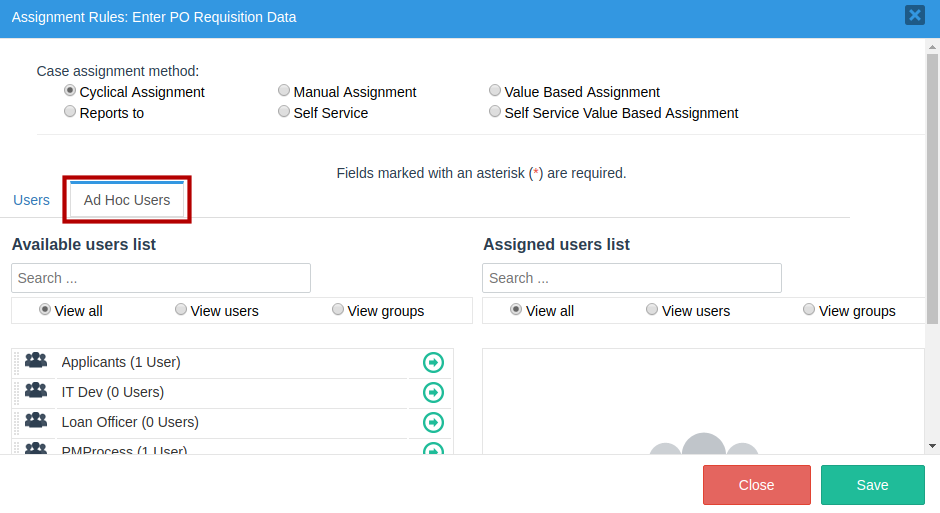
Take into account that when users are assigned in this window, it is not necessary to have any additional configuration to set Ad hoc users.
To reassign a task where the ad hoc assignment was set, follow these steps:
1. Go to Actions > Reassign.
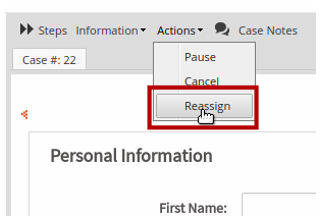
2. Choose one user from the list.
3. In the Reason to reassign this case field, provide a reason for the reassignment.
4. Click Reassign.
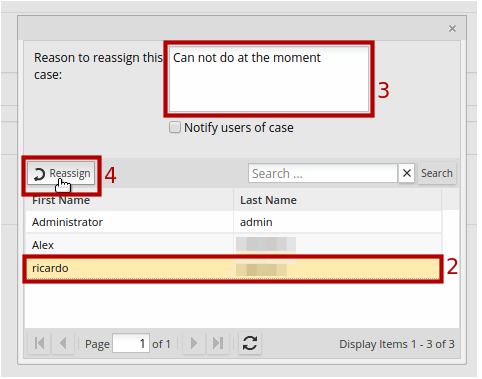
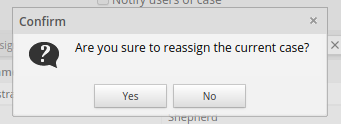
A confirmation message displays.
After the normally assigned user completes the task, the case will automatically be reassigned to one of the Ad hoc users to review the steps in the task and verify that it was done correctly.
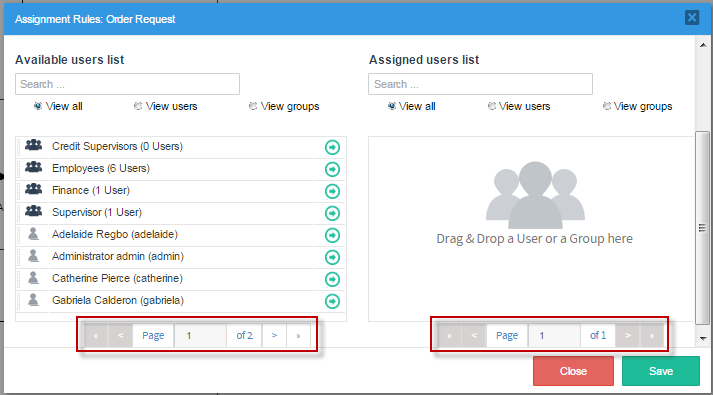
Assignment Window Performance
Finally, take into account that all users and groups created in ProcessMaker are shown in the list of users and ad hoc tabs. Also, notice that the "Assignment Rules" window has a new improved interface with a new pagination feature. Pagination supports a large quantity of users in the interface, allowing the navigation through the already added Users/Groups/Departments, and each page lists up to 8 Users/Groups/Departments. The list of eight can be passed from the "Available users list" to the "Assigned users list". This type of management improves the performance of the listings when there is a great quantity of users/groups (like 40000) in ProcessMaker.
Edit Label
It is possible to edit the label of a task. Select the "Edit Label" option inside the Task Context Menu
The label will be editable, so change it and press Enter to apply changes:
A label can also be edited by double clicking on its name.
Note: Take into account that the name of the task should not be changed when there are cases being executed in this task. If it is necessary to change the name of the task, then take into account that cases that have already been started in the process will not update the name of the task in the lists.
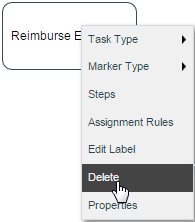
Delete
To delete a task or sub-process, right click on it and then select Delete in the task context menu. The "Del" button on the keyboard can also be used to remove it.
Before a task may be deleted, any users or groups assigned to the task must be unassigned from the task. Task also cannot be deleted if there are active, paused or canceled cases in that task.

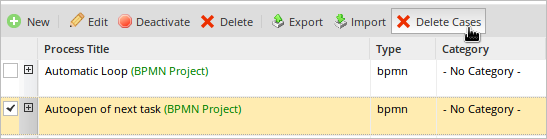
Any active or paused cases should be completed, before deleting the task. If cases were canceled in the task, then the only way to delete the task is to first go to the Designer menu and select the process in the list. Then, click the Delete Cases button to eliminate all the cases for that process in the database.
If needing to keep the existing cases, then another option is to export the process and reimport it as a new process, so it does not have any existing cases and the task can be deleted.
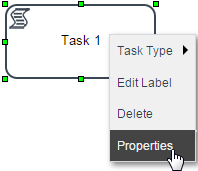
Properties
The task properties should be the first option to be configured. In the modal window that opens there are various options to configure the task and give it major functionality and control. Select and fill in the options that will better fit the definition of the task.
Definitions
Case Labels
Case labels are used to provide a title and description for cases, so they can easily be identified in a list of cases. System and case variables can be inserted inside these labels to customize the information. Users can search for particular cases using the case titles and the case descriptions that are displayed in the "Case Summary".
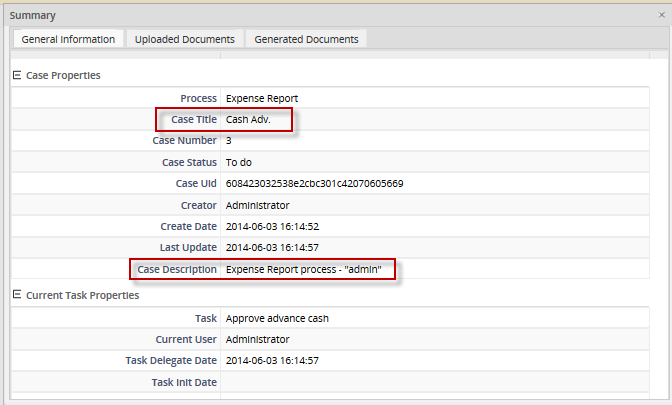
Both the case title and description can be viewed inside the summary of a case:
Using Variables in Case Labels
If the variable is referenced as @@variable, then its value will be enclosed in double quotation marks. Any single and double quotation marks will be escaped with backslashes when inserted into the case title and case description. For example, if the case title is: Last Name @@lname and the value of @@lname is O'brien, then the case title will be: Last Name "O\'brien"
If the variable is referenced as @#variable, then its value will be inserted without any changes in the case title and case description. For example, if the case title is: Last Name: @#lname and the value of @#lname is O'brien, then the case title will be: Last Name: O'brien
Remember that variables associated with checkboxes, dropdown boxes and suggest boxes have both the value of the selected option stored in @#variable and the label of the selected option stored in @@variable_label. For example, to display the label of the selected option in the "clientType" variable, then the case title would be @#clientType_label.
Some types of variables, such as arrays (used by checkgroup controls), grids and files, may not convert easily into strings that can be inserted into case labels. If it is necessary to include these types of variables in a case label, it is recommended to use a trigger executed beforehand that transforms the value of these variables into string variables that can be inserted into the case label.
For example, the following trigger code executed in the previous task retrieves the filename uploaded in a file control associated with the @@contractFile variable and place it in the @@contractFilename variable.
if (isset(@@contractFile_label) and !empty(@@contractFile_label)) {
$aFile = json_decode(@@contractFile_label);
if (count($aFile))
@@contractFilename = $aFile[0];
}
Then, the @#contractFilename variable might have a value such as "signedContract_2016-10.pdf", which can be inserted into a case title.
Likewise, the following trigger gets a list of the options selected in a checkgroup associated with the @@selectCountries variable and places the labels in the @@selectCountriesNames variable:
if (isset(@@selectCountries_label) and !empty(@@selectCountries_label)) {
$aCountries = json_decode(@@selectCountries_label);
foreach ($aCountry as $country) {
@@selectCountriesNames .= (empty(@@selectCountriesNames) ? '' : ', ') . $country;
}
}
Then, the @#selectCountriesNames variable might have a value such as "Argentina, Holland, Gambia", which can be inserted into a case description.
Timing Control
This property is used to set a task's due date. The task should be completed within a determined time period, which can be set according to a number of work days or days in a customized calendar.
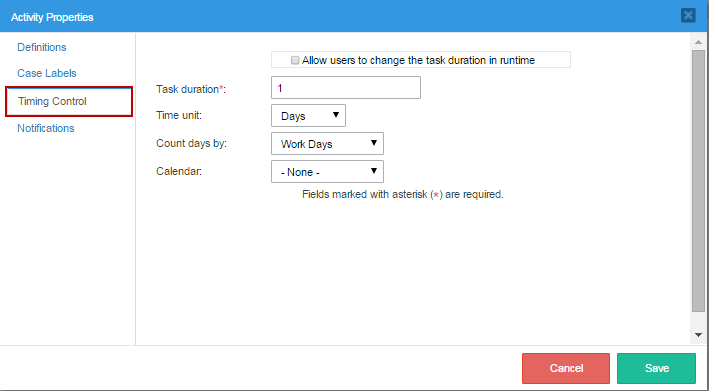
There are five options to set:
If the time set to complete a task has already passed, the time will be displayed in red under the "Due Date" column in the list of cases found at HOME > Inbox. If the user still has time to complete the task, the due date will be displayed in green.

ProcessMaker Timing control handles the timing control between users that have different timezones set in their user parameters by calculating the availability hours based in a custom calendar if there is one.
ProcessMaker follows these steps in the described scenario:
The due date is calculated based on the timeZone belonging to the user that is routing the case to the next task.
Notifications
This task property is used to send an email notification to the next assigned user in the case. Make sure that ProcessMaker is configured to use an email server. For more information, see Notifications.
To send an email notification to the next user(s) assigned to the next task(s) in a case, check the option: After routing notify the next assigned user(s). Marking this option will display the following options:
Examples
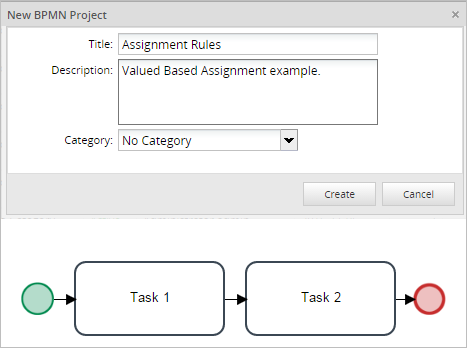
Value Based Assignment Example
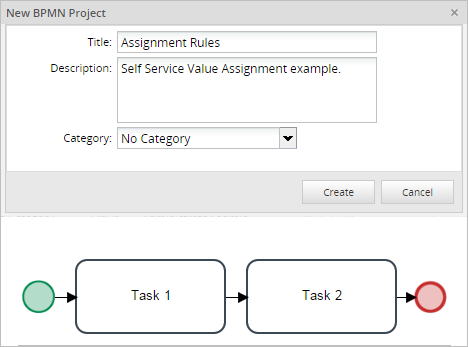
This example shows how to use Value Based Assignment when the variable is set by a trigger that looks up the unique ID of the user based on the username. Starting with a process named "Assignment Rules", it will have a Start Event, two tasks and an End Event, in which both tasks will have different assignment rules and steps to follow.
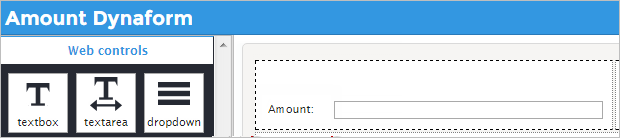
For this Value Based Assignment, create two variables. The first variable, named "Amount", will be chosen in the Dynaform in a Textbox named "Amount". The second variable is "NextUser", which will be used in a trigger code.
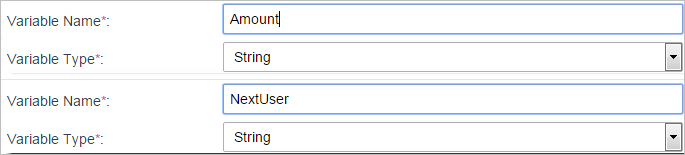
Next, create a Dynaform with the name "Amount", which will have only a Textbox control and a button to submit the amount inserted. This text box will be filled in with a number; if the number is equal to or bigger than 1000, it will choose the user "Rose Poe", and if it's less than 1000 it will choose the user "Gabriela Calderon".
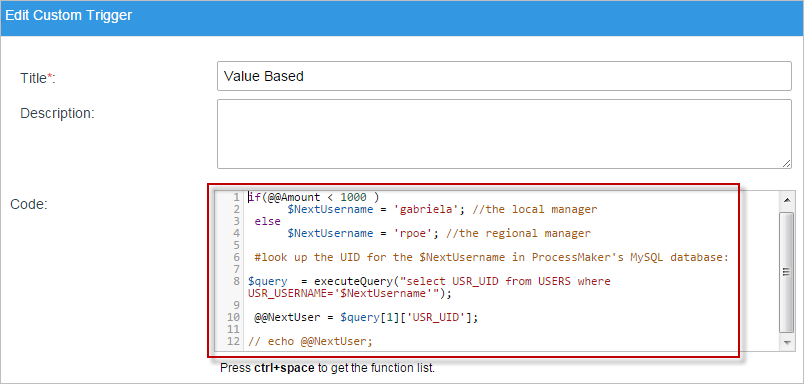
Now, the trigger needs additional code to choose the user. The following code can be used for this example:
$NextUsername = 'gabriela'; //the local manager
else
$NextUsername = 'rpoe'; //the regional manager
//look up the UID for the $NextUsername in ProcessMaker's MySQL database:
$query = executeQuery("select USR_UID from USERS where USR_USERNAME='$NextUsername'");
@@NextUser = $query[1]['USR_UID'];
We used the variable just created at the end of the code, @@NextUser, to determine the value the process will base itself on.
Now, add all the Dynaforms, steps and rules needed for this example to work. First, right click on "Task 1" > "Steps" and drag and drop the Dynaform "Amount". Also, add the trigger to obtain the user's information, then save and exit. Right click on "Task 1" > "Assignment Rules"; for the first task, leave the Case Assignment method as "Cyclical Assignment".
For "Task 2", right click and select "Assignment Rules". Here, the case assignment method is "Value Based Assignment". A new field named "Variable for Value Based Assignment" will appear where the variable "@@NextUser" must be added. Click on the "Save" button to store all changes.
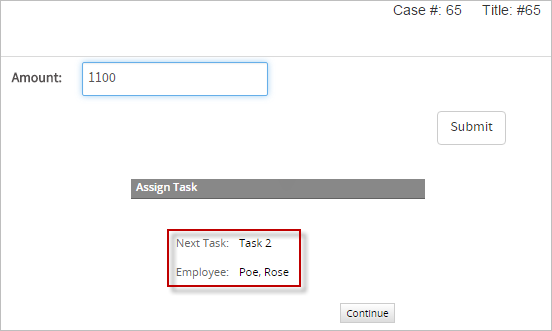
Run the case by going to "Home" > "New Case", then double click on the process "Value Based" and first Dynaform will appear. Then, fill in the amount with 1100 and submit it. Since the person assigned to the next task is "Rose Poe", the trigger is working correctly.
If the amount is less than 1000, then the person assigned to the second task is "Gabriela Calderon".

Self Service Value Based Assignment Example
To test Self Service Valued Based Assignment, create a new process with one Start Event, two tasks and an End Event.
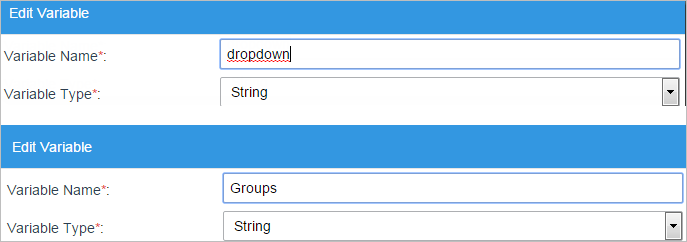
Now, create two variables: one named "dropdown" and another one named "Groups", both with the type "String". These created variables will work with the process to call all the stored Groups in ProcessMaker.
Create a Dynaform that will have a dropdown control and a submit button. Also, this Dynaform will have an SQL sentence that will look at the groups stored in the ProcessMaker data storage:

Now, assign the steps and rules for both tasks. Right click on the first task and select "Steps", then add the DynaForm named "Groups" created previously. Remember that this DynaForm will be populated by the ProcessMaker stored groups. The user will choose one group, and as the case will be unassigned, the employees inside the group can choose to work on the case or not. Then, right click on "Task 1" and select "Assignment Rules". For this task, select "Cyclical Assignment".
Now, for "Task 2" select "Assignment Rules". In this case, the method will be "Self Service Value Based Assignment" and the variable will be @@Groups. This will call the groups and the people assigned to that particular group.
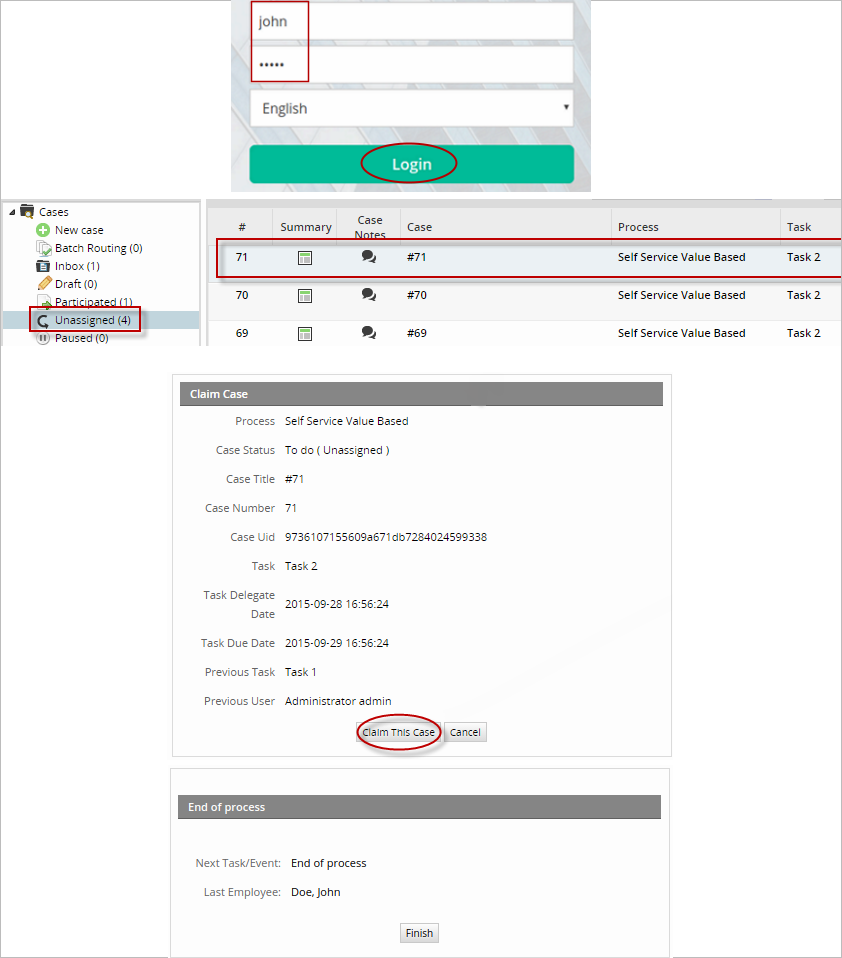
After every new configuration, the process should be tested. Go to "Home" > "New Case" and double click on "Self Service Value Based". When the dropdown box is clicked, it will show all the groups in ProcessMaker storage. For this example, choose the group "Finance" that only has one user with the username "John Doe", and then submit it. As seen in the image below the second task is unassigned.

To see if it works, log out and log in again as "Finance" employee John Doe. Once inside, check the Unassigned inbox and the case just started will appear. If the group had more users, then any of them could enter and claim this case to work on it. For this example, double click on the case to claim it. The next window is only an end process window, but in other cases when the process is bigger, John would have to do the next task; otherwise, the next user would depend on the assignment rule given in the process.
Unclaiming a Self Service Task
After a user claims a case with a self service task, there is no built-in function in ProcessMaker to unclaim that case and allow another user to claim the case. However, it is possible to unclaim a case by adding a loop that routes back to the same self-service task.
To allow users to unclaim a case, first create a string variable named "unclaimCase". After the self service task, add an exclusive gateway, which has a path that routes back to the self service task.
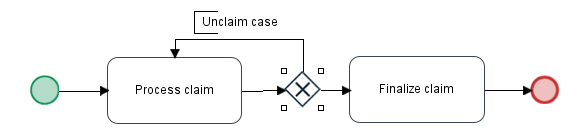
In the Properties of the exclusive gateway, add conditions to control the routing. If the @@unclaimCase variable equals "yes", then the process will loop back to the self service task; otherwise, it will route on to the next task in the process.

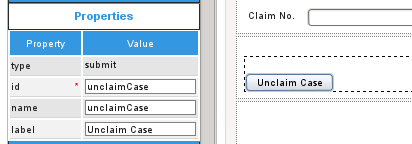
Then, add a submit button that has the ID "unclaimCase" to the DynaForm in the self service task.
Then, add the following JavaScript code to the DynaForm to set the value of the @@unclaimCase variable to "yes" when the "unclaimCase" button is clicked:
this.value = "yes";
});
When the "Process Claim" task is completed, the case will be routed back to the same task and all the users in the assignment pool for the task will be free to claim the case. If the case needs to be immediately unclaimed, then create the following trigger, which uses the PMFDerivateCase() function to immediately route the case to the exclusive gateway.
Set the above trigger to fire after the DynaForm that contains the "unclaimCase" button.

