Overview
In ProcessMaker, a workspace allows a group of processes and their cases to be managed as a cohesive unit. The data in each workspace is stored in one database in MySQL and its files are located in a separate directory, so there is no contamination of data between workspaces. Because the data is in separate databases and directories, workspaces can be separately backed up and restored.
Workspaces allow complex organizations to divide up their processes and users into separate groupings for easier data management. For example, the Human Resources, Accounting and Sales departments might all have their own separate workspaces that are accessed by different sets of users.
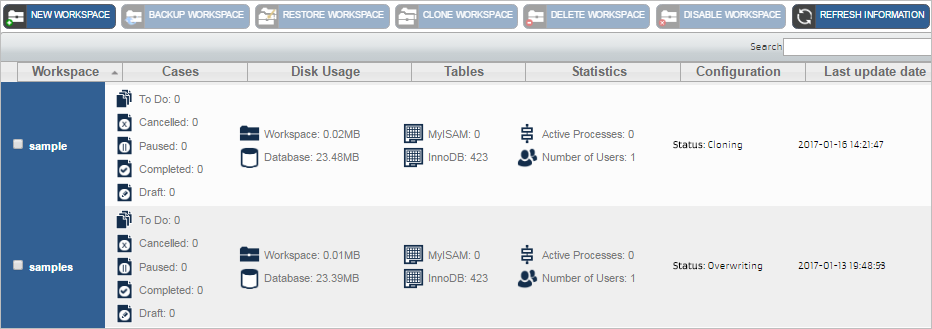
Businesses that offer ProcessMaker as a hosted service can create a separate workspace for each of its clients. The Enterprise Edition facilitates the hosting of workspaces by providing user-friendly Multitenant Workspace Management, where workspaces can be easily managed with options to create, clone, restore, backup, enable and disable workspaces, as well as the ability to view statistics about multiple workspaces at a glance.
Creating Workspaces
The "workflow" workspace is created by default when ProcessMaker is first installed. This workspace is specified inside the URL when accessing ProcessMaker through a web browser:

Additional workspaces can be added either by changing the URL in the web browser in the Community Edition or through the Multitenant Workspace Management plugin in the Enterprise Edition.
Creating Workspaces in the Enterprise Edition
In the ProcessMaker Enterprise Edition, users can use the Multitenant Workspace Management plugin, which provides a user-friendly interface to create, clone, restore, backup, enable and disable workspaces, along with other functionalities.
Creating Workspaces in the Community Edition
Log in to ProcessMaker with a user who has the PM_SETUP_ADVANCE permission in their role. Then, edit the web browser URL to access the form to create a new workspace:
Replace <IP-ADDRESS>:<PORT> and <CURRENT-WORKSPACE> with the information for your setup. For instance, if ProcessMaker is running on a server with the IP 192.168.1.100 on the default port 80, and in the default workspace named "workflow", then use the following address:
Then fill out the New Workspace form.
New Workspace Form
In the form that appears, enter information about the new workspace.
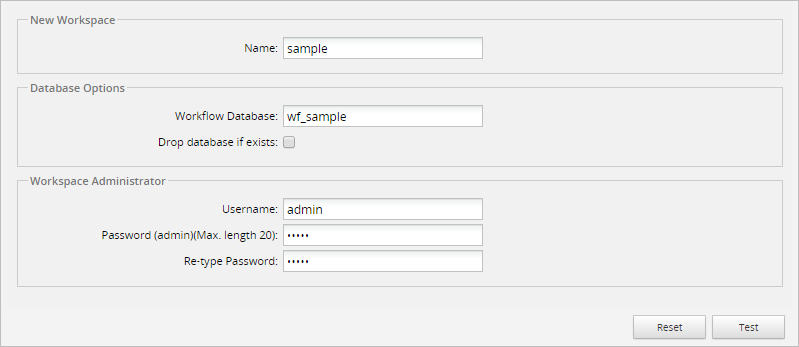
New Workspace
- Name: The name of the new workspace, which can contain a maximum of 13 characters. From version 3.1.3 on, the maximum length has been increased to 30 characters.
Database Options: The workspace data will be stored in one database:
- Workflow Database: The name of the database that will hold data about processes, cases, users, PM Tables, etc.
- Drop database if exists: Check this option to delete any existing databases with the same name as the database name entered into the Name field. Note that in most cases, it is not recommended to check this option, since any existing data will NOT be recoverable.
Workspace Administrator: Define the credentials of the administrator user for the workspace that will be created. This user will have the "PROCESSMAKER_ADMIN" role by default.
- Username: The username of the administrator of the new workspace. By default, the username is "admin".
- Password: The password of the administrator username of the new workspace. The password must be entered twice to avoid careless typos. By default, the password is "admin".
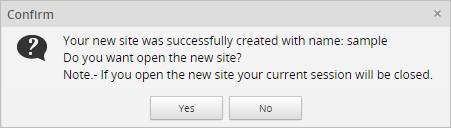
After filling out the form, click on Test to check whether the entered values are valid and don't conflict with the names of existing MySQL databases. If there are no conflicts with an existing site, a message window will open asking if the new site should be created. Click Yes to create the new site, or click No to close the window and return to the form.

ProcessMaker will begin to create the new workspace. Once done, a new message dialog will be displayed. To be redirected to the login screen of the new workspace, click on Yes.
To stay in the New Workspace form, click on No. Then, use the web browser's back button (or ALT+BACKARROW) to return to the previous page.
Switching Workspaces
After the new workspace has been created, access the new workspace at any time by changing the URL in the web browser.

Setting a Default Workspace
If only one ProcessMaker workspace is being used, it may be a good idea to add that workspace to the URL to make it the default workspace. If a default workspace is set, after entering the domain (e.g. http://127.0.0.1:8081) the system will read the configuration and redirect to the default workspace (e.g. http://127.0.0.1:8081/sysworkflow/en/neoclassic/login/login).
To set a default workspace, edit the file index.html with a plain text editor. The index.html file is generally found at the following location:
- Linux/UNIX:
- /opt/processmaker/workflow/public_html/index.html
- Windows:
Add the workspace name in line 6 of the code:
For example, if the default "workflow" workspace is being used, this line will look like the code below:
Warning: Changes to the source code will be overwritten each time ProcessMaker is upgraded, or when the system properties are modified, so they will have to be reapplied after each upgrade or setup modification.

