Overview
When working with large databases, many different users or just for security issues, system administrators often prefer to work with more than one database. This type of database management helps improve system performance when working with a large number of transactions in a short time frame, or with environments located great distances from one another. It also better manages data security and integrity, making it possible to secure data that not everyone should have access to.
ProcessMaker uses MySQL as its principal database program to store ProcessMaker's wf_<WORKSPACE> database. MySQL offers replication between master and slave databases.
Requirements
Before setting up a double connection in ProcessMaker, take into account the following requirements:
- Both master and slave database must use MySQL.
- Static IP must be configured on the master and slave server.
- The user must have the permissions to create non-root users in both servers.
- If ProcessMaker 3.0 or later was installed in a clean environment, ProcessMaker will only use one database: wf_<WORKSPACE>.
- If ProcessMaker was upgraded from a version before 2.8, ProcessMaker will use three databases: wf_<WORKSPACE>, rb_<WORKSPACE> and rp_<WORKSPACE>.
Installation
ProcessMaker Enterprise version 3.2 automatically includes the Double Connection feature after the Enterprise license is activated. To check whether the Double Connection feature is available, log into ProcessMaker as a user, such as "admin", with the PM_SETUP_ADVANCE permission in their role. Then, go to Admin > Plugins > Enterprise Manager and click on the Enterprise Features tab to see the list of available features.
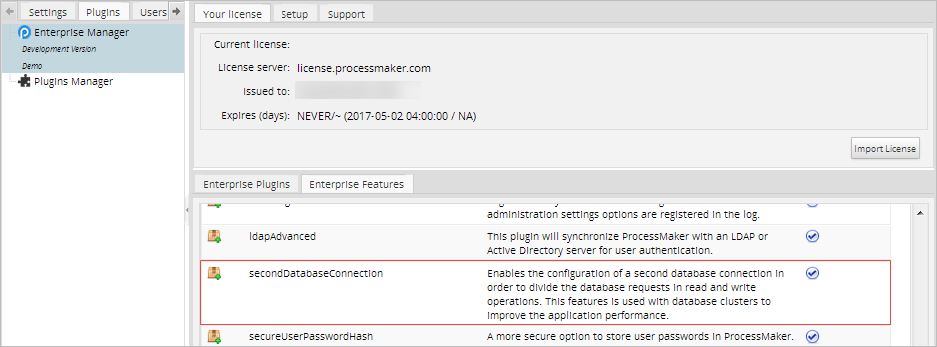
How the Feature Works
ProcessMaker takes advantage of MySQL replication to offer the Double Connection feature that allows ProcessMaker to manage two database connections. These connections can be made to two different servers where the databases are installed. It also has a data access layer that identifies, separates and/or redirects queries to one of the two connections and inserts and updates to the other connection.
Master, Slave and Binary Logs
| Concept | Description |
|---|---|
| Master | The master database is the database that ProcessMaker uses. Master MySQL servers write all transactions that change data to a binary log that the slave server will read. |
| Slave | The slave database is a replication of the master database that only has read access to the master database. Slave MySQL servers connect to a master and download the transactions from the master's binary log, thereby applying them to its own local server. |
| Binary Logs | Binary logs are binary files that contain details about every transaction that the MySQL server has executed. The MySQL master creates binary logs in the forms name.000001, name.000002, and so on. Once a binary log reaches a defined size, it starts a new one. After a certain period of time, MySQL removes old logs. |
MySQL Replication
To set up MySQL replication with a master and slave databases, first install MySQL on a second server that will contain the slave database. Then, follow these instructions to set up the replication. In this example, the master and slave have the following characteristics:
| Server | Host |
|---|---|
| Master | 192.168.75.1 |
| Slave | 192.168.75.136 |
Configuring the Master Database
The master database is the one that was installed as a requirement for installing ProcessMaker and is currently used by ProcessMaker.
Go to the master server and edit the MySQL configuration file named my.cnf, whose location depends on your operating system.
Set the following settings:
Where:
- server-id: Set a unique integer. This value must be different from the server-id of the slave database. In this example, the master has an ID of 1 and the slave has an ID of 2.
- log-bin: Set the name of the binary file that will hold a log of the changes made in the master database. The slave database will replicate any change recorded in this binary log file. If unsure where to place the file, just set it to mysql-bin and MySQL will place it in its default log directory.
- sync_binlog: This value determines how many binary log writes need to occur before its contents are flushed out of the buffer and onto disk. Per recommendations in high performance MySQL, the sync_binlog value must be set to 1 in Production.
- max-binlog-size: Set the maximum size of the binary log to "500MB". If the binary log exceeds this size after a write, the server rotates it by closing it and opening a new binary log. If not set, the default value is 1GB.
- expire_logs_days: Number of days after which the binary log will be automatically removed. The default is 0, which means no automatic removal. When using replication, expire_log_days should always be set higher than the maximum lag by any slave.
- innodb_flush_log_at_trx_commit: Set to 1. When the value is 1 (the default), the log buffer is written out to the log file at each transaction commit and the flush to disk operation is performed on the log file.
- binlog_do_db: Set to the name of the workflow database that will be replicated in the slave server, which is named wf_workflow by default. If processmaker 2.8 was upgraded from a previous version, then list both the wf_<WORKSPACE> and rb_<WORKSPACE> databases.
binlog_do_db = wf_workflow binlog_do_db = rb_workflow - binlog_format: Set to "ROW" to help avoid errors.
After saving the changes to the my.cnf file, restart the MySQL server for the changes to take effect. On most Linux/UNIX systems it can be restarted with the command:
Then, enter MySQL as the root user:
In Windows, it is necessary to navigate through the file system to the directory where the mysql.exe executable is located:
Windows Vista/7/8/Server 2008:
The slave needs a user to connect to the master using a MySQL user name and password, so create a user account on the master that the slave can use to connect.
The slave that connects to the master in a replication setup (for the purpose of reading the binary log on the master) must have an account to log in. This account must be granted the dedicated permission REPLICATION SLAVE.
To check if the correct privileges where assigned to this new user named "slave", write the following command.
Then, issue the following command to display information about the master database:
Take note of the values in the File (mysql-bin.000007) and Position (637) columns, since these values will be used later to configure the slave database.
Finally, exit MySQL but do not close the terminal.
Copying the Master Database(s)
Enter the following command to make a copy of the database to be replicated. Change wf_workflow to the name of the wf_<WORKSPACE> database to be replicated. In this example the "wf_workflow" will be copied to the "pm-db.sql" file.
If ProcessMaker was upgraded from version 2.5 or earlier, then make a copy of both the wf_<WORKSPACE> and rb_<WORKSPACE> databases.
Then copy the pm-db.sql file from the master server to the slave server. For example, if using scp to copy the file:
Configuring the Slave Database
Go to the server where the slave database will be located. If not already installed, install MySQL on the server. Enter MySQL and create the ProcessMaker database in the slave:
Exit MySQL but do not close the terminal.
The database that was created will contain the data that was saved in the pm-db.sql file, so run the following command:
If using Windows, remember to change the the directory containing the mysql.exe executable before issuing the above command and include the path to the pm-db.sql file.
Then, open the my.cnf file on the slave server with a plain text editor to set the following settings:
Where:
- server-id: Set an integer that is different from the master ID. The master's server-id is 1, so the slave will be set to 2.
- relay-log: Set to "mysql-relay-bin.log". This is the basename of the relay log. The relay log is a set of numbered files containing events that describe database changes. If not set, the basename will be hostname-relay-bin, where host_name is the name of the slave server host.
- max-relay-log-size: Set to 500MB to limit the size of the relay log. The slave will rotate its relay log if it exceeds this size after a write.
- relay_log_purge: Set to 1. If set to 1, relay logs will be purged as soon as they are no longer necessary.
-
binlog_do_db: Set the the name of the wf_<WORKSPACE> database being replicated, which is named wf_workflow by default. If processmaker was upgraded from version 2.5 or earlier, then also add the name of the rb_<WORKSPACE> database:
binlog_do_db = wf_workflow binlog_do_db = rb_workflow - binlog_format: Set to "ROW" to help avoid errors.
Save the changes and restart the MySQL server for the new changes to take effect.
After restarting MySQL, log in as the root user. If using Windows, remember to first change to the directory where the mysql.exe executable is located.
Configure the slave database to be able to connect to the master database.
Where:
- MASTER_HOST: Set the IP or address of the master server.
- MASTER_USER: Set the user name of the new user that was created in the master database. In this example, the user name is "slave."
- MASTER_PASSWORD: Set the password of the new user that was created in the master database. In this example, the user named "slave" was created with the password "slavepass".
- MASTER_LOG_FILE: Set the log file and log position that were previously displayed with the SHOW MASTER STATUS command in the master database.
- MASTER_LOG_POS: Set the log position that was previously displayed with the SHOW MASTER STATUS command in the master database.
Finally, start the slave database replication with the following command:
Check to see whether the slave database is able to connect to the master database:
If the database replication is set up correctly, both the Slave_IO_Running and Slave_SQL_Running parameters will be set to Yes and Slave_IO_State will be set to Waiting for master to send event.
If Slave_IO_Running or Slave_SQL_Running is set to No, check the Possible Problems section for more details.
Finally, create a user for the master server to access the slave database.
Grant the master user the privileges necessary to manage the databases replicated.
Check the privileges of the new master user with the following command:
Configuring the Double Connection in the ProcessMaker Code
After setting up MySQL replication of master and slave databases, the code of ProcessMaker needs to be changed to read from the slave database.
Go to the directory where ProcessMaker is installed and edit the configuration file database.php with a plain text editor:
Linux:
Windows:
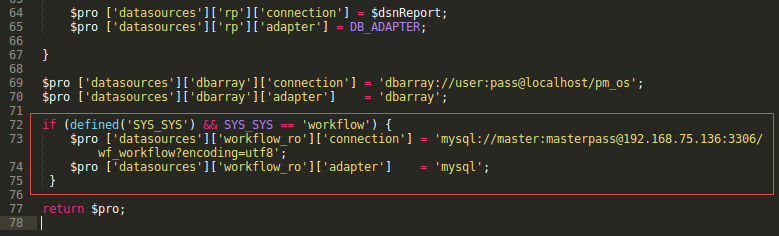
In the database.php file, add the following lines at the end of the script before the return $pro; statement:
If ProcessMaker 3.x was installed from scratch, only one database will be created, the wf_<WORKSPACE> database:
if (defined('SYS_SYS') && SYS_SYS == 'WORKSPACE-NAME') { $pro ['datasources']['workflow_ro']['connection'] = 'mysql://MYSQL-USER:PASSWORD@SLAVE-SERVER-ADDRESS:PORT/ SLAVE-DATABASE-NAME?encoding=utf8'; $pro ['datasources']['workflow_ro']['adapter'] = 'mysql'; } return $pro; Where:
- WORKSPACE-NAME: Replace this parameter with the name of the workspace, which is 'workflow' by default.
- MYSQL-USER: Replace this parameter with the user that was created for the master in the slave server. This user can be root, but for greater security it is recommended to create a new MySQL user on the slave server for this purpose. In this example, the user created is "master".
- PASSWORD: Replace this parameter with the password of the master user created in the slave server. In the previous step, the master user has the password "masterpass". If no password is set for the MySQL user, set the string as: ' '.
- SLAVE-SERVER-ADDRESS: Specify the IP address or domain name of the server where the slave database is installed.
- PORT: Specify the number of the port where the slave database is installed. If using
the default MySQL port 3306, it is not a required parameter and the string will look like:
mysql://MYSQL-USER:PASSWORD@SLAVE-SERVER-ADDRESS/ SLAVE-DATABASE-NAME?encoding=utf8 - SLAVE-DATABASE-NAME: Name of the slave database where ProcessMaker was replicated.
If ProcessMaker was upgraded from version 2.5 or earlier, the rbac database must also be replicated and added to the configuration:
if (defined('SYS_SYS') && SYS_SYS == 'WORKSPACE-NAME') { $pro ['datasources']['workflow_ro']['connection'] = 'mysql://MYSQL-USER:PASSWORD@SLAVE-SERVER-ADDRESS:PORT/wf_workflow?encoding=utf8'; $pro ['datasources']['workflow_ro']['adapter'] = 'mysql'; $pro ['datasources']['rbac_ro']['connection'] = 'mysql://MYSQL-USER:PASSWORD@SLAVE-SERVER-ADDRESS:PORT/rb_workflow?encoding=utf8'; $pro ['datasources']['rbac_ro']['adapter'] = 'mysql'; } return $pro;
The condition is added for each workspace that will use a second connection for read-only queries.
Example
For a clean installation of ProcessMaker 3.0, only the wf_workflow database needs to be replicated. To do this, add the following code:
Save it and the workspace "workflow" will work from now on with two database connections.
Testing the Double Connection
After setting up the MySQL replication and configuring the ProcessMaker code to use the slave database, test to see whether the replication works. Log in to ProcessMaker and execute any action.
Opening the case list requires reading from the slave database, so if there is a problem connecting to the slave database, the following error message will be displayed:
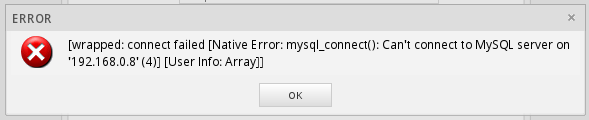
To check whether the database is replicating, add a new user to ProcessMaker, then log in to the slave database from the command line:
Query the slave database for the new user that was just added:
If not using the default wf_workflow database, change the database name in the code to the name of your wf_<WORKSPACE> database. If the database replication is working correctly, the username of the new user will be listed.
Possible Problems
Slave_SQL_Running: No
If the slave was running previously but has stopped, the reason usually is that some statement that succeeded on the master failed on the slave. To check the status of the slave, first log in to the mysql instance and run the following command:
Press enter, and the terminal will show the following message:
If either Slave_IO_Running or Slave_SQL_Running is set to No, then the replication is broken and needs to be repaired.
To repair it, first stop the slave service with the following commands:
Then run the following code so the slave skips the invalid SQL query that caused the replication to stop. To skip two queries, set SET GLOBAL SQL_SLAVE_SKIP_COUNTER = 2; and so on.
Now, start the slave again.
And check if replication is working again.
Slave_IO_State: Connecting to master
If the slave cannot connect to the master, then Slave_IO_State will be Connecting to master.
In this case, check some of these alternatives:
-
Check the value of Master_Host, Master_User, Master_Port, Master_Log_File and Read_Master_Log_Pos to verify that they are correct. If they need to be changed, then stop the database replication:
mysql> STOP SLAVE; And issue the CHANGE MASTER command again.
mysql> CHANGE MASTER TO MASTER_HOST='192.168.75.1', MASTER_USER='slave', MASTER_PASSWORD='slavepass', MASTER_LOG_FILE='mysql-bin.000007', MASTER_LOG_POS=637; Then restart the slave replication:
mysql> START SLAVE; -
Try to connect to the master database from the command line of the slave server:
mysql -u slave -h 192.168.75.1 -p If able to connect as the root user, but not as the slave user, then the GRANT commands weren't issued correctly in the master database. To check if the correct privileges were assigned to this new user, write the following command:
mysql> SHOW GRANTS FOR slave@192.168.75.136; +-------------------------------------------------------------+ | Grants for slave@192.168.75.136 | +-------------------------------------------------------------+ | GRANT REPLICATION SLAVE ON *.* TO 'slave'@'192.168.75.136' | +-------------------------------------------------------------+ 1 row in set (0,00 sec) If neither the root and slave users are able to connect to the master server, check if the following lines are commented out from the my.cnf file configuration and the master server is listening on all IP addresses.
# skip-networking # bind-address = 127.0.0.1 -
Check whether MySQL on the master server is running and whether a firewall might be blocking its port. To check the port, use a command such as netstat to check whether the master server is listening on its MySQL port, which is 3306 by default, and whether it has established a connection with the slave server:
# netstat -an | grep 3306
tcp 0 0 192.168.75.1:3306 0.0.0.0:* LISTEN
tcp 0 0 192.168.75.1:3306 192.168.0.97:51941 ESTABLISHEDIf the MySQL port is blocked by the firewall, unblock it. For example, if using IP Tables on a Linux/UNIX server, it can be unblocked with the following command:
# iptables -A INPUT -i eth0 -p tcp --destination-port 3306 -j ACCEPT

