Overview
Checkboxes and radio buttons are binary fields designed to allow the user to quickly select or deselect an option. Checkboxes are used for a single option, whereas checkgroups and radiogroups are used to offer a group of related options.
 Checkbox
Checkboxes offer a binary on/off choice and are square in appearance with a check mark when activated (on). Checkboxes are convenient for allowing a user to activate an option with a single click of the mouse.
By default, the value in a checkbox is "On" if selected (activated) and "Off" if deselected (deactivated), but these values can be customized for different situations using the "Value" and "Value if not checked" properties.
Properties
- Field Name *Required
- Label
Behavior
- Value *Required
- Value if not checked *Required
- Default Value
Appearance
In order to be able to add HTML formatting tags to the label of a checkbox, activate the option "Enable Html".
Value
Sets the value of the checkbox if it is selected (activated) so a check appears in the box.
XML Definition:
- <NAME ... value="ON-VALUE" ...>...</NAME>
Value if not checked
Sets the value of the checkbox if it is deselected (deactivated) so no check mark is in the box.
XML Definition:
- <NAME ... falsevalue="OFF-VALUE" ...>...</NAME>
Label on the right side
By default the checkbox appears on the left side of the checkbox. Select this option to make the label appear on the right side of the checkbox.
XML Definition:
- <NAME ... labelonright="0|1" ...>...</NAME>
Accessing Checkboxes with JavaScript
Checkboxes can not be accessed as a normal field through their value property. The code getField("checkbox-name").value will always report that the value of a checkbox is "On", regardless of whether it is checked or not. Instead the state of a checkbox should be accessed through its checked property.
To read the boolean value of a checkbox:
To check a checkbox, set its checked property to true; and to uncheck it, set it to false:
getField("checkbox-name").checked = false;
To change the label for a checkbox, activate the "Enable Html" option and put tags with an id around the label and then use JavaScript's innerHTML to modify the text.
For instance, if filling out a DynaForm for contacting a client, the label on a checkbox can be changed from "Notify client by mail" to other options, depending on the value selected in a dropdown box named "ContactMethod". When defining the checkbox, set the Label property to:
Then add the following JavaScript code to the DynaForm:
{
if (getField("ContactMethod").value == "telephone")
document.GetElementById("NotifyLabel").innerHTML = "Notify client by telephone";
else if (getField("ContactMethod").value == "fax")
document.GetElementById("NotifyLabel").innerHTML = "Notify client by fax";
else
document.GetElementById("NotifyLabel").innerHTML = "Notify client by mail";
}
getField("ContactMethod").onchange = changeCheckboxLabel;
To change the color of a checkbox's label when the checkbox is clicked, also access the checkbox's label through its id. In this example, the Label of the "NotifyClient" checkbox changes to red when the checkbox is marked:
{
if (getField("NotifyClient").checked==true)
document.getElementById("NotifyLabel").style.color="RED";
else
document.getElementById("NotifyLabel").style.color="GRAY";
return true;
}
getField("testme").onchange=changeColor;
changeColor();
Accessing Checkboxes with PHP
When a DynaForm containing a checkbox is submitted, a case variable for the checkbox is created. If the checkbox was marked, it will contain the string for its Value property, which by default is "On". If unmarked, it will contain the string for its Value if not checked property, which by default is "Off".
For example, to decide which message to send out based on the value of a checkbox field named "informalMessage":
$template = "informalMail.html";
else
$template = "formalMail.html";
$to = userInfo(@@USER_LOGGED)['mail'];
PMFSendMessage(@@APPLICATION, 'admin@example.com', $to, '', '', "Work Notification", $template);
Marking a Checkbox
To mark (select) a checkbox in a Trigger, set the value of the case variable for the checkbox to true. Set the trigger to fire before displaying the DynaForm which contains the checkbox.
For example, the following trigger code marks a checkbox with the field name "emailClient":
Alternatively, a checkbox can be marked by setting its case variable to the string for its Value property, which by default is "On". For example:
Unmarking a Checkbox
To unmark (unselect) a checkbox in a Trigger, set the value of the case variable for the checkbox to false. Set the trigger to fire before displaying the DynaForm which contains the checkbox. For example:
Alternatively, the checkbox can be unmarked by setting its case variable to the string for its Value if not checked property, which by default is "Off". For example:
If the case variable is set to any unrecognized value, then the checkbox will also be unmarked.
Setting Checkboxes in Grids
In version 2.0.38 and later, checkboxes can be used in grids. They can be marked or unmarked just like normal checkboxes by setting their value in the associative array of associative arrays which store grids.
For example, to mark a checkbox named "taxPaid" in the second row of a grid named "invoiceList":
Checkgroup
A checkgroup is a group of checkboxes where the user can mark all, some or none of the checkboxes. The label of the checkgroup serves as a header and all the checkboxes in the group should be related to that header. In addition, each checkbox has its own label.
Properties
- Field Name *Required
- Label
Behavior
Appearance
Data
Accessing Checkgroups with JavaScript
Unlike other types of fields, the checked options in a checkgroup can NOT be accessed with getField("field-name").value. Instead, each checkbox within the checkbox has to be accessed individually. They can either be accessed with ProcessMaker's custom getField() function:
or with the standard getElementbyId() method for the document object:
For instance, a checkbox with an option, whose value is "DoEmail" in the checkgroup named "ContactOptions" could be checked with the code:
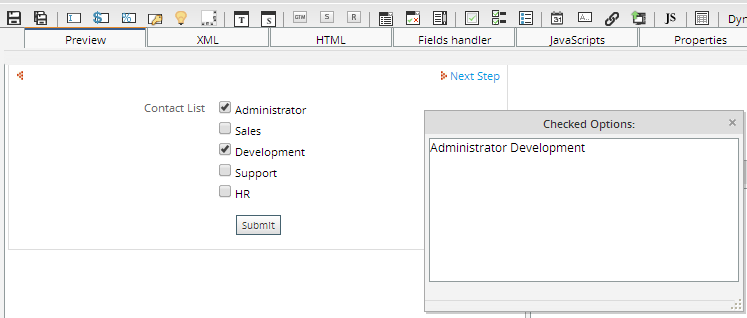
Each checkbox in a checkgroup is given the HTML name "form[checkgroup-name][]". This name can be used to find all checkboxes in the group and see whether they are checked. For instance, this code could be used find out which options are checked in the "ContactOptions" checkgroup:
var report = "";
for (var i = 0; i < arrCheck.length; i++)
{
if (arrCheck[i].checked)
report += arrCheck[i].value + "\n";
}
G.alert(report, "Checked Options:");
Result will be:
The labels on the checkboxes in a checkgroup are not assigned a name or an id, but they are enclosed inside tags with the class name "FormCheck", so they can be accessed through their class name. For instance, to change a checkbox labeled "Contact client by mail" to "Contact client by telephone":
for (var i = 0; i < arrSpan.length; i++)
{
if (arrSpan[i].className == 'FormCheck' && arrSpan[i].innerHTML == "Contact client by mail")
arrSpan[i].innerHTML = "Contact client by telephone";
}
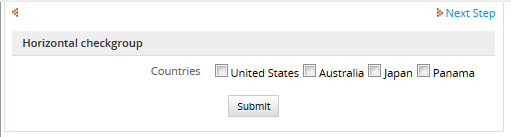
Displaying checkboxes horizontally
Usually, when you add a checkgroup all options are displaying vertically, if you want to change the position of the options, add the following code:
str = string.replace(/<br>/g,"");
document.getElementById("form[Countries][US]").parentNode.innerHTML = str;
The above example obtain the value of the checkgroup and then replace the break line with no space between options, the final result will be:
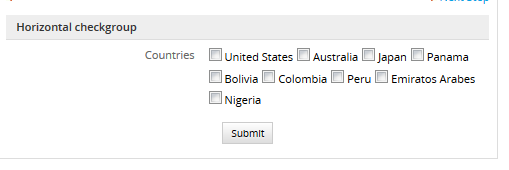
If for some reason, the options are more than the space in the dynaform and you don't want to modify the size of it, the above code will fit the options as follows:
Accessing Checkgroups with PHP
The values of the options selected in the checkgroup are stored in its case variable when the DynaForm is submitted. If multiple options are selected, then the values are separated by '|' (pipes) in a string. See the example code for listboxes to see how to use PHP's explode() function and a foreach loop to get the values.
The list of options for a checkgroup can be populated in a trigger in the same way as a dropdown box. The checkbox options can be preselected by defining a case variable with the same name as the checkgroup which has the values of each selected checkbox separated by vertical bars. For example, to check the first and third and fifth options in a checkgroup named "Numbers" which has values of "one", "three" and "five", respectively, fire the following trigger before the DynaForm:
 Radiogroup
Like checkboxes, radiogroups offer only a binary on/off option, they are round and a black dot appears in the middle when activated (on). A radiogroup is a group of radio buttons which only allow the user to select one option, and will deselect all other options in the group.
Since a option can be selected with a single click and all the options can be seen at a glance, radiogroups are more convenient to use than dropdown boxes, which also only allow a single option to be selected. Radiogroups, however, occupy more space than dropdown boxes and their vertical layout can greatly expand the size of a DynaForm, which forces a user to do a great deal of scrolling. It is not recommended to use radiogroups when there are a large number of available options.
Properties
- Field Name *Required
- Label
Behavior
Appearance
Data
If a default value is not specified for a radiogroup, then no option in the radiogroup is initially selected when a DynaForm is first displayed.
Changing the orientation of a RadioGroup
By default a RadioGroup is created vertically, to modify the orientation to make it horizontal, go to "Dynaform Editor" and click on the "HTML" tab and Enable the html code as the image below.
Then, add the following code at the end of the html code of the dynaform as it follows:
<style>
.lineRadio br{
display:none;
}
</style>
{/literal}
Inside the HTML look for the name of the radiogroup and add the class:
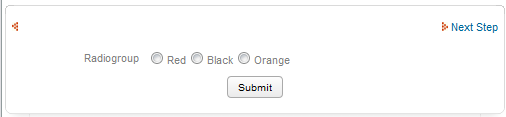
Once the code is added to the HTML, the view of the radiogroup will be as follows:
Accessing Radiogroups with JavaScript
The selected option of a radiogroup, can be set just like a checkgroup.
For example, if using a radio group named "department" with an option, whose value is "sales", then this code would mark that option:
Unlike checkgroups, setting the checked property of an option in a radiogroup causes all other options to be deselected (i.e., their checked properties will be set to false).
All options in a radiogroup are given the same name: "form[radiogroup-name]"
This name can be used to get all the options in the radiogroup and then find the one which is marked (i.e., selected == true). For instance, this code finds the marked option in the "department" radiogroup:
var selected = "";
for (var i = 0; i < aOptions.length; i++)
{
if (aOptions[i].checked)
selected = aOptions[i].value;
}
G.alert(selected, "Selected Option:");
The labels for the options in a radiogroup are not assigned a name or an id, so they can not be directly referenced, except by either using the innerHTML property or the childNodes array of the cell which holds the radiogroup.
This code gets the label of the "sales" option for the "department" radiogroup:
var label = "";
for (var i = 0; i < aNodes.length; i++)
{
if (aNodes[i].value == "Sales")
label = aNodes[i+1].data;
}
Similarly, this code would change the label of the "sales" option to "International Sales":
var label = "";
for (var i = 0; i < aNodes.length; i++)
{
if (aNodes[i].value == "Sales")
aNodes[i+1].data = "International Sales";
}
Hide and Show a RadioGroup
To hide a radiogroup, use the hideRowById() function to hide a radiogroup and all its options:
To show a radiogroup, use the showRowById() function:
Attributes can set individually for each option in a radiogroup. For example, the hidden(), visible(), enable(), disable(), and toReadOnly() functions can be called for each option. To set an attribute for all the options in a radiogroups, use the getElementsByName() function and loop through through all the options. For example to disable all options in the "department" radiogroup:
for (var i = 0; i < aOptions.length; i++) {
disable(aOptions[i]);
}
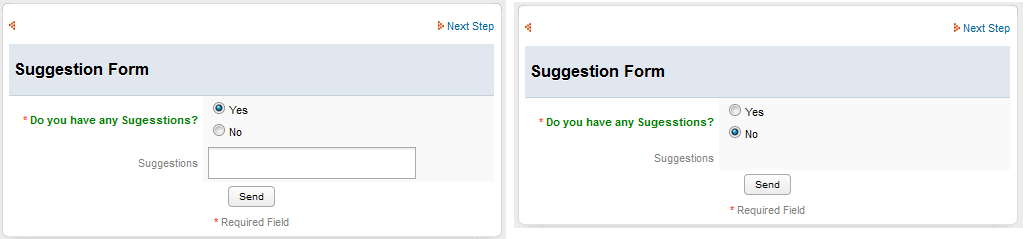
Hide and Show any Field Using Options of a RadioGroup
By choosing an option of a RadioGroup is possible to show or hide any field. For instance, the function ShowHideField will hide and show a text area inside a Dyanform:
Let's check first the xml definitions for the DynaForm:
<es><![CDATA[<font color="green"><b>Do you have any Sugesstions?</b></font>]]><option name="1">Yes</option><option name="0">No</option></es>
</RDG_Suggestion>
<Field_Suggestions type="textarea" required="0" readonly="0" rows="2" cols="32" mode="edit" btn_cancel="Cancel">
<en>Suggestions</en>
</Field_Suggestions>
Then create the function with the fields defined above:
var Txtareahidden=getField('Field_Suggestions');
if (getField('RDG_Suggestion][0').checked==true){
Txtareahidden.style.display='none'; //hide
} else {
Txtareahidden.style.display=''; // show
}
}
ShowHideField(); // onload dyanform
getField('RDG_Suggestion][0').onchange=ShowHideField;
getField('RDG_Suggestion][1').onchange=ShowHideField;
So the Suggestions textarea field will be hidden only if the user checks the option "No" and the validation of the radiogroup will be "False" otherwise the textarea will be displayed as the image below: