- Overview
- Dropdown
- Save label of selected value in variable
- Adding subtitles inside a dropdown
- Accessing Dropdowns with JavaScript
- The
optionsArray - Looping through the options Array
- Adding Options
- Removing Options
- Changing a textbox depending on a dropdown's selection
- Accessing Dropdowns with PHP
- Manually Populating Dropdowns
- Querying the $_DBArray
- Populate a Dropdown with a Database Query
- Populate a Dropdown from a Grid
- Passing JSON Strings of Options
- Passing Database Queries To Dropdowns
- Saving Lists of Dropdown Options
- YesNo
- Listbox
Overview
Dropdown boxes, yes/no boxes and listboxes allow a user to select option(s) from a list of predefined options.
 Dropdown
Dropdown boxes allow the user to select a single option from a list of predetermined options which drop down.
Properties
- Field Name *Required
- Label
Behavior
Appearance
Data
Dropdown boxes are used because they save space compared to listboxes, but dropdown boxes do not allow multiple selections and the user is forced to use the mouse to display the list of available options.
An option can be selected by clicking once on the dropdown box to display the list of options and then clicking a second time on the option to be selected. Alternatively, an option can be selected by holding down on the right mouse button to display the list and then moving the mouse cursor to an option and releasing the mouse mouse.
To select an option with the keyboard, use the TAB or SHIFT+TAB to bring the focus to the dropdown box. Press the UP or LEFT arrow key to select the previous option in the list. Press the DOWN or RIGHT arrow key to select the next option in the list. Press HOME to select the first option in the list and END to select the last option. Pressing a letter or number key will move the selection to the first option whose label starts with that letter or number. Pressing the same letter or number again moves to subsequent options starting with that letter or number. There is no way to display the list of options with the keyboard, but once the list is displayed with a single click, the keyboard can be used to move the selection. To select the current option and hide the list, press ENTER or TAB.
Each option in dropdown boxes have both a value, which is what is stored when a user selects an option and the label, which is the text displayed to the user. A dropdown box has have its list of options defined in its XML definition. In addition, it can append extra options to the list with an SQL SELECT statement.
Save label of selected value in variable
Activate this option to save the label of the selected option for a dropdown box. The label will be saved as a case variable with the same name as the dropdown box, but with "_label" appended at the end. For instance, if a dropdown box is named "MyDropdown", then the value of the selected option would be stored in the case variable @@MyDropdown and the label of the selected option would be stored in the case variable @@MyDropdown_label.
XML Definition:
- <NAME ... savelabel="0|1" ...>...</NAME>
Note: In version 2.0 and later, the savelabel="0|1" property has been eliminated because the case variables @@field-name_label are automatically created to save the label of the selected option.
Example:
If there is a dropdown named "Country", then its case variable holding the label of the selected option will be @@Country_label. This is also applied for radiogroups and listboxes.
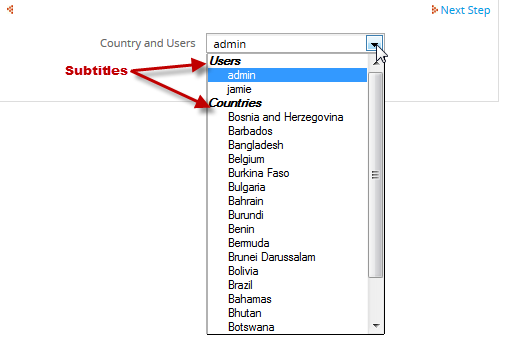
Adding subtitles inside a dropdown
Available Version: From 2.5.1 on.
The addition of subtitles will help users to categorize and group a list of values extracted from queries, specially if they have to insert more than one query inside a dropdown. To enable subtitles inside a dropdown a optgroup attribute inside the XML must be added with a value of 1. The example below will guide you in the creation of subtitles:
Create a dropdown field with the following structure:

As you can see, there is a new attribute named "Include option group", by clicking on that option, the use of subtitles will be available, by adding an option next to each dropdown value:

Inside the XML, the attribute added will be:
</Users_Countries>
Then create queries to be displayed in the dropdown, for this example, let's create two queries, to list users and to list countries:
UNION
(SELECT USR.USR_UID AS UID, USR.USR_USERNAME AS NAME
FROM USERS AS USR
WHERE USR.USR_USERNAME <> '' AND USR.USR_USERNAME LIKE '%a%'
)
UNION
(SELECT 'optgroup2' AS UID, 'Countries' AS NAME)
UNION
(SELECT COUNTRY.IC_UID AS UID, COUNTRY.IC_NAME AS NAME
FROM ISO_COUNTRY AS COUNTRY
WHERE COUNTRY.IC_NAME LIKE 'b%'
)
In both cases it is required to have optgroup inside the query, this will work as the ID of the subtitle, and two, one for Users subtitle and the other for Countries subtitle. Then use UNION to join both queries and to be displayed on the same dropdown.
Save your dynaform and the final XML will be:
<![CDATA[ (SELECT 'optgroup1' AS UID, 'Users' AS NAME)
UNION
(SELECT USR.USR_UID AS UID, USR.USR_USERNAME AS NAME
FROM USERS AS USR
WHERE USR.USR_USERNAME <> '' AND USR.USR_USERNAME LIKE '%a%'
)
UNION
(SELECT 'optgroup2' AS UID, 'Countries' AS NAME)
UNION
(SELECT COUNTRY.IC_UID AS UID, COUNTRY.IC_NAME AS NAME
FROM ISO_COUNTRY AS COUNTRY
WHERE COUNTRY.IC_NAME LIKE 'b%'
) ]]>
<en>Choose a user or a Country<option name="optgroup1"/></en>
</Users_Countries>
Save your dynaform and then go to preview tab, select the dropdown, the final result will be:
Accessing Dropdowns with JavaScript
The value (not the label) of the selected option in a listbox is stored in:
getField("dropdown-name").value
For instance, if a DynaForm contains the dropdown box named "MyDropdown", the value of its selected option can be read:
and it can be changed:
If there is no option in the dropdown box with a value of 'valueX', then the selected option in the dropdown box will not change.
The options Array
A particular option in a dropdown box can be accessed by using its options array, which counts the options beginning with the number 0.
getField("dropdown-name").options[index].selected is a boolean value indicating whether a particular option in the dropdown box or listbox is selected.
getField("dropdown-name").options[index].value is the value for an option and getField("dropdown-name").options[index].text is its label. The selected and text properties may be both read and changed, but value is read-only.
getField("dropdown-name").selectedIndex is the index number of the selected option in a dropdown box. This index number can be used to get the value and label of the selected option, which is stored in the options array:
var selectedValue = getField("MyDropdown").options[idx].value;
var selectedLabel = getField("MyDropdown").options[idx].text;
To select the second option in MyDropdown and change its label to "Foo Bar":
getField("MyDropdown").options[1].text = "Foo Bar";
Looping through the options Array
The number of available options in a dropdown box is stored in getField("dropdown-name").length. This number can be used when looping through the options array. For instance, to capitalize every option in a dropdown box named "MyDropdown":
for (var i = 0; i < nOpts; i++) {
getField('MyDropdown').options[i].text = getField('MyDropdown').options[i].text.toUpperCase();
}
Adding Options
The createElement() and add() methods can be used to append an option to a dropdown box. For instance, to add the option "Contact by Phone" to "MyDropdown":
opt.text = "Contact by Phone";
opt.value = "phone";
getField("MyDropdown").options.add(opt);
Removing Options
Similarly the remove(index) method can be used to remove an option. For instance, to remove the "Contact by Phone" option from "MyDropdown":
for (var i = 0; i < nOpts; i++) {
if (getField('MyDropdown').options[i].value == "phone")
getField('MyDropdown').options.remove(i);
}
To remove all the options from a dropdown box or listbox, set its length property to 0:
Changing a textbox depending on a dropdown's selection
The following example changes the value of a textbox depending on what option is selected in a dropdown. For instance, if a loan needs to be approved or rejected depending on the amount selected, the code will be:
var idx = getField("Loan").selectedIndex;// name of the dropdown
var selectedValue = getField("Loan").options[idx].value;
// use the option defined on the dropdown
if (selectedValue == 'Op1') {
getField('TxtLoan').value='Rejected';// changing the value of the textbox
getField("TxtLoan").style.background= "red";// changing the background of the textbox
}
else {
getField('TxtLoan').value='Approved'; //// changing the value of the textbox
getField("TxtLoan").style.background= "green";// changing the background of the textbox
}
};
var dynaformOnload = function() { // calling the function
leimnud.event.add(getField('Loan'), 'change', changeDrop );
changeDrop();
};
The result will be:

Accessing Dropdowns with PHP
When a DynaForm is submitted, the value of the selected option in a dropdown box is saved to a case variable with the name of the dropdown box. For example, a dropdown box named "ContactType" has the following options:
A trigger which is fired after the DynaForm is submitted could be used to check for the selected value in the dropdown box. For instance the following code would send out an email informing an employee how to contact the client:
$template = 'TelephoneClient.html';
$subject = 'Reminder to telephone client';
}
elseif (@@ContactType == '2') {
$template = 'EmailClient.html';
$subject = 'Reminder to email client';
}
else {
$template = 'FaxClient.html';
$subject = 'Reminder to fax client';
}
PMFSendMessage(@@APPLICATION, "admin@acme.com", "employee@acme.com", "", "", $subject, $template);
To set the option selected in a dropdown box, set its value in the trigger fired directly before the DynaForm is displayed. For example, to select the option "Email" in the above example, set its value to "2" in the trigger code:
Manually Populating Dropdowns
There are two ways to manually populate the list of options in a dropdown box:
- Adding an associative array of associative arrays to $_DBArray and then querying that array with SQL.
- Serializing an array of arrays as a JSON string and then using JavaScript to add the options to the dropdown box.
The first method is simpler and doesn't require writing any JavaScript code, but the second method is more flexible because it allows additional options to be added to an existing list of options.
Querying the $_DBArray
To populate the list of options in a dropdown box with a trigger, first create an associative array of associative arrays, which is how ProcessMaker internally stores grids and the results of databases queries. This associative array of associative arrays can be queried like a normal table with an SQL SELECT statement.
For example, to manually populate a dropdown box named "contactMethod", create the following trigger which fires before the DynaForm:
'1' => array('CODE'=>'1', 'TYPE'=>'Telephone'),
'2' => array('CODE'=>'2', 'TYPE'=>'Email'),
'3' => array('CODE'=>'3', 'TYPE'=>'Fax')
);
# Then make $contactOptions available to be queried
# in the DynaForm like a table from a database:
global $_DBArray;
$_DBArray['CONTACT_OPTIONS'] = $contactOptions;
$_SESSION['_DBArray'] = $_DBArray;
Then, in the DynaForm create dropdown box named "contactMethod" with sqlconnection="dbarray" in its XML definition and an SQL query to access the CONTACT_TYPE array. For example:
Where CODE will become the "value" for each option and TYPE will become the "label" for each option. The complete XML definition for the dropdown box would be:
mode="edit" options="Array" sqlconnection="dbarray">
SELECT CODE, TYPE FROM CONTACT_OPTIONS
<en>Contact Type</en>
</contactMethod>
Populate a Dropdown with a Database Query
To populate the list of options in a dropdown box with a database query, fire a trigger before the DynaForm is displayed which uses executeQuery() to query the database for the value and the label fields used in the dropdown box. Then, assign the results of that query to the $_DBArray as shown in the previous example:
$contacts = executeQuery("SELECT CONTACT_ID, CONTACT_NAME FROM CONTACTS", $db);
//error check that it returned at least one record
if (is_array($contacts) and count($contacts) > 0) {
# Then make $contacts available to be queried
# in the DynaForm like a table from a database:
global $_DBArray;
$_DBArray['CONTACTS'] = $contacts;
$_SESSION['_DBArray'] = $_DBArray;
}
Then, in the DynaForm create a dropdown box which queries the CONTACTS array like a normal database table: For example:
mode="edit" options="Array" sqlconnection="dbarray">
SELECT CONTACT_ID, CONTACT_NAME FROM CONTACTS
<en>Select Contact</en>
</MyDropdown>
Populate a Dropdown from a Grid
Populating a dropdown box from a grid is very similar to populating from a database query, since both are internally stored as an associative array of associative arrays.
In the following example, a grid named "contactsGrid" has the fields "id", "firstName" "lastName", "address", and "telephone". The "id" field will become the value and the "firstname" and "lastname" will be concatenated to become the label for each option in a dropdown box named "selectContact":
Then, in the DynaForm create a dropdown box which queries the CONTACTS array like a normal database table:
mode="edit" options="Array" sqlconnection="dbarray">
SELECT id, CONCAT(lastname, ' ', firstname) FROM CONTACTS
<en>Select Contact</en>
</MyDropdown>
Passing JSON Strings of Options
Another way to populate the list of options is to fire a trigger beforehand which uses the json_encode() function to create a serialized JSON string of options and then pass that serialized string to a hidden field in the DynaForm. When the DynaForm loads, use JavaScript to unserialize the JSON string as an array of options. Then, use the document.createElement() and dropdown.options[X].add() methods to dynamically construct the list of options. This method can be used to add additional options to the list of existing options in a dropdown box.
For example, the following trigger is used to construct a list of products for a dropdown box named "selectProduct". The list of products is serialized and passed to a hidden field in the DynaForm named "sProducts":
When the DynaForm loads, the following JavaScript code is used to unserialize the "sProducts" hidden field as an array of arrays. Then, the code adds each element in the array to the "selectProduct" dropdown using its add() method:
if (typeof(aProducts) == 'object' && aProducts.length) { //if an array
for (var i=0; i < aProducts.length; i++) {
var opt = document.createElement("OPTION");
opt.value = aProducts[i][0];
opt.text = aProducts[i][1];
getField("selectProducts").options.add(opt);
}
}
Passing Database Queries To Dropdowns
Similar to the previous example, the results of a database query can be serialized as a JSON string and passed to a hidden field in a DynaForm. The results of a database query are stored as an associative array of associative arrays, which is more difficult to deal with since JSON converts associative arrays into objects. In the trigger, transform the associative array of associative arrays into a simple array of arrays before serializing with json_encode().
For example, if the products list from the |example above comes from a database query, then use the following trigger code:
$db = "XXXXXXXXXXXXXXXXXXXXXX"; //database connection unique ID
$products = executeQuery("SELECT PRODUCT_NO, PRODUCT_NAME FROM PRODUCTS", $db);
if (is_array($products) and count($products) > 0) {
foreach($products as $product) {
$aProducts[] = array($product['PRODUCT_NO'], $product['PRODUCT_NAME']);
}
}
@@sProducts = json_encode($aProducts);
Then use the same JavaScript code as above, to unserialize the JSON string and populate the "selectProduct" dropdown box.
For a grid, the trigger code would be basically the same. For example, if a grid named "productsGrid" has the fields "productNo" and "productName":
if (isset(@=productsGrid) and count(@=productsGrid) > 0) {
foreach(@=productsGrid as $product) {
$aProducts[] = array($product['productNo'], $product['productName']);
}
}
@@sProducts = json_encode($aProducts);
Then use the same JavaScript code as above, to unserialize the JSON string and populate the "selectProduct" dropdown box.
Saving Lists of Dropdown Options
If using a SQL query to populate the list of options in a dropdown box, keep in mind that the options will change as the contents of the database changes. Likewise, dropdown boxes which are dynamically populated with JavaScript based upon users' input will also change their contents. If a subsequent DynaForm or trigger will need to have access to exactly the same list of options, then use JavaScript to store the list of options to a hidden field which will be saved as a case variable when the DynaForm is submitted. The list of options can either be saved as a serialized JSON string or as a string formatted like PHP's serialize() function.
Saving Dropdown options as a JSON string
When the DynaForm is submitted, the following JavaScript code converts the dropdown's options array into a JSON string and stores it in a hidden field named "sOptions":
getField('sOptions').value = JSON.stringify(getField('MyDropdown').options);
}
getField('MySubmitButton').form.onsubmit = saveDropdownOptions;
Note: The JSON.stringify() function is available in FireFox 3.5+ and Internet Explorer 8+, but the json2.js code file will have to be imported if using older web browsers.
Then, the following trigger is fired later in the process to convert the JSON string back into an array of objects. Then, loop through the array and construct an associative array of associative arrays, which can queried with an SQL SELECT statement to populate a subsequent dropdown box:
$aNewOptions = array();
if (is_array($aOptions)) {
$total = count(array);
for ($i = 0; $i < $total; $i++) {
$aNewOptions[$i + 1] = array('VALUE' => $aOptions[i].value, 'LABEL' => $aOptions[i].text);
}
}
global $_DBArray;
$_DBArray['OPTIONS_LIST'] = $aNewOptions;
$_SESSION['_DBArray'] = $_DBArray;
Finally, a subsequent DynaForm uses the following SQL query to populate its list of options in a dropdown box:
Saving Dropdown Options as a serialize() string
The following JavaScript code saves the list of options as a serialized 2 dimensional array which can be decoded with PHP's unserialize() function. The serialized string is stored in a hidden field when the DynaForm is submitted. The code loops through the options and saves each option in a serialized inner array with the value and label and then sticks that array inside a serialized outer array:
// a:2:{i:0;a:2:{i:0;s:6:"value0";i:1;s:6:"label0";}i:1;a:2:{i:0;s:6:"value1";s:6:"label1";}}
function saveDropdownOptions() {
var nOpts = getField('MyDropdown').length;
var sOpts = "a:" + nOpts + ":{"; //start a serialized 2 dimensional array
for (var i = 0, var value, var label; i < nOpts; i++) {
value = getField('MyDropdown').options[i].value;
label = getField("MyDropdown").options[i].text;
sOpts += "i:" + i + ";a:2:{"; //start inner array of two elements
sOpts += "i:0;s:" + value.length + ':"' + value + '";"'; //add value element
sOpts += "i:1;s:" + value.length + ':"' + value + '";"'; //add label element
sOpts += "}"; //close array inner array
}
sOpts += "}"; //close outer array
getField('MyHidden').value = aOpts;
}
getField('MySubmitButton').onclick = saveDropdownOptions;
A subsequent trigger will be able to access the list of options by unserializing it. For example, the following trigger code would place the options in a case variable named @@MyTextArea so it can be displayed in a textarea field a subsequent DynaForm:
@@MyTextArea = "";
foreach ($arrayOptions as $option) {
$value = $option[0];
$label = $option[1];
@@MyTextArea .= "$value: $label\n";
}
 YesNo
YesNo
Yes/No dropdown boxes are designed to present a binary option to the user. Unlike a checkbox, the values in a Yes/No dropdown box can not be customized and are always "Yes" or "No. Checkboxes are more convenient for the user, since they involve a simple click, rather than a click and hold, select and release action. However, Yes/No dropdown boxes can be useful when the words "Yes" or "No" need to be displayed or when presenting a binary option in grid forms, where checkboxes do not function.
Properties
- Field Name *Required
- Label
Behavior
Appearance
Accessing Yes/No Boxes with JavaScript
Yes/No boxes can be accessed with JavaScript just like dropdown boxes. They have just two options:
- value: "0" label: "NO"
- value: "1" label: "YES"
To set a Yes/No box to "YES":
To set a Yes/No box to "NO":
To check if a Yes/No box has selected the "YES" option:
//do something
To check if a Yes/No box has selected the "NO" option:
//do something
To change the label of the "YES" option in a Yes/No box to "Approved":
Accessing Yes/No Boxes with PHP
The value of Yes/No boxes is stored as 1 for "Yes" and 0 for "No". If using a Yes/No as a case variable in a condition, check for "Yes" with:
Or:
And check for "No" with:
Or:
 Listbox
Listboxes allow one or more options to be selected from a list of options.
Listboxes are more convenient to use than dropdown boxes, since they do not require clicking and holding down on the mouse to see the list of available options. Their disadvantage is that listboxes occupy more space than dropdown boxes and can not be included in grid forms, since they do not fit well in rows in a table.
Properties
- Field Name *Required
- Label
Behavior
Appearance
Data
Unlike dropdown boxes, listboxes allow for a variable number of options to be selected. If there are more options than can be displayed at a time, vertical scrollbars will automatically appear to allow the user to scroll to the other options. To select an option, click on it with the mouse. Use the UP and LEFT arrow keys to select the previous option in the list or the DOWN and RIGHT arrow key to select the next option in the list. PAGEUP and PAGEDOWN will select an option which is located one screen up or down in the list. CTRL+HOME will select the first option in the list, while CTRL+END will select the last option.
Multiple options can be selected by holding down on the CONTROL key while clicking options with the mouse or pressing one of the keys listed above. Likewise, hold down on the CONTROL key while clicking the mouse or pressing a key to unselect a previously selected option. To select all the options between the previously selected option and current option, hold down on the SHIFT key while clicking the mouse or pressing a key.
The Size property in listboxes determines their height in lines, which is set to 4 by default. Their width is automatically set to the widest option in the list.
Like dropdown boxes, each option in listboxes have both a value, which is what is stored when a user selects an option and the label, which is the text displayed to the user. Listboxes can have its list of options defined in its XML definition. In addition, it can append extra options to the list with an SQL SELECT statement.
Accessing Listboxes with JavaScript
Listboxes can be accessed through JavaScript in the same way that dropdown boxes are accessed. getField("listbox-name").value only stores the first selected option in a listbox. Therefore it is necessary to loop through all the options to find all the selected options for a listbox. For instance, to create an array of all the selected options in MyListbox:
var selectedOpts = new Array();
for (var i = 0; i < nOpts; i++) {
if (getField('MyListbox').options[i].selected)
selectedOpts.push(getField('MyListbox').options[i].value);
}
Accessing Listboxes with PHP
When a DynaForm is submitted, the values of the option(s) selected in a listbox are stored in a string in a case variable with the same name as the listbox. If multiple options are selected, the values are separated by '|' (pipes). To find out whether a particular option was selected, break the string of selected values into an array with the explode() function, then use the array_search() or in_array() functions to check if the option's value is in the array. If no option is selected in a listbox, the case variable will not be created.
For example, the "selectManagers" listbox is used to select which managers should review a report. The following trigger code sets the @@districtManagerReview and @@ceoReview cases variables which are used in subsequent conditions in a parallel fork routing rule. Here is how to check for the values selected in a listbox named "MyList" with trigger code:
@@ceoReview = "no";
# Check if something was selected in the listbox:
if (isset(@@selectManagers) and is_string(@@selectMangers)) {
# break the string into an array, each element containing a selected option:
$aManagers = explode('|', @@selectManagers);
if (in_array("district_manager", $aManagers))
@@districtManagerReview = "yes";
if (in_array("ceo", $aManagers))
@@ceoReview = "yes";
}
Manually Populating Listboxes
The options in a listbox can be populated in the same way as dropdown boxes by either adding an associative array of associative arrays to $_DBArray and then querying that array with SQL or by passing a JSON string of options to the DynaForm and using JavaScript to add the options to the listbox.
Preselecting Options in Listboxes
To set which options will be selected in a listbox, fire a trigger beforehand which will create a string with each option's value separated by '|' (pipes). If only one option is selected, then no '|' (pipes) are needed.
For example, to preselect the options "ceo", "district_manager" and "local_manager" in the "selectManagers" listbox:
The list of options in a listbox can be populated with a database query defined in the Sql Connection and Sql properties for the listbox, however these properties do not allow for the preselection of options in the listbox. To use a database query to preselect options in a listbox, create a trigger which fires before the DynaForm to set the value of the case variable for the listbox.
For example, the "selectTeamMembers" listbox has its list of employees populated with the following SQL query in the wf_
The following trigger preselects the 3 users with the fewest cases with "TO_DO" status to automatically be in the team:
$query = "SELECT AD.USR_UID, COUNT(AD.USR_UID) AS NUM_CASES
FROM APP_DELEGATION AD, APPLICATION A
WHERE A.APP_STATUS = 'TO_DO' AND A.APP_UID = AD.APP_UID
ORDER BY NUM_CASES";
$users = executeQuery($query);
if (is_array($users) and count($users) > 0) {
for ($i = 1; $i <= 3 and $cnt <= count($users); $i++) {
@@selectTeamMembers += (empty(@@selectTeamMembers) ? '' : '|') . $users[$i]['USR_UID'];
}
}

