Overview
Usually, when cases are created, all files/folders are stored at:
- <INSTALL-DIRECTORY>/processmaker/shared/sites/workspace-name/files
This seems to be perfect when you generate less than 32k cases, but what happens if more cases need to be created?.... The storage capacity when generated/uploaded files are saved on the server is limited. This limitation is due to the file system, some of them have limitations in the number of folders/files that can be stored in the same directory accepting only the creation of 32k folders, which means 32k cases, (don't forget that each folder represents a case). If there are more than 32,000 cases and all of them have Input/Output documents inside, neither folders or upload documents can be created.
Note: This migration works not only in Linux but also in Windows Installations; however, on Windows this problem is not presented since it uses NTFS file system and it can support at least 4 billion elements (folders, and files)
Available Version: From 2.5.1 on.
Recommendations
- The user who will execute the command must have root privileges.
- Under windows installations, the user who will execute the command must have root privileges too; however, this structure is not necessary, since this uses NTFS and it can support at least 4 billion elements (folders, and files).
- If you need to migrate from Windows to Linux, and you have the new structure applied on Linux, you must have to apply the new structure on Windows before doing the migration.
- If you execute the workspace-restore command in a version 2.5.1 or 2.5.2, the structure of the directories will change, applying this new structure.
Migrating case folders
To increase storage capacity, ProcessMaker has included in version 2.5.1 a new command which will help to migrate the old folder structure into a new one, which will support the creation of more than 32,000 cases. This command only works in new installations because of compatibility with previous versions.
To run the command, go to the following path:
and execute the following command:
- ./processmaker migrate-cases-folders
Replace workspace with the name of your workspace where the new structure will be created. Without argument the structure will be applied to all available workspaces.
Note that it is possible to have different structures for each workspace created the folder structure can be applied. But if you create a new workspace in the server where the structure has been applied, this new workspace will inherit that structure and it won't be necessary to execute the command again.
To distinguish this, a flag will be created in the CONFIGURATION table which indicates which workspace is using this structure.
This command will distribute folders migrating the old structure where a folder was created per each case to a structure where that folder is divided into subfolders.
...How does it work?
If you remember, in the old structure, when cases was created the following structure also was created inside files folder:
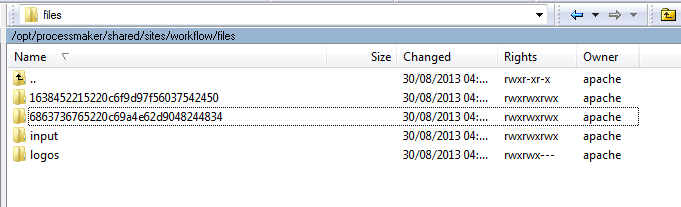
If you check the image, there are two folders which belong to 2 different cases, we will take as an example folder with the 1638452215220c6f9d97f56037542450 UID name, the migration will consist on the following steps:
Step 1: Executing the command to migrate folders Execute the command ./processmaker migrate-cases-folders in order to have the structure divided as the image below shows:
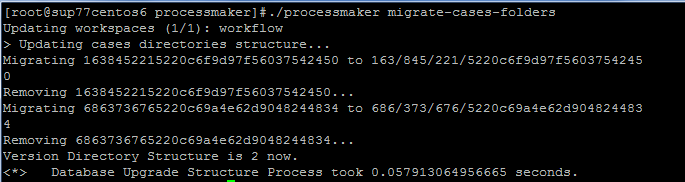
Step 2: Dividing folders into sub-folders As you can see folders will be split into 4 sub-folders, the first three with 3 characters, so in the case of the above example, folders will be created as:
- first folder: 163
- second folder: 845
- third folder: 221
- fourth folder: 5220c6f9d97f56037542450
Step 3: Checking the new structure go to the following location to check the new structure created:
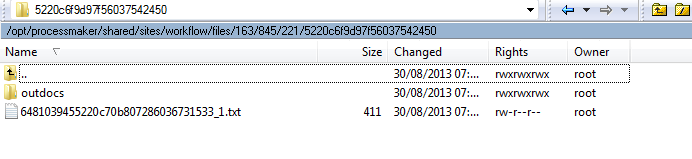
By default, all files will be migrated to the last folder.
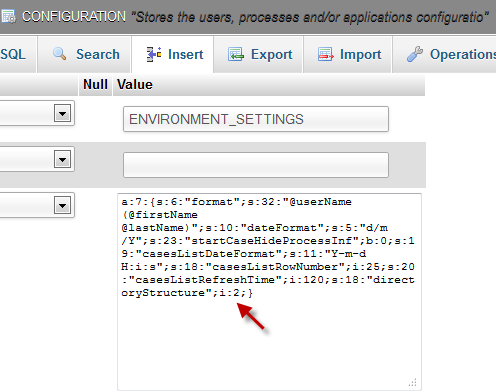
Using the Configuration table
To check if a workspace is working under the new structure a flag is added inside CONFIGURATION table , go to the ProcessMaker database, look for wf_
Accessing documents by using the new file structure
Once the migration is finished, path were files are located (Input Documents and Output Documents)will change, so it is necessary to change the path in order to redirect files to the new structure.
Use the following function in order to change the documents' path to be used with the new structure.
$g->getPathFromUID($appUid)
That can be used inside a trigger or a plugin.
According with the structure applied, it will return the complete ID: 58090836853b71d23e8e253013331630 or 580/908/368/53b/71d/23e/8e2/530/133/316/30. Internally the function will automatically change every path. However if triggers or plugins were creating in order to obtain a path they have to be changed manually, otherwise they will stop working.
For instance, taking the following example in which the path is created in order to attach files using the old structure:
$inDoc['DOC_VERSION'] . '.' . pathinfo($inDoc['FILENAME'], PATHINFO_EXTENSION);
With the new structure change it to:
$aAttachFiles[$inDoc['FILENAME']] = PATH_DOCUMENT . $g->getPathFromUID($caseId) . PATH_SEP . $inDoc['APP_DOC_UID'] . '_' .
$inDoc['DOC_VERSION'] . '.' . pathinfo($inDoc['FILENAME'], PATHINFO_EXTENSION);

