- Overview
- Setting up the gulliver script
- Using the gulliver script
- Creating a new Plugin
- System Logo
- Example Page
- Permission for Role
- Redirect after Login
- External Step
- On Transit Page
- Dashboard
- Report
- Plugin Classes
- Copying the Plugin files to ProcessMaker
- Activate the New Plugin
- Altering the Database Structure
Overview
Available Version: ProcessMaker 2.0.36 and earlier. To know the plugin development in ProcessMaker 2.0.36, click this link.
Although the ProcessMaker core is free/libre/open source software which allows the source code to be freely modified, it is not recommended to edit the code, because each version upgrade will overwrite any changes in the code. Instead, it is recommended to develop a plugin if needing to add additional functionality to ProcessMaker and/or customize its interface.
Plugins are developed using the gulliver new-plugin command in a Linux/UNIX server. Plugins cannot be developed in Windows servers, because symbolic links are needed. After the plugin has already been created, it can be exported to other installations of ProcessMaker, including Windows servers.
Setting up the gulliver script
ProcessMaker is programmed using a custom PHP development framework named Gulliver. To create a plugin in Gulliver, symbolic links have to first be established in the server where ProcessMaker is installed.
The gulliver script needs to be executed inside the workflow/engine/gulliver directory. Login to the ProcessMaker server as the "root" user or a user with administrative powers. Then, make a symbolic link from <INSTALL-DIRECTORY>/gulliver/bin/gulliver to <INSTALL-DIRECTORY>/workflow/engine/gulliver. For example:
Note: Plugins can not be created on Windows servers, because Windows does not support symbolic links; however, there is an experimental script for Windows servers available at <INSTALL-DIRECTORY>/workflow/engine/gulliver-win.bat which can be tested.
Using the gulliver script
As the "root" user (or a user with administrative powers), change to the <INSTALL-DIRECTORY>/workflow/engine/ directory. Then, execute the ./gulliver command to see a list of the available options.
For example:
Note: The gulliver script can only be executed when the current working directory is workflow/engine/, so don't try to execute it without first changing to that directory.
Creating a new Plugin
To create a new plugin, issue the command:
It is recommended that plugin names only use ASCII characters which can easily used in a web address, so no characters like "ë", "Ñ", "?", "%", or " " (space). Also, take care of NOT using hyphens in the name of the new plugin ProcessMaker will no import it later. For example, to create a plugin to delete cases:
The new plugin will be created in a new plugins/pluginName directory located in the parent directory where ProcessMaker is installed. The new plugin directory will have a minimum of the following classes, config, data and public_html subdirectories and 5 code files:
For example, if creating the "deleteCases" plugin in an installation of ProcessMaker at /opt/processmaker, then at least the following directories and files will be automatically created:
The pluginName.php and class.pluginName.php files register the plugin and define a PHP class for the plugin. The classes directory holds additional code files for PHP classes defined for the plugin. For more information, see Plugin Clases.
The data directory holds any data needed to be inserted into the database. The public_html directory holds any images, style sheets, JavaScript, and any other files which need to be publicly accessible.
The config directory contains 3 files which define the database tables to hold information for the new plugin. The config/schema.xml file defines database table(s) to store information needed by the plugin. The config/propel.ini file initializes the configuration variables for Propel, which is a library to map PHP objects to database tables and fields. Theconfig/propel.mysql.ini file initializes the configuration variables for the MySQL database used by Propel.
Then, the gulliver new-plugin script will ask a series of yes/no questions about the new plugin. If the response is "y" (yes), then additional files will be created in the new plugin directory and additional code will be added to the pluginName.php file. To better understand the plugin methods used in this file, see the code in <INSTALL-DIRECTORY>/workflow/engine/classes/class.pluginRegistry.php.
System Logo
If a new logo (image in the upper, left hand corner of the interface) should be displayed in ProcessMaker, then enter "y" for the following option:
Entering "y" will generate the following file:
A PNG image file will be generated in the plugin's public_html directory, such as:
The image will appear as:

In addition, the following code will be added to the plugins/pluginName/pluginName.php file:
$this->setCompanyLogo ('/plugin/pluginName/pluginName.png');
}
To use a different image, simply place the image file in the public_html directory and change the path to reference that new image. For example, if using a logo located at/opt/plugins/deleteCases/deleteCases/public_html/myCompanyLogo.png, then change the path to:
$this->setCompanyLogo ('/plugin/deleteCases/myCompanyLogo.png');
}
Example Page
If the plugin will display a new page in ProcessMaker, then enter "y" for the following option:
Entering "y" will generate the following 3 sample files which can be used as a model for creating pages in ProcessMaker.
For example:
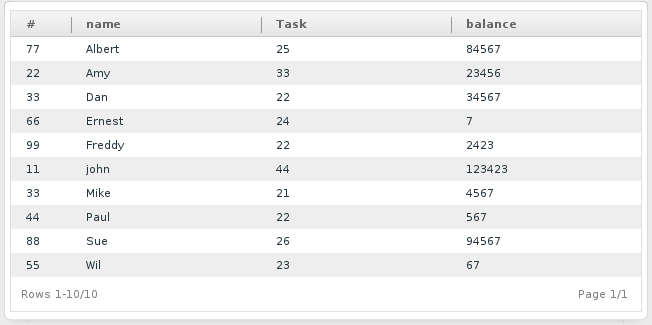
The pluginName/menupluginName.php file contains code to add a new menu to the ProcessMaker interface. By default, clicking on this new menu will display the page generated by thepluginName/pluginNameList.php file, which displays a list of users in a grid. The structure of the grid and its "uid", "name", "age" and "balance" fields are all defined in a sample XML named pluginName/welcome.xml. Notice that the XML code in this file is very similar to the XML code used for a grid DynaForm.
This option will display a users list:
In addition, code such as the following will be added to the plugins/pluginName/pluginName.php file to register the menu option:
$this->registerMenu( 'setup', 'menudeleteCases.php');
}
By default, the new menu option will be added to the submenu under the top-level ADMIN menu (which is called 'setup'), however, that submenu has been deactivated in version 2.0. To add the menu as an option under the main ProcessMaker menu, change 'setup' to 'processmaker':
For more information, see ProcessMaker Functions > Menus.
The following code will also be added to the menupluginName.php file add the new menu to the ProcessMaker interface:
global $G_TMP_MENU;
$G_TMP_MENU->AddIdRawOption('ID_DELETECASES', 'deleteCases/deleteCasesList', "deleteCases" );
?>
The Menu::AddIdRawOption() method is used to add a new menu option to the $G_TMP_MENU global variable, which is the default ProcessMaker menu defined ingulliver/system/class.menu.php. The parameters of this method can be edited to execute a different file when the user clicks on the menu option and change its text label.
For example, to make the menu option execute a custom code file located at /opt/plugins/deleteCases/deleteCases/manageCases.php and use the text label "Manage Cases" instead of "deleteCases", change the code to:
Permission for Role
If the plugin will need to use ProcessMaker's role based access control (RBAC) so that only users with the designated permission in their role will be able to access the plugin and its functionality, then enter "y" for the following option:
Entering "y" will add the following code to the pluginName.php file to generate a new role:
$RBAC = RBAC::getSingleton() ;
$RBAC->initRBAC();
$roleData = array();
$roleData['ROL_UID'] = G::GenerateUniqueId();
$roleData['ROL_PARENT'] = '';
$roleData['ROL_SYSTEM'] = '00000000000000000000000000000002';
$roleData['ROL_CODE'] = 'PROCESSMAKER_pluginName';
$roleData['ROL_CREATE_DATE'] = date('Y-m-d H:i:s');
$roleData['ROL_UPDATE_DATE'] = date('Y-m-d H:i:s');
$roleData['ROL_STATUS'] = '1';
$RBAC->createRole ( $roleData );
$RBAC->createPermission ('PM_pluginName' );
}
Where pluginName is replaced by the name of the plugin in upper case.
Redirect after Login
To cause users with the plugin's permission in their role to be redirected to a specified page after logging into ProcessMaker, enter "y" at this option:
Entering "y" will add code like the following to the pluginName.php file:
$this->redirectLogin( 'PROCESSMAKER_DELETECASES', 'users/users_List' );
}
By default, the plugin redirects to the user's list, but this can be changed. For example, to redirect to the plugins/deleteCases/deleteCases/deleteCasesList.php page on login:
External Step
To create a custom external step for tasks, similar to steps like DynaForms, Input Documents and Output Documents, enter "y" at this option:
Enter "y" will add a file like the following:
This file will need to be edited to add the code to handle the external step. In addition, code will be added to the pluginName.php file, like the following:
$this->registerStep( '2194269554e95dacc74c6d2077314289', 'stepdeleteCases', 'deleteCases external step' );
}
On Transit Page
To create a custom "ON_TRANSIT" page with a top-level menu option, which displays lists of cases in a paged table, enter "y" at this option:
Entering "y" will add files like the following:
In addition, code will be added to the pluginName.php file, like the following to add a new menu option to display the custom page when clicked:
$this->registerMenu( 'processmaker', 'menudeleteCasesOnTransit.php');
}
When the plugin is activated, this option will create a top level menu option named "ON_TRANSIT":
![]()
Dashboard
If the plugin should display a dashboard with information generated by the plugin, then enter "y" at the following option:
If entering "y", then the following information is created.
The drawChart.php file code contains sample code to create a table of data that can be used in the dashboard. Note that ProcessMaker version 2.0 no longer has the dashboard feature, so the plugin designer will have to manually create the page to display the dashboard.
In addition, the following code is added to the pluginName.php file:
$this->registerDashboard();
}
This option also adds the getAvailableCharts(), getChart(), getdeleteCasesChart(), deleteCasesChart() methods to the pluginNameClass class defined in the class.pluginName.php file.
Report
To add a custom DynaForm to display a report about the plugin in the dashboard, enter "y" at this option:
Entering "y" will create a file like:
The pluginName/report.xml file contains sample XML code to display a report about the plugin. By default, it contains fields to display information about a user.
In addition, the following code is added to the pluginName.php file:
$this->registerReport();
}
This option also adds the getAvailableReports(), getReport() and pluginNameReport_1() methods to the pluginNameClass class defined in the class.pluginName.php file.
Plugin Classes
The last option sets the configuration, classes, and additional functions for the plugin:
Regardless of whether entering "y" or "n", files like the following will be created:
The pluginName.php file defines a class for the plugin named pluginNamePlugin, which is based upon the PMPlugin class, which is defined inworkflow/engine/classes/class.plugin.php. This class sets up the plugin and registers it in ProcessMaker. The contents of the setup() and install() methods depend on which of the previous options were selected, but at a minimum this file contains code like:
G::LoadClass('plugin');
class deleteCasesPlugin extends PMPlugin
{
function deleteCasesPlugin($sNamespace, $sFilename = null) {
$res = parent::PMPlugin($sNamespace, $sFilename);
$this->sFriendlyName = 'deleteCases Plugin';
$this->sDescription = 'Autogenerated plugin for class deleteCases';
$this->sPluginFolder = 'deleteCases';
$this->sSetupPage = 'deleteCases';
$this->iVersion = 0.78;
//$this->iPMVersion = 2425;
$this->aWorkspaces = null;
//$this->aWorkspaces = array('os');
return $res;
}
function setup() {
}
function install() {
}
}
$oPluginRegistry =& PMPluginRegistry::getSingleton();
$oPluginRegistry->registerPlugin('deleteCases', __FILE__);
The pluginName/class.pluginName.php file defines the pluginNameClass class, which is also based upon the PMPlugin class. Its define methods also depend upon the previous selected options, but at a minimum it contains:
/**
* class.deleteCases.php
*
*/
class deleteCasesClass extends PMPlugin {
function __construct ( ) {
set_include_path(
PATH_PLUGINS . 'noOptions' . PATH_SEPARATOR .
get_include_path()
);
}
function setup()
{
}
}
If "y" was entered, then in addition to the above files, the following file will also be created:
The pluginName/classes/class.pmFunctions.php file is used to define any special functions for the plugin, which can be called from inside a trigger like a normal ProcessMaker Functions. These custom functions can be given any name, but the convention is use names like pluginName_function-name(), so they can easily be distinguished from the standard ProcessMaker and PHP functions used in triggers.
The following code is also added to the pluginName.php file to incorporate the plugin's custom functions into ProcessMaker:
$this->registerPmFunction();
}
Copying the Plugin files to ProcessMaker
After using the gulliver new-plugin script to create the new plugin, copy its directory and its pluginName.php file into the <INSTALL-DIRECTORY>/workflow/engine/plugins/directory. For example:
If not wishing to copy the files, another alternative is to create symbolic links to the workflow/engine/plugins directory.
Activate the New Plugin
After linking or copying the plugin's files into the ProcessMaker file system, then login to ProcessMaker as the "admin" user (or another user with the PM_SETUPADVANCED permission in his/her role). Go to ADMIN > Plugins > Plugin Manager and select the new plugin which should appear in the list. Then, click on the "Enable" button to activate the plugin.

The new plugin should now be ready to be used. To see any new changes to the interface (such as new menus), refresh the web browser.
Note: Each time that the menu is changed in the plugin's files, the plugin will need to be deactivated and then reactivated for those changes to appear in the ProcessMaker interface.
Altering the Database Structure
Plugins can be used to alter the structure of the database(s) used by ProcessMaker. To add tables and/or tables to a database, complete these steps in order:
- Edit the Propel XML schema file to define the additional tables and/or fields
- Run the gulliver propel-build-model script to construct Propel Cases for the data objects.
- Run the gulliver propel-build-sql script to generate the SQL files to alter the database.
- Run the gulliver propel-build-crud for each table to update the database.
Editing Propel XML schema files
Changes are made to the ProcessMaker database(s) through the XML schema file located at plugins/pluginName/pluginName/config/schema.xml, which is generated by thegulliver new-plugin script.
Edit the schema.xml file to add the tables and fields used by the plugin. By default, it contains:
<!--Autogenerated by CreoleToXMLSchema!-->
<DATABASE name="workflow">
<TABLE name="PLUGIN_DEMO">
<vendor TYPE="mysql">
<parameter name="Name" VALUE="PLUGIN_DEMO"/>
<parameter name="Engine" VALUE="MyISAM"/>
<parameter name="Version" VALUE="10"/>
<parameter name="Row_format" VALUE="Dynamic"/>
<parameter name="Auto_increment" VALUE=""/>
<parameter name="Collation" VALUE="utf8_general_ci"/>
<parameter name="Create_options" VALUE=""/>
<parameter name="Comment" VALUE="The plugin demo table for deleteCases"/>
</vendor>
<COLUMN name="PLG_UID" TYPE="VARCHAR" SIZE="32" required="true" primaryKey="true" DEFAULT="">
<vendor TYPE="mysql">
<parameter name="Field" VALUE="PLG_UID"/>
<parameter name="Type" VALUE="varchar(32)"/>
<parameter name="Null" VALUE="NO"/>
<parameter name="Key" VALUE="PRI"/>
<parameter name="Default" VALUE=""/>
<parameter name="Extra" VALUE=""/>
</vendor>
</column>
<COLUMN name="PLG_PARENT_ID" TYPE="INTEGER" required="true" DEFAULT="0">
<vendor TYPE="mysql">
<parameter name="Field" VALUE="PLG_PARENT_ID"/>
<parameter name="Type" VALUE="int(11)"/>
<parameter name="Null" VALUE="NO"/>
<parameter name="Key" VALUE=""/>
<parameter name="Default" VALUE="0"/>
<parameter name="Extra" VALUE=""/>
</vendor>
</column>
<COLUMN name="PLG_NAME" TYPE="VARCHAR" SIZE="100" required="true" DEFAULT="">
<vendor TYPE="mysql">
<parameter name="Field" VALUE="PLG_FOLDER_NAME"/>
<parameter name="Type" VALUE="varchar(100)"/>
<parameter name="Null" VALUE="NO"/>
<parameter name="Key" VALUE=""/>
<parameter name="Default" VALUE=""/>
<parameter name="Extra" VALUE=""/>
</vendor>
</column>
<COLUMN name="PLG_FULL_PATH" TYPE="VARCHAR" SIZE="255" required="true" DEFAULT="">
<vendor TYPE="mysql">
<parameter name="Field" VALUE="PLG_FULL_PATH"/>
<parameter name="Type" VALUE="varchar(255)"/>
<parameter name="Null" VALUE="NO"/>
<parameter name="Key" VALUE=""/>
<parameter name="Default" VALUE=""/>
<parameter name="Extra" VALUE=""/>
</vendor>
</column>
<INDEX name="indexApp">
<index-COLUMN name="PLG_UID"/>
<vendor TYPE="mysql">
<parameter name="Table" VALUE="PLUGU"/>
<parameter name="Non_unique" VALUE="1"/>
<parameter name="Key_name" VALUE="indexApp"/>
<parameter name="Seq_in_index" VALUE="1"/>
<parameter name="Column_name" VALUE="PLUGIN_DEMO"/>
<parameter name="Collation" VALUE="A"/>
<parameter name="Cardinality" VALUE="6"/>
<parameter name="Sub_part" VALUE=""/>
<parameter name="Packed" VALUE=""/>
<parameter name="Null" VALUE=""/>
<parameter name="Index_type" VALUE="BTREE"/>
<parameter name="Comment" VALUE=""/>
</vendor>
</index>
< able>
</database>
To add tables and/or fields to a database, first indicate which database they should be added to in the <database name="db-name"> tag. The db-name is one of the databases for the current workspace:
- "workflow" : wf_<WORKSPACE> database
- "rbac" : rb_<WORKSPACE> database
- "report" : rp_<WORKSPACE> database
The <table name="table-name"> tag is used to indicate the name of the table to modify. The "table-name" can either be a new table or an existing table in the database. Remember that MySQL table names are case sensitive in Linux/UNIX, but not in Windows. Make sure that the same table-name is used in the tag: <parameter name="Name" value="table-name"/>
Fields in each table are defined with the <column name="field-name"> tag. The properties for each field can be defined inside the <column name="field-name" 'properties'/> or through separate <parameter name="property-name" value="property-value"/> tags. For example, this XML:
Creates the same "PLG_UID" field as this XML:
<parameter name="Field" value="PLG_UID"/>
<parameter name="Type" value="varchar(32)"/>
<parameter name="Null" value="NO"/>
<parameter name="Key" value="PRI"/>
<parameter name="Default" value=""/>
<parameter name="Extra" value=""/>
</column>
The sample schema.xml file created by the gulliver new-plugin script duplicates the definition of each field property, but that duplication is unnecessary and is not recommended. For more information about Propel XML schema files, see the Propel Manual. For more examples of XML schema files, see the following files which define the <wf_<WORKSPACE> andrp_<WORKSPACE> databases for ProcessMaker:
- <INSTALL-DIRECTORY>/rbac/engine/config/schema.xml
- <INSTALL-DIRECTORY>/workflow/engine/config/schema.xml
Creating Classes with gulliver propel-build-model
After editing the config/schema.xml file, the run the following script to generate the Propel classes for the tables defined in the schema file:
For example:
Note: The gulliver propel-build-model script needs to have the XSL module installed in PHP for XSLT parsing. To install it:
In Debian/Ubuntu:
In Red Hat/CentOS/Fedora:
Creating SQL files with gulliver propel-build-sql
After generating the Propel classes, then create the SQL files which will insert new tables/files in the database:
Applying changes with gulliver propel-build-crud
After generating the SQL files, apply the database changes for each new or altered table:

