- Overview
- Apache
- Configuring Apache
- Restarting Apache
- Compression to Improve ProcessMaker Performance
- Configuring ProcessMaker to Use SSL/TLS
- PHP
- Configuring PHP
- Checking the PHP Modules
- Uploading Large Input Documents
- Uploading Large Numbers of Files
- Setting the Time Zone
- Managing Login Sessions in ProcessMaker
- More Rows in Grids
- Importing Large Processes
- PHP Accelerators
- Insertion of Quotation Marks and Backslashes
- Verification of Files Using the fileinfo Extension
- MySQL
- Configuring MySQL
- Restarting MySQL
- Triggers in MySQL 5.5 and Later
- Increasing the Thread Stack Size
- Disabling ONLY_FULL_GROUP_BY mode in MySQL
- Changing the Database Location, MySQL User or Password
- Moving the shared directory
- Checking the ProcessMaker Requirements
Overview
After installing ProcessMaker, it may be necessary to modify the configuration of Apache, PHP and MySQL in certain situations, which are listed on this page.
Apache
Configuring Apache
To configure Apache, edit its httpd.conf file (or apache2.conf and ports.conf files if using Debian/Ubuntu). The other file to modify is the pmos.conf file, which holds the VirtualHost definition for ProcessMaker. The location of these two files depends upon the operating system:
Red Hat/CentOS:
- /etc/httpd/conf/httpd.conf
- /etc/httpd/conf.d/pmos.conf
Debian/Ubuntu/Mint:
- /etc/apache2/apache2.conf
- /etc/apache2/ports.conf
- /etc/apache2/sites-available/pmos.conf
Manual installation in Windows:
- C:\Apache24\conf\httpd.conf
- C:\Apache24\conf\extra\pmos.conf
Bitnami (Linux):
- /opt/processmaker-3.X.X.bX-0/php/php.ini
- /opt/processmaker-3.X.X.bX-0/apps/processmaker/conf/httpd-app.conf
Bitnami (Windows):
- C:\Bitnami\processmaker-3.X.X.bX-0\php\php.ini
- C:\Bitnami\processmaker-3.X.X.bX-0\apps\processmaker\conf\httpd-app.conf
php_value short_open_tag On
php_value memory_limit 512M
php_value upload_max_filesize 100M
php_value max_input_vars 8000
</IfModule>
Make sure to edit this file, if needing to change one of these PHP settings.
Restarting Apache
After changing a setting in the httpd.conf or pmos.conf files, restart Apache for the new configuration to go into effect:
Red Hat/CentOS:
-
service httpd restart
Debian:
-
service apache2 restart
Ubuntu/Mint:
-
sudo service apache2 restart
SuSE/OpenSUSE:
-
systemctl start apache2.service
FreeBSD:
-
/usr/local/etc/rc.d/apache22 restart
Manual installation in Windows:
-
Open a DOS terminal and issue the following commands to restart the Apache service:
net stop Apache2.4 net start Apache2.4 orcd C:\Apache24\bin httpd.exe -k restart -n "Apache2.4"
Bitnami Installation in Linux
Enter the following commands as the root user or prepend the sudo command. Change to the directory where the Bitnami stack is installed. For example, on a Linux server:
# cd /opt/processmaker-3.X.X.bX-0/ Then, restart Bitnami's Apache:
# ./ctlscript.sh restart apache Syntax OK /opt/processmaker-3.X.X.bX-0/apache2/scripts/ctl.sh : httpd stopped Syntax OK /opt/processmaker-3.X.X.bX-0/apache2/scripts/ctl.sh : httpd started at port 313
Bitnami Installation in Windows
Change to the directory where Bitnami's Apache is installed. For example:
cd C:\Bitnami\processmaker-3.X.X-1\apache2\bin Then, restart Bitnami's Apache:
httpd -k restart -n processmakerApache Note: The
netcommand can also be used:net stop processmakerApache net start processmakerApache To check which services are running:
net start
Compression to Improve ProcessMaker Performance
ProcessMaker performance can be improved by using ZIP compression when uploading/downloading pages. Compression should be supported by all modern web browsers. The compression uses Apache's deflate module, which should have been enabled when ProcessMaker was installed.
Note: The deflate module is enabled if the Apache configuration file httpd.conf contains a line like:
In Debian/Ubuntu/Mint, the deflate module can be enabled in Apache with the following command (issued as root or using sudo):
After adding the deflate module, restart apache.
To enable ZIP compression, edit the pmos.conf file (or bitnami.conf if working with a Bitnami installation). Add the following lines to the VirtualHost definition:
Then, restart Apache for the new settings to take effect.
Configuring ProcessMaker to Use SSL/TLS
If your organization needs greater security to protect sensitive data being passed between web clients and the ProcessMaker server, it may be a good idea to set up an SSL or TLS connection that can be accessed through the https protocol (rather than the standard http protocol).
Follow the steps in the following tutorials to set up an SSL-secured web server in Red Hat/CentOS, Debian/Ubuntu and Windows. After creating the certificates that will be used by the ProcessMaker server, configure ProcessMaker to use https in Apache.
Edit the file apache-path/pmos.conf (or \Bitnami\processmaker-3.x.b2-0\apache2\conf\bitnami\bitnami.conf if working with a Bitnami installation) and add the following lines to your virtual host configuration:
VirtualHost in Apache 2.2
If using Apache 2.2, then use the following VirtualHost configuration.
Restart the Apache web server so the altered configuration will take effect. Now it is possible to use ProcessMaker over SSL. Log in to ProcessMaker by using the https protocol:
VirtualHost in Apache 2.4
If using Apache 2.4, then use the following VirtualHost configuration.
Restart the Apache web server so the altered configuration will take effect. Now it is possible to use ProcessMaker over SSL. Log in to ProcessMaker by using the https protocol:
PHP
Configuring PHP
To change the configuration of PHP, edit the php.ini file with a plain text editor (such as Notepad in Windows and vim or nano in Linux/UNIX). The location of the php.ini file depends on your operating system:
Red Hat/CentOS:
- /etc/php.ini
Debian/Ubuntu/Mint/SuSE/openSUSE:
- /etc/php5/apache2/php.ini
In Debian/Ubuntu systems with multiple web servers:
- /etc/php5/cgi/php.ini
FreeBSD:
- /usr/local/etc/php.ini
Manual installation in Windows:
- C:\php\php.ini
Bitnami (Linux):
- /opt/processmaker-3.X.X.bX-0/php/php.ini
- /opt/processmaker-3.X.X.bX-0/apps/processmaker/conf/httpd-app.conf
Bitnami (Windows):
- C:\Bitnami\processmaker-3.X.X.bX-0\php\php.ini
- C:\Bitnami\processmaker-3.X.X.bX-0\apps\processmaker\conf\httpd-app.conf
After changing a setting in the php.ini file, restart Apache for the new PHP configuration to go into effect.
Checking the PHP Modules
To check whether all the required PHP modules are installed, enter the following command in a terminal:
Linux/UNIX:
-
php -m
Windows:
-
Navigate to where PHP is installed. For example:
cd C:\php Then, issue the command:
php -m
If an error message about a missing MSVCR100.dll file appears when executing the command:
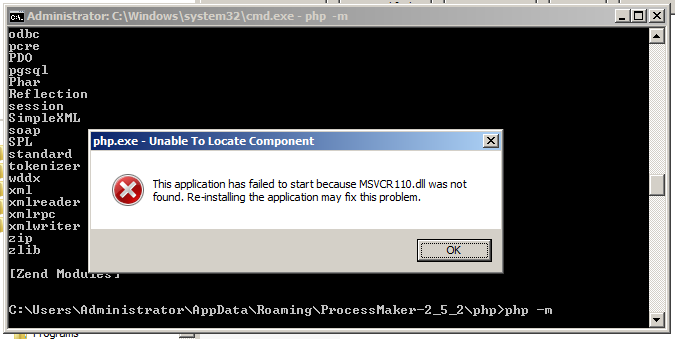
Then, install or update the Microsoft Visual C++ 2010 Redistributable Package for 32 bit or 64 bit.
Checking PHP Modules from the ProcessMaker Interface
To check whether all the required PHP modules are loaded from inside ProcessMaker version 2.5.0 and later, log in as a user, such as "admin", who has the PM_SETUPADVANCE permission in his/her role. Then go to ADMIN > Settings > PHP Information and check whether all the required modules are listed.

Uploading Large Input Documents
To upload large Input Documents or attached files while running processes, the post_max_size and upload_max_filesize settings in the php.ini file should be increased to more than the default 2MB. For instance, if planning on uploading files as large as 24MB, then:
After modifying these settings, restart Apache.
Note: If using a Bitnami installation, then also change the upload_max_filesize setting in the apps/processmaker/conf/httpd-app.conf file.
Uploading Large Numbers of Files
By default, PHP limits the maximum number of uploaded files to 20. If needing to upload a larger number of files in a Dynaform, then increase the size of the max_file_uploads setting in the php.ini file:
After modifying this setting, restart Apache.
Setting the Time Zone
The time zone for ProcessMaker can be set under ADMIN > Settings > System, or by manually editing the time_zone setting in the env.ini file.
It is also recommended to set the same time zone in the date.timezone setting in the php.ini file. See this list of available time zones. For example, to set PHP to use Eastern Standard Time in the US, set date.timezone to "America/New_York":
In the US, use these time zones:
| US standard time zone | PHP time zone |
|---|---|
| Eastern | America/New_York |
| Central | America/Chicago |
| Mountain | America/Denver |
| Mountain no DST | America/Phoenix |
| Pacific | America/Los_Angeles |
| Alaska | America/Anchorage |
| Hawaii | America/Adak |
| Hawaii no DST | Pacific/Honolulu |
After changing the time zone, restart Apache for the changes to take effect.
Managing Login Sessions in ProcessMaker
By default, ProcessMaker logs a user out after 24 minutes of inactivity. This time can be changed by setting the value of session.gc_maxlifetime in php.ini.
In addition, session.cache_expire sets how long data in the cache is stored and session.cache_limiter determines whether data is cached by the web browser and proxies.
After modifying these settings, restart Apache.
More Rows in Grids
In PHP 5.3.9 and later, the max_input_vars setting limits the maximum number of posted variables. By default, max_input_vars is set to 1000. If a grid has 5 fields per row, then only the first 200 rows of the grid will be saved in a Dynaform and only the first 200 rows will be included in an Output Document.
To use grids with more rows, increase this setting in the php.ini configuration file:
Then, restart Apache for the new setting to take effect.
- Note: If using the Suhosin security patch, then change the following settings in the suhosin.ini configuration file.
In Red Hat/CentOS:
- /etc/php5/apache2/conf.d/suhosin.ini
In Debian/Ubuntu/Mint:
- /etc/php5/conf.d/suhosin.ini
Configure the file as follows:
Note: If using a Bitnami installation, then also change the max_input_vars setting in the apps/processmaker/conf/httpd-app.conf file.
Importing Large Processes
To import large processes it may be necessary to increase the memory_limit to 256M in php.ini:
After modifying this setting, restart Apache.
Note: If using a Bitnami installation, then also change the memory_limit setting in the apps/processmaker/conf/httpd-app.conf file.
PHP Accelerators
Installing an opcode cache manager, such as Zend, Alternative PHP Cache (APC), XCache, eAccelerator or ionCube EncoderZend, can double the speed of ProcessMaker and decrease the load on your server's CPU. Of the available PHP accelerators, ProcessMaker recommends APC because it is maintained by PHP developers; however, APC, Xcache and eAccelerator all have good performance.
Make sure to restart Apache after installing an opcode cache manager and only use one opcode cache manager at a time.
Installing APC
Debian/Ubuntu/Mint:
APC can be installed from your distribution's repository:
Red Hat/CentOS:
- See this tutorial to install APC on Red Hat/CentOS.
Windows:
- See this tutorial to install APC on Windows. Make sure to download the version of APC compiled for your version of PHP.
Insertion of Quotation Marks and Backslashes
To prevent single quotation marks and backslashes from being automatically inserted in Output Documents, turn off magic quotes in php.ini.
After modifying these settings, restart Apache.
Verification of Files Using the fileinfo Extension
Version 2.8.0 and later uses the fileinfo extension in PHP to verify the extensions of uploaded files and ensure that the file extension matches the contents of the file. The fileinfo extension is included by default in PHP 5.3.0 and later, but it may need to be enabled. Use php -m in the command line or go to ADMIN > Settings > System Information in ProcessMaker to check whether the fileinfo extension is enabled.
Windows:
-
Enable the fileinfo extension by editing the php.ini file with a plain text editor and adding or uncommenting the following line:
extension=php_fileinfo.dll Then, restart Apache and verify that the extension is enabled.
Linux/UNIX:
-
In most Linux/UNIX distributions, the fileinfo extension is enabled by default in PHP. If not, add the following line to the php.ini file:
extension=php_fileinfo.so Then restart Apache to use the fileinfo extension.
MySQL
Configuring MySQL
MySQL can be configured by editing its my.cnf file (which is named my.ini in Windows). Its location depends on the operating system:
Red Hat/CentOS/SuSE/OpenSUSE:
- /etc/my.cnf
Debian/Ubuntu/Mint:
- /etc/mysql/my.cnf
or
/etc/mysql/mysql.conf.d/mysqld.cnf
Manual installation in Windows:
- C:\Program Files\MySQL\mysql-5.X.X-winx64\my.ini
Bitnami (Linux):
- /opt/processmaker-3.X.X.bX-0/mysql/my.cnf
Bitnami (Windows):
- C:\Bitnami\processmaker-3.X.X.bX-0\mysql\my.ini
Restarting MySQL
After modifying the my.cnf file, restart MySQL:
Red Hat/CentOS:
-
service mysqld restart
Debian/Ubuntu/Mint/SuSE/OpenSUSE:
-
service mysql restart
Manual installation in Windows:
-
Open a DOS terminal and issue the following commands to restart the service:
net stop mysql net start mysql
Bitnami Installation
-
Enter the following commands as the root user or prepend the sudo command. Change to the directory where the Bitnami stack is installed. For example, on a Linux server:
# cd /opt/processmaker-3.x.x.b1-0/ Then, restart Bitnami's MySQL:
# ./ctlscript.sh restart mysql 170410 20:08:12 mysqld_safe mysqld from pid file /opt/processmaker-3.X.X.b1-0/mysql/data/mysqld.pid ended /opt/processmaker-3.X.X.b1-0/mysql/scripts/ctl.sh : mysql stopped 170410 20:08:17 mysqld_safe Logging to '/opt/processmaker-3.X.X.b1-0/mysql/data/mysqld.log'. 170410 20:08:17 mysqld_safe Starting mysqld.bin daemon with databases from /opt/processmaker-3.X.X.b1-0/mysql/data /opt/processmaker-3.X.X.b1-0/mysql/scripts/ctl.sh : mysql started at port 3307
Triggers in MySQL 5.5 and Later
To avoid problems running triggers in MySQL 5.5 and later, edit the my.cnf configuration file and set the binlog_format to log by rows rather than statements:
For more information, see the MySQL documentation. Then, restart MySQL for the new setting to take effect.
Increasing the Thread Stack Size
According to the Mysql manual, the default thread stack is 128K, which sometimes is not enough to execute long queries, e.g., long joins. If the thread stack is too small, the following Thread stack overrun (MySQL ERROR 1436) may occur:
If this problem is encountered, edit the MySql configuration file my.cnf and increase the size of the thread_stack setting in the following line:
Then, restart MySQL for the change to take effect.
Disabling ONLY_FULL_GROUP_BY mode in MySQL
Warning: MySQL 5.7.XX is not officially supported by ProcessMaker 3.0.x and 3.1.x.
MySQL 5.7.5 and later enables the ONLY_FULL_GROUP_BY mode by default, which causes a problem with some of the database queries used by ProcessMaker. For example, going to Home > Participated when ONLY_FULL_GROUP_BY mode is enabled will generate the error:
debug_sql=1 in the env.ini file, will show the cause of the error:
GROUP BY clause and contains nonaggregated column 'wf_Brahmastra.APP_CACHE_VIEW.DEL_INDEX'
which is not functionally dependent on columns in GROUP BY clause; this is incompatible with
sql_mode=only_full_group_by] [User Info: SELECT APP_CACHE_VIEW.APP_UID, APP_CACHE_VIEW.DEL_INDEX ...
To remove the ONLY_FULL_GROUP_BY mode, first login to MySQL as the root user:
Bitnami install in Windows:
Bitnami install in Linux:
Manual install in Linux/UNIX:
Then, get the complete list of settings for sql_mode:
Copy all the settings except for ONLY_FULL_GROUP_BY, which needs to be removed from the list.
To exit MySQL, use the command:
Then, edit the my.cnf file to change the configuration of MySQL.
Its location depends on the OS and how ProcessMaker was installed:
Bitnami install in Windows:
Bitnami install in Linux:
Manual install in Debian/Ubuntu:
/etc/mysql/my.cnf
or/etc/mysql/mysql.conf.d/mysqld.cnf
Manual install in Red Hat/CentOS:
/etc/my.cnf
Note: In Linux/UNIX, these files can only be edited by logging in as root with su or sudo -i.
Edit the sql_mode setting which is found in the [mysqld] section.
If it doesn't exist, then add it. Set all the modes that are already being used,
except ONLY_FULL_GROUP_BY.
For example:
Then, restart MySQL (or reboot):
Bitnami install in Windows:
Bitnami install in Linux:
Manual install in Debian/Ubuntu:
service mysql restart
Manual install in Red Hat/CentOS:
service mysqld restart
Now, the query error should not appear when going to Home > Participated in ProcessMaker.
Changing the Database Location, MySQL User or Password
It is necessary to update the encrypted information in the paths_installed.php file after:
- changing the location of the ProcessMaker databases,
- changing the MySQL user with superglobal privileges to create databases for new workspaces (which is usually the "root" user), or
- changing the password of that MySQL user.
First make the changes in MySQL, then update the information in ProcessMaker. See: Changing the MySQL.
The <install_directory>/shared directory holds all the files used by workspaces, including the files uploaded to cases and Output Document files generated by cases. To move the shared directory to a new location, edit the file <install_directory>/workflow/engine/config/paths_installed.php with a plain text editor. Change the paths of the PATH_DATA and PATH_C constants to their new locations.
For example, if the /opt/processmaker/shared file has been moved to a network attached storage (NAS) which is mounted at /mnt/pm/shared and the db.php file contains the following:
define('PATH_DATA', '/opt/processmaker/shared/');
define('PATH_C', '/opt/processmaker/shared/compiled/');
define('HASH_INSTALLATION', '0aSaw6LMn6vYbJzGaMhkaJSal8ZqyGlpZ8RnkmzIap2clmySashlnMmp1NOmmWuSZsdimpybmp1pxWlgZMdnxp2ZbJttxWVomJuayJfalaSflGSVbA');
define('SYSTEM_HASH', '57b6d08d7ed2d400c2b8d597a504d5de');
Make sure to not change the HASH_INSTALLATION and SYSTEM_HASH. Then, save the changes in the db.php file and the new location can be used.
Checking the ProcessMaker Requirements
Inside the Admin tab, an option to check whether ProcessMaker's requirements are met was added in version 3.0 and later. This option checks whether all the requirements are correctly installed and lists which versions are installed.
Log in to ProcessMaker as a user with the PROCESSMAKER_ADMIN role. Then go to ADMIN > Settings > Check PM Requirements:
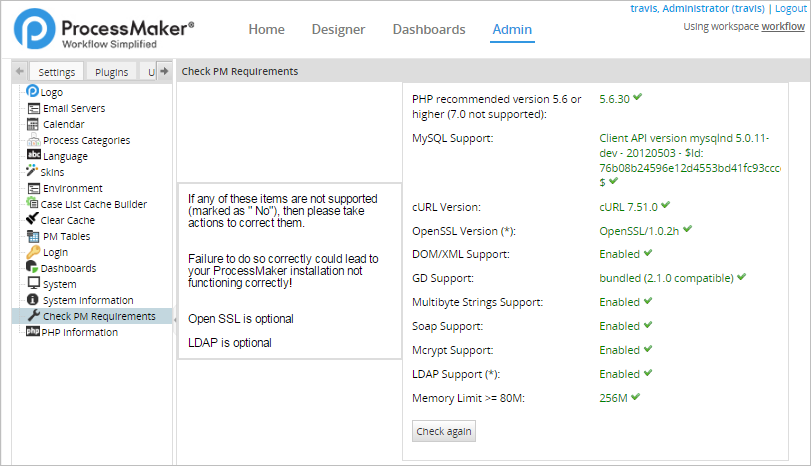
After installing any missing requirements, click on the Check again button to verify whether everything is properly installed.


