- Overview
- How the feature works
- Requirements
- Licensing
- Implementing Windows Single Sign-On with Apache in ProcessMaker
- Installing and configuring mod_auth_sspi module in Apache 2.2
- Installing and configuring mod_auth_sspi module in Apache 2.4
- Register the User's Computer to the Active Directory Domain
- Configuring browsers to use Windows Single Sign-On
- Access to ProcessMaker with Windows Single Sign-On
Overview
Windows Single Sign On is a feature of the Enterprise edition of ProcessMaker. This feature brings the ability to use Active Directory accounts like normal ProcessMaker accounts. This means that users will be able to automatically login to ProcessMaker, skipping the login screen, using their Active Directory accounts.
For ProcessMaker installations in Linux environments, please go to the following guide: Windows Single Sign-on in Linux.
For ProcessMaker installations in Windows environments, please follow the instructions below:
How the feature works
The Windows Single Sign On feature works using the Microsoft Active Directory user credentials in order to give users the ability to directly login to ProcessMaker. Take into account that ProcessMaker does not save the user's password, it just verifies the credentials with which the user is logged in Windows via a trusted connection with the Active Directory Server. In addition, synchronization of the Active Directory account list with the ProcessMaker account list will happen automatically. New accounts created in the Active Directory will be also created in ProcessMaker.
For employees/accounts that no longer work at the company anymore, but their accounts are still maintained in the Active Directory, move them to "Terminated" OU and ProcessMaker will consider them disabled accounts.
Requirements
The following requirements are needed in order to work with this feature.
- Access to ProcessMaker Enterprise Edition 3.0.1 or higher.
- ProcessMaker ldapAdvance feature.
- Take into consideration that the Apache modules from the Ldap Advanced feature must be enabled for the Windows Single Sing On Plugin to work properly. Please verify that the following modules are uncommented in the
httpd.conffile of the Apache installation:
LoadModule authnz_ldap_module modules/mod_authnz_ldap.so
LoadModule ldap_module modules/mod_ldap.so - Access to Active Directory Server
- An Active Directory server running.
- Credentials for a valid account in the Active Directory server, with administrator permissions
- DNS Domain entries, in case your network requires them.
- It is recommended that the user configuring the feature has access to the Active Directory server in order to verify the registry imported to ProcessMaker.
Licensing
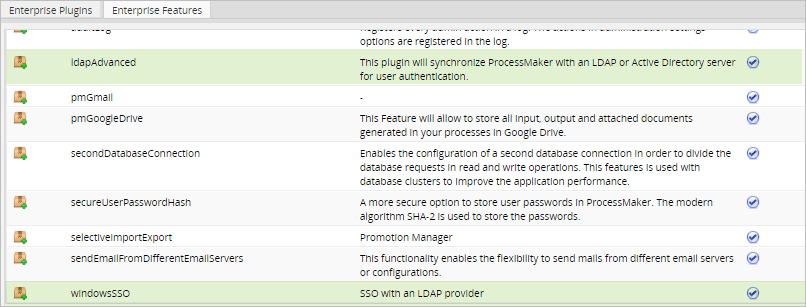
To make sure that the license installed in ProcessMaker includes the windowsSSO and the ldapAdvanced features go to Admin > Plugins > Enterprise Manager then select the Enterprise Features tab.
Installation and Configuration
ProcessMaker uses the RBAC plugin for the authentication design. This design allows users to define their own ways to verify the users' authentication. This feature is an example of how the RBAC extension allows users to be authenticated with Active Directory. For this, a connection called Authentication Source needs to be defined.
Active Directory Authentication
An Authentication Source is basically the server and the port of an Active Directory server. ProcessMaker creates a record for the user in the database with a flag which indicates that the user should be authenticated in Active Directory.
The following are the steps to import Active Directory users, groups and/or departments using the Advanced LDAP feature. Each section are the steps and considerations to be taken into account to import said users. Please click on them to access to the documentation of this feature and follow the steps.
Implementing Windows Single Sign-On with Apache in ProcessMaker
Next sections detail the configuration needed to work with the feature Windows Single Sign On when ProcessMaker is installed in Apache
- Installing and configuring mod_auth_sspi module in Apache 2.2
- Installing and configuring mod_auth_sspi module in Apache 2.4
Installing and configuring mod_auth_sspi module in Apache 2.2
This module will allow implementing Windows Single Sign-On in Apache 2.2. The steps of the installation are the following:
- Download the mod_auth_sspi module from http://sourceforge.net/projects/mod-auth-sspi/.
Once downloaded, unzip the file and go to:
mod_auth_sspi-x.x.> bin. Copy the mod_auth_sspi.so module inside the "modules" folder of Apache
Note: Take into account that event if the system type is 64 bits, if Apache is installed with the 32 bit system type, the module must also be the same as Apache (32-bit system type).
- Enable the module inside the
httpd.conffile of Apache adding the line:LoadModule sspi_auth_module modules/mod_auth_sspi.so -
Edit the
pmos.conffile of ProcessMaker, adding the following lines of code inside the<Directory>.....</Directory>sectionAuthName "ProcessMaker SSO" AuthType SSPI SSPIAuth On SSPIOfferBasic Off SSPIAuthoritative On SSPIDomain "projects.processmaker.com" SSPIOmitDomain On require valid-user Where:
- AuthName: Name of the authentication.
- AuthType SSPI: Type of the authentication.
- SSPIAuth: Set this option to On to enable the SSPI authentication.
- SSPIOfferBasic: Set this option to Off to disable the SSPI.
- SSPIAuthoritative: Set this option to On.
- SSPIDomain: Enter the domain name where the authentication was implemented .
- SSPIOmitDomain: Set this option to On to omit the domain.
- Require: Set this option to valid_user so only valid users are required.
- Once the installation of the module was finished, restart the Apache server in order to apply changes.
Installing and configuring mod_auth_sspi module in Apache 2.4
| Note: If working with ProcessMaker 3.0.1.8 or later, please apply this configuration. |
The following are the steps to configure the mod_auth_sspi module in Apache 2.4
- Download the
mod_auth_sspimodule here based on your Apache version. Download the x86 version for Apache 32 bit and the x64 version for Apache 64 bit. - Copy the
mod_authnz_sspi.sofrom the "Apache24/modules" folder and place it in the modules folder of the Apache folder in the server where ProcessMaker is installed. - Add the following line to enable the module inside the
httpd.conffile of Apache:LoadModule authnz_sspi_module modules/mod_authnz_sspi.so - Make sure that the following modules are uncommented since both are required for the module to work correctly.
LoadModule authn_core_module modules/mod_authn_core.so
LoadModule authz_core_module modules/mod_authz_core.so Open the
pmos.conffile that was configured when ProcessMaker was installed and add the lines in bold in your Single Sign-On virtual host configuration after the ProcessMaker configuration, as shown below:------------------------- #ProcessMaker Single Sign-On Listen *:portNumber <VirtualHost *:portNumber > ServerName "your_processmaker_domain" DocumentRoot <INSTALLATION-DIRECTORY>/opt/processmaker/workflow/public_html DirectoryIndex index.html index.php <Directory <INSTALLATION-DIRECTORY>/opt/processmaker/workflow/public_html> Options Indexes FollowSymLinks MultiViews AllowOverride All Order allow,deny allow from all Require all granted AuthName "ProcessMaker SSO" AuthType SSPI SSPIAuth On SSPIAuthoritative On SSPIOfferBasic On SSPIOmitDomain On Require valid-user ExpiresActive On <IfModule mod_rewrite.c> RewriteEngine On RewriteCond %{REQUEST_FILENAME} !-f RewriteRule ^.*/(.*)$ app.php [QSA,L,NC] </IfModule> </Directory> </VirtualHost> ------------------------- For example:
#ProcessMaker Single Sign-On Listen 4017 <VirtualHost *:8080> ServerName "127.0.0.1:8080" DocumentRoot c:/opt/processmaker/workflow/public_html DirectoryIndex index.html index.php <Directory c:/opt/processmaker/workflow/public_html> Options Indexes FollowSymLinks MultiViews AllowOverride All Order allow,deny allow from all #Require all granted AuthName "ProcessMaker SSO" AuthType SSPI SSPIAuth On SSPIAuthoritative On SSPIOfferBasic On SSPIOmitDomain On Require valid-user ExpiresActive On <IfModule mod_rewrite.c> RewriteEngine On RewriteCond %{REQUEST_FILENAME} !-f RewriteRule ^.*/(.*)$ app.php [QSA,L,NC] </IfModule> </Directory> </VirtualHost>
Restart the Apache server in order to apply changes.
- Apache 2.4 (downloaded from the official page)
- PHP 5.4 (downloaded from the official page)
- ProcessMaker 3.0.1.7 (available in SourceForge)
Register the User's Computer to the Active Directory Domain
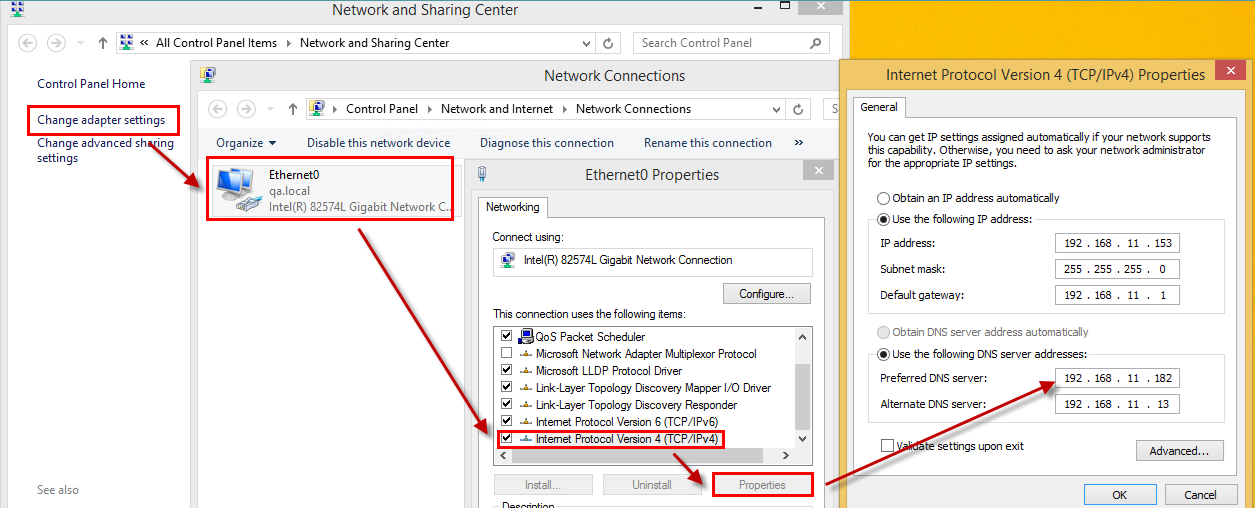
To have this feature working correctly, it is necessary to configure the Internet Protocol Version 4 of the user's computers so, they login to Windows (and ProcessMaker) using their Active Directory credentials. For this, set the preferred DNS address with the same as the Active Directory server.
Then, make sure that the domain of the computer is the same domain as the Active Directory.
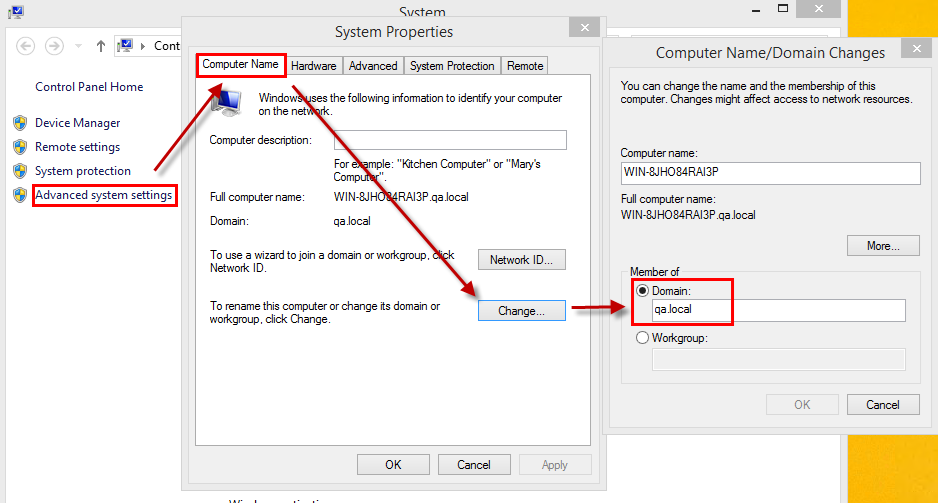
After setting the domain, the login credentials of the Active Directory server must be entered in the window that is shown. After setting the credentials, the computer must be restarted.
Note: In case the server domain and DNS is not registered in the Windows client machine that will be connected to the Windows Single Sign-On, add a new entry into the Hosts file which is located at: C:/Windows/System32/drivers/etc
Configuring browsers to use Windows Single Sign-On
To enable the Windows Single Sign On functionalities in ProcessMaker, configure the browsers where ProcessMaker will be used. Below you will find the configuration for each one of the browsers.
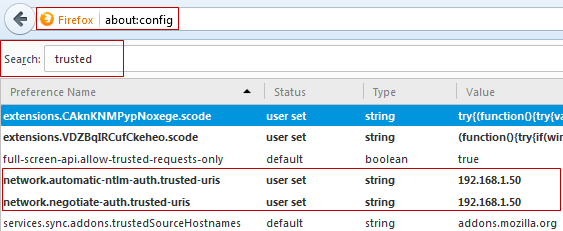
Mozilla Firefox
Go to the browser URL field and write "about: config", then look for the word "trusted". In the results network.automatic-ntlm-auth.trusted-uris and network.negotiate-auth.trusted-uris add the address or domain name of the server where ProcessMaker is installed.
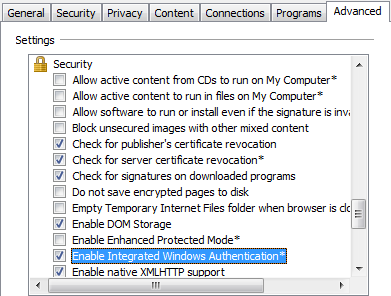
Internet Explorer
Go to "Tools > Internet Options > Advanced" and check if the Enable Integrated Windows Authentication option is enabled.
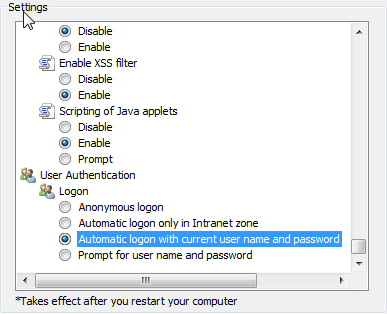
Then, go to "Tools > Internet Options > Security > Custom level" and check if the Automatic logon with current username and password for both Internet and Local Intranet is enabled.
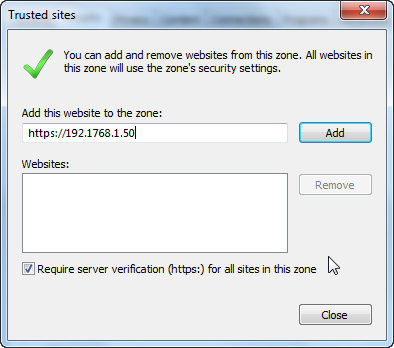
Finally, go to "Tools > Internet Options > Security > Trusted sites > Sites" and add the names of the places where ProcessMaker is installed.
Google Chrome
Google Chrome can use the same configuration Internet Explorer uses. For more information check the IE TAB for Google Chrome extension in this documentation, this allows Google Chrome to have the same options Internet Explorer has.
Access to ProcessMaker with Windows Single Sign-On
Don’t forget that any user who wants to login to ProcessMaker must belong to a domain.
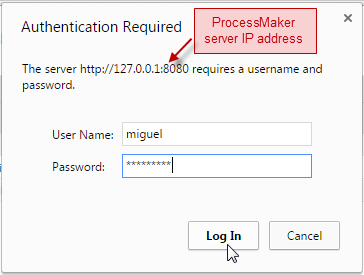
The user logins to the computer using his Active Directory credentials, then opens a browser and introduces ProcessMaker URL:
- The ProcessMaker IP address and the respective port number where the plugin was implemented. In the example configuration: http://127.0.0.1:8080
- Click enter and the URL will autocomplete.
- Then, introduce the workspace name. That workspace must be the one where the plugin was installed.
After that, the user will go into ProcessMaker skipping the login page, so he will enter into ProcessMaker without introducing his ProcessMaker credentials, at the same time the user will be registered inside ProcessMaker.