Overview
Email response is a new type of Action by Email. This option is different than other response types: the email recipient submits the response via email to a specific email address. Email responses from that specified email address are processed periodically for responses through cron.php.
There are two benefits of using this method.
- The email content is saved in a case variable; this allows users to add additional information to support their decision.
- An action can be taken even while offline from a mobile device, which is received by ProcessMaker after the device connectivity is restored.
Requirements
Email Response has the following requirements:
- It is absolutely necessary to have the PHP Module IMAP enabled in the server instance. Therefore, Email Response reviews the content of the email that holds the response.
- It is recommended to have an email account dedicated to receive messages for all messages and actions taken by this method.
Restrictions
Consider the following restrictions before using Email Response:
- Only the body text is transferred to the variable. ProcessMaker ignores attachments.
- The IMAP configuration for the outgoing server is validated at the time the listener account is set up. This is an improvement that is considered for future versions.
Configuration
To correctly run Email Response, please consider the following configurations:
SMTP-IMAP Email Setting
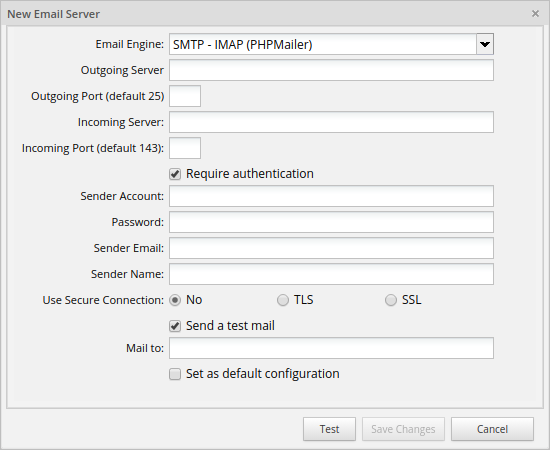
Email settings include a new email engine. This new engine adds two fields to set up the incoming email server and port.
Follow these steps to configure SMTP - IMAP engine:
-
Log in to ProcessMaker as an administrator or a user with the PM_SETUP_EMAIL permission in their role.
-
Go to ADMIN > Settings > Email Servers.
-
The Email Servers screen displays. In the top bar, click the New button. The New Email Server screen displays.
-
In the Email Engine field, select SMTP - IMAP (PHPMailer). The SMTP-IMAP options display below the Email Engine field.

-
In the Outgoing Server field, enter the IP address or domain name for the email server that will send to the notifications. For example, "smtp.gmail.com" or "smtp.example.com".
-
In the Outgoing Port (default 25) field, enter the SMTP port number used by the email server. Generally, it is port 25, or alternatively port 587. If the connection to the email server use SSL or TLS, generally port 465 is used. If this field is empty, the default port to use is 25.
-
In the Incoming Server field, enter the IP address or domain name of the email server that will be used to read the notifications. The incoming server is used to connect with the IMAP protocol to read the emails that are received in the account. This field is required. For example, "imap.gmail.com".
-
In the Incoming Port (default 143), enter the IMAP port number used by the incoming server, the default is 143. However, since most email servers connect through SSL, it is recommended to use 993.
-
In the Require authentication checkbox, check this option to enable authentication. After checking this option, the Password field displays.
-
In the Sender Account field, enter the name of the user account from where emails are to be sent from. Some email servers, such as Gmail, require that the account name include the full email address, such as: “johndoe@gmail.com”.
-
In the Password field, enter the password for the user account.
-
In the Sender Email field, enter the email account from where the email notifications are to be sent from.
-
In the Sender Name field, set the name of the email address from where emails are to be sent from, such as "My Company Admin". If left blank, then emails will be sent from "ProcessMaker" by default. When the flow of a process reaches an intermediate email event and the Sender Name is blank, the Sender Name in the email displays the value of the Sender Account field by default.
-
In the Use Secure Connection field, select whether the email requires a secure connection:
- No: No secure connection to the email server required.
- TLS: Use a Transport Layer Security to connect to the email server.
- SSL: Use a Secure Sockets Layer to connect to the email server.
-
In the Send a test mail checkbox, check this option to send a test mail. After checking this option, the Mail to field displays.
-
In the Mail to field, enter the email account to where the test mail will be sent from.
-
In the Set as default configuration checkbox, check this option to set this email configuration as default from now on.
-
Click Test.
-
Click Save Changes.
Note: It is strongly recommended to establish secure connections with email servers using SSL or TLS security certificates by enabling one of the two previous options.
Email Response Configuration
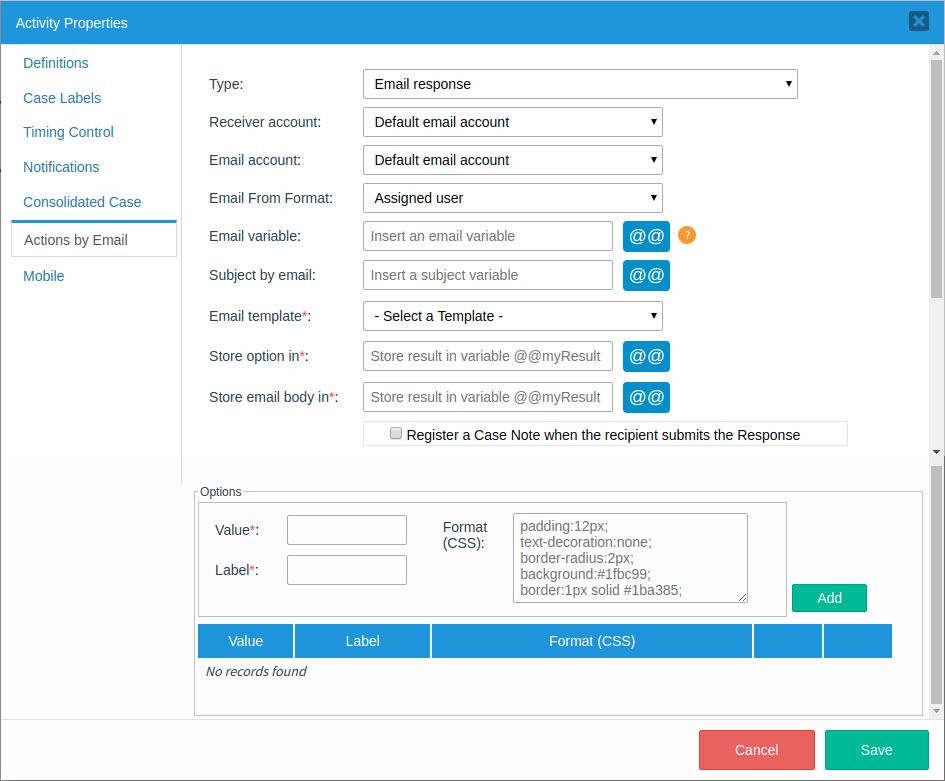
The Actions by Email adds a new type Email response. Follow these steps to configure email response:
-
Log in to ProcessMaker as an administrator or a user with the PM_FACTORY permission in their role.
-
Go to Designer tab.
-
Open a process.
-
The process map displays. Right click a task.
-
The task context menu displays. Click Properties. The Activity Properties screen displays.

-
In the Type field, select “Email response”.
-
In the Receiver account field, select the email account that will receive the response emails. The options in this field depend on the email accounts type SMTP - IMAP configured in the SMTP - IMAP Email Setting section.
-
In the Email account field, select the email account that sends the email. The options in this field depend on the email accounts configured in the SMTP - IMAP Email Configuration section.
-
In the Email From Format field, select one of the following options:
- The email is sent using the name of the user who completed the previous task.
- The email is sent using the From Mail and From Name values defined in the email server configuration that was selected in the Email Account field.
-
In the Email variable field, either enter the email address of the person who will receive the email or select a variable that holds the recipient's email address. If this field is left blank, the next assigned user's email will be used by default.
-
In the Subject by email field, enter the text of the email's subject line. This text can include a custom variable whose content will be inserted into the subject line. This variable can come from a previous Dynaform field or be created in a trigger.
-
In the Email template field, select the template file used as the content of the email. Actions By Email includes a default template file named actionsByEmail.html that can be used for testing purposes. This field is required.
-
In the Store option in field, select the case variable where the value of the option selected by the user will be stored. This field is required.
-
In the Store email body in field, select the case variable where the body of the email will be stored. This field is required.
-
In the Register a Case Note when the recipient submits the Response checkbox, check this option to add a case note when an email response will be processed successfully.
-
In the Options group, add the options that will be sent to the users in the email. Each option added must have a value, which will be stored in the previous selected variable after users select one option and send the response. Each option must also have a label that will be shown to the user and can be customized with CSS code so it is easier for users to identify each option in the email.
Cron Configuration
ProcessMaker will periodically read the Action by Email receiver account inbox looking for new messages. To do this, it is required to configure a Cron task that executes the script actionsByEmailEmailResponse.
The location of the script depends on the ProcessMaker installation path. If ProcessMaker was installed in the /opt/ directory in Linux, then execute:
- Configure
/10 * * *according to the Crontab options. - Replace
web-server-userwithapacheornginx.
For more information about the Cron options and how to configure the Crontab options, see Syntax of Cron Options and Configuring Crontab in Linux/UNIX.
How Email Response Works
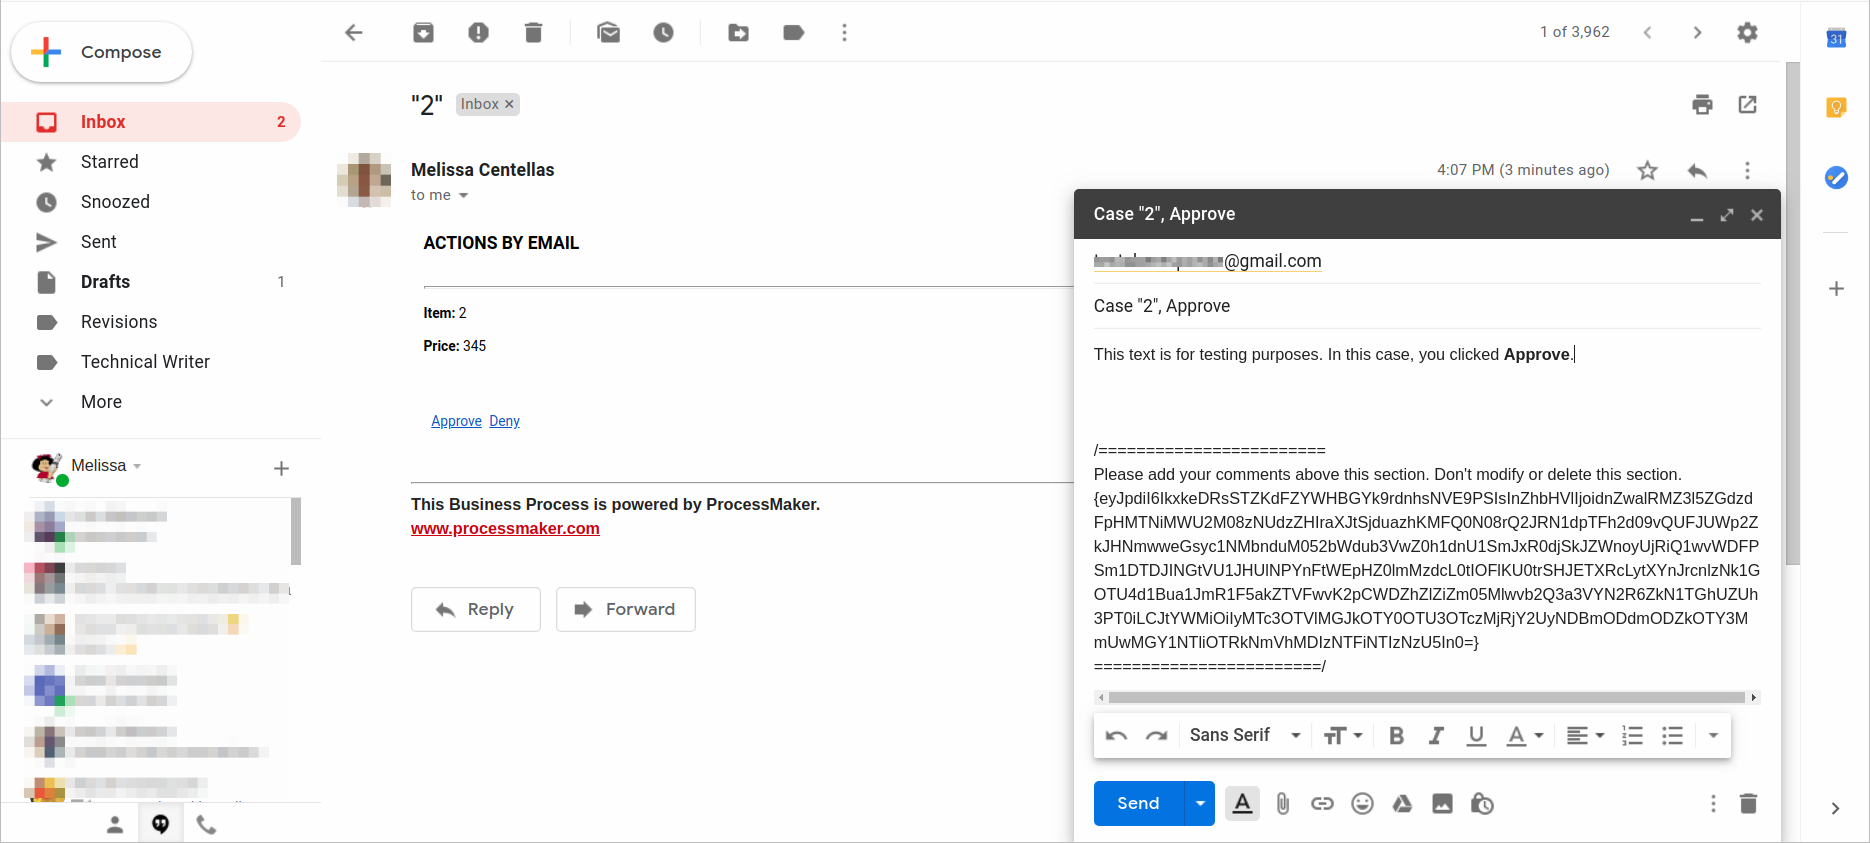
The end user receives an email with the options provided in Email response configuration. Each option will trigger a new message email containing the following:
- Receiver: In the example below, the receiver's name is "Actions by Email Listener," which is the email account selected in the "Receiver account" drop-down defined in the task's configuration. This receiver email should not be changed by the end user because ProcessMaker will read the Inbox of that account looking for unread emails to process the user's decisions.
- Subject:It is composed by two elements:
- Case title: The case title defined in the task the email was triggered.
- Option selected: The label of the option selected by the end user.
- Body: The body must be populated with the elements below:
- User's response: By default this area is populated with 3 empty lines. However, the user might populate this section with a text. This text will be read by ProcessMaker to be stored in the variable set in "Store email body in."
- Top separator: A "/" character and 25 "=" characters.
- Instructions: A text that reads "Please add your comments above this section. Don't modify or delete this section."
- Code: An encrypted value enclosed in brackets that identifies the case and action that was taken.
- Bottom separator: 25 "=" characters and one "/" character.

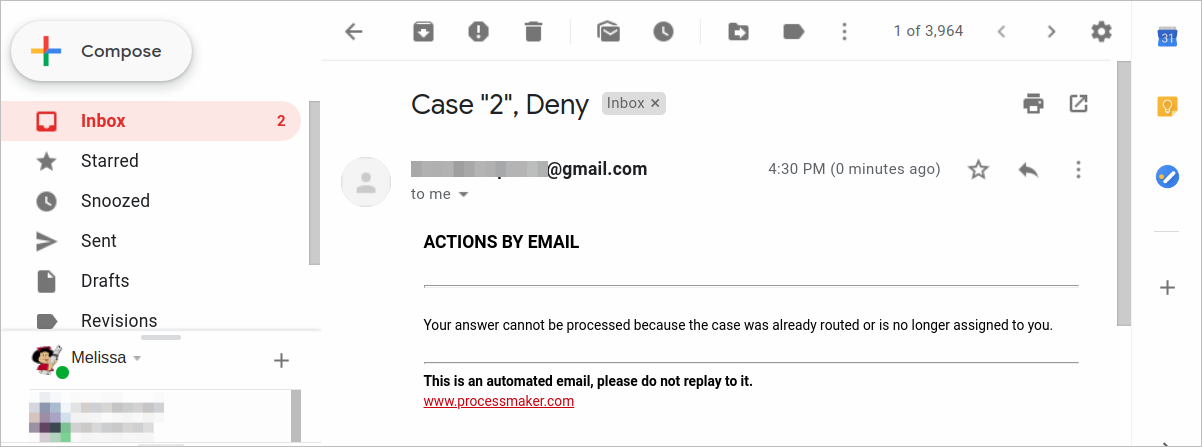
Otherwise, if you try to send again a response and you previously sent a response, the following email displays:

Email Response Exceptions
ProcessMaker may fail to process the answer. In this case, it communicates to the user that the action was not successful. This feedback is delivered to the receiver account as another email as a response. The most common causes of this problem are:
- The code identifier is malformed or cannot be found.
- The case was already routed.


