Follow these instructions to manually install ProcessMaker 2.0 - 2.5.2 in Windows. See these instructions to install ProcessMaker 2.8 or later. Before installing, check the installation requirements. After installation, see Additional Server Configuration.
Install Apache Server
1. First, download the Apache Installer for 32 bits or 64 bits and the Visual C++ 10 Redistributable Package for 32 bits and for 64 bits, which is necessary to execute the Apache binaries.
Install Apache in any location, such as: C:\server
2. Edit Apache's httpd.conf file configuration:
- Verify that all your paths are pointing to the right path of the Apache server. For example:
- Verify if the below modules are enabled (just uncomment the line).
LoadModule deflate_module modules/mod_deflate.dll
LoadModule expires_module modules/mod_expires.dll
LoadModule ldap_module modules/mod_ldap.dll
LoadModule rewrite_module modules/mod_rewrite.dll
LoadModule ssl_module modules/mod_ssl.dll
LoadModule vhost_alias_module modules/mod_vhost_alias.dll
LoadModule filter_module modules/mod_filter.dll # Necessary if using Apache 2.4
3. Add the following lines at the end of the httpd.conf file. This will include the php module, which will be mentioned inside the PHP installation section.
AddType application/x-httpd-php .php
# configure the path to php.ini
PHPIniDir "C:\server\php-5.3x86"
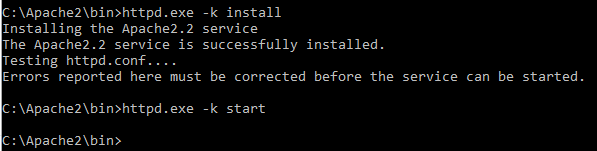
4. Finally, install the Apache Service Monitor by downloading the Visual C++ Redistributable for Visual Studio 2012 from page. Install it and as a final step execute the following command to verify if there are any errors on some configuration files and start the service.
C:\Apache2\bin\httpd.exe -k start
In order to stop the service type the following command:
C:\Apache2\bin\httpd.exe -k stop.
Install PHP
1. Download the PHP hypertext preprocessor for windows. (Use the Thread Safe version, because it is used to configure the Apache server).
2. Decompress the file in any place, such as: c:\php
3. Rename the file php.ini-production to php.ini and edit it using the following configurations:
memory_limit = 512M
error_reporting = E_ALL & ~E_DEPRECATED & ~E_STRICT
display_errors = Off
post_max_size = 24M
extension_dir = "C:\php\ext"
upload_max_filesize = 24M
4. Make sure that the following extensions are uncommented:
extension=php_gd2.dll
extension=php_ldap.dll
extension=php_mbstring.dll
extension=php_mysql.dll
extension=php_mysqli.dll
extension=php_openssl.dll
extension=php_pdo_mysql.dll
extension=php_soap.dll
5. Verify that the paths to the PHP directory are correct in Apache's httpd.conf file. (See Step 3 of Install Apache Server.)
6. Copy the following files to your c:\windows\system32\ and C:\windows\SysWOW64 folders:
- libsasl.dll
- ssleay32.dll
- libeay32.dll
Install MySQL server
1. Download the installer from the MySQL website (Note that ProcessMaker ONLY supports until MySQL v. 5.5, latest versions have not been tested by the QA team yet.). After clicking the next page will ask for your registration but this can be bypassed by clicking on » No thanks, just take me to the downloads! button below the register or login section. Then, choose the closest mirror to download MySQL. After the installer has downloaded, double click on the installer to begin the installation.
2. In the feature selection screen, change the architecture to “Any” and not “32-bit” or “64-bit” to encompass all installation methods. Select all the options in order to install all documentation, connectors and a MySQL server. A 64-bit or 32-bit version of the MySQL server may be installed, but not both. After clicking on MySQL Servers and choosing which you would like we can proceed. After this is done we can click next to progress to the next part of the installation. The next screen will check the requirements needed for MySQL to install on your computer and notify you which products are already installed and which will be installed with the MySQL install. We can proceed to press the Execute button to begin the install of the required programs before MySQL is installed. After all requirements are met the next button will appear.
Next we will be shown the list of items to be installed and at the bottom will be the Execute button to proceed to the install. Make sure everything is in order before proceeding to the next step. After everything is installed we can press next button and be shown the Configuration screen where it will prompt us to configure any installed servers. When we press the next button it will prompt us to choose one of three configuration styles. The three styles are Developer Machine, Server Machine, and Dedicated Machine and out of the three we will want to choose the Development Machine. After we press next we will be prompted to set up the TCP/IP, create a Windows Service and create a password for the Root account of MySQL Sever. After pressing the next button it will apply these changes and allow you to press the next button to the final screen.
Install ProcessMaker
The following steps are to install and configure ProcessMaker on your server:
- Download ProcessMaker Code
- Configure Apache
- Edit the pmos.conf file
- Restart Apache Service
- ProcessMaker Setup
Download ProcessMaker Code
Go to http://sourceforge.net/projects/processmaker/files/ProcessMaker and download the tarball file for a recent version of ProcessMaker. Use a program such as WinRAR or 7-Zip to decompress the processmaker-2_X_X.tar.gz file which was downloaded. Then, move the extracted processmaker folder to a location which isn't restricted by Windows security, such as: c:\opt\processmaker
- Make the following directories writable. Right click on the following directories and choose the option Properties from the dropdown menu. In the "Properties" window, uncheck the option Read only:
\processmaker\shared \processmaker\compiled \processmaker\workflow\engine\config\ \processmaker\workflow\engine\content\languages\ \processmaker\workflow\engine\js\labels\ \processmaker\workflow\engine\plugins\ \processmaker\workflow\engine\xmlform\ \processmaker\workflow\engine\plugins\
- From version 2.0.40 on, make the following directory writable:
\processmaker\workflow\public_html\
- From version 2.5.0 on, make the following directories writable:
/processmaker/workflow/public_html /processmaker/gulliver/thirdparty/html2ps_pdf/cache
Configure Apache
Use a plain text editor (such as Notepad or Notepad++) to edit the Apache configuration file, httpd.conf, which can be found at a location such as:
- C:\Server\Apache24\conf\httpd.conf
Add the following line to include the pmos.conf file, which defines the ProcessMaker VirtualHost:
Note: If planning on running ProcessMaker on a nonstandard port (which is not the default port 80), then also add the following line:
For example, if using port 8080:
Edit the pmos.conf file
Manually create the conf\extra\pmos.conf file with a plain text editor (such as Notepad or Notepad++), which will be placed in a location such as:
- C:\Server\Apache24\conf\extra\pmos.conf
In the pmos.conf file, add the following lines to define the ProcessMaker virtual host:
# the ServerName with you own subdomains.
NameVirtualHost your_ip_address
#processmaker virtual host
<VirtualHost your_ip_address >
ServerName "your_processmaker_domain"
DocumentRoot C:\opt\processmaker\workflow\public_html
DirectoryIndex index.html index.php
<Directory "C:\opt\processmaker\workflow\public_html">
AddDefaultCharset UTF-8
AllowOverRide none
Options FollowSymlinks
Order allow,deny
Allow from all
RewriteEngine on
RewriteRule ^.*/(.*)$ sysGeneric.php [NC,L]
ExpiresActive On
ExpiresDefault "access plus 1 day"
ExpiresByType image/gif "access plus 1 day"
ExpiresByType image/png "access plus 1 day"
ExpiresByType image/jpg "access plus 1 day"
ExpiresByType text/css "access plus 1 day"
ExpiresByType text/javascript "access plus 1 day"
AddOutputFilterByType DEFLATE text/html
</Directory>
</VirtualHost>
Note: If using Apache 2.4, then change the following line from:
Allow from all
To:
Replace your_ip_address with the IP number or domain name of the server running ProcessMaker. If only planning on running and accessing ProcessMaker on your local machine, then use the IP address "127.0.0.1". If using ProcessMaker on a machine whose IP address might change (such as a machine whose IP address is assigned with DHCP), then use "*", which represents any IP address. If not using the standard port 80, then it is necessary to also specify the port number.
If your DNS or hosts has a defined domain for ProcessMaker, then use that domain for your_processmaker_domain. Otherwise, use the same IP address for your_processmaker_domain as was used for your_ip_address.
For example, if running ProcessMaker on a Windows XP server at address 192.168.1.100 on port 8080 with a domain at processmaker.mycompany.com:
#processmaker virtual host
<VirtualHost 192.168.1.100:8080 >
ServerName "processmaker.mycompany.com"
DocumentRoot C:\Program Files\processmaker\workflow\public_html
DirectoryIndex index.html index.php
<Directory "C:\Program Files\processmaker\workflow\public_html">
...
For example, if running ProcessMaker, which is installed at C:\opt\processmaker on a server at address server1.example.com with a domain at pm.example.com:
#processmaker virtual host
<VirtualHost server1.example.com >
ServerName "pm.example.com"
DocumentRoot c:\opt\processmaker\workflow\public_html
DirectoryIndex index.html index.php
<Directory "c:\opt\processmaker\workflow\public_html">
...
For example, if ProcessMaker is installed in the c:\Users\fred\processmaerk directory on your local machine at port 8080 with an dynamic IP assigned by DHCP:
#processmaker virtual host
<VirtualHost *:8080 >
ServerName "*"
DocumentRoot C:\Users\fred\processmaker\workflow\public_html
DirectoryIndex index.html index.php
<Directory "C:\Users\fred\processmaker\workflow\public_html">
...
Note: It is also possible to define the virtual host for ProcessMaker directly in the Apache configuration by inserting the above VirtualHost definition in the Apache configuration file, which is generally named httpd.conf.
Restart Apache Service
After changing the Apache configuration and editing the pmos.conf file, go to Start > All Programs > Administrative Tools > Services to open the Services Monitor. Select the "Apache2" service and click on its Restart option.
The Apache Service can also be restarted from the command line. Open a DOS terminal and navigate to the Apache directory. For example:
Then, enter the following command to restart Apache:
ProcessMaker Setup
After editing the configuration files, then open a web browser and enter the IP address or domain name (and port number if not using the default port 80) where ProcessMaker is installed.
For example, if using ProcessMaker installed the local machine on port 3000, go to: http://127.0.0.1:3000
Then in the web browser, use the installation wizard to complete the installation.

