Overview
The ProcessMaker is rapidly evolving with frequent new versions being released. In order to take advantage of recent bug fixes and the new features being offered, ProcessMaker 2.0 can be upgraded by overwriting the existing code and updating the database to a more recent version. If upgrading from version 1.X to 2.0, see these instructions. If migrating from a Windows to a Linux system, see these instructions.
It is important to follow the correct upgrading procedure so that the PHP source code, the file locations, and the MySQL databases holding ProcessMaker data will all be simultaneously updated to work together. The structure of the databases and the file locations may be changed from one version of ProcessMaker to the next, so do NOT try to use data from one version of ProcessMaker in a different version of ProcessMaker.
Note: When upgrading ProcessMaker, it is recommended to Clear Cache or press Crtl F5 to refresh your web browser in ProcessMaker 2.0.40 and later; or Delete ProcessMaker's Compiled Cache in ProcessMaker 2.0.39 and earlier.
Safety Precautions before Upgrading
If using ProcessMaker in production, before upgrading ProcessMaker, it is recommended to first install the new version of ProcessMaker on a separate test server (or in a separate port or domain in the same server) and import your processes into the test server to verify that there are no incompatibilities.
Before upgrading ALWAYS make a complete backup copy of directory where ProcessMaker is installed and use mysqldump to make a complete backup of the 3 databases used by each workspace. If an error arises, it will be possible to go back to the previous version of ProcessMaker and restore its data.
Note: It is not very easy to restore a previous version of ProcessMaker with just a backup created with the gulliver workspace-backup command, so it is recommended to make full ProcessMaker backups using the method below.
Linux/UNIX:
To make a backup copy of the entire MySQL database:
To back up just the databases for a ProcessMaker workspace, such as the "workflow" workspace:
TIP: If unsure what the MySQL databases are named, login to MySQL and issue the command:
SHOW DATABASES;
Windows:
Use a compression program like 7-Zip or WinRar to make a backup copy of the ProcessMaker installation directory, which is usually located at c:\Program Files\ProcessMaker\processmaker (if installed version 1.6-4260 and later) or c:\Program Files\ProcessMaker\apps\processmaker (if installed a version before 1.6-4260).
Open a command prompt window (by going to Start > All Programs > Accessories > Command Prompt) and navigate to the directory where the mysqldump command is located:
Then, enter use the mysqldump to backup the MySQL databases as shown above for Linux/UNIX. Note that if ProcessMaker was installed before version 1.6.4260, then the reportsdatabase is named rpWORKSPACE (without underscore), so the command to backup the "workflow" workspace would be:
Restoring ProcessMaker If Problems Arise
If problems arise due to the upgrade, use the backup files to rollback to the previous version of ProcessMaker.
Linux/UNIX:
Login as "root" or the user with administrative powers and remove the ProcessMaker installation directory and replace it with the backup:
Then, restore the databases:
Windows:
Delete the current ProcessMaker installation directory, which by default is located at c:\Program Files\ProcessMaker-2_X_X in Windows XP/2003 or c:\Users\USERNAME\AppData\Roaming\ProcessMaker-2_X_X in Windows Vista/7/2008.
If MySQL is installed under the ProcessMaker installation directory, then your old database files should be restored and there is nothing more to do. However, if MySQL was installed separately, then you need to restore the databases used by ProcessMaker. Open a command prompt window (by going to Start > All Programs > Accessories > Command Prompt) and navigate to the directory where the mysql command is located:
Then, restore the MySQL databases:
Upgrading ProcessMaker 2.0
In ProcessMaker 2.0, the upgrade procedure overwrites all existing source code, which is why ProcessMaker can't be upgraded from the graphical interface. Note that any custom changes made to the source code will be overwritten with each upgrade. After upgrading, use the processmaker upgrade script to update the database and file locations for the new version.
Upgrading the source code
After making a backup of the existing ProcessMaker installation, follow the steps below to install the new ProcessMaker source code, overwriting the old source code.
1. Go to http://sourceforge.net/projects/processmaker/files/ProcessMaker and download a processmaker-2.X.X.tar.gz file, which has a new version of the ProcessMaker source code.
2. Decompress the processmaker-2.X.X.tar.gz file, overwriting the existing processmaker directory and all its contents, which is generally found at /opt/processmaker in Linux/UNIX, atC:\Program Files\ProcessMaker-2_X_X\processmaker in Windows XP/2003, and at C:\Users\USERNAME\AppData\Roaming\ProcessMaker-2_X_X\processmaker in Windows Vista/7/2008.
Warning: Do NOT delete the old processmaker directory and then copy the new processmaker directory into the same place, because all the essential configuration information and all the uploaded input documents and attached files from the old installation will be lost. Instead, decompress the file so it will overwrite any existing files but won't effect any other files (such as the contents of the shared and workflow/engine/config directories and the workflow/engine/test/bootstrap/gulliverConstants.php file).
Linux/UNIX:
1. Login as the "root" user (or use the sudo command). Then, use the tar command to overwrite the existing installation of processmaker. Use the --overwrite option to replace the existing files and the -p option to preserve the permissions of existing files. Use the -C option to specify the parent directory where processmaker is located.
For example, to upgrade an installation of ProcessMaker located at /opt/processmaker with the file /root/processmaker-2.0.38.tar.gz:
Note: If the processmaker directory isn't named "processmaker", then temporarily rename it as "processmaker" so it will be correctly overwritten when the tar.gz file is decompressed. Then rename it back to its original name.
For example, if ProcessMaker is installed at /usr/local/bin/pm, then rename it to /usr/local/bin/processmaker before overwriting the code files:
2. Then, issue the following commands so that ProcessMaker can access the necessary files when run by the Apache server:
3. Finally, change the owner of the ProcessMaker files to the user which runs Apache. This user depends upon your distribution:
Debian/Ubuntu:
RedHat/CentOS/Fedora:
SUSE/OpenSUSE:
Windows:
Use a decompression program like 7-Zip or WinRAR which supports the tar.gz format to decompress the source code and overwrite the existing processmaker directory, which by default is located at c:\Program Files\ProcessMaker-2_X_X\processmaker in Windows XP/2003 or c:\Users\USERNAME\AppData\Roaming\ProcessMaker-2_X_X\processmakerin Windows Vista/7/2008.
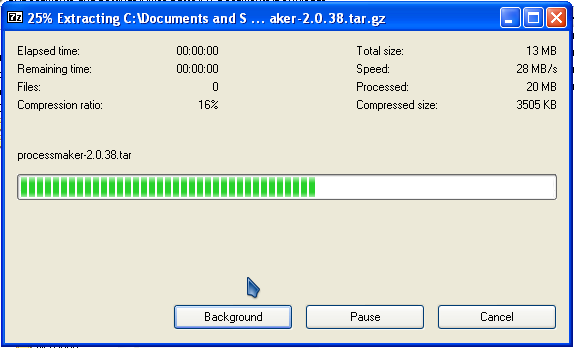
Upgrading with 7-Zip
- Right click on the processmaker-2_X_X.tar.gz file which was downloaded and select the option 7-Zip > Extract files... from the dropdown menu.
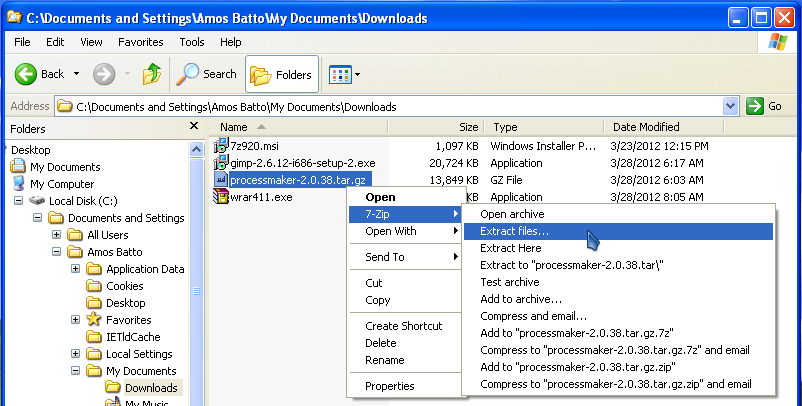
- In the "Extract" dialog box that appears, go to the Extract to: field and enter the parent directory to the processmaker directory, which by default is located at c:\Program Files\ProcessMaker-2_X_X in Windows XP/2003 and c:\Users\USERNAME\AppData\Roaming\ProcessMaker-2_X_X in Windows Vista/7/2008. Also select the Overwrite without Prompt option in the Overwrite mode: dropdown box.
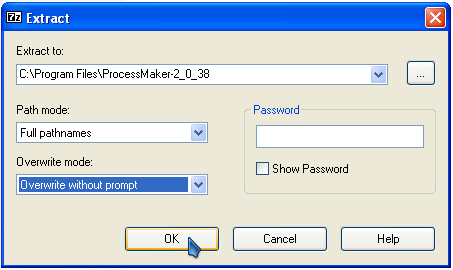
- Then, click on OK to begin the extraction.
Upgrading with WinRAR
- Right click on the processmaker-2_X_X.tar.gz file which was downloaded and select the option Extract files... from the dropdown menu.
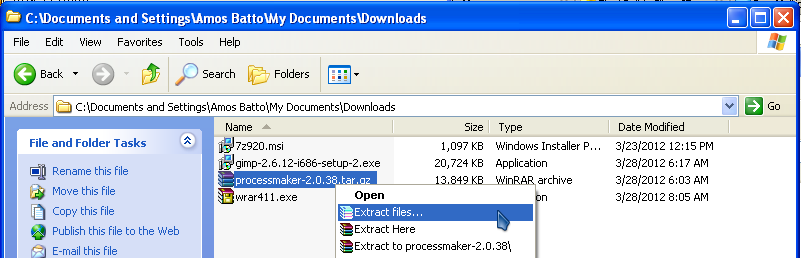
- In the "Extraction Path and Options" dialog box that appears, go to the Destination Path field and enter the parent directory to the processmaker directory, which by default is located at c:\Program Files\ProcessMaker-2_X_X in Windows XP/2003 and c:\Users\USERNAME\AppData\Roaming\ProcessMaker-2_X_X in Windows Vista and later. Also mark the Overwrite without prompt option in the Overwrite mode section.
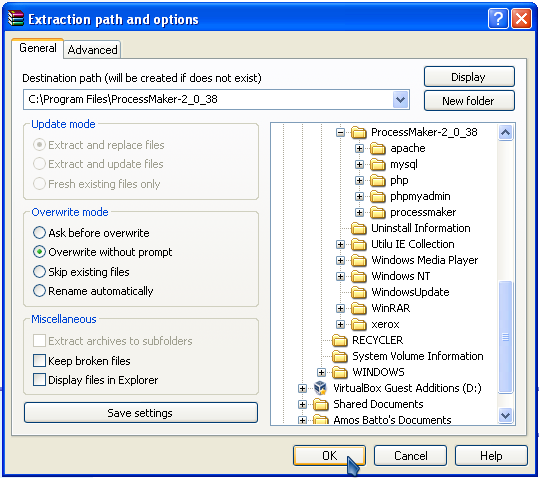
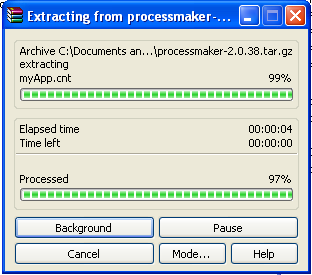
- Then, click on OK to begin the extraction.
-
Modifying my.cnf file
Modify this file for MySql versions 5.5.x or greater
To avoid problems running triggers in MySQL, go to etc/my.conf and change the line from binlog_format=mixed or binlog_format=row to binlog_format = MIXED
For more information, see the MySQL documentation.
Upgrading the ProcessMaker databases
After upgrading the processmaker source code, then use the processmaker upgrade command to upgrade the 3 databases used by each ProcessMaker workspace. The databases have be upgraded because the table structure may have been modified in the new version.
Go to the processMaker installation directory and run the processmaker upgrade command from the command line.
Linux/UNIX:
Login as root (or use the sudo -i command), then:
Note: If an error message appears such as "/usr/bin/env: php: No such file or directory", then make sure that the PHP Command Line Interface is installed (whose package is named php-cli in Red Hat/CentOS/Fedora and php5-cli in Debian/Ubuntu/Mint). If PHP-CLI is already installed, then it is not installed in a location found in your $PATH, so use the full path when executing PHP-CLI:
Windows:
If you run the .exe file to install ProcessMaker run the following command from the command line:
If you made a manual installation, login as an Administrator and open the Command Prompt (by going to Start > All Programs > Accessories > Command Prompt) and enter:
Upgrading ProcessMaker translations
When ProcessMaker is upgraded, the command doesn't upgrade the translations file into the latest versions. In this case, it is required to download the language (depending on the language used) from here and upload it into ProcessMaker.
Recommendations after upgrading
When upgrading a language, it is strongly recommended to Clear Cache or press Crtl F5 to refresh your web browser from ProcessMaker 2.0.40 +; or Deleting ProcessMaker Compiled Cache in ProcessMaker 2.0.39.
Options for the processmaker command
In most cases, running the processmaker upgrade command will be sufficient when upgrading, but other commands are available if a finer degree of control is needed
To display which commands are available, run the ./processmaker command in the following path:
- INSTALL-DIRECTORY/processmaker
The following commands could be used:
Upgrading
workspace-upgrade will execute the three following commands on each workspace:
./processmaker upgrade
- Checks the integrity of all source code files and then runs upgrade on all available workspaces.
./processmaker workspace-upgrade [WORKSPACE1 WORKSPACE2 ...]
- Without arguments,
workspace-upgradewill upgrade all available workspaces. If the workspaces names are specified, then only those workspaces will be upgraded.
- Without arguments,
./processmaker database-upgrade
- Checks the database schema and upgrade it if necessary.
./processmaker translation-upgrade
- Updates translations from the existing PO translation files.
./processmaker cacheview-repair
- Updates the wf_WORKSPACE.APP_CACHE_VIEW tables and triggers.
./processmaker plugins-database-upgrade
- Checks the database schema and upgrade it if necessary, only for tables related with the Enterprise Plugins. It creates all necessary tables, in the case they are not created.
Restoring
./processmaker workspace-restore BACKUP-FILE [WORKSPACE]
- To restore a workspace from a backup. Check this documentation to get the complete description.
./processmaker workspace-restore [LANG]
- Updates the languages used on the workspace where the restore will be applied. Available in version 2.5.1 and later.
Migrating case folders
![]() Available in version 2.5.1 and later.
Available in version 2.5.1 and later.
./processmaker migrate-cases-folders [WORKSPACE]
- Migrates the folder structure where documents/files are stored to save more than 32k cases. For more information, see the complete documentation about this command
How to apply a hotfix
![]() Available in version 2.5.1 and later.
Available in version 2.5.1 and later.
Use this command to apply the hotfix in a Linux-based ProcessMaker server:
./processmaker hotfix-install HOT-FIX-FILENAME
And this command to apply the hotfix in a Windows-based ProcessMaker server:
processmaker.bat hotfix-install HOT-FIX-FILENAME
- Applies hotfixes to critical bugs found in versions up to 2.5.0. These bugfixes will be only applied to the ProcessMaker source code and not to the ProcessMaker database or labels, so there should be no danger of data loss or modification during the Hotfix installation. These Hotfixes are only available for the ProcessMaker Enterprise Edition.
- To apply the hotfix, upload the tar file in the following location:
- INSTALL-DIRECTORY/shared/hotfixes
- In new installations, hotfixes folder will be created automatically, while in old installations it must be created manually.
- Note: If ProcessMaker is installed in directory not named "processmaker", then extract the contents of the hotfix file in some temporary folder, inside that temporary folder enter to "processmaker" folder and copy the entire folder content where ProcessMaker is installed on the server (overwrite files), then run the command to apply the patch to force the server cache be cleared.
- Improvement: In version 2.5.2 and later, it is possible to apply the hotfix in a folder with a different name than ProcessMaker. For example, if the ProcessMaker installation is located in a directory named "ProcessMaker_Installation", and apply the hotfix inside that folder, it will respect the name of the new folder and the hotifix will be applied in the ProcessMaker_Installation directory.
Other Commands
./processmaker build-js
- Compress JavaScript core files and also clear the ProcessMaker server cache. This command is available in version 2.5.0 and later, to deal with changed JavaScript code.
./processmaker browser-cache-files-upgrade
- Changes the ID that is used to download Javascript files. When the ID is changed all Javascript files will be downloaded again, it means all Javascript cache will be cleared. Available in version 2.5.0 and later.
./processmaker translation-repair
- Repairs the translation file, it means it updates database and XML translation files. Note that it will repair each language you have installed on your ProcessMaker installation.

