- Overview
- Setting up the gulliver script
- Using the gulliver script
- Creating a new Plugin
- Plugin Files
- Yes/No Questions
- System Logo
- Example Page
- New Options in the Cases Sidebar
- New Role and Permission
- Redirect after Login
- External Step
- PMFunction Class
- Linking the Plugin Files into ProcessMaker
- Activate the New Plugin
- Altering the Database Structure
- Editing the Propel XML schema file
- Creating Classes with gulliver propel-build-model
- Creating SQL files with gulliver propel-build-sql
- Applying changes with gulliver propel-build-crud
- Creating Exportable Plugins
- Creating Custom Pages
- Creating a cron using ProcessMaker classes
Overview
Available Version: ProcessMaker 2.0.36. To know the plugin development before ProcessMaker 2.0.36, click this link.
Plugins are used to add additional functionality to ProcessMaker and/or customize its interface and databases. Version 2.0.36 and later offers a new plugin creation script, which is based upon the new 2.0 interface using the Ext JS framework.
Although the ProcessMaker core is free/libre/open source software which allows the source code to be freely modified, it is not recommended to edit the code, because each version upgrade will overwrite any changes in the code. Instead, it is recommended to develop a plugin to modify the source code.
Plugins are developed using the gulliver new-plugin command in a Linux/UNIX server. Plugins cannot be developed in Windows servers, because symbolic links are needed. After the plugin has already been created, it can be exported to other installations of ProcessMaker, including Windows servers.
Setting up the gulliver script
ProcessMaker is programmed using a custom PHP development framework named Gulliver. To create a plugin in Gulliver, symbolic links have to first be established in the server where ProcessMaker is installed.
The gulliver script needs to be executed inside the workflow/engine directory. Login to the ProcessMaker server as the "root" user or a user with administrative powers. Then, make a symbolic link from <INSTALL-DIRECTORY>/gulliver/bin/gulliver to<INSTALL-DIRECTORY>/workflow/engine/gulliver.
For example:
Note: Plugins can not be created on Windows servers, because Windows does not support symbolic links; however, there is an experimental script for Windows servers available at <INSTALL-DIRECTORY>/workflow/engine/gulliver-win.bat which can be tested. Please report any problems at this page
Using the gulliver script
As the "root" user (or a user with administrative powers), change to the <INSTALL-DIRECTORY>/workflow/engine/ directory. Then, execute the ./gulliver command to see a list of the available options.
For example:
# ./gulliver
available pake tasks:
check-standard-code > check standard code
args: <directory>
create-poedit-file > create poedit file for system labels
args: [<lang-id> [<country-id> [verbose]]]
generate-unit-test-class > generate a unit test file for an existing class
args: <class-filename>
new-plugin > build new plugin
args: <name>
new-project > build new project
args: <name>
pack-plugin > pack plugin in .tar file
args: <plugin>
propel-build-crud > generate basic CRUD files for an existing class
args: <class-name> <table-name> <pluginName>
propel-build-db > create database for current model
propel-build-model > create classes for current model
propel-build-schema > create schema.xml from existing database
propel-build-sql > create sql for current model
propel-dump-data > dump data to fixtures directory
propel-insert-sql > insert sql for current model
test-all > launch all tests
test-functional > launch functional tests for an application
test-unit > launch unit tests
version > gulliver version
workspace-backup > backup a workspace
args: [-c|--compress] <workspace> [<backup-name>|<backup-filename>]
workspace-restore > restore a previously backed-up workspace
args: [-o|--overwrite] <filename> <workspace>
Note: The gulliver script can only be executed when the current working directory is workflow/engine/, so don't try to execute it without first changing to that directory.
The gulliver script can only be executed when the current working directory is workflow/engine/, so don't try to execute it without first changing to that directory.
Creating a new Plugin
To create a new plugin, issue the command:
It is recommended that plugin names only use ASCII characters which can easily used in a web address, so do not use characters like "ë", "Ñ", "?", "%", or " " (space). Also, take care of NOT using hyphens in the name of the new plugin ProcessMaker will no import it later. Take into account that "Plugin" is a reserved word of ProcessMaker, so do not include it in the name of the new plugin. Finally, remember that plugin names are case sensitive.
For example, to create a plugin named "deleteCases":
using DSN Connection mysql://wf_workflow2033:c3s07f98zgyx@localhost:3306/wf_workflow2036?encoding=utf8
creating plugin directory /opt/plugins/deleteCases
saved 388 bytes in file deleteCases/setup.xml [pluginSetup.xml]
saved 183 bytes in file deleteCases/messageShow.xml [pluginMessageShow.xml]
saved 3056 bytes in file deleteCases/config/schema.xml [pluginSchema.xml]
saved 2067 bytes in file deleteCases/config/propel.ini [pluginPropel.ini]
saved 2061 bytes in file deleteCases/config/propel.mysql.ini [pluginPropel.mysql.ini]
Plugin Files
The new plugin will be created in a new plugins/pluginName directory located in the parent directory where ProcessMaker is installed. The new plugin directory will have a minimum of 4 subdirectories (classes, config, data and public_html), 2 php files, 3 xml files and 2 ini files:
These files and directories have the following purpose:
| pluginName.php | Defines a PHP class for the plugin (which inherits from the PmPlugin class) to register the new plugin and define its methods to setup, install, activate, deactivate and uninstall the plugin. See: |
| pluginName | Directory to hold all the rest of the plugin's directories and files. |
| pluginName/class.pluginName.php | Defines another class for the plugin named (which also inherits from the PmPlugin class), where custom methods and member variables for the plugin can be added. |
| pluginName/classes | A directory to hold additional class definition files for the plugin. For more information, see Plugin Clases. |
| pluginName/config | A directory containing 3 files which define the database tables to hold information for the new plugin. |
| pluginName/config/propel.ini | File initializes the configuration variables for Propel, which is a library to map PHP objects to database tables and fields. |
| pluginName/config/propel.mysql.ini | File initializes the configuration variables for the MySQL database used by Propel. |
| pluginName/config/schema.xml | An XML file to define the database table(s) to store data needed by the plugin. |
| pluginName/data | A directory holds any data needed to be inserted into the database. |
| pluginName/messageShow.xml | A sample XML file to display error messages. |
| pluginName/public_html | A directory to hold any images, style sheets, JavaScript, and any other files which need to be publicly accessible. |
| pluginName/setup.xml | An sample XML file to configure the plugin. See Plugin Configuration Page |
For example, if creating the "deleteCases" plugin in an installation of ProcessMaker at /opt/processmaker, then at least the following directories and files will be automatically created:
└── plugins/
└── deleteCases/
├── deleteCases.php
└── deleteCases/
├── class.deleteCases.php
├── classes/
├── config/
│ ├── propel.ini
│ ├── propel.mysql.ini
│ └── schema.xml
├── data/
├── messageShow.xml
├── public_html/
└── setup.xml
pluginName.php
Inside this file the class of the plugin can be found where the user can modify some basic elements or information about the plugin.
Warning: Please consider that any code added to the setup() method of the pluginName.php file will be executed on every ProcessMaker page. Developers must be careful about what is added to this section.
|
{
$res = parent::PMPlugin($sNamespace, $sFilename);
$this->sFriendlyName = "Example Plugin";// Change the name of your plugin
$this->sDescription = "Autogenerated plugin for class Example"; // Change the description of your plugin
$this->sPluginFolder = "Examle"; //Name of the plugin, it is strongly recommended not to change this name.
$this->sSetupPage = "setup"; //Page type
$this->iVersion = 1; // version of the plugin
//$this->iPMVersion = 2425;// ProcessMaker Version
$this->aWorkspaces = null;// It indicates that the plugin will be available only for workflow workspace
//$this->aWorkspaces = array("os");// enable this if you want to make your plugin available for more than one workspace, each workspace must be separated by semicolon (;)
//Modify the dashboard information in case you've created it
$this->dashletsUids = array(
array("DAS_UID" => "28865334652d40b2e9caa98030647555",
"DAS_CLASS" => "dashletLili1",
"DAS_TITLE" => "Dashlet Lili1",
"DAS_DESCRIPTION" => "Dashlet Lili1",
"DAS_VERSION" => "1.0",
"DAS_CREATE_DATE" => date("Y-m-d"),
"DAS_UPDATE_DATE" => date("Y-m-d"))
);
public function setup()
{
$this->setCompanyLogo("/plugin/Lili1/Lili1.png"); //change ProcessMaker logo
$this->registerMenu("processmaker", "menuLili1.php");//file where you can modify the menu
$this->registerMenu("cases", "menuCasesLili1.php");//file where you can modify the cases menu
$this->registerStep("88110927552d40b2e206a16023508301", "stepLili1Application", "Lili1 external step"); //external step file and name
$this->registerPmFunction();
$this->redirectLogin("PROCESSMAKER_LILI1", "users/users_List");
$this->registerDashlets();
$this->registerCronFile("Plugin_File_Name"); // plugins can register files to be executed when the cron is enabled. * See note below
}
Note: Current plugins copied files in the bin/plugins folder in order to be executed by the cron, so it was not possible to know to which file the plugin belongs to, moreover it was not possible to know which environments should run those cron files.
Another problem was that if there was an error while the cron was executed, the cron execution was abruptly canceled and the remaining actions were not executed. This leads to have the execution of the cron even if the plugin was not enabled. This problem was solved on version 2.5.2 by adding the following line:
Yes/No Questions
Then, the gulliver new-plugin script will ask a series of yes/no questions about the new plugin. If the response is "y" (yes), then additional files will be created in the new plugin directory and additional code will be added to the pluginName.php file. To better understand the plugin methods used in this file, see the code in
System Logo
If a new logo (image in the upper, left hand corner of the interface) should be displayed in ProcessMaker, then enter "y" for the following option:
Entering "y" will generate the following file:
saved 750 bytes in file public_html/deleteCases.png [deleteCases.png]
A PNG image file will be generated in the plugin's public_html directory, such as:
The image will appear as:

In addition, the following code will be added to the plugins/pluginName/pluginName.php file:
$this->setCompanyLogo ('/plugin/pluginName/pluginName.png');
}
To use a different image, simply place the image file in the public_html directory and change the path to reference that new image. For example, if using a logo located at/opt/plugins/deleteCases/deleteCases/public_html/myCompanyLogo.png, then change the path to:
$this->setCompanyLogo ('/plugin/deleteCases/myCompanyLogo.png');
}
If the plugin will create a new top-level menu and display a new page in ProcessMaker, then enter "y" for the following option:
Create an example Page [Y/n]:
Entering "y" will generate 5 sample files which can be used as a model for creating pages in ProcessMaker:
For example:
saved 924 bytes in file deleteCases/deleteCasesApplication.php [pluginApplication.php]
saved 45 bytes in file deleteCases/deleteCasesApplication.html [pluginApplication.html]
saved 6512 bytes in file deleteCases/deleteCasesApplication.js [pluginApplication.js]
saved 1516 bytes in file deleteCases/deleteCasesApplicationAjax.php [pluginApplicationAjax.php]
The pluginName/menupluginName.php <pre> file contains code to add a new top-level menu to the ProcessMaker interface which appears as <strong><pre> pluginName - APPLICATION1 by default.

Note that only one top-level menu item can be created per plugin, so create multiple plugins if needing multiple top-level menus.
By default, clicking on this new menu item will direct the web browser to the address:
http://<IP-ADDRESS>/sys<WORKSPACE>/<LANG>/<SKIN>/<pluginName>/<pluginName>Application
For example:
http://www.example.com/sysworkflow/en/classic/deleteCases/deleteCasesApplication
When clicked, this menu item displays a list of users:
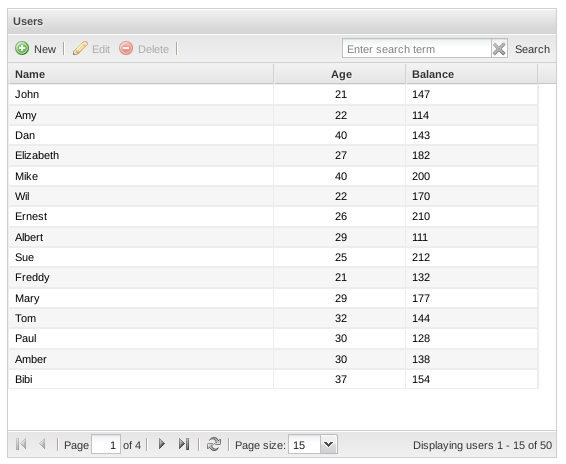
This page is generated by the following four files:
| pluginName/pluginNameApplication.html | HTML code to display on the page, which is none in this case. |
| pluginName/pluginNameApplication.js | JavaScript code to execute, which in this case defines the table, its fields and its controls. |
| pluginName/pluginNameApplication.php | PHP code to be executed on the server side to publish the page. |
| pluginName/pluginNameApplicationAjax.php | PHP code to complete any AJAX requests which come from the page. |
Data generally comes from a database query, but in this sample page, all the names in the list come from an array in the pluginNameApplication.js file and the numbers are randomly generated.
In addition, a new menu option will be added the top-level ProcessMaker menu, with code which is inserted in the plugins/pluginName/pluginName.php file. The PMPlugin::registerMenu() method is used to register the new menu option. The first parameter is the name of the menu where the option will be added at the end. 'processmaker' is the main ProcessMaker menu. The second parameter is the name of the file which defines the new menu option, which should be located in the plugins/pluginName/pluginName/ directory.
For example:
$this->registerMenu("processmaker", "menudeleteCases.php");
}
The menupluginName.php file (which in this example is menudeleteCases.php) will be created to define the new menu option. The following code adds the new menu to the ProcessMaker main menu with the Menu::AddIDRawOption() method:
global $G_TMP_MENU;
$G_TMP_MENU->AddIdRawOption("ID_DELETECASES_MNU_01", "deleteCases/deleteCasesApplication", "deleteCases - application1");
?>
$G_TMP_MENU is a global variable which is an instance of the Menu class, defined in gulliver/system/class.menu.php. The Menu::AddIdRawOption() method is used to add a new menu option to the $G_TMP_MENU global variable. The parameters of this method can be edited to define a different menu ID, execute a different file when the user clicks on the menu option, and/or change its text label.
For example, to make the menu option execute a custom code file located at /opt/plugins/deleteCases/deleteCases/manageCases.php and use the text label "Manage Cases" instead of "deleteCases - application1", change the code to:
$G_TMP_MENU->AddIdRawOption("ID_DELETECASES_MNU_01", "deleteCases/manageCases", "Manage Cases");
By default the sample page will be displayed inside the principal window in the web browser. If the sample page should be displayed inside an <iframe> under the main ProcessMaker menu, then the plugin files need to be edited.
First, edit the $G_TMP_MENU->AddIdRawOption() function in the menupluginName.php file, so that it executes a different code file when the user clicks on the menu item.
For example, change menudeleteCases.php file from:
global $G_TMP_MENU;
$G_TMP_MENU->AddIdRawOption("ID_DELETECASES_MNU_01", "deleteCases/deleteCasesApplication", "deleteCases - application1");
?>
To:
global $G_TMP_MENU;
$G_TMP_MENU->AddIdRawOption("ID_DELETECASES_MNU_01", "deleteCases/main", "deleteCases - application1");
?>
Then, create a file named main.php in the same directory with the following content:
$G_MAIN_MENU = 'processmaker';
$G_ID_MENU_SELECTED = 'ID_DELETECASES_MNU_01';
$G_PUBLISH = new Publisher;
$G_PUBLISH->AddContent('view', 'deleteCases/mainLoad');
G::RenderPage('publish');
?>
Finally, create another file named mainLoad.php in the same directory, with the following content:
Now, when the user clicks on the menu item, it will first load the main ProcessMaker menu, then create an <iframe> under the menu which displays the contents generated by thedeleteCases/deleteCasesApplication* files.
New Options in the Cases Sidebar
To add several new options in the cases sidebar under the HOME menu, enter "y" at the following question:
Entering "y" will cause the following 11 files to be created:
saved 948 bytes in file deleteCases/deleteCasesApplication.php [pluginApplication.php]
saved 45 bytes in file deleteCases/deleteCasesApplication.html [pluginApplication.html]
saved 6530 bytes in file deleteCases/deleteCasesApplication.js [pluginApplication.js]
saved 1516 bytes in file deleteCases/deleteCasesApplicationAjax.php [pluginApplicationAjax.php]
saved 557 bytes in file deleteCases/deleteCasesApplication2.php [pluginApplication2.php]
saved 45 bytes in file deleteCases/deleteCasesApplication2.html [pluginApplication2.html]
saved 7607 bytes in file deleteCases/deleteCasesApplication2.js [pluginApplication2.js]
saved 557 bytes in file deleteCases/deleteCasesApplication3.php [pluginApplication3.php]
saved 45 bytes in file deleteCases/deleteCasesApplication3.html [pluginApplication3.html]
saved 573 bytes in file deleteCases/deleteCasesApplication3.js [pluginApplication3.js]
The file pluginName/menupluginName.php is created to define 3 new options to be added to the cases sidebar. In addition, code is inserted in pluginName/pluginName.php to register a new option in the cases sidebar with the PMPlugin::registerMenu() method. For example:
$this->registerMenu("cases", "menudeleteCases.php");
}
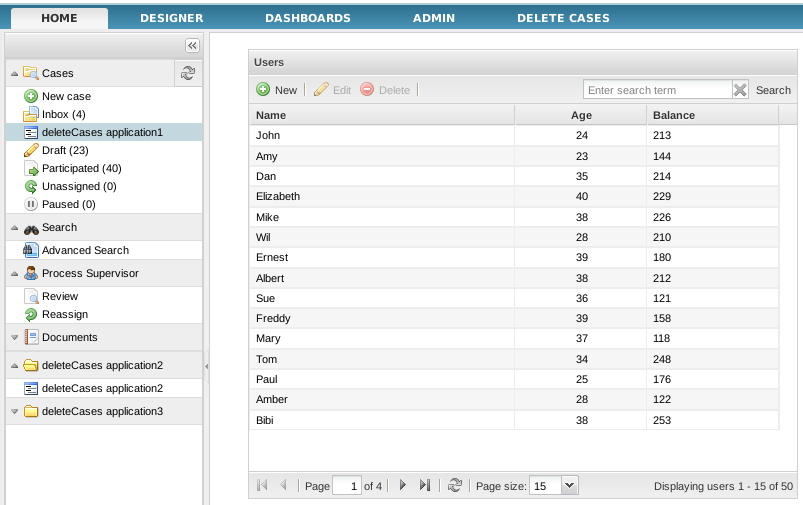
A new option has been added below "Inbox" in the sidebar named "deleteCases application1". When clicked, it displays the same list of users as the Example Page, but the page will be embedded in the casesSubFrame frame.
A new header has also been added to the bottom of the sidebar named "deleteCases application2". Under that header is an item also named "deleteCases application2", which displays the following page when clicked:
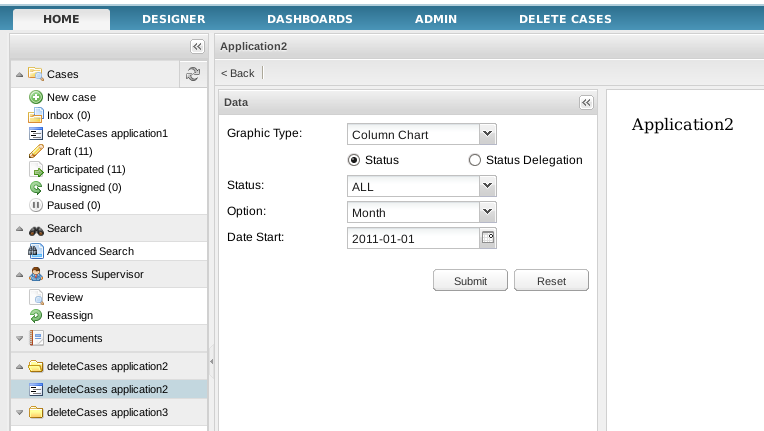
This page is generated with the following files:
- deleteCases/deleteCasesApplication2.php
- deleteCases/deleteCasesApplication2.html
- deleteCases/deleteCasesApplication2.js
Another header was added to the sidebar named "deleteCases application3". Clicking on it displays a panel with the text "Content 3":
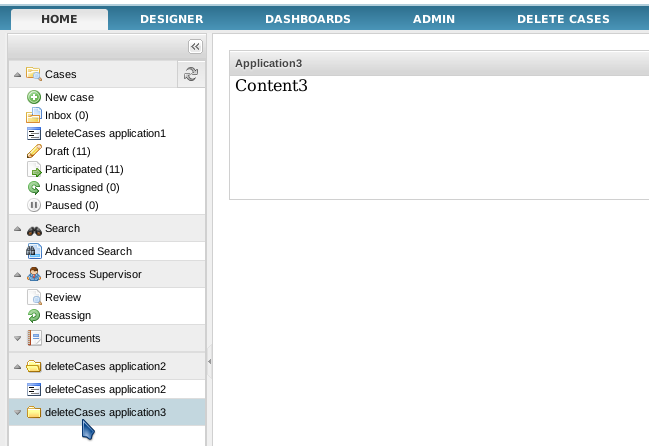
This page is created with the files:
- deleteCases/deleteCasesApplication3.php
- deleteCases/deleteCasesApplication3.html
- deleteCases/deleteCasesApplication3.js
New Role and Permission
If the plugin will need to use ProcessMaker's role based access control (RBAC) so that only users with the designated permission in their role will be able to access the plugin and its functionality, then enter "y" for the following option:
the Permission 'PM_DELETECASES' [y/N]:
Entering "y" will add the following code to the pluginName.php file to generate a new role and permission:
$RBAC = RBAC::getSingleton() ;
$RBAC->initRBAC();
$roleData = array();
$roleData['ROL_UID'] = G::GenerateUniqueId();
$roleData['ROL_PARENT'] = '';
$roleData['ROL_SYSTEM'] = '00000000000000000000000000000002';
$roleData['ROL_CODE'] = 'PROCESSMAKER_pluginName';
$roleData['ROL_CREATE_DATE'] = date('Y-m-d H:i:s');
$roleData['ROL_UPDATE_DATE'] = date('Y-m-d H:i:s');
$roleData['ROL_STATUS'] = '1';
$RBAC->createRole ( $roleData );
$RBAC->createPermision ('PM_pluginName' );
}
Where:
- $roleData['ROL_UID']: The unique ID for the new role.
- $roleData['ROL_PARENT']: It's deprecated and should always be set to (an empty string).
- $roleData['ROL_SYSTEM']: It should always be set to '00000000000000000000000000000002' which is the ID for the ProcessMaker system. (In previous versions, there used to be an RBAC system with the ID '00000000000000000000000000000001', but it is no longer used.)
- $roleData['ROL_CODE'] The name of the new role, which by default is set to PROCESSMAKER_pluginName in upper case. The name can be changed. Just make sure that it doesn't conflict with the names of any existing roles.
- $roleData['ROL_CREATE_DATE']: The date and time in the format "YYYY-MM-DD HH:MM:SS" when the plugin was created.
- $roleData['ROL_UPDATE_DATE']: The date and time in the format "YYYY-MM-DD HH:MM:SS" when the plugin was last updated.
- $roleData['ROL_STATUS']: Set to '1' if the new role is activated and can be assigned to users. Otherwise, set to '0' if the new role shouldn't be assigned to users.
- $RBAC->createPermision ('PM_pluginName' ): Creates the name of the new permission, which by default is set to PM_pluginName in upper case. It can be changed as long as it doesn't conflict with the names of any existing permissions.
Creating the New Role and Permission
The code in the install() function will be executed when the plugin is imported into ProcessMaker. Therefore, the new role and permission will only be created in ProcessMaker when the new plugin is imported.
First, use the gulliver pack-plugin script to create an exportable tar file for the plugin which can be imported. Then, go to ADMIN > Plugins > Plugin Manager. Click the Import button and select the plugin's tar file to import it. Even if the plugin already appears in the list of available plugins, import the plugin again, so it will execute the install() function and create the new role and permission. Finally, activate the new plugin, and the new role and permission will be available in ProcessMaker.
Redirect after Login
If a new role and permission were created in the previous step, a further question will be asked whether to redirect users with that role to a specified page after logging into ProcessMaker. To redirect, enter "y" at this option:
Entering "y" will add code like the following to the pluginName.php file:
$this->redirectLogin('PROCESSMAKER_DELETECASES', 'users/users_List');
}
By default, the plugin redirects to the user's list, but this can be changed. For example, for all users with the PROCESSMAKER_DELETECASES role to be redirected to thedeleteCases/deleteCasesApplication.php page on login:
External Step
To create a custom external step for tasks, similar to steps like DynaForms, Input Documents and Output Documents, enter "y" at this option:
Enter "y" will add a file like the following:
saved 166 bytes in file deleteCases/stepdeleteCases.php [pluginStep]
This file will need to be edited to add the code to handle the external step. In addition, code will be added to the pluginName.php file, like the following:
$this->registerStep( '2194269554e95dacc74c6d2077314289', 'stepdeleteCasesApplication', 'deleteCases external step' );
}
The first parameter of the registerStep() method is the external step's unique ID number, which was automatically generated by ProcessMaker. The second parameter is the name of the file(s) (without the extension) which will be executed when running the step. The third parameter is the name of the external step which is displayed to the user in ProcessMaker. Feel free to edit the external step's name.
The following files will be added to the plugin:
- pluginName/steppluginNameApplicationAjax.php: The
- pluginName/steppluginNameApplication.html: Defines the HTML code for the external step. By default, just defines a div with the id "
- pluginName/steppluginNameApplication.js:
- pluginName/steppluginNameApplication.php:
When a case is executed with an external step, these files will display the following table of system variables for the case:

Adding an External Step to a Process
After importing and activating a plugin with an external step, the external step can be assigned as a step in a task.
Go to DESIGNER and open a process for editing. Right click on a task in the process and select Steps from the dropdown menu. In the Steps Of: dialog box that appears, go to the Stepstab and click on New to add a step. The external step created by the plugin should appear in the list of available steps
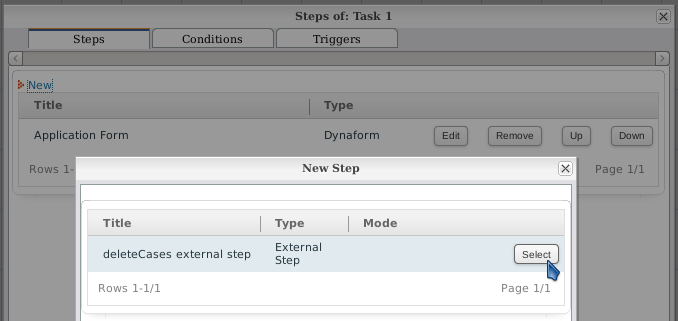
Click on the Select button to the right of the external step to insert it as a step in the task. The external step should now appear in the list of steps.
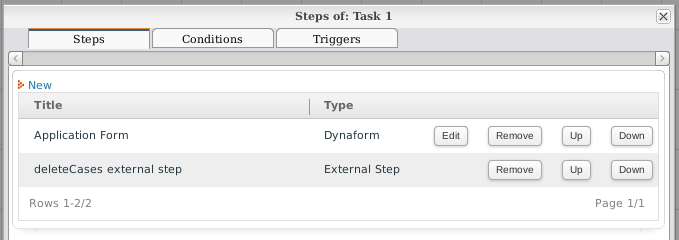
Now the external step will be executed at this task when a case is executed.
Note: The external step will appear as an available step in all processes in the workspace.
Editing External Steps
The default external step files created by the gulliver new-plugin script can be edited to add custom content. It is important that the external step page contains links or buttons to go to the previous and next steps.
If using Ext JS to generate the page, the following JavaScript code can be used to create a previous step button in an Ext JS toolbar:
text: " < " + CONFIG.previousStepLabel + " ",
handler: function() {
window.location.href = CONFIG.previousStep;
}
})
Likewise, the following JavaScript code can be used to create a next step button in an Ext JS toolbar:
text: " " + CONFIG.nextStepLabel + " > ",
handler: function() {
window.location.href = CONFIG.nextStep;
}
})
In order for these links to have the proper URL and label, the CONFIG variable needs to be passed to the JavaScript file with the HeadPublisher::Assign() method in the PHP file.
By default, the gulliver new-plugin script creates the steppluginNameApplication.php file to set the URLs and labels for the "Previous Step" and "Next Step" links:
For example, the stepdeleteCasesApplication.php file contains:
try {
global $Fields;
$oHeadPublisher = &headPublisher::getSingleton();
//SYS_SYS //Workspace name
//PROCESS //Process UID
//APPLICATION //Case UID
//INDEX //Number delegation
$config = array();
$config["previousStep"] = $Fields["APP_DATA"]["__DYNAFORM_OPTIONS"]["PREVIOUS_STEP"];
$config["previousStepLabel"] = $Fields["APP_DATA"]["__DYNAFORM_OPTIONS"]["PREVIOUS_STEP_LABEL"];
$config["nextStep"] = $Fields["APP_DATA"]["__DYNAFORM_OPTIONS"]["NEXT_STEP"];
$config["nextStepLabel"] = $Fields["APP_DATA"]["__DYNAFORM_OPTIONS"]["NEXT_STEP_LABEL"];
$oHeadPublisher->addContent("extstep/stepextstepApplication"); //Adding a html file .html.
$oHeadPublisher->addExtJsScript("extstep/stepextstepApplication", false); //Adding a javascript file .js
$oHeadPublisher->assign("CONFIG", $config);
G::RenderPage("publish", "extJs");
exit(0);
} catch (Exception $e) {
echo $e->getMessage();
exit(0);
}
?>
PMFunction Class
The last option sets the configuration, classes, and additional functions for the plugin:
Create a PmFunction Class for extend Processmaker [y/N]:
Regardless of whether entering "y" or "n", files like the following will be created:
saved 5263 bytes in file deleteCases/class.deleteCases.php [pluginClass]
The pluginName.php file defines a class for the plugin named pluginNamePlugin, which is based upon the PMPlugin class, which is defined in workflow/engine/classes/class.plugin.php. This class sets up the plugin and registers it in ProcessMaker. The contents of the setup() and install() methods depend on which of the previous options were selected, but at a minimum this file contains code like:
G::LoadClass('plugin');
class deleteCasesPlugin extends PMPlugin
{
function deleteCasesPlugin($sNamespace, $sFilename = null) {
$res = parent::PMPlugin($sNamespace, $sFilename);
$this->sFriendlyName = 'deleteCases Plugin';
$this->sDescription = 'Autogenerated plugin for class deleteCases';
$this->sPluginFolder = 'deleteCases';
$this->sSetupPage = 'deleteCases';
$this->iVersion = 0.78;
//$this->iPMVersion = 2425;
$this->aWorkspaces = null;
//$this->aWorkspaces = array('os');
return $res;
}
function setup() {
}
function install() {
}
}
$oPluginRegistry =& PMPluginRegistry::getSingleton();
$oPluginRegistry->registerPlugin('deleteCases', __FILE__);
PMPlugin Class Methods
The custom pluginNamePlugin class inherits a number of class methods from its parent PMPlugin class. If these methods aren't redefined in pluginNamePlugin, then the default methods from PMPlugin will be used.
It may be useful to redefine the following methods in :
- setup(): This method is automatically executed by workflow/public_html/sysGeneric.php, which is called when a ProcessMaker page is loaded. setup() will be executed almost every time a user clicks in the ProcessMaker interface, so add code which needs to be executed with every user interaction. However, remember that that code could potentially slow down ProcessMaker, so avoid code which might wait for responses from remote servers. If needing that kind of code, it is a good idea to implement it as a code file, which is called only when the plugin is used.
- install(): This method is called when the plugin is installed, i.e., when the plugin is imported into processMaker by going to ADMIN > Plugins and clicking on Import.
- enable(): This method is called when the plugin is enabled, i.e., when going to ADMIN > Plugins > Plugin Manager, selecting the plugin and clicking on Enable.
- disable(): This method is called when the plugin is disabled, i.e., when going to ADMIN > Plugins > Plugin Manager, selecting the plugin and clicking on Disable.
- uninstall(): This method is called when the plugin is uninstalled. Note that recent versions of ProcessMaker no longer have a Remove button to uninstall plugins so this method will never be called through the interface.
To define custom versions of these class methods, add them to the definition of the pluginNamePlugin class:
...
public function setup() {
//add code here
}
public function install() {
//add code here
}
public function enable() {
//add code here
}
public function disable() {
//add code here
}
public function uninstall() {
//add code here
}
}
The pluginNameClass class
The pluginName/class.pluginName.php file defines the pluginNameClass class, which is also based upon the PMPlugin class. The content of its methods also depend upon the previous selected options, but at a minimum it contains a private __construct() which is called whenever a class instance is created and a private setup() method which is called when a page is loaded in ProcessMaker.
For example:
/**
* class.deleteCases.php
*
*/
class deleteCasesClass extends PMPlugin {
function __construct ( ) {
set_include_path(
PATH_PLUGINS . 'noOptions' . PATH_SEPARATOR .
get_include_path()
);
}
function setup()
{
}
}
Custom methods and member variables can be added to the pluginNameClass class. The inherited methods from PMPlugin can also be defined in the pluginNameClass class.
Custom pmFunctions
If "y" was entered, then in addition to the above files, the following file will also be created:
saved 484 bytes in file deleteCases/classes/class.pmFunctions.php [class.pmFunctions.php]
The pluginName/classes/class.pmFunctions.php file is used to define any special functions for the plugin, which can be called from inside a trigger like normal ProcessMaker Functions. These custom functions can be given any name, but the convention is use names like pluginName_function-name(), so they can easily be distinguished from the standard ProcessMaker and PHP functions used in triggers.
By default, the class.pmFunctions.php file contains two sample functions named pluginName_getMyCurrentDate() and pluginName_getMyCurrentTime() to return the current date and current time.
For example:
/**
* class.deleteCases.pmFunctions.php
*
* ProcessMaker Open Source Edition
* Copyright (C) 2004 - 2008 Colosa Inc.
* *
*/
////////////////////////////////////////////////////
// deleteCases PM Functions
//
// Copyright (C) 2007 COLOSA
//
// License: LGPL, see LICENSE
////////////////////////////////////////////////////
function deleteCases_getMyCurrentDate()
{
return G::CurDate('Y-m-d');
}
function deleteCases_getMyCurrentTime()
{
return G::CurDate('H:i:s');
}
New custom functions can be added. For example, if needing a add a custom function named deleteCases_getCaseStatus() to return the status of a case:
$c = new Cases();
$aInfo = $c->loadCase($caseId);
return $aInfo['APP_STATUS'];
}
As long as the plugin is activated, then the deleteCases_getCaseStatus() function can be called in a ProcessMaker trigger. For example:
$subject = 'Finish up the case';
}
elseif (deleteCases_getCaseStatus(@@APPLICATION) == 'DRAFT') {
$subject = 'Start working on the case';
}
PMFSendMessage(@@APPLICATION, 'boss@example.com', 'employee1@example.com', '', '', $title, 'overdueCase.html');
When the plugin is created, the following code is automatically added to the pluginName.php file in order to incorporate the plugin's custom functions into ProcessMaker:
$this->registerPmFunction();
}
Linking the Plugin Files into ProcessMaker
After using the gulliver new-plugin script to create the new plugin, create symbolic links from the plugin's PHP file and its directory to the <INSTALL-DIRECTORY>/workflow/engine/plugins/ directory so the new plugin can be used by ProcessMaker.
For example:
ln -s /opt/plugins/deleteCases/deleteCases /opt/processmaker/workflow/engine/plugins/
It is recommended to create symbolic links, but another way to make the plugin available to ProcessMaker is to copy its files directly into ProcessMaker's plugin directory.
For example:
cp -r /opt/plugins/deleteCases/* /opt/processmaker/workflow/engine/plugins
Activate the New Plugin
After linking or copying the plugin's files into the ProcessMaker file system, then login to ProcessMaker as the "admin" user (or another user with the PM_SETUP_ADVANCE permission in his/her role). Go to ADMIN > Plugins > Plugins Manager and select the new plugin which should appear in the list. Then, click on the Enable button to activate the plugin. The new plugin should now be ready to be used. To see any new changes to the interface (such as new menus), refresh the web browser.
Note: Each time that the menu is changed in the plugin's files, the plugin will need to be deactivated and then reactivated for those changes to appear in the ProcessMaker interface.
Altering the Database Structure
Plugins can be used to alter the structure of the database(s) used by ProcessMaker. To add tables and/or tables to a database, complete these steps in order:
- Edit the Propel XML schema file(s) to define the additional tables and/or fields
- Run the gulliver propel-build-model script to construct Propel classes for the data objects.
- Run the gulliver propel-build-sql script to generate the SQL files to alter the database.
- Run the gulliver propel-build-crud for each table to update the database.
Editing the Propel XML schema file
Changes are made to the ProcessMaker database(s) through the XML schema file located at plugins/pluginName/pluginName/config/schema.xml,, which is generated by the gulliver new-plugin script.
Edit the schema.xml file to add the tables and fields used by the plugin. By default, it contains:
<!--Autogenerated by CreoleToXMLSchema!-->
<database name="workflow">
<table name="PLUGIN_DEMO">
<vendor type="mysql">
<parameter name="Name" value="PLUGIN_DEMO"/>
<parameter name="Engine" value="MyISAM"/>
<parameter name="Version" value="10"/>
<parameter name="Row_format" value="Dynamic"/>
<parameter name="Auto_increment" value=""/>
<parameter name="Collation" value="utf8_general_ci"/>
<parameter name="Create_options" value=""/>
<parameter name="Comment" value="The plugin demo table for deleteCases"/>
</vendor>
<column name="PLG_UID" type="VARCHAR" size="32" required="true" primaryKey="true" default="">
<vendor type="mysql">
<parameter name="Field" value="PLG_UID"/>
<parameter name="Type" value="varchar(32)"/>
<parameter name="Null" value="NO"/>
<parameter name="Key" value="PRI"/>
<parameter name="Default" value=""/>
<parameter name="Extra" value=""/>
</vendor>
</column>
<column name="PLG_PARENT_ID" type="INTEGER" required="true" default="0">
<vendor type="mysql">
<parameter name="Field" value="PLG_PARENT_ID"/>
<parameter name="Type" value="int(11)"/>
<parameter name="Null" value="NO"/>
<parameter name="Key" value=""/>
<parameter name="Default" value="0"/>
<parameter name="Extra" value=""/>
</vendor>
</column>
<column name="PLG_NAME" type="VARCHAR" size="100" required="true" default="">
<vendor type="mysql">
<parameter name="Field" value="PLG_FOLDER_NAME"/>
<parameter name="Type" value="varchar(100)"/>
<parameter name="Null" value="NO"/>
<parameter name="Key" value=""/>
<parameter name="Default" value=""/>
<parameter name="Extra" value=""/>
</vendor>
</column>
<column name="PLG_FULL_PATH" type="VARCHAR" size="255" required="true" default="">
<vendor type="mysql">
<parameter name="Field" value="PLG_FULL_PATH"/>
<parameter name="Type" value="varchar(255)"/>
<parameter name="Null" value="NO"/>
<parameter name="Key" value=""/>
<parameter name="Default" value=""/>
<parameter name="Extra" value=""/>
</vendor>
</column>
<index name="indexApp">
<index-column name="PLG_UID"/>
<vendor type="mysql">
<parameter name="Table" value="PLUGU"/>
<parameter name="Non_unique" value="1"/>
<parameter name="Key_name" value="indexApp"/>
<parameter name="Seq_in_index" value="1"/>
<parameter name="Column_name" value="PLUGIN_DEMO"/>
<parameter name="Collation" value="A"/>
<parameter name="Cardinality" value="6"/>
<parameter name="Sub_part" value=""/>
<parameter name="Packed" value=""/>
<parameter name="Null" value=""/>
<parameter name="Index_type" value="BTREE"/>
<parameter name="Comment" value=""/>
</vendor>
</index>
</table>
</database>
To add tables and/or fields to a database, first indicate which database they should be added to in the <database name="DB-NAME"> tag. The DB-NAME is one of the databases for the current workspace:
- "workflow" : The wf_<WORKSPACE> database
- "rbac" : The rb_<WORKSPACE> database
- "report" : The rp_<WORKSPACE> database
The <table name="TABLE-NAME"> tag is used to indicate the name of the table to modify. The "TABLE-NAME" can either be a new table or an existing table in the database. Remember that MySQL table names by default are case sensitive in Linux/UNIX, but not in Windows. In order to make a cross-platform plugin, it is recommended to use table names and field names in UPPER CASE. Make sure that the same TABLE-NAME is used in the tag: <parameter name="Name" value="TABLE-NAME"/>
Fields in each table are defined with the <column name="FIELD-NAME"> tag. The properties for each field can be defined inside the <column name="FIELD-NAME" PROPERTIES/> or through separate <parameter name="PROPERTY-NAME" value="PROPERTY-VALUE"/> tags.
For example, this XML code:
Creates the same "PLG_UID" field as this XML code:
<vendor type="mysql">
<parameter name="Field" value="PLG_UID"/>
<parameter name="Type" value="varchar(32)"/>
<parameter name="Null" value="NO"/>
<parameter name="Key" value="PRI"/>
<parameter name="Default" value=""/>
<parameter name="Extra" value=""/>
</vendor>s
</column>
Note that the first definition uses Propel's universal properties which are valid for all types of databases, whereas the second example uses properties which are specific to MySQL. This same "PLG_UID" field could be created using both forms of the properties:
<vendor type="mysql">
<parameter name="Field" value="PLG_UID"/>
<parameter name="Type" value="varchar(32)"/>
<parameter name="Null" value="NO"/>
<parameter name="Key" value="PRI"/>
<parameter name="Default" value=""/>
<parameter name="Extra" value=""/>
</vendor>
The sample schema.xml file created by the gulliver new-plugin script duplicates the definition of each field property using both universal and MySQL properties, but that duplication is unnecessary and is not recommended. The same sample file could be written in a shorter form as:
<!--Autogenerated by CreoleToXMLSchema!-->
<database name="workflow">
<table name="PLUGIN_DEMO">
<vendor type="mysql">
<parameter name="Name" value="PLUGIN_DEMO"/>
<parameter name="Engine" value="MyISAM"/>
<parameter name="Version" value="10"/>
<parameter name="Row_format" value="Dynamic"/>
<parameter name="Auto_increment" value=""/>
<parameter name="Collation" value="utf8_general_ci"/>
<parameter name="Create_options" value=""/>
<parameter name="Comment" value="The plugin demo table for deleteCases"/>
</vendor>
<column name="PLG_UID" type="VARCHAR" size="32" required="true" primaryKey="true" DEFAULT="" />
<column name="PLG_PARENT_ID" type="INTEGER" required="true" DEFAULT="0" />
<column name="PLG_NAME" type="VARCHAR" size="100" required="true" DEFAULT="" />
<column name="PLG_FULL_PATH" type="VARCHAR" size="255" required="true" DEFAULT="" />
<index name="indexApp">
<index-column name="PLG_UID"/>
<vendor type="mysql">
<parameter name="Table" value="PLUGU"/>
<parameter name="Non_unique" value="1"/>
<parameter name="Key_name" value="indexApp"/>
<parameter name="Seq_in_index" value="1"/>
<parameter name="Column_name" value="PLUGIN_DEMO"/>
<parameter name="Collation" value="A"/>
<parameter name="Cardinality" value="6"/>
<parameter name="Sub_part" value=""/>
<parameter name="Packed" value=""/>
<parameter name="Null" value=""/>
<parameter name="Index_type" value="BTREE"/>
<parameter name="Comment" value=""/>
</vendor>
</index>
</table>
</database>
For more information about Propel XML schema files, see the Propel Manual. For more examples of XML schema files, see the following files which define the <wf_<WORKSPACE> and rp_<WORKSPACE> databases for ProcessMaker:
- <INSTALL-DIRECTORY>/rbac/engine/config/schema.xml
- <INSTALL-DIRECTORY>/workflow/engine/config/schema.xml
Creating Classes with gulliver propel-build-model
After editing the config/schema.xml file, the run the following script to generate the Propel classes for the tables defined in the schema file:
./gulliver propel-build-model <pluginName>
For example:
>> propel.ini using the file : plugins/deleteCases/config/propel.ini
Buildfile: /opt/processmaker/gulliver/thirdparty/propel-generator/build.xml
[resolvepath] Resolved /opt/processmaker/workflow/engine/plugins/deleteCases/config to /opt/pm2033/workflow/engine/plugins/deleteCases/config
propel-project-builder > check-project-or-dir-set:
propel-project-builder > check-project-set:
propel-project-builder > set-project-dir:
propel-project-builder > check-buildprops-exists:
propel-project-builder > check-buildprops-for-propel-gen:
propel-project-builder > check-buildprops:
propel-project-builder > configure:
[echo] Loading project-specific props from /opt/processmaker/workflow/engine/plugins/deleteCases/config/propel.ini
[property] Loading /opt/processmaker/workflow/engine/plugins/deleteCases/config/propel.ini
propel-project-builder > om:
[phing] Calling Buildfile '/opt/processmaker/gulliver/thirdparty/propel-generator/build-propel.xml' with target 'om'
[property] Loading /opt/processmaker/gulliver/thirdparty/propel-generator/./default.properties
propel > check-run-only-on-schema-change:
propel > om-check:
propel > om:
[echo] +------------------------------------------+
[echo] | |
[echo] | Generating Peer-based Object Model for |
[echo] | YOUR Propel project! (NEW OM BUILDERS)! |
[echo] | |
[echo] +------------------------------------------+
[phingcall] Calling Buildfile '/opt/processmaker/gulliver/thirdparty/propel-generator/build-propel.xml' with target 'om-template'
[property] Loading /opt/processmaker/gulliver/thirdparty/propel-generator/./default.properties
propel > om-template:
[propel-om] Target database type: mysql
[propel-om] Target package: classes.model
[propel-om] Using template path: /opt/processmaker/gulliver/thirdparty/propel-generator/templates
[propel-om] Output directory: /opt/processmaker/workflow/engine/plugins/deleteCases
[propel-om] Processing: schema.xml
[propel-om] Processing Datamodel : JoinedDataModel
[propel-om] - processing database : workflow
[propel-om] + PLUGIN_DEMO
[propel-om] -> BasePluginDemoPeer [builder: PHP5ComplexPeerBuilder]
[propel-om] -> BasePluginDemo [builder: PHP5ComplexObjectBuilder]
[propel-om] -> PluginDemoMapBuilder [builder: PHP5MapBuilderBuilder]
[propel-om] -> (exists) PluginDemoPeer
[propel-om] -> (exists) PluginDemo
BUILD FINISHED
Total time: 0.2184 seconds
The propel-build-model script will add the following files to the plugin:
├── config
| └── schema-transformed.xml
└── classes
└── model
├── map
│ └── TableNameMapBuilder.php
├── om
│ ├── BaseTableNamePeer.php
│ └── BaseTableName.php
├── TableNamePeer.php
└── TableName.php
Note: The gulliver propel-build-model script needs to have the XSL module installed in PHP for XSLT parsing. Otherwise, the following error message will appear:
To install the XSL module:
In Debian/Ubuntu:
apt-get install php5-xsl
In Red Hat/CentOS/Fedora:
yum install php-xml
Creating SQL files with gulliver propel-build-sql
After generating the Propel classes, then create the SQL files which will insert new tables/files in the database:
./gulliver propel-build-sql <db-type> <pluginName>
The <db-type> will be "mysql", since ProcessMaker runs on a MySQL database. For example to generate the SQL files for the "deleteCases" plugin:
./gulliver propel-build-sql mysql deleteCases
Applying changes with gulliver propel-build-crud
After generating the SQL files, apply the database changes for each new or altered table:
./gulliver propel-build-crud <class> <table> <pluginName>
Creating Exportable Plugins
After creating the new plugin, use the gulliver pack-plugin script to pack the plugin files into a tar archive which can be exported.
Using the gulliver pack-plugin script
From the command line, login as root (or any user with rights to the plugins directory. Then, change to the workflow/engine directory and execute the gulliver pack-plugin script.
Remember that the <pluginName> is case sensitive and needs to be spelled exactly as the plugin's directory.
For example, to create an export file for the deleteCases plugin:
# ./gulliver pack-plugin deleteCases
1283 deleteCases.php
2061 deleteCases/config/propel.ini
2055 deleteCases/config/propel.mysql.ini
3053 deleteCases/config/schema.xml
382 deleteCases/setup.xml
183 deleteCases/messageShow.xml
376 deleteCases/class.deleteCases.php
File created in /opt/plugins/deleteCases/deleteCases-1.tar
Filesize 15.50 Kb
The tar file created by the gulliver pack-plugin script will be named NAME-VERSION.tar and will be located in the plugins/pluginName directory. If the tar file already exists, it will automatically be overwritten.
Then, copy the plugin's tar file to the local computer. If working on a remote server, then scp in Linux/UNIX or pscp in Windows can be used to copy the tar file to the local computer.
For example in Linux/UNIX:
scp root@example.com:/opt/plugins/deleteCases/deleteCases-1.tar
Importing a Plugin
After using the gulliver pack-plugin script to create a tar file for the plugin, then login to ProcessMaker as a user such as "admin" who has the PM_SETUP_ADVANCE permission in his/her role. Go to ADMIN > Plugins and click on the Import button. Select the tar file for the plugin and click on Import to upload and install the new plugin in ProcessMaker.
The new plugin should appear in the list in the Plugins Manager. Then, activate the new plugin in order to use it.
Note: Importing a plugin which already exists in ProcessMaker will overwrite the existing plugin. This is the way to upgrade plugins.
Creating Custom Pages
In ProcessMaker 2.0, either Gulliver + XML->HTML + Maborak or Gulliver + HTML + Ext JS can be used to generate custom pages in plugins. Gulliver is a custom PHP framework and Maborak is a custom JavaScript used by ProcessMaker. In version 2.0, ProcessMaker added the Ext JS framework for JavaScript and is gradually replacing all the XML->HTML + Maborak pages with HTML + Ext JS pages.
Ext JS generates very nice interface objects and is very flexible, however it is more difficult to generate a basic page using Gulliver + HTML + Ext JS. In contrast, it is much easier to generate basic pages using Gulliver + XML->HTML + Maborak. Unfortunately, the Maborak framework is not documented, hard to understand, and not very flexible. It generates simpler interfaces compared to Ext JS. Nonetheless, it is much easier to create pages using Gulliver + XML->HTML + Maborak, because the same XML used to create DynaForms can be used to create custom pages for a plugin.
Custom pages with HTML + Ext JS
To create a custom page using Gulliver + HTML + Ext JS, create the following five files:
- A PHP Page Setup file: Sets the HTML and JavaScript files for the custom page, passes variables to the JavaScript, and then renders the page.
- A HTML Template file: Sets the HTML content of the page. If using Ext JS to generate the interface items, this often is just an HTML page with an empty <div> which serves as a container for the HTML generated by Ext JS.
- An Ext JS code file: Generates the content for the custom page, such as toolbars, buttons, links, fields and labels.
- A PHP AJAX file: Handles the submission of forms from the page and any AJAX calls.
- A PHP Menu file: Creates a menu item that displays the custom page when clicked.
PHP Page Setup
To setup a custom page to be displayed using Gulliver + HTML + Ext JS, create a PHP file which does the following steps:
- First, get a single instance of the [class|headPublisher] class using the headPublisher::getSingleton() method. Remember that the Gulliver framework should only use a single instance of the headPublisher (or Publisher class for displaying pages.
- Then, use the headPublisher::addContent() method to add one or more HTML files to the next page that will be displayed.
- Then, use the headPublisher::addExtJsScript() method to add one or more JavaScript files which will be executed when the HTML files are loaded. The Ext JS library is used to create interface items and forms and fields which will be inserted in the HTML code.
- Then, use the headPublisher::assign() method to set JavaScript variables, which can be used by the JavaScript code to generate content in the HTML. For example, links, labels and the values in fields can be passed to the JavaScript.
- Finally, call G::RenderPage() to generate the content of the next page and display it.
Creating a cron using ProcessMaker classes
To create a cron using ProcessMaker classes, create a PHP file by following the steps below:
- First create the PHP file, for example Plugin_File_Name.php inside services folder.
- Then, add the following code:
class Plugin_File_NameClassCron
{
/**
* Default Constructor for the class
*/
function __construct ( ) {
}
function executeCron(){
if(SYS_SYS == "workflow" || SYS_SYS == "my_workspace"){ //execute the cron depending on the workspaces defined
$pluginFile="";
if (!class_exists('classPlugin_File_Name')){
$pluginFile = PATH_PLUGINS.'myproject'.PATH_SEP.'services'.PATH_SEP.'class.Plugin_File_Name.php';
}
if(file_exists($pluginFile)){
G::LoadClass('plugin');
require_once($pluginFile);
// the automated task is check and recreate the dimension tables
$plugin = new myClass(); //define the class with the name of the file where the actions will be executed by the cron
$plugin->followUpActions();
}
}
}
}
- Then, create a different PHP file, myClass.php where the code that will be executed by the cron, will be introduced, for example, sending emails, starting cases automatically, assigning permissions, etc.
class myClass
{
public $workspace = SYS_SYS;
function followUpActions()
{
//CODE
}
}


