- Overview
- Changing the installation directory
- Editing the ProcessMaker configuration file for Apache
- Editing the Apache configuration file
- Restarting Apache
- Changing the IP Address or Port Number
- Editing the PHP configuration
- Increasing the maximum execution time
- Transferring the MySQL databases
- Moving ProcessMaker to another server
Overview
ProcessMaker sets its configuration settings at installation and does not provide a easy way to alter those settings from the graphical interface. Nonetheless, the IP address, port number, installation directory and MySQL databases can be altered after installation by editing the configuration files on the system. Use a bare text editor, such as Notepad or Notepad++ in Windows, vim or gedit in Linux/UNIX, to edit the configuration files and always make a backup of the files before editing them.
Changing the installation directory
If moving the ProcessMaker code to a new location on the server, configuration files will need to be changed for Apache and in the ProcessMaker code.
First, move the ProcessMaker code to a new location on the server. For instance, if moving the code from/opt/processmaker to /usr/bin/processmaker in Linux/UNIX:
Then, open the file
Change the paths to the new location. For example, change the following lines from:
To:
Next, open the file
Under the ***System Directories & Paths*** section, change the paths to the new location. For example, change from:
To:
After changing the path, then delete the binary file
The srvConf.singleton file will be automatically recreated at the next login to ProcessMaker.
Then delete ProcessMaker's compiled cache, which contains data also pointing to the old path. For example:
The contents of the compiled directory will automatically be recreated the next time that DynaForms are displayed in ProcessMaker.
Editing the ProcessMaker configuration file for Apache
Finally, change the location of the ProcessMaker code in the Apache configuration file. Open the file pmos.conf, whose location depends upon your system:
- Red Hat/CentOS/Fedora:
- /etc/httpd/conf.d/pmos.conf
- Debian/Ubuntu:
- /etc/apache2/sites-available/pmos.conf
- Windows:
- If Apache was manually installed, the ProcessMaker configuration file can probably be found at:
- C:/Program Files/Apache Software Foundation/Apache2.2/conf/pmos.conf
- If Apache was installed with the ProcessMaker Windows Installer, then look for it at:
- C:/Program Files/ProcessMaker/apache2/conf/pmos.conf
- If Apache was manually installed, the ProcessMaker configuration file can probably be found at:
In the pmos.conf file, change the path to the ProcessMaker code. For example, change the lines from:
DirectoryIndex index.html index.php
<Directory "/opt/processmaker/workflow/public_html">
</directory>
To:
DirectoryIndex index.html index.php
<Directory "/usr/bin/processmaker/workflow/public_html">
Editing the Apache configuration file
If the location of the pmos.conf file has been changed on your system, then it is necessary to modify the Include directive in the Apache configuration file to point to the new location. Edit the httpd.conf file and change the following line:
Windows:
Edit the file C:\Archivos de programa\ProcessMaker\apache2\conf\httpd.conf to change the following line to point to the new location of pmos.conf:
Red Hat/Cent OS/Fedora:
Probably no change is necessary in the file /etc/httpd/httpd.conf, since all web site configuration files including pmos.conf should be found in the directory /etc/httpd/conf.d/
Debian/Ubuntu:
Probably no change is necessary in the file /etc/apache2/apache2.conf, since all web site configuration files including pmos.conf should be found in the directory/etc/apache2/sites-available/
Restarting Apache
After saving the changes to the configuration files, then restart the Apache web server for the new ProcessMaker configuration to take effect.
Red Hat/CentOS/Fedora:
Debian:
Ubuntu:
SUSE/openSUSE:
FreeBSD:
Windows:
If Apache was installed with the ProcessMaker Windows Installer, then issue the following commands from DOS:
NET START ProcessMakerApache
If using Windows XP Professional or Windows 2003 Server, Apache can also be restarted by going to Control Panel > Administrative Tools > Services. Right click on the "ProcessMakerApache" service, and select Restart from the dropdown menu.
If Apache was manually installed as a Windows service, then use the following commands:
NET START Apache2.2
If unsure whether Apache has been installed as a Windows service, look for it in the list of Windows services by going to Start > All Programs > Accessories > System Tools > System Information or by issuing the following DOS command:
In the left-hand panel of the System Information window, go to Software Environment > Services to see a list of available services. If not in the list, then Apache will have to be manually restarted by issuing the following DOS command:
Once Apache has been restarted, then ProcessMaker can be used in the new location on the server.
Changing the IP Address or Port Number
To change the IP address or port number for an existing ProcessMaker installation, use a plain text editor to modify the pmos.conf, and db.php files on your system.
1. If Apache isn't already configured to use a new IP address for the server or to listen on a new port number, then edit the Apache configuration file. Its location depends upon your system:
- Red Hat/CentOS/Fedora:
- /etc/httpd/conf/httpd.conf
- Debian/Ubuntu:
- /etc/apache2/apache.conf
- FreeBSD:
- /usr/local/etc/apache/httpd.conf
- Windows:,
- If Apache was installed by the ProcessMaker Windows Installer:
:\ \apache2\conf\httpd.conf
- For example:
- C:\Program Files\ProcessMaker\apache2\conf\httpd.conf
- If Apache was manually installed:
:\ \Apache Software Foundation\Apache2.2\conf\httpd.conf
- For example:
- C:\Program Files\Apache Software Foundation\Apache2.2\conf\httpd.conf
- If Apache was installed by the ProcessMaker Windows Installer:
Set the IP address for the ServerName directive. For example, if changing from the IP address 192.168.0.100 to the address 10.1.2.3, then change the line from:
To:
If your DNS or hosts file has defined a domain name for ProcessMaker, it can be used instead of an IP number. For example:
If changing ProcessMaker to a different port number, then change Listen in the Apache configuration file. For instance, if changing from port 85 to port 8080, then change from:
To:
The IP address doesn't have to be specified if you want Apache to listen on the same port for all incoming IP addresses:
2. Then, edit the pmos.conf file, which is the Apache configuration file for ProcessMaker. Replace the old IP address or port number with the new IP address or port number. The port number is defined after the IP address and is separated by ":" (a colon). If no port number is included in the address, ProcessMaker will use port 80 by default, which is the port generally used by the web.
For example, if changing from the address 192.168.0.100:85 (where 85 is the port number) to the address 10.1.2.3:8080 (where the 8080 is the port number), then change the lines from:
#processmaker virtual host
<VirtualHost 192.168.0.100:85 >
ServerName "192.168.0.100:85"
To:
#processmaker virtual host
<VirtualHost 10.1.2.3:8080 >
ServerName "10.1.2.3:8080"
3. Then, edit the db.php file, which indicates how to access ProcessMaker's databases in MySQL. If ProcessMaker was manually installed, it can be found at:
If ProcessMaker was installed using the ProcessMaker Windows Installer before version 1.6-4260, then look for it at:
If in Windows, ProcessMaker version 1.6-4260 or later, then look for it at:
Replace the old IP address with the new one, but do not change the port number, since it is the port for the MySQL database, which in most cases will be the default port 3306. For example, if changing from IP address 192.168.0.100 to 10.1.2.3, then change the file from:
// Processmaker configuration
define ('DB_ADAPTER', 'mysql' );
define ('DB_HOST', '192.168.0.100:3306' );
define ('DB_NAME', 'wf_workflow' );
define ('DB_USER', 'wf_workflow' );
define ('DB_PASS', '1tyv2zm5wxks' );
define ('DB_RBAC_HOST', '192.168.0.100:3306' );
define ('DB_RBAC_NAME', 'rb_workflow' );
define ('DB_RBAC_USER', 'rb_workflow' );
define ('DB_RBAC_PASS', '1tyv2zm5wxks' );
define ('DB_REPORT_HOST', '192.168.0.100:3306' );
define ('DB_REPORT_NAME', 'rp_workflow' );
define ('DB_REPORT_USER', 'rp_workflow' );
define ('DB_REPORT_PASS', '1tyv2zm5wxks' );
?>
To:
// Processmaker configuration
define ('DB_ADAPTER', 'mysql' );
define ('DB_HOST', '10.1.2.3:3306' );
define ('DB_NAME', 'wf_workflow' );
define ('DB_USER', 'wf_workflow' );
define ('DB_PASS', '1tyv2zm5wxks' );
define ('DB_RBAC_HOST', '10.1.2.3:3306' );
define ('DB_RBAC_NAME', 'rb_workflow' );
define ('DB_RBAC_USER', 'rb_workflow' );
define ('DB_RBAC_PASS', '1tyv2zm5wxks' );
define ('DB_REPORT_HOST', '10.1.2.3:3306' );
define ('DB_REPORT_NAME', 'rp_workflow' );
define ('DB_REPORT_USER', 'rp_workflow' );
define ('DB_REPORT_PASS', '1tyv2zm5wxks' );
?>
The db.php file has to be edited for each ProcessMaker workspace, including the default "workflow" workspace.
4. Finally, restart the Apache web server for the new IP address or port number to take effect.
Editing the PHP configuration
The configuration of PHP controls a number of aspects of ProcessMaker's behavior, such as the maximum amount of memory per session and the maximum size of uploaded files. To change the configuration of PHP, edit the php.ini file, whose location depends on your system:
- Red Hat/CentOS/Fedora:
- /etc/php.ini
- Debian/Ubuntu/SUSE/openSUSE:
- /etc/php5/apache2/php.ini
- In Debian/Ubuntu systems with multiple web servers:
- /etc/php5/cgi/php.ini
- FreeBSD:
- /usr/local/etc/php.ini
- Windows:
- If PHP was installed by the ProcessMaker Windows Installer:
- C:\Program Files\ProcessMaker\php\php.ini
- If PHP was manually installed:
- C:\Program Files\PHP\php.ini
- If PHP was installed by the ProcessMaker Windows Installer:
After saving your changes, restart Apache for the new PHP configuration to go into effect.
Increasing the maximum size of uploaded files
Since uploaded files are stored as files in the hard drive, their size can be as large as allowed by the operating system and harddrive format. Nonetheless, PHP by default is configured to allow the upload of files no larger than 2MB. To increase the maximum size of uploaded files, change the upload_max_filesize and post_max_size settings in the php.ini file.
Look for the "File Uploads" section and set file_uploads = On and increase the size of upload_max_filesize:
Uploaded files are passed to the ProcessMaker server as POST data, whose maximum size by default is 8MB. If larger files need to be uploaded, also increase the size of post_max_size:
Increasing the maximum execution time
By default, the maximum time that a command can be executed in PHP is set to 30 seconds. If you see an error message such as:
Then increase the value of the max_execution_time in php.ini:
Increasing the maximum memory per session
The memory for each session of ProcessMaker is generally set to 80MB, but this may not be enough memory to generate large Output Documents or do other memory-hogging actions. To change the memory_limit in version 2.0.29 and later, set it in the env.ini configuration file.
If more memory per session is needed before version 2.0.29, increase the value of the memory_limit setting in the php.ini file:
In addition, edit the sysGeneric.php file, which is generally located at:
- Linux/UNIX:
- /opt/processmaker/workflow/public_html/sysGeneric.php
- Windows, before ProcessMaker version 1.6-4260:
- Windows, ProcessMaker version 1.6-4260 and later:
In the sysGeneric.php file, edit line 7 to increase the value of '80M':
Moving the ProcessMaker databases
For large scale usage of ProcessMaker, it is recommended to store the ProcessMaker databases on a separate server, since it will reduce some of the load on the web server running ProcessMaker. Moving the ProcessMaker databases to a new location, is a two step process. First, transfer the databases to a different installation of MySQL, then configure ProcessMaker to use those databases in a new location.
Transferring the MySQL databases
The best way to move the ProcessMaker databases from one installation of ProcessMaker to another is to use the processmaker workspace-backup and processmaker workspace-restore commands.
However, if needing to move the MySQL databases to a new location without changing the ProcessMaker installation (or moving an older version of ProcessMaker which doesn't support workspace backup and restore), then use MySQL's utilities. Use the mysqldump command to make a copy of each database, and then use the mysql command to restore the database in a different installation of MySQL.
Each ProcessMaker workspace uses 3 MySQL databases. These 3 databases can use any name that was specified during installation, but they are generally named wf_
To check the names of these databases on your system, open a command line terminal on the server where the ProcessMaker databases are currently located and login to MySQL as the "root" user:
If using MS Windows, first add the directory where mysql.exe is installed to your PATH environment variable:
Now you can login to MySQL without first changing to the mysql\bin directory.
Once inside MySQL, issue the show databases command to see the list of databases. For instance, these would be the databases on a system with "workflow" and "sales" workspaces:
After verifying the database names, then logout of MySQL and use the mysqldump command to make a backup of the three databases for each workspace:
For example, to make a backup of the default "workflow" workspace using the "root" user whose password is "P@sSw0rD":
Then, go to the other server where the databases will be installed. In the command line terminal, use the mysql command to import each of the databases:
For example, if importing the "workflow" workspace with a "root" user whose password is "Dr0wSs@P":
Then login to MySQL and configure a user to have full privileges to control the MySQL databases:
Once in MySQL, give the user which will be running ProcessMaker superuser privileges to create create and modifiy MySQL tables:
Replace USER with the name of your MySQL user and PASSWORD with the password for that user. (If you haven't created any additional MySQL users, use 'root' as the user and the root's password.) Also replace 'IP-ADDRESS' with the domain name or IP address of the web server where ProcessMaker is installed. For example, if ProcessMaker is installed at 192.168.1.101, then:
Finally, exit MySQL:
Also make sure that no firewall is blocking the port used by MySQL, which by default is port 3306.
Configuring ProcessMaker for a Different Database Location
For ProcessMaker 2.0 and above
ProcessMaker 2.0 provides a way to change the database location and credentials inside the interface. See Changing the MySQL Location or its "root" user.
For versions older then 2.0
ProcessMaker uses an encrypted hash to store the information about how to access each database. After moving the MySQL databases, this hash will have to be regenerated with new information.
With a plain text editor edit the r.php file, which is generally located at:
- Linux/UNIX:
- /opt/processmaker/workflow/engine/methods/install/r.php
- Windows, before ProcessMaker version 1.6-4260:
- Windows, ProcessMaker version 1.6-4260 and later:
In r.php, edit the third line:
Replace "localhost" with the IP address of the new location of the ProcessMaker databases. Replace "mysql-root" and "mysql-root-password" with the username and password of the MySQL user who can create the databases. (In most cases, this will be the "root" user.)
For instance, if the ProcessMaker databases are being moved to a server located at 192.169.1.100, which will be accessed by the "root" user with the password "Dr0WsS@P":
After changing r.php, open a web browser and login to ProcessMaker as the "admin" user in the "workflow" workspace. Then, execute the r.php script by entering the following address your web browser:
- http://
/sysworkflow/en/green/install/r.php
A hash will be generated for the installation and for the system:
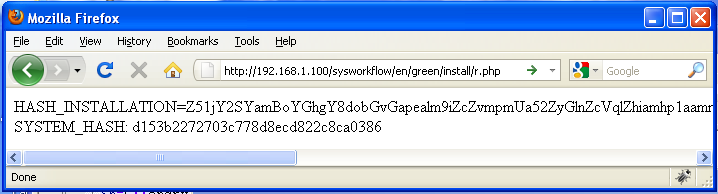
Copy the values of the HASH_INSTALLATION and SYSTEM_HASH. Then, edit the paths_installed.php file, which is generally located at:
- Linux/UNIX:
- /opt/processmaker/workflow/engine/config/paths_installed.php
- Windows, before ProcessMaker version 1.6-4260:
- Windows, ProcessMaker version 1.6-4260 and later (or manual install):
Replace the values of HASH_INSTALLATION and SYSTEM_HASH with the new hashes generated by r.php:
define( 'PATH_DATA', '/opt/processmaker/shared/' );
define( 'PATH_C', '/opt/processmaker/compiled/' );
define( 'HASH_INSTALLATION','<b-->Z51jY2SYamBoYGhgY8dobGvGapealm9iZcZvmpmUa52ZyGlnZcVqlZhiamhp1aamrMhpmpbGamRplW+TlJNqb27IaZqWxmpkaZVvk5STam9uyGjXuteLcoLHaZiUkmVqbZZoZWbFaWlvlm+VlsdvaWrHcMjElGtqaJQ' );
define( 'SYSTEM_HASH','<strong>d153b2272703c778d8ecd822c8ca0386'</strong> );
?>
Now, it should be possible to use the ProcessMaker databases in the new location.
Moving ProcessMaker to another server
ProcessMaker can be moved to another server along with all the existing processes, users and cases, either by using the new Backup and Restore utility (available in version 1.6-4184 or later in Linux/UNIX) or by manually transferring the database and the files in the shared directory.
It is extremely important to only transfer data between the same versions of ProcessMaker. Do NOT try to use data from one version of ProcessMaker in another version of ProcessMaker.
Using the Workspace Backup and Restore utility
If using ProcessMaker 1.6-4184 or later on Linux/UNIX, then Gulliver's workspace-backup command can be used to make a backup of the ProcessMaker workspaces in the old server:
Then, go to the new server and follow the standard procedure to install the same version of ProcessMaker as is being used on the old server. After installing ProcessMaker in the new server, then copy the backups/workspace.tar file from the old server to the new server. For example, if using scp to transfer the "workflow" workspace from the old server at 192.168.1.100 to the new server at 1.2.3.4:
Then, use Gulliver's workspace-restore command to import the workspace into the new server:
If importing a workspace which already exists on the new server, such as the default "workflow" workspace, then use the overwrite option when doing the restore:
Now all the data from the old ProcessMaker server should be available on the new server.
Manually Transferring to a New Server
If using a version before 1.6-4184 or using Windows, then the ProcessMaker databases and the contents of the shared directory will have to be manually transferred to the new server.
First, follow the standard procedure to install the same version of ProcessMaker on the new server as is being used on the old server.
Then, follow the instructions above to copy the ProcessMaker databases from the old server to the new server.
Finally, copy the contents of the shared directory from the old server to the new server. It can generally be found at:
Now all the data from the old ProcessMaker server should be available on the new server.

