Overview
Web Entry allows anonymous, external users to initiate new cases from an external web page, without the necessity of manually logging into ProcessMaker. Web Entry provides a web link or the HTML code to a DynaForm in the first task of a process. The user fills out this DynaForm and submits the data back to ProcessMaker through WSDL Web Services, which can either be called automatically or manually. It can only be used to start cases.
Web Entry is useful when offering services directly to clients through your organization's web page. For instance, a school could use Web Entry to allow prospective students to apply by filling out a ProcessMaker DynaForm embedded in its web page. Likewise, a company could use Web Entry to provide its clients with an order form for its services.
Web Entry provides the "PHP pages with web services" option to generate an external web link to a DynaForm in the initial step of a process. This link can be used in an HTML in an external web page or can be embedded inside an external web page through an HTML or
For ambitious web developers who want greater control, Web Entry also offers the "Single HTML" option to generate the HTML code for a DynaForm. That code can be incorporated directly into an organization's web page, but ProcessMaker's WSDL Web Services have to be manually called to remotely login and create a new case with the data filled in the DynaForm. If filling out a form for an existing case, send the data to the case with the sendVariables() web service.
Before Using Web Entries
Take into consideration that Web Entries generate additional PHP files that consume SOAP endpoints, which require the username and password of the user assigned to the Web Entry. ProcessMaker does not store these credentials at any moment for users imported from an LDAP server. Therefore, Web entries can NOT be assigned to LDAP users.
If you are using PHP 7 and a ProcessMaker version 2 process, you need to regenerate the Web Entry or create a new one in order to not have problems.
Warning: Avoid modifying auto-generated PHP files. It is bad practice to modify these files, because they will regenerate after saving the Web Entry configuration or when the Dynaform involved in the Web Entry is saved from Designer. Modified information will be lost.
Create a Web Entry
First, create the DynaForm which will be displayed in a Web Entry and assign it as a step in an initial task in the process. Then, open the process and right click on a blank area of the process map. Select the option Web Entry from the drop down menu.
At the top of the list of Web Entries, click on the New link to create a new Web Entry.
Creation of the Web Entry until version 2.5.x Creation of the Web Entry from version 2.8
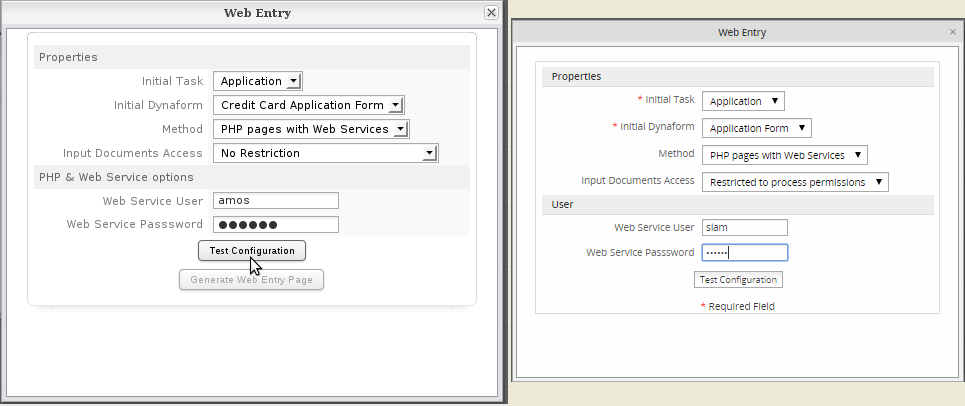
Define the following Web Entry properties:
- Initial Task: Select the task in which the case will start. Only tasks which have a Starting Task routing rule can be selected.
- Initial Dynaform: Select which DynaForm in the initial task will be used for the Web Entry. Only DynaForms assigned as a step in the Initial Task can be selected.
- Method: Select whether the Web Entry form will be based upon:
PHP pages with Web Services: If this option is selected, then the fields to enter a Web Services User and Password will appear below.
Single HTML: This option only generates the HTML code for the DynaForm, so it is not necessary to enter a Web Services User and Password. - Input Documents Access: If the Web Entry form has a file field which is associated with an Input Document, this option configures whether the external user can upload input documents with No Restriction (the default option) or access is Restricted to Process Permissions for the Web Services User entered below.
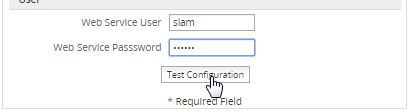
- Web Services User: Enter the name of a ProcessMaker user who will login to ProcessMaker using Web Services and will be assigned to the first task for any cases which are created using Web Entry. This user must be assigned to the selected Initial Task and have a status of "ACTIVE".
- Web Services Password: Enter the password for the Web Services User.
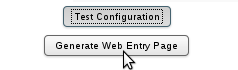
After defining the web entry properties, click on Test Configuration to verify that the selected properties and the user are valid. If valid, the Generate Web Entry Page button will be activated.
From version 2.8 when creating a Web Entry it is required to first test the configuration and if it was successful, the button Generate web entry will be enabled.
Step 1: Test the Configuration
Step 2: Enable Generate Web Entry Page
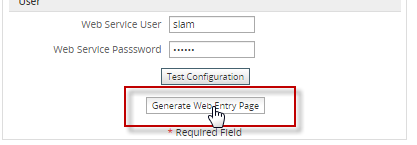
Click on Generate Web Entry Page to create the new Web Entry.
Note: Due to the fact that a normal user may change his/her password and thus break the Web Entry, it is good idea to create a dummy user whose password will never change for the purpose of creating new cases with Web Entry.
PHP pages with Web Services
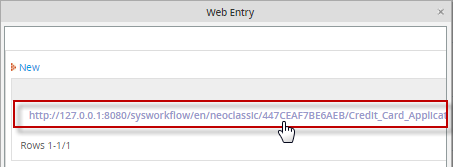
If the PHP Pages with Web Services option was selected when creating the Web Entry, then a link to the Web Entry form will be added to the list of available Web Entries:
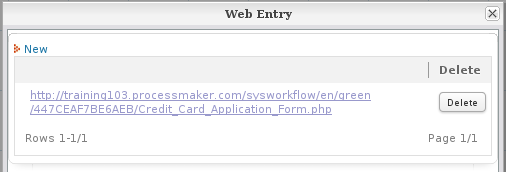
This is a link to the initial DynaForm to start a case with Web Entry. This link can be inserted in an external web page or sent as a link in an email. When the external user fills out and submits the DynaForm, web services will automatically be called to login into ProcessMaker and start a new case with the data filled into the DynaForm. The new case will be automatically assigned to the user defined for the web entry and its status will be set to DRAFT.
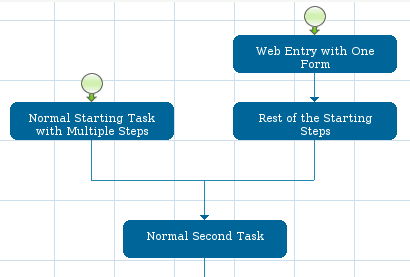
Then, the case will automatically be routed to the next task in the process. This means that any other steps in that task will be skipped. If there are other steps which need to executed in the initial task, it is recommended to create an alternative initial task which is just used by web entry. It should contain just one step which is the DynaForm used by the Web Entry. Then, create a second task where all the rest of the starting steps will be placed, so they can be worked on by a normal ProcessMaker user:
Note 1: The PHP page with web services option can only be used with processes whose second task have Cyclical Assignment of users.
Note 2: No triggers in the initial task will be fired by the Web Entry. If triggers need to be fired, then use the Single HTML option.
Single HTML
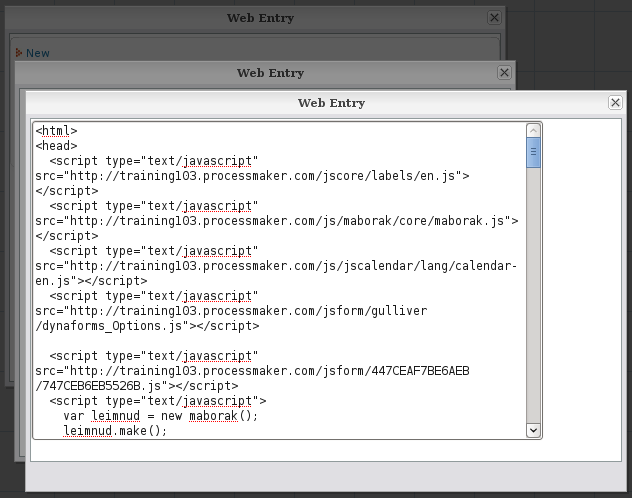
If the Single HTML option was selected when defining the Web Entry, then a dialog box will appear with the HTML code for the selected DynaForm in the initial task.
(<a href="...">) or a frame (<frame src="...">). Note that this HTML code will does not support Dependent Fields, nor DynaForm Conditions. If pasting the Web Entry's HTML code into an existing page, copy the code between the <head>...</head> tags into the existing page's head and copy the code between the <body>...</body> tags part into the existing page's body. The Single HTML option has a number of limitations, but to use it, see the code examples at Manually Implementing Web Entry.
Running Web Entries in Browser without JavaScript
Available Version: PM 2.8
Sometimes, when JavaScript was disabled from browsers for security issues, it was possible to send Dynaform without filling all fields even if they were required because validation functions did not work. From ProcessMaker 2.8 validations of required fields are possible even if JavaScript is disabled inside the browser. With these validations all data entered inside a Dynaform is validated before its submit.
For example, if a web entry was generated using PHP pages with Web Services, generate the link to access the DynaForm of the first task:
When the assigned user accesses the Dynaform through the link and tries to send the Dynaform without filling all the required fields, even if JavaScript is not enabled inside the browser, an alert is shown to the user:

For more information about how to enable Javascript inside your browser visit this page
Inserting Web Entries into Web Pages
The easiest way to insert a Web Entry form into an external web page is to simply add a link (anchor) to the Web Entry form in the web page.
For example, a web entry generated with the "PHP Pages with Web Services" option has the link:
Then, a link to the Web Entry form could be added to a web page:
To link to the same Web Entry form by clicking on an image
A Web Entry form can be embedded inside an existing web page through the use of HTML frames
For example, the same web entry form can be embedded in a HTML frameset like this:
<head>
</head>
<frameset border="0" frameborder="0" framespacing="0" rows="20%,*">
<frame src="title.html">
<frameset border="0" frameborder="0" framespacing="0" cols="30%,*">
<frame src="menu.html">
<frame src="http://acme.com/sysworkflow/en/classic/447CEAF7BE6AEB/Application_Form.php">
</frameset>
</html>
Likewise, the same web entry form could be embedded in an <iframe>.
<head>
</head>
</body>
<p><img src="acmelogo.png"><big>Acme title text</big></p>
<iframe src="http://acme.com/sysworkflow/en/classic/447CEAF7BE6AEB/Application_Form.php" width="100%" height="800">
<p>No iframe support, so click on the
<a href="http://acme.com/sysworkflow/en/classic/447CEAF7BE6AEB/Application_Form.php">Application Form Link</a></p>
</iframe>
<p>Acme footer text</p>
</body>
</html>
If the Web Entry form was generated with the Single HTML option, then it just generates the HTML code. Paste that code into an HTML file and save the file in a public place in the web server, so it can be used as the src for the frame.
Manually Implementing Web Entry
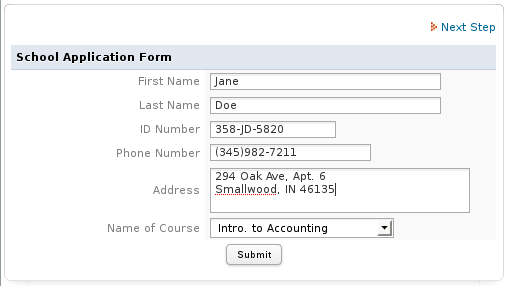
If using the Single HTML option, a new case will need to be created and the form's data will have to be sent to the ProcessMaker server using WSDL Web Services. The newCase() or newCaseImpersonate() web service can be used to create the case with data filled out in the Web Entry form.For example, a school has an application form to apply for a course in its web page:
When a web entry with Single HTML option is created for the above DynaForm, it generates the following code:
<head>
<script type="text/javascript" src="http://example.com/jscore/labels/en.js"></script>
<script type="text/javascript" src="http://example.com/js/maborak/core/maborak.js"></script>
<script type="text/javascript" src="http://example.com/js/jscalendar/lang/calendar-en.js"></script>
<script type="text/javascript" src="http://example.com/jsform/gulliver/dynaforms_Options.js"></script>
<script type="text/javascript" src="http://example.com/jsform/8020012184e556501ceecf6014729518/4878024044e556511de9fe9093783949.js"></script>
<script type="text/javascript">
var leimnud = new maborak();
leimnud.make();
leimnud.Package.Load("panel,validator,app,rpc,fx,drag,drop,dom,abbr",{ Instance:leimnud,Type:"module" });
leimnud.exec(leimnud.fix.memoryLeak);
if(leimnud.browser.isIphone)
{ leimnud.iphone.make(); }
leimnud.event.add(window,"load",function(){ loadForm_YTVOaW5HQ2tabUdvcUphaXFtdHVvbUxRbU1pVDBtYWpaV1NucG1xaXBtMW9wbW1rYTVOaW9HQ25hSldscVdlaXBtYWQxMnJUbUp4Z3BXT3FiR09wcUdxYjdhS2w___("http://example.com/sysworkflow/en/classic/gulliver/defaultAjaxDynaform")});
</script>
<script type="text/javascript">
var aux1 = window.location.href.split("?");
if(aux1[1]){
if(aux1[1]!=""){
var aux2 = aux1[1].split("&");
for(var i=0; i<=aux2.length; i++){
if(aux2[i]=="__flag__=1"){
alert("Request sent!");
}
}
}
}
</script>
</head>
<body>
<form id="YTVOaW5HQ2tabUdvcUphaXFtdHVvbUxRbU1pVDBtYWpaV1NucG1xaXBtMW9wbW1rYTVOaW9HQ25hSldscVdlaXBtYWQxMnJUbUp4Z3BXT3FiR09wcUdxYjdhS2w___" name="8020012184e556501ceecf6014729518_4878024044e556511de9fe9093783949" action="http://example.com/sysworkflow/en/classic/services/cases_StartExternal.php" class="formDefault" method="post" encType="multipart/form-data" style="margin:0px;" onsubmit="return validateForm('[{%27name%27:%27appFirstName%27,%27type%27:%27text%27,%27label%27:%27First Name%27,%27validate%27:%27Any%27,%27required%27:%270%27},{%27name%27:%27appLastName%27,%27type%27:%27text%27,%27label%27:%27Last Name%27,%27validate%27:%27Any%27,%27required%27:%270%27},{%27name%27:%27appID%27,%27type%27:%27text%27,%27label%27:%27ID Number%27,%27validate%27:%27Any%27,%27required%27:%270%27},{%27name%27:%27appPhone%27,%27type%27:%27text%27,%27label%27:%27Phone Number%27,%27validate%27:%27Any%27,%27required%27:%270%27},{%27name%27:%27appAddress%27,%27type%27:%27textarea%27,%27label%27:%27Address%27,%27validate%27:%27%27,%27required%27:%270%27},{%27name%27:%27appCourse%27,%27type%27:%27dropdown%27,%27label%27:%27Name of Course%27,%27validate%27:%27%27,%27required%27:%270%27}]');"> <div class="borderForm" style="width:500; padding-left:0; padding-right:0; border-width:1;">
<div class="boxTop"><div class="a"></div><div class="b"></div><div class="c"></div></div>
<div class="content" style="height:100%;" >
<table width="99%">
<tr>
<td valign='top'>
<input type="hidden" class="notValidateThisFields" name="__notValidateThisFields__" id="__notValidateThisFields__" value="[{%27name%27:%27appFirstName%27,%27type%27:%27text%27,%27label%27:%27First Name%27,%27validate%27:%27Any%27,%27required%27:%270%27},{%27name%27:%27appLastName%27,%27type%27:%27text%27,%27label%27:%27Last Name%27,%27validate%27:%27Any%27,%27required%27:%270%27},{%27name%27:%27appID%27,%27type%27:%27text%27,%27label%27:%27ID Number%27,%27validate%27:%27Any%27,%27required%27:%270%27},{%27name%27:%27appPhone%27,%27type%27:%27text%27,%27label%27:%27Phone Number%27,%27validate%27:%27Any%27,%27required%27:%270%27},{%27name%27:%27appAddress%27,%27type%27:%27textarea%27,%27label%27:%27Address%27,%27validate%27:%27%27,%27required%27:%270%27},{%27name%27:%27appCourse%27,%27type%27:%27dropdown%27,%27label%27:%27Name of Course%27,%27validate%27:%27%27,%27required%27:%270%27}]" />
<input type="hidden" name="DynaformRequiredFields" id="DynaformRequiredFields" value="[{%27name%27:%27appFirstName%27,%27type%27:%27text%27,%27label%27:%27First Name%27,%27validate%27:%27Any%27,%27required%27:%270%27},{%27name%27:%27appLastName%27,%27type%27:%27text%27,%27label%27:%27Last Name%27,%27validate%27:%27Any%27,%27required%27:%270%27},{%27name%27:%27appID%27,%27type%27:%27text%27,%27label%27:%27ID Number%27,%27validate%27:%27Any%27,%27required%27:%270%27},{%27name%27:%27appPhone%27,%27type%27:%27text%27,%27label%27:%27Phone Number%27,%27validate%27:%27Any%27,%27required%27:%270%27},{%27name%27:%27appAddress%27,%27type%27:%27textarea%27,%27label%27:%27Address%27,%27validate%27:%27%27,%27required%27:%270%27},{%27name%27:%27appCourse%27,%27type%27:%27dropdown%27,%27label%27:%27Name of Course%27,%27validate%27:%27%27,%27required%27:%270%27}]" />
<table cellspacing="0" cellpadding="0" border="0" width="100%">
<tr>
<td class='FormTitle' colspan="2" align=""><span id='form[appTitle]' name='form[appTitle]' >School Application Form</span></td>
</tr>
<tr>
<td class='FormLabel' width="40%">First Name</td>
<td class='FormFieldContent' width='450' ><input class="module_app_input___gray" id="form[appFirstName]" name="form[appFirstName]" type="text" size="30" maxlength="64" value="" style="" onkeypress="" /></td>
</tr>
<tr>
<td class='FormLabel' width="40%">Last Name</td>
<td class='FormFieldContent' width='450' ><input class="module_app_input___gray" id="form[appLastName]" name="form[appLastName]" type="text" size="30" maxlength="64" value="" style="" onkeypress="" /></td>
</tr>
<tr>
<td class='FormLabel' width="40%">ID Number</td>
<td class='FormFieldContent' width='450' ><input class="module_app_input___gray" id="form[appID]" name="form[appID]" type="text" size="15" maxlength="64" value="" style="" onkeypress="" /></td>
</tr>
<tr>
<td class='FormLabel' width="40%">Phone Number</td>
<td class='FormFieldContent' width='450' ><input class="module_app_input___gray" id="form[appPhone]" name="form[appPhone]" type="text" size="20" maxlength="64" value="" style="" onkeypress="" /></td>
</tr>
<tr>
<td class='FormLabel' width="40%">Address</td>
<td class='FormFieldContent' width='450' ><textarea id="form[appAddress]" name="form[appAddress]" wrap="hard" cols="32" rows="2" style="" wrap="OFF" class="module_app_input___gray" ></textarea></td>
</tr>
<tr>
<td class='FormLabel' width="40%">Name of Course </td>
<td class='FormFieldContent' width='450' ><select class="module_app_input___gray" id="form[appCourse]" name="form[appCourse]" pm:label="Name of Course " pm:dependent="0" ><option value="accounting" >Intro. to Accounting</option><option value="operating_systems" >Intro to Operating Systems</option></select></td>
</tr>
<tr>
<td class='FormButton' colspan="2" align=""><input style="" class='module_app_button___gray ' id="form[appSubmit]" name="form[appSubmit]" type='submit' value="Submit" /></td>
</tr>
</table>
</td>
</tr>
</table>
</div>
<div class="boxBottom"><div class="a"></div><div class="b"></div><div class="c"></div></div>
</div>
<script type="text/javascript">
try { dynaformSetFocus();}catch(e){}
</script>
<input type="hidden" name="PRO_UID" value="8020012184e556501ceecf6014729518">
<input type="hidden" name="TASKS" value="9217522174e5566d0cdf6d9080799970">
<input type="hidden" name="DYNAFORM" value="4878024044e556511de9fe9093783949">
<!--Insert custom scripts here-->
</form></body>
</html>
Modifying the HTML Code
Paste the HTML code for the web entry into a publicly-accessible file named "applicationForm.html" and edit it. The submission of the form will be processed by a custom code file named "wsApplicationForm.php", so change line 35 from:
</p>
<p>To: </p>
<pre lang="html4strict">
<form id="appForm" name="appForm" action="wsApplicationForm.php" class="formDefault" method="post" encType="multipart/form-data" style="margin:0px;"> <div class="borderForm" style="width:500; padding-left:0; padding-right:0; border-width:1;">
To add any extra JavaScript code to the form (such as showing/hiding fields or verification of input), insert that code at the end of the form inside tags. For example, to verify that the ID field is not left blank when the user clicks on the submit button:
<input type="hidden" name="DYNAFORM" value="4878024044e556511de9fe9093783949">
<!--Insert custom scripts here-->
<script type="text/javascript">
getField("appSubmit").onclick = function() {
if (getValueById("appID") == "") {
alert("The ID field can not be left blank. Please enter a valid ID");
return false;
}
return true; //return true to allow the form to be submitted.
}
</script>
</form></body>
</html>
<p>The following two <pre><script>
var leimnud = new maborak();
leimnud.make();
leimnud.Package.Load("panel,validator,app,rpc,fx,drag,drop,dom,abbr",{ Instance:leimnud,Type:"module" });
leimnud.exec(leimnud.fix.memoryLeak);
if(leimnud.browser.isIphone)
{ leimnud.iphone.make(); }
leimnud.event.add(window,"load",function(){
loadForm_YTVOaW5HQ2tabUdvcUphaXFtdHVvbUxRbU1pVDBtYWpaV1NucG1xaXBtMW9wbW1rYTVOaW9HQ25hSldscVdlaXBtYWQxMnJUbUp4Z3BXT3FiR09wcUdxYjdhS2w___
("http://example.com/sysworkflow/en/classic/gulliver/defaultAjaxDynaform")});
</script>
<script type="text/javascript">
var aux1 = window.location.href.split("?");
if(aux1[1]){
if(aux1[1]!=""){
var aux2 = aux1[1].split("&");
for(var i=0; i<=aux2.length; i++){
if(aux2[i]=="__flag__=1"){
alert("Request sent!");
}
}
}
}
</script>
Server-side Code to Start a Case
Then, create a server-side script to process the Web Entry when it is submitted and use web services to start a case in ProcessMaker. This code can be written in any language which supports WSDL web services which are used to call ProcessMaker's login() and newCase() web services.
For example, create a PHP file named "wsApplicationForm.php" on the web server (which is not publicly readable for security reasons) to process the application form when it is submitted by the user and call the newCase() web service. The data in the input fields "appFirstName", "appLastName", "appID", "appPhone", "appAddress", "appCourse" from applicationForm.html will be saved as a POST variable in an associative array named "form". In PHP it can be accessed as $_POST['form']['field-name']. A new case will be created using the newCase() web service. The form's input fields will be passed as an array of objects to the newCase() web service, so the new case will have case variables for each input field.
The code for the "wsApplicationForm.php" file is:
//check if the form was submitted. If not then redisplay the form:
if (!isset($_POST['form'])) {
print '<p><font color="red">Please fill out the form and click on the "Submit" button.</color></p>';
print file_get_contents('applicationForm.html');
die();
}
//login to web services as a dummy user with the username "webEntryUser":
$client = new SoapClient('http://192.168.1.76:2031/sysworkflow/en/green/services/wsdl2');
$pass = 'md5:' . md5('p4s5w0rd');
$params = array(array('userid'=>'webEntryUser', 'password'=>$pass));
$result = $client->__SoapCall('login', $params);
if ($result->status_code == 0)
$sessionId = $result->message;
else
exit("Unable to connect to ProcessMaker.\nError Number: $result->status_code\n" .
"Error Message: $result->message\n");
class variableStruct {
public $name;
public $value;
}
$aVars = array(); //array of variables to pass to the new case
//loop through $_POST['form'] associative array, which has the form's fields
foreach ($_POST['form'] as $fieldName=>$fieldValue) {
//if an array, it could be a checkgroup, listbox or a grid
if (is_array($_POST['form'][$fieldName])) {
//if an associative array of associative arrays, then it is a grid and it needs to be
//serialized to be passed to the new case as a string variable
if (isset($_POST['form'][$fieldName][1]) and is_array($_POST['form'][$fieldName][1]))
$fieldValue = serialize($_POST['form'][$fieldName]);
//else a checkgroup or listbox, so concatenate multiple values separated by "|"
else {
$val = '';
foreach ($_POST['form'][$fieldName] as $option)
$val .= ($val != '' ? '|' : '') . $option;
$fieldValue = $val;
}
}
$obj = new variableStruct();
$obj->name = $fieldName;
$obj->value = $fieldValue;
$aVars[] = $obj;
}
$params = array(array('sessionId'=>$sessionId, 'processId'=>$_POST['PRO_UID'],
'taskId'=>$_POST['TASKS'], 'variables'=>$aVars));
$result = $client->__SoapCall('newCase', $params);
if ($result->status_code == 0)
print "<html><body>Thank you for submitting your Application.<br>" .
"Your Application Number: {$result->caseNumber}</body></html>";
else
die("<html><body><font color=\"red\">Error submitting application:<br>" .
"{$result->message}<br><br>" .
"Please resubmit the application or call 776-654-6554.</font></body></html>");
?>
Handling Specific Input Fields
The above code will generically process all the input fields in any submitted DynaForm. To only pass specific input fields to the new case, replace the foreach loop with code that manually populates the $aVars array by referencing specific input fields. For example:
$aVars = array(); //array of variables to pass to the new case
$firstName = new variableStruct();
$firstName->name = 'appFirstName';
$firstName->value = $_POST['form']['appFirstName'];
$aVars[] = $firstName;
$lastName = new variableStruct();
$lastName->name = 'appLastName';
$lastName->value = $_POST['form']['appLastName'];
$aVars[] = $lastName;
$id = new variableStruct();
$id->name = 'appID';
$id->value = $_POST['form']['appID'];
$aVars[] = $id;
...
Handling Grids
Grids are stored as an associative array of associative arrays, but only strings can be passed to a case with the newCase() web service, so the above script serializes the grid as a string. Therefore, any grids from the web entry form will need to be unserialized (i.e., converted back into an associative array of associative arrays). Create a trigger in the process to unserialize the grid, so it can be used normally in subsequent tasks and steps.
For example, if the Web Entry form has a grid named "contactsGrid", then use PHP's unserialize() function in a trigger to convert from a string to an array, but first check if the "contactsGrid variable exists and if it is a string. If the case was started inside ProcessMaker and not by a web entry, then the grid will already be in its proper format and doesn't need to be unserialized:
@=contactsGrid = unserialize(@=contactsGrid);
This trigger can be set to fire before the step that follows the Web Entry form in the process. Another alternative is to not set the trigger to fire at any point, but to fire the trigger with the executeTrigger() web service in the external script which processes the Web Entry form.
For example, the following code could be added to the end of the script in the above example:
//The caseId is returned by newCase()
//The delIndex should be 1 if first task in process
//Lookup the triggerIndex in the database or at ADMIN > Web Services Test > triggerList()
$params = array(array('sessionId'=>$sessionId, 'caseId'=>$result->caseId,
'triggerIndex'='0123456789abcde01232456789abcde' 'delIndex'=>1));
$triggerResult = $client->__SoapCall('executeTrigger', $params);
if ($triggerResult->status_code != 0)
die("<html><body><font color=\"red\">Error executing trigger:<br>" .
"{$triggerResult->message}<br><br>" .
"Please call 776-654-6554.</font></body></html>");
...
Routing (Derivating) the Case
If the web entry form is the last step in the first task, then add code at the end of the script to use the routeCase() web service to route (derivate) the case to the second task in the process. The unique ID for the new case should have been returned by the newCase() web service and the delegation index of the case should be 1, since it is the first task in the process:
$params = array(array('sessionId'=>$sessionId, 'caseId'=>$result->caseId, 'delIndex'=>1));
$routeResult = $client->__SoapCall('routeCase', $params);
if ($routeResult->status_code != 0)
die("<html><body><font color=\"red\">Error routing application:<br>" .
"{$result->message}<br><br>" .
"Please call 776-654-6554.</font></body></html>");
?>
Web Entry with Multiple DynaForms
If needing to display multiple DynaForms, then generate the HTML code for each DynaForm with the Single HTML option and paste that code into separate files. The server-side script which processes all the forms can create a session where the data entered into the forms will be saved. Based upon the data which is already saved for the session, the script will know which is the next form to display to the user. If the session expires (which happens by default after 24 minutes in PHP), then the data will be lost and the user will start over with the first DynaForm.
The script can be written in any language which supports WSDL web services, but if using PHP, the session_start() and session_destroy() functions can be used to manage the session and the forms' data can be saved in the $_SESSION superglobal variable.
For example, this web entry has three forms named form1.html, form2.html> and <pre>form3.html. The data from the first two forms are saved as the session variables $_SESSION['form1'] and $_SESSION['form2']. When the third form is processed, the data from $_SESSION['form1'] and $_SESSION['form2'] is also passed to the newCase() web service to start the case.
if (!isset($_POST['form'])) { //if no submitted data, then start over with form1
header("location: form1.html");
die();
}
//if no stored form1 data and fieldX from form1 is not set, then lost session and should start over
elseif (!isset($_SESSION['form1'] and !isset($_POST['form']['fieldX'])) {
header("location: form1.html");
die();
}
//if fieldX from form1 is set, then start session and save data from form1
elseif (isset($_POST['form']['fieldX'])) {
session_start();
$_SESSION['form1'] = $_POST['form'];
header("location: form2.html");
die();
}
//if fieldY from form2 is set, then save data from form2
elseif (isset($_POST['form']['fieldY'])) {
$_SESSION['form2'] = $_POST['form'];
header("location: form2.html");
die();
}
//if fieldZ from form3 is not set, then some error in logic
elseif (!isset($_POST['form']['fieldZ')) {
die("Error in your script!");
}
//login to web services as a dummy user with the username "webEntryUser":
$client = new SoapClient('http://192.168.1.76:2031/sysworkflow/en/green/services/wsdl2');
$pass = 'md5:' . md5('p4s5w0rd');
$params = array(array('userid'=>'webEntryUser', 'password'=>$pass));
$result = $client->__SoapCall('login', $params);
if ($result->status_code == 0)
$sessionId = $result->message;
else
exit("Unable to connect to ProcessMaker.\nError Number: $result->status_code\n" .
"Error Message: $result->message\n");
class variableStruct {
public $name;
public $value;
}
$aFormFields = array_merge($_SESSION['form1'], $_SESSION['form2'], $_POST['form']);
unset($_SESSION['form1']);
unset($_SESSION['form2']);
$aVars = array(); //array of variables to pass to the new case
foreach ($aFormFields as $fieldName=>$fieldValue) {
//if an array, it could be a checkgroup, listbox or a grid
if (is_array($aFormFields[$fieldName])) {
//if an associative array of associative arrays, then it is a grid and it needs to be
//serialized to be passed to the new case as a string variable
if (isset($aFormFields[$fieldName][1]) and is_array($aFormFields[$fieldName][1]))
$fieldValue = serialize($aFormFields[$fieldName]);
//else a checkgroup or listbox, so concatenate multiple values separated by "|"
else {
$val = '';
foreach ($aFormFields[$fieldName] as $option)
$val .= ($val != '' ? '|' : '') . $option;
$fieldValue = $val;
}
}
$obj = new variableStruct();
$obj->name = $fieldName;
$obj->value = $fieldValue;
$aVars[] = $obj;
}
$params = array(array('sessionId'=>$sessionId, 'processId'=>$_POST['PRO_UID'],
'taskId'=>$_POST['TASKS'], 'variables'=>$aVars));
$result = $client->__SoapCall('newCase', $params);
if ($result->status_code == 0)
print "<html><body>Thank you for submitting your Application.<br>" .
"Your Application Number: {$result->caseNumber}</body></html>";
else
die("<html><body><font color=\"red\">Error submitting application:<br>" .
"{$result->message}<br><br>" .
"Please resubmit the application or call 776-654-6554.</font></body></html>");
//If the application form was the last step in the first task, then route (derivate)
//the case to the second task in the process to evaluate the application:
//The delIndex for the first task is generally 1
$params = array(array('sessionId'=>$sessionId, 'caseId'=>$result->caseId, 'delIndex'=>1));
$routeResult = $client->__SoapCall('routeCase', $params);
if ($routeResult->status_code != 0)
die("<html><body><font color=\"red\">Error routing application:<br>" .
"{$result->message}<br><br>" .
"Please call 776-654-6554.</font></body></html>");
?>
Web Entry in the Middle of a Process
To display a DynaForm from the middle of a Process to an external user, first generate the HTML code for the form using the Single HTML option for Web Entry.
Note: A Web Entry can not be created for a DynaForm which is not a step in an initial task in the process. To get around this, temporarily mark the task as an initial task and generate the web entry. Then, change the task back.
Paste the HTML code into a publically accessible file on the web server and modify the code as in the example above so that the form will be processed by your custom script. Give the external user a link to the form which has a GET variable for the unique ID of the case. (Note: this introduces security issues, so you might want to do this with a SSL connection and check that the data seems reasonable. ) In the custom script file which processes the form, login to ProcessMaker with a user who is a Process Supervisor with rights to write to the DynaForm and the use the sendVariables() web service to send the data from the form to the case.
For example, the HTML file is named "customerForm.html" and its script is named "wsCustomerForm.php". A email is sent to the customer which contains a link like:
https://www.acme.inc/customerForm.html?case=8326e27ab4692c178dc2356ac3452b3e
The case unique ID can be inserted in the email template using the @#APPLICATION system variable:
https://www.acme.inc/customerForm.html?case=@#APPLICATION
The form is processed just like a normal web entry form, but instead of using the newCase() web service, it uses the sendVariables() web service with the case ID from the GET variable:
Customizing Web Entry
The PHP page with web services option generates three files in the public directory for the current workspace, which is generally located at:
Linux/UNIX:
/opt/processmaker/shared/sites/<WORKSPACE>/public/<PROCESS-UID>/
Windows, ProcessMaker version 1.6-4260 and later:
<INSTALL-DIRECTORY>\processmaker\shared\sites\<WORKSPACE>\public\<PROCESS-UID>\
Windows, before ProcessMaker version 1.6-4260:
C:\Program Files\ProcessMaker\apps\processmaker\shared\sites\<WORKSPACE>\public\<PROCESS-UID>\
The generated files are:
wsClient.php
<DYNAFORM-NAME>_Form.php
<DYNAFORM-NAME>_FormPost.php
These 3 files interact with ProcessMaker's WSDL web services. The wsClient.php file defines the functions required to login and initiate a new case (and route it to the second task if necessary). The <DYNAFORM-NAME>_Form.php file contains the code to populate the $_SESSION superglobal variable and display the DynaForm.
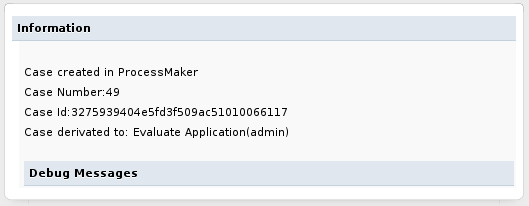
The <DYNAFORM-NAME>_FormPost.php file determines what content is displayed to the user after the DynaForm is submitted. This code can be edited to display different information. By default, web entry displays the case number, the case unique ID, and who the case is assigned to:
To display different information edit line 54 of the source code:
$aMessage['MESSAGE'] = "Case created in ProcessMaker<br/>Case Number:$caseNr <br/>Case Id:$caseId<br/>Case derivated to: $assign";
For example, to display only the case number:
$aMessage['MESSAGE'] = "Case created in ProcessMaker<br/>Case Number:$caseNr";
The code can be altered to redirect to a custom web page, instead of the ProcessMaker screen. For example to redirect to the address http://mycompany.com/customerConfirmation.html after submitting the DynaForm, change lines 69-72:
$G_PUBLISH->AddContent('xmlform', 'xmlform', 'login/showInfo', '', $aMessage );
G::RenderPage( 'publish', 'blank' );
}
To:
}

