Overview
Stack 230 provides detailed information about the database and application server configurations needed to correctly install the following versions of ProcessMaker on the Windows Server 2016 platform.
| ProcessMaker 3.2.2 | ProcessMaker 3.3.x |
| ProcessMaker 3.2.3 |
Summary
| Platform | Database | PHP |
|---|---|---|
| Windows Server 2016 | MySQL 5.6.x | 5.6.x |
| Web Server | Filesystem | Architecture |
| Apache 2.4.x | NTFS | 64 bits |
Disclaimer
The stack procedure and references described below are used by ProcessMaker in its cloud environment and it works appropriately in cloud configurations. If this stack is implemented on-premises, ProcessMaker Inc. does not guarantee the stack functions correctly.
Environment
Follow the steps listed below to prepare the environment before installing ProcessMaker.
Step 1: Install MySQL 5.6.XX
| Warning: ProcessMaker is not compatible with MySQL STRICT mode, which is enabled by default as of MySQL 5.6.6. Read the Turning Off MySQL STRICT Mode section to learn how to disable it. |
Follow these steps to download the MySQL 5.6.xx installer (64-bit version):
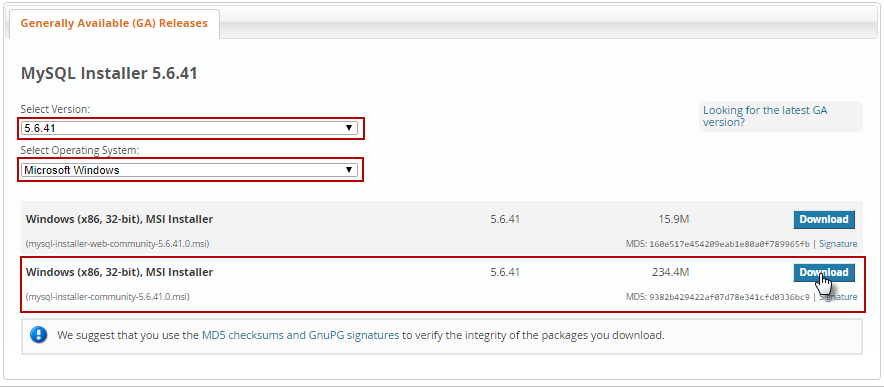
Go to the MySQL Community Server download website.
In Select Version, select "5.6.XX".
In Select Operating System, select "Microsoft Windows."
Click Download to download the full installer.
Execute the installer and configure MySQL as the administrator. To install and configure MySQL properly for ProcessMaker, follow these steps:
In the License Agreement screen, accept the license and then click Next.

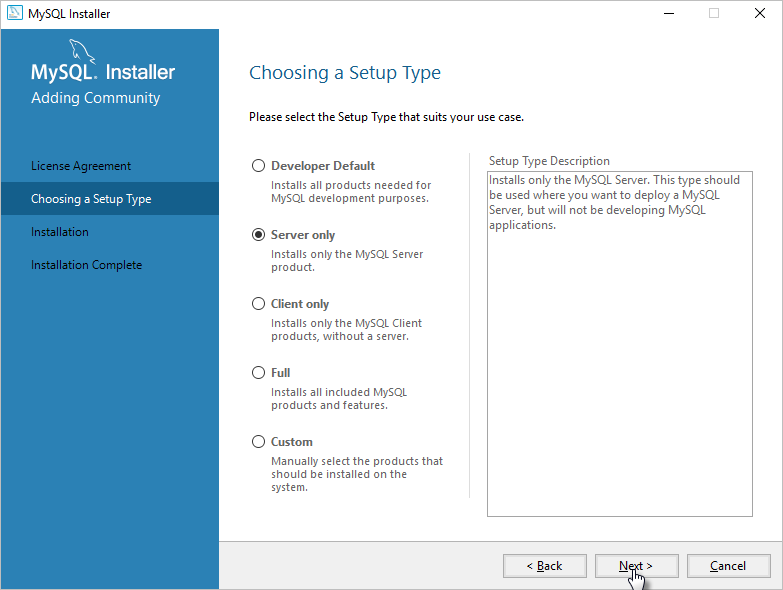
The Choose a Setup Type screen displays. Choose the setup type according to the type of use. (Server only is generally recommended). Click Next.
The Check Requirements screen displays. Check the requirements and click Execute to perform the installation of any missing dependencies.
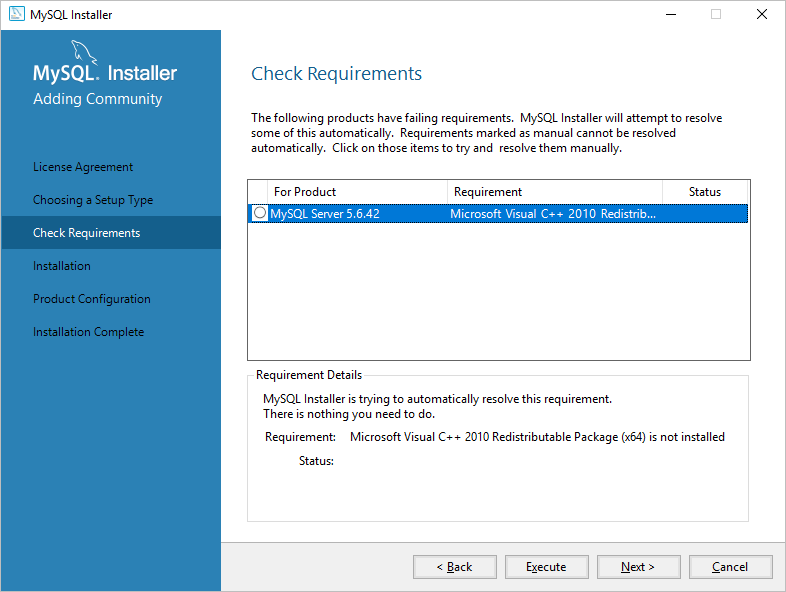
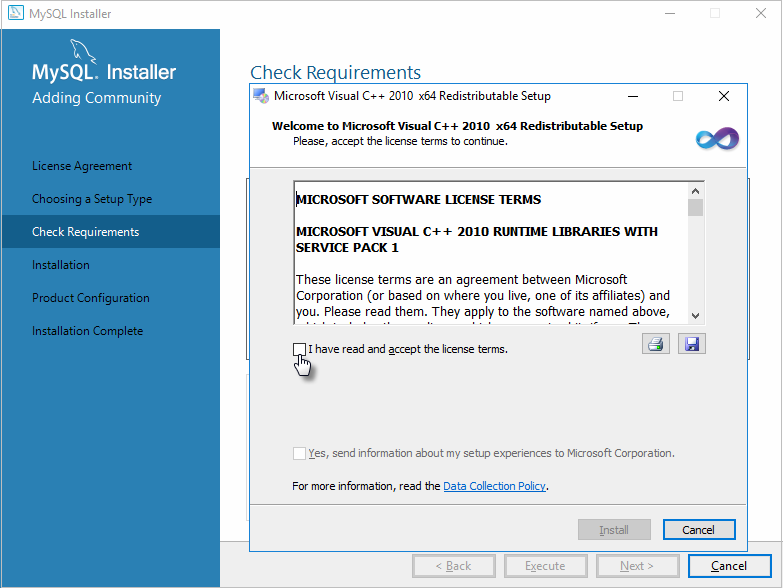
Accept the license of each dependency, and then install it.
After the installation of the missing dependencies is completed, click Next.
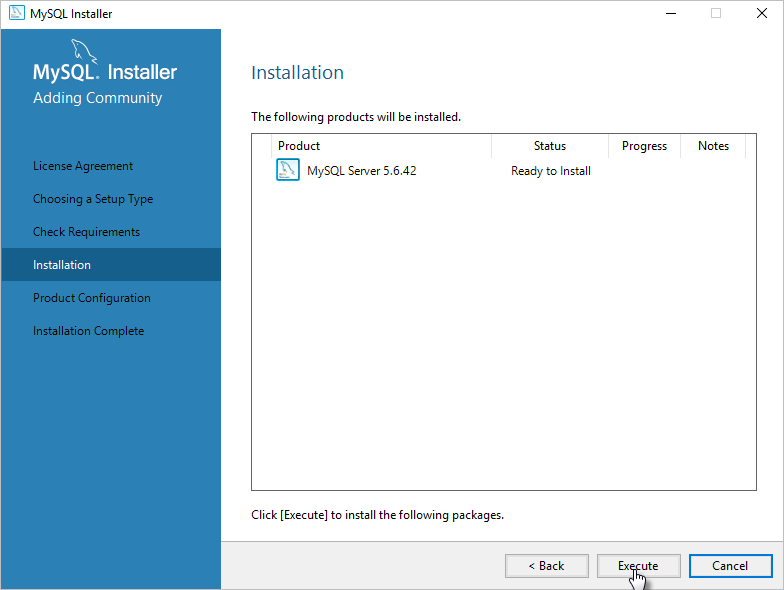
The Installation screen displays. Click Execute to run the MySQL installation.
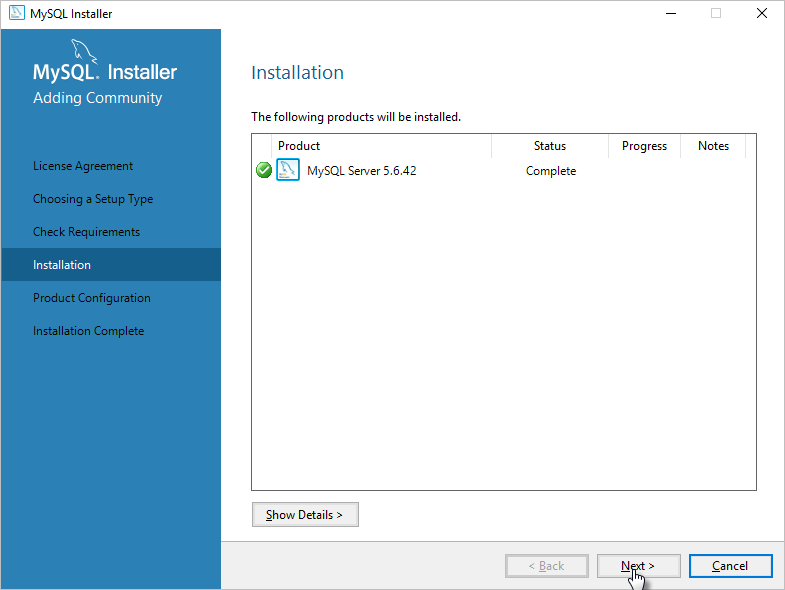
After the installation is done, the approved requirements displays. Click Next to complete the server configuration.
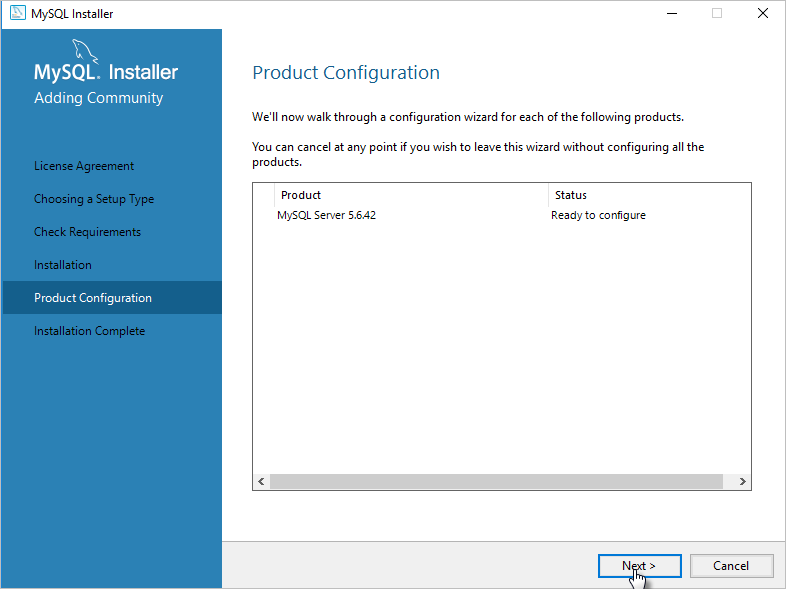
The Product Configuration screen displays. This screen begins a wizard to step you through product configuration. Click Next.
The Type and Networking screen displays. This screen displays default configuration settings. Do not adjust the default settings unless it is needed. Click Next.

In the Config Type field, you can select:
- Development Computer if you just want to try ProcessMaker.
- Server Computer if ProcessMaker will be running along MySQL in the same server.
- Dedicated Computer if only MySQL is installed in the server. ProcessMaker will be hosted in other server.
The Accounts and roles screen displays. Follow these guidelines to use this screen:
- In the MySQL Root Password field, enter a strong password to use in the synchronization with MySQL database and ProcessMaker. Make sure to remember it.
- To specify the additional user(s) that have privileges to administer the MySQL database, click Add User.
- Select an added user, and then click the drop-down menu to select which MySQL privilege(s) that user has.
- After the optional users have been added and their privileges configured, click Next.
For more information about the Accounts and Roles step, visit the page MySQL reference manual.

The Windows Service screen displays. Select the Configure MySQL Server as a Windows Service and Start the MySQL Server at System Startup checkboxes. Click Next.

The Apply Configuration screen displays. To apply the configuration, click Execute.

After the configuration is completed, click Finish.

The Product Configuration screen displays again. Click Next.

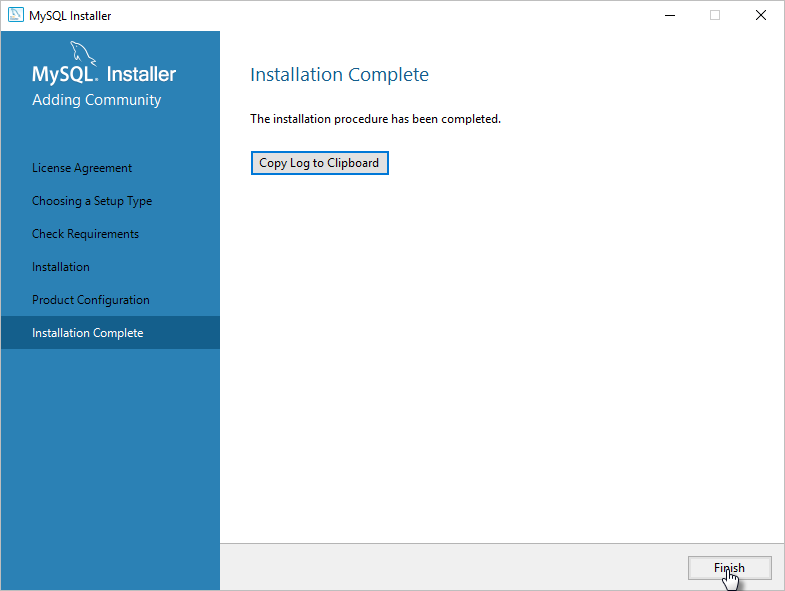
The Installation Complete screen displays. Click Finish. The MySQL installation is complete.
Optimize the MySQL Database
After you have installed MySQL, open the file my.ini to optimize the database. By default my.ini is located on the path C:\Program Files\MySQL\MySQL Server 5.6 or where you have installed MySQL. For more information, see Additional Configuration.
Make the following revisions in the my.ini file, and then save the file:
-
Set the variable
max_connections = 1000. -
Add the line
skip-name-resolveat the end of the file.
Possible MySQL Errors During the Installation
If you had any problem during the installation, see MySQL Possible Configuration Issues.
Step 2: Install Apache 2.4
To install Apache 2.4 in ProcessMaker, follow these steps:
Download the Apache 2.4.x VC11 binary file (64-bit version) from the Apache Haus or Apache Lounge page.
- Apache Haus:
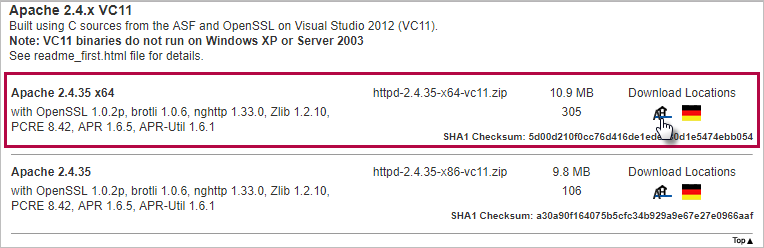
- Apache Lounge:
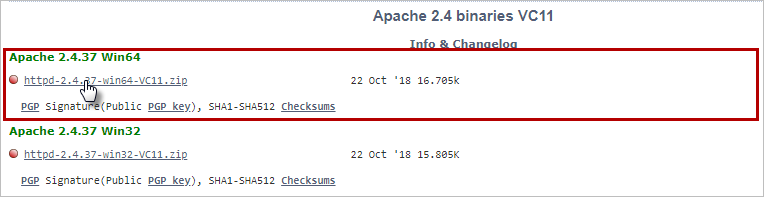
- Apache Haus:
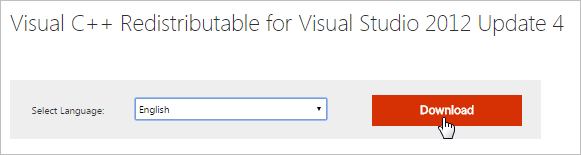
Before installing Apache to compile with VC++ 2012, you must download and install the Visual Studio packages from the Visual C++ Redistributable for Visual Studio 2012 page. Select the language of the operating system and then click the Download button.
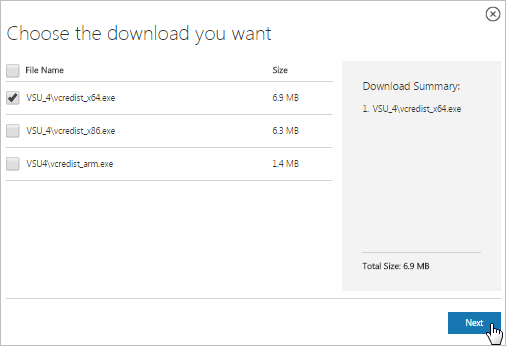
The Choose the download you want screen displays. Click the checkbox next to the option VSU_4\vcredist_x64.exe and click the Next button in the lower right corner of the screen. The file vcredist_x64.exe starts downloading automatically.
After the download is finished, install the file vcredist_x64.exe as the administrator.
After installation, create a folder with the name opt and extract the httpd-2.4.35-x64-vc11.zip file to
C:\opt.Before installing Apache, edit the Apache file httpd.conf located at
C:\opt\Apache24\conf\httpd.conf.
Change the lines:
Define SRVROOT "/Apache24" ServerRoot "${SRVROOT}" To:
Define SRVROOT "C:/opt/Apache24" ServerRoot "${SRVROOT}" Save the changes and close the httpd.conf file.
Add the Apache path to the Windows environment variables. Run cmd.exe as administrator and execute the following command:
setx /M PATH %PATH%;C:\opt\Apache24\bin In the command line (Remember to run cmd.exe as administrator), proceed to install Apache.
cd C:\opt\Apache24\bin httpd -k install httpd -k start To enable the necessary modules for ProcessMaker, we need to run as administrator the following commands:
cd C:\opt\Apache24\conf\ powershell -Command "(gc httpd.conf) -replace '#LoadModule alias_module modules/mod_alias.so', 'LoadModule alias_module modules/mod_alias.so' | Out-File -Encoding UTF8 httpd.conf" powershell -Command "(gc httpd.conf) -replace '#LoadModule deflate_module modules/mod_deflate.so', 'LoadModule deflate_module modules/mod_deflate.so' | Out-File -Encoding UTF8 httpd.conf" powershell -Command "(gc httpd.conf) -replace '#LoadModule expires_module modules/mod_expires.so', 'LoadModule expires_module modules/mod_expires.so' | Out-File -Encoding UTF8 httpd.conf" powershell -Command "(gc httpd.conf) -replace '#LoadModule rewrite_module modules/mod_rewrite.so', 'LoadModule rewrite_module modules/mod_rewrite.so' | Out-File -Encoding UTF8 httpd.conf" powershell -Command "(gc httpd.conf) -replace '#LoadModule vhost_alias_module modules/mod_vhost_alias.so', 'LoadModule vhost_alias_module modules/mod_vhost_alias.so' | Out-File -Encoding UTF8 httpd.conf" powershell -Command "(gc httpd.conf) -replace '#LoadModule headers_module modules/mod_headers.so', 'LoadModule headers_module modules/mod_headers.so' | Out-File -Encoding UTF8 httpd.conf" powershell -Command "(gc httpd.conf) -replace '#LoadModule filter_module modules/mod_filter.so', 'LoadModule filter_module modules/mod_filter.so' | Out-File -Encoding UTF8 httpd.conf" powershell -Command "(gc httpd.conf) -replace '#LoadModule access_compat_module modules/mod_access_compat.so', 'LoadModule access_compat_module modules/mod_access_compat.so' | Out-File -Encoding UTF8 httpd.conf" Restart the Apache service in the Service Manager or by using using the following command in the console.
cd c:\opt\Apache24\bin httpd -k restart
Possible Apache Errors During the Installation
If you had any problem during the installation, see Apache Possible Configuration Issues.
Step 3: Install PHP 5.6
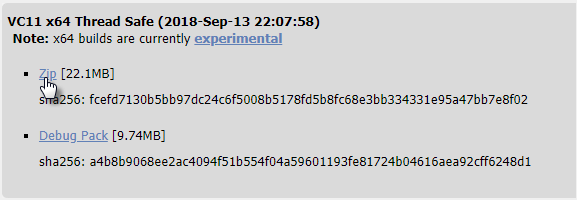
To download the PHP binary file, go to the PHP Download page, click the latest VC11 x64 Thread Safe Zip version from the PHP 5.6 (5.6.XX) section.
Follow these steps to install PHP 5.6:
Decompress the
.zipfile content inC:\opt\php.Reopen the Apache file httpd.conf located at
C:\opt\Apache24\conf\httpd.conf, and add the following lines to the end of the file.LoadModule php5_module "C:/opt/php/php5apache2_4.dll" AddHandler application/x-httpd-php .php # Configure the path of the php.ini PHPIniDir "C:/opt/php" Change the name of the file php.ini-development to php.ini. This file is located in
C:\opt\php\php.ini-development.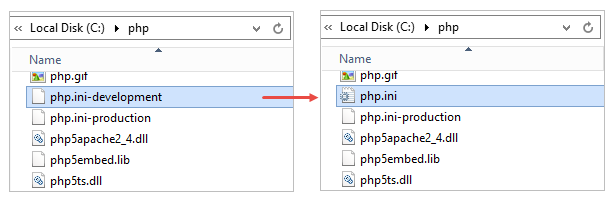
Do these changes in the php.ini file.
- Set the following configurations:
short_open_tag = On memory_limit = 512M error_reporting = E_ALL & ~E_DEPRECATED & ~E_STRICT display_errors = Off max_execution_time = 60 post_max_size = 40M upload_max_filesize = 20M max_input_vars = 8000 extension_dir = "C:\opt\php\ext" zend_extension = php_opcache.dll - Add the following lines to the bottom of the php.ini file:
extension="c://opt/php/ext/php_bz2.dll" extension="c://opt/php/ext/php_curl.dll" extension="c://opt/php/ext/php_exif.dll" extension="c://opt/php/ext/php_fileinfo.dll" extension="c://opt/php/ext/php_gettext.dll" extension="c://opt/php/ext/php_gmp.dll" extension="c://opt/php/ext/php_gd2.dll" extension="c://opt/php/ext/php_ldap.dll" extension="c://opt/php/ext/php_mbstring.dll" extension="c://opt/php/ext/php_mysql.dll" extension="c://opt/php/ext/php_mysqli.dll" extension="c://opt/php/ext/php_opcache.dll" extension="c://opt/php/ext/php_openssl.dll" extension="c://opt/php/ext/php_pdo_sqlite.dll" extension="c://opt/php/ext/php_pdo_mysql.dll" extension="c://opt/php/ext/php_pdo_odbc.dll" extension="c://opt/php/ext/php_shmop.dll" extension="c://opt/php/ext/php_soap.dll" extension="c://opt/php/ext/php_shmop.dll" extension="c://opt/php/ext/php_sockets.dll" extension="c://opt/php/ext/php_sqlite3.dll" extension="c://opt/php/ext/php_xsl.dll" - Save the changes and close the php.ini file.
- Set the following configurations:
In the Command Prompt console go to the folder
C:/opt/phpand run the following lines to configure Opcache:cd C:\opt\php\ powershell -Command "(gc php.ini) -replace 'expose_php = On', 'expose_php = Off' | Out-File -Encoding UTF8 php.ini" powershell -Command "(gc php.ini) -replace ';opcache.enable_cli=0', 'opcache.enable_cli=1' | Out-File -Encoding UTF8 php.ini" powershell -Command "(gc php.ini) -replace ';opcache.max_accelerated_files=4000', 'opcache.max_accelerated_files=10000' | Out-File -Encoding UTF8 php.ini" powershell -Command "(gc php.ini) -replace ';opcache.max_wasted_percentage=5', 'opcache.max_wasted_percentage=5' | Out-File -Encoding UTF8 php.ini" powershell -Command "(gc php.ini) -replace ';opcache.use_cwd=1', 'opcache.use_cwd=1' | Out-File -Encoding UTF8 php.ini" powershell -Command "(gc php.ini) -replace ';opcache.validate_timestamps=1', 'opcache.validate_timestamps=1' | Out-File -Encoding UTF8 php.ini" powershell -Command "(gc php.ini) -replace ';opcache.fast_shutdown=0', 'opcache.fast_shutdown=1' | Out-File -Encoding UTF8 php.ini" Add the PHP path to windows environment variables by running cmd.exe as administrator, and execute the following command:
setx /M PATH %PATH%;C:/opt/php Stop and start the Apache service to apply the previous changes to the php.ini and httpd.conf. Execute the following command in the console.
cd C:\opt\Apache24\bin httpd -k stop httpd -k start
Recommended Step - Tuning Server
It is recommended to modify the hosts that is located at C:\Windows\System32\drivers\etc\hosts:
To apply changes, restart the network services.
Also is recommended to be sure in php.ini, the following value max_execution_time = 60. This value has been previously updated in Step 3.
ProcessMaker Installation
Read Install ProcessMaker to learn how to install ProcessMaker.

