- Overview
- Task Notifications
- Message Events
- Trigger Messages
- Create the HTML Email Template
- Links to Cases in Templates
- Grids in Templates
- Sending emails with PMFSendMessage()
- Assigning the trigger to step(s)
- Trigger Message Examples
- Emailing the Current Designated User for a Case
- Emailing the Supervisor of a Case's Designated User
- Emailing the Previous User for a Case
- Emailing the Previous User with a Database Query
- Emailing the Next Designated User
- Emailing the Next Designated Users of Parallel Tasks
- Emailing all Assigned Users for a Task
- Emailing All Assigned Users to the Next Task(s)
- Emailing all Participants in a Case
- Emailing Members of a Group
- Emailing Members of a Department
- Emailing Users with a Role
- Emailing when Cases are Canceled/Paused/Reassigned
- Debugging Email Notifications
- Log Module to manage notifications
Overview
Notifications can be used to keep users apprised of new cases in their Inbox and notify them at specified times while running cases. In ProcessMaker, all notifications are sent to users via email, which is why it is important to enter a valid email address for each user and properly configure ProcessMaker to connect to an email server so notifications can be sent out.
There are three types of notifications:
- Task Notifications, which are sent when a user is designated to work on a task in a case.
- Message Events, which are sent at specified timings based upon when tasks (or groups of tasks) begin in a case.
- Trigger Messages, which are sent out using the PMFSendMessage() function.
The subject line and body of these email notifications can be customized and system variables and case variables can be inserted into their content so each notification is personalized for the recipient with data from the current case.
The content for Task Notifications is plain text, which is defined in the Task Properties. In contrast, the content of Message Events and Trigger Messages is specified inside a template file, which permits the use of HTML formatting. The template file can be created using ProcessMaker's template editor in the Process Files Manager or it can be uploaded to the Process Files Manager after being created in an external HTML editor such as FrontPage, DreamWeaver or BlueGriffon.
Note: Emails are sent to the configured email server when cron.php is executed, so the ProcessMaker server needs to be configured to execute a cron job in Linux/UNIX or a Scheduled Task in Windows.
Task Notifications
Task Notifications are useful for keeping users apprised when they have been designated to work on a task in a case.
To create a designated user message, go to the DESIGNER menu and open a process for editing. In the process map, right click on a task which should send out notifications when users are designated to work on it. In the dropdown menu which appears, select the Properties option.
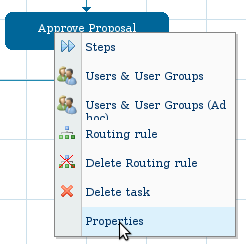
Go to the Notifications tab and mark the After routing notify the next assigned user(s) checkbox. Then define the content of the notification. System variables and case variables can be inserted in the content. Since version 2.0.23, an option has been added to define the Subject of the email message, which can also include variables.
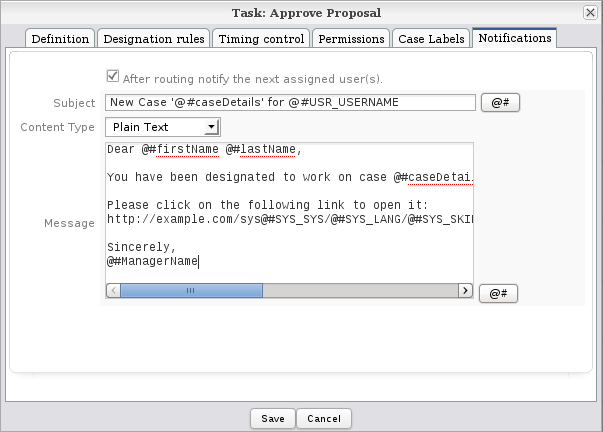
Since version 2.0.23, there is also an option to select the Content Type. For a simple message without formatting, choose the Plain Text option. Enter text in the Message box.
To include a variable in the message, click on the [@#] button and select the variable to insert. @@variable-name will insert the variable enclosed in double quotation marks, whereas @#variable-name inserts the variable without enclosing quotation marks. Make sure that all variables used in the message have already been created at some earlier point in the process. System variables are automatically created and case variables are created in DynaForm fields or defined in Triggers.
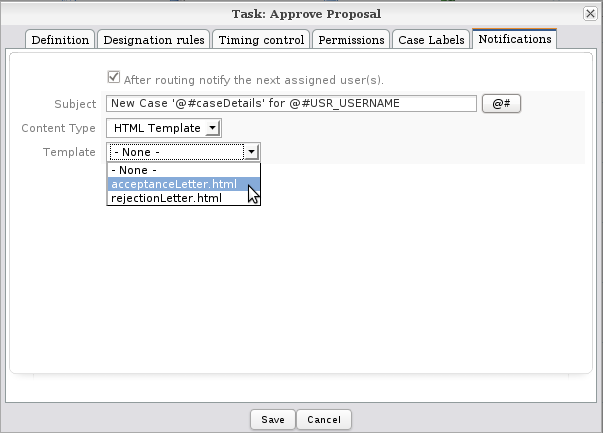
For more control over the formatting, select the HTML Template option for the Content Type dropdown box. Then, select the name of the template file to be used for the body of the email message. For creating templates files, see Process Files Manager.
When done defining the task notification, click on Save.
Note: If a case variable doesn't exist, then the message will be sent out with the name of the variable in the text. Case variables will not be created if a DynaForm has a condition which evaluates to false or the user clicks on the Next Step link instead of the submit button in a DynaForm (if using the "No Save & Continue" option for its Next Step Link property). In order to avoid variable names appearing in messages, fire a trigger after the DynaForm and check whether the variable has been set. If not, set the variable to an empty string, so that any subsequent notifications will insert a blank space in place of the variable:
Message Events
Messages events can be used to send out messages are specified timings. For more information, see Events.
Trigger Messages
Email notifications can be sent out in triggers using the PMFSendMessage() function. Sending out messages in Triggers provides a great deal of flexibility, since the parameters for the PMFSendMessage() function allow the sender, the list of recipients, the subject line, the template file and even customized insertion variables to be specified. In addition, sending the message can be based upon the conditions of the particular case, a condition can be set for the firing of the trigger or the PMFSendMessage() function can be wrapped inside an if clause in the Trigger code.
In order to configure the notification, the following steps are necessary:
- Create the Create the HTML email template
- Create a trigger containing the PMFSendMessage() function
- Assign the trigger to a step in the process.
Create the HTML Email Template
Email template files can be created inside ProcessMaker with the very limited WYSIWYG editor in the Process Files Manager. For greater creativity, create the template file with an external plain text editor or HTML editor and then upload it to ProcessMaker.
Open a process for editing. Right click on a blank area in the process map and select Process File Manager from the dropdown menu.
In the list of directories which appears, click on the mailTemplates directory to open it.
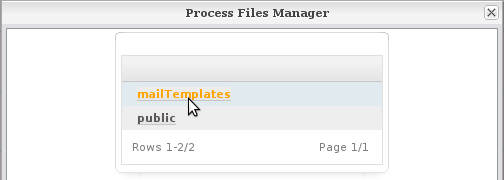
Then click on either the New or Upload links to create or upload the template file.
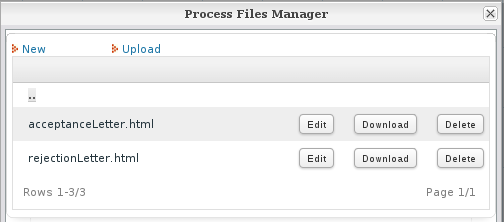
The template file will determine the body of the email message. This text can contain system and case variables and HTML tags. For more information, on the format of template files, see Output Documents.
For example, the following template is used when a leave request is approved:
Your leave request has been approved. Please find details below:
Date From: @#fromReq
Date To: @#toReq
Days Requested: @#daysReq
Once your leave period has ended, please do not forget to fill out a Leave Report upon returning.
Regards,
@#reqSupervisor
It's HTML code can be edited by clicking on the  button in the editor to see the following HTML code:
<html>
<head>
</head>
<body>
<p>Dear @#reqUserName, <br>
Your leave request has been approved. Please find details below: <br>
<b>Date From:</b> @#fromReq <br>
<b>Date To:</b> @#toReq <br>
<b>Days Requested:</b> @#daysReq <br>
<br>
Once your leave period has ended, please do not forget to fill out a Leave Report upon returning. <br><br>
Regards, <br>
@#reqSupervisor</p>
</body>
</html>
Links to Cases in Templates
The email template can also contain links to access resources inside ProcessMaker. To learn more about web browser redirection inside ProcessMaker, see JavaScript Frames, the G::header() function and the Link field.
A email template can include a link to open a case with a click of the mouse. Links to the current case can be constructed using system variables. For example, to open a link to the current case:
Dear @#reqUserName,
Your leave request has not yet been approved. Please find the details below:
Date From: @#fromReq
Date To: @#toReq
Days Requested: @#daysReq
We need you to fill in some details. Please click the link below:
http://example.com/sys@#SYS_SYS/@#SYS_LANG/@#SYS_SKIN/cases/open?APP_UID=@#APPLICATION&DEL_INDEX=@#INDEX&action=draft
Regards, @#reqSupervisor
It's HTML code can be edited by clicking on the button in the editor to see the following HTML code:
<html>
<head>
</head>
<body>
<p>Dear @#reqUserName, <br>
Your leave request has been approved. Please find details below:</p>
<table>
<tr><td><b>Date From:</b> </td><td>@#fromReq</td></tr>
<tr><td><b>Date To:</b> </td><td>@#toReq </td></tr>
<tr><td><b>Days Requested:</b></td><td>@#daysReq</td></tr>
</table>
<p>We need you to fill in some details. Please click the link below:<br>
<a href="http://example.com/sys@#SYS_SYS/@#SYS_LANG/@#SYS_SKIN/cases/open?APP_UID=@#APPLICATION&DEL_INDEX=@#INDEX&action=draft">http://example.com/sys@#SYS_SYS/@#SYS_LANG/@#SYS_SKIN/cases/open?APP_UID=@#APPLICATION&DEL_INDEX=@#INDEX&action=draft</a></p>
<p>Regards, <br>
@#reqSupervisor</p>
</body>
</html>
Remember that the person receiving the email needs to either be assigned to work on the current task in the case or have process permissions to open the case. If opening a case as a Process Supervisor, a different URL can be used:
http://example.com/sys@#SYS_SYS/@#SYS_LANG/@#SYS_SKIN/cases/open?APP_UID=@#APPLICATION&DEL_INDEX=@#INDEX&to_revise=true&action=to_revise
If the case is completed, paused or canceled, or the user doesn't have rights to open the case, then the summary for the case will be displayed. The summary can also be displayed setting action=sent and it is not necessary to include the delegation index number in the URL:
http://example.com/sys@#SYS_SYS/@#SYS_LANG/@#SYS_SKIN/cases/open?APP_UID=@#APPLICATION&action=sent
If the user doesn't currently have an active login session in ProcessMaker, the web browser will first redirect to the login page and then redirect to the specified case after logging in. If the case is opened in a task which has already been completed, then the web browser will redirect to the list of cases in the Inbox.
Redirecting to the ../cases/main page
Unfortunately, the page "cases/open?..." is designed to open a case inside an <iframe> below the main menu bar, so redirecting the web browser to this address will open a window which doesn't have the main menu bar and the Home Sidebar. To be able to get back to the principal page after completing the task, it is recommended to add the following trigger to the process which redirects the web browser back to the "../cases/main" page:
Set the above trigger to execute after routing in the task specified by the "cases/open?..." page. When the user completes working on the task and clicks on the continue button at the end of the task, the web browser will automatically be redirected to the "../cases/main" page which displays the top-level menu, the Home sidebar and the list of cases in the Inbox.
If the user needs to be able to immediately return to the "../cases/main" page, a button can be added to a DynaForm, which redirects to that page when clicked.
For example, if a button is added with the ID "goToInbox", then the following JavaScript code can be added to the DynaForm to save the contents of the DynaForm and redirect the web browser:
$("form").saveForm();
top.location.href = "../cases/main";
});
Grids in Templates
The email template can also contain grid data. For example, the grid can be placed inside an HTML table:
| Date From | Date To | Number Days | Comment |
|---|---|---|---|
| @#detDateFrom | @#detDateTo | @#detNoDays | @#detComment |
Regards, @#reqSupervisor
It's HTML code would be:
<html>
<head>
</head>
<body>
Dear @#reqUserName, <br>
Your leave request has been approved. Please find details below: <br>
<table>
<tr><th>Date From</th><th>Date To</th><th>Number Days</th><th>Comment</th></tr>
<!-- @>reqLeaveGrid -->
<tr><td>@#detDateFrom</td><td>@#detDateTo</td><td>@#detNoDays</td><td>@#detComment</td></tr>
<!-- @<reqLeaveGrid -->
</table>
<p>Once your leave period has ended, please do not forget to fill out a Leave Report upon returning. <br><br>
Regards, <br>
@#reqSupervisor</p>
</body>
</html>
For each row in the grid between @>reqLeaveGrid and @<reqLeaveGrid, the grid fields @#detDateFrom, @#detDateTo, @#detNoDays, and @#detComment will be repeated on a new line. For more information on inserting grids in templates, see Grids in Output Documents.
Moreover, it is possible to introduce images inside the template by editing the HTML code. For example:
<img src="http://example.com/companyLogo.jpg">
Images inserted in email templates should be hosted in a server with public access, otherwise they might be viewable by the person receiving the email. For example, the corporate logo placed in the location INSTALL-DIRECTORY/workflow/public_html/companyLogo.jpg on the ProcessMaker server is publicly accessible at the address: http://example.com/companyLogo.jpg
Sending emails with PMFSendMessage()
The PMFSendMessage() function is used to sends out customized email notifications based upon a template file. To use this function, create a Trigger and add this function to the code for that trigger. For more information and code examples, see the documentation for the PMFSendMessage() function. Also see the code examples below.
To find which users are assigned to cases, tasks, groups, departments, roles, etc., it is often necessary to use lookup information in the database using the executeQuery() function. Then, the email address of those users can be found with the userInfo() function. Emails can be sent to multiple recipients with the PMFSendMessage() function by separating the email addresses with commas (,) in the in the $to, $cc or $bcc parameters.
Assigning the trigger to step(s)
Once you have uploaded your template email file and defined a trigger to send the email, it is possible to assign the related trigger to steps in different instances:
- before/after a step (DynaForm, Input Document or Output Document) is displayed
- before the case is assigned a user for the next task in the case
- before/after a case is routed (derivated) to the next task in the case
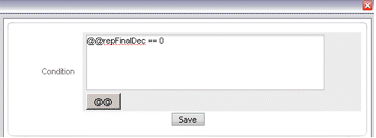
In each case, it is also possible to define conditions that dictate whether a trigger should be executed or not. If the condition evaluates to false, the trigger will not be fired. If it evaluates to true, the trigger will be fired.
For example, the following condition defines that the trigger will be executed only if @@repFinalDec case variable is 0. In other words, the notification will be sent only when this condition is true.
Trigger Message Examples
Emailing the Current Designated User for a Case
A message can be sent to the user currently designated to work on the case by using the @@USER_LOGGED system variable to get that user's unique ID. Then, pass that unique ID to the userInfo() function to look up his/her email address. For example:
$to = $aUser['mail'];
PMFSendMessage(@@APPLICATION, 'boss@example.com', $to, '', '', 'Some Message Title', 'someTemplate.html');
Emailing the Supervisor of a Case's Designated User
To send a message to the supervisor of the current designated user for a case, first use the InternaCases::loadCase() to look up who is currently designated to work on the case and then use the Users::Load() method to get that user's supervisor. Finally, use userInfo() to get the supervisor's email.
For example to email the supervisor of the user assigned to the current case when the case is overdue:
$c = new Cases();
$aCase = $c->loadCase(@@APPLICATION, @%INDEX);
$u = new Users();
$aUser = $u->Load($aCase['CURRENT_USER_UID']);
if (!empty($aUser['USR_REPORTS_TO'])) {
$aSupervisor = userInfo($aUser['USR_REPORTS_TO']);
PMFSendMessage(@@APPLICATION, 'admin@example.com', $aSupervisor['mail'], $aUser['USR_EMAIL'],
'', 'Case is Overdue', 'overdueTemplate.html');
}
else {
@@ERROR = "There is no supervisor for user {$aCase['CURRENT_USER']}.";
$g = new G();
$g->SendMessageText(@@ERROR, "ERROR");
}
Emailing the Previous User for a Case
To send a message to a user who worked on a previous task in the case, create a trigger in that fires during that previous task which saves the user's unique ID to a case variable.
For example, in a process to approve purchase requests, an email message needs to be sent to the purchase requester, informing him/her whether the purchase was approved or disapproved. In the first task when the requester fills out the purchase request form, fire the following trigger:
In the subsequent task, when the manager decides to approve or disapprove the purchase request, fire the following trigger to send an email to the requester:
if (isset(@@requesterId) and !empty(@@requesterId)) {
$aUserTo = userInfo(@@requesterId);
$aUserFrom = userInfo(@@USER_LOGGED);
PMFSendMessage(@@APPLICATION, $aUserFrom['mail'], $aUserTo['mail], '', '', 'Purchase Request Decision',
'purchaseDecision.html');
}
Emailing the Previous User with a Database Query
Another way to find the user who worked on a previous task in a case is to look up the record for that task in the wf_<WORKSPACE>.APP_DELEGATION table. There is a record for each task in a case with the last user to work on that task. First, look up the unique ID for the task with the taskList() web service at ADMIN > Settings > Web Services Test (or look it up in the wf_<WORKSPACE>.TASK.TAS_UID field in the database). Then, use executeQuery() in a trigger to look up the user who worked on a particular task for the case in the wf_<WORKSPACE>.APP_DELEGATION.USR_UID field.
For example, to send a message to a user who worked on a task with the ID "7710617204e67abaabfb1c9082177702" in the current case:
$caseId = @@APPLICATION;
$query = "SELECT USR_UID FROM APP_DELEGATION WHERE APP_UID='$caseId' AND TAS_UID='$taskId'";
$tasks = executeQuery($query);
if (is_array($tasks) and count($tasks) > 0) {
//get the last record, in case the task was repeated in the case
$userId = $tasks[count($tasks)]['USR_UID'];
$aUser = userInfo($userId);
PMFSendMessage(@@APPLICATION, 'boss@example.com', $aUser['mail'], '', '', 'Some Message Title', 'someTemplate.html');
}
Emailing the Next Designated User
An email can be sent out to the user designated to work on the next task in two ways:
- Using the PMFGetNextAssignedUser() function for tasks with Cyclical Assignment.
- Looking up the next user in the APP_DELEGATION table after derivation of the previous task.
The second way is more reliable and works with any type of designation rule.
For Next Tasks with Cyclical Assignment
If the next task uses cyclical assignment, the next designated user in a case can be looked up using the PMFGetNextAssignedUser() function. The parameters of this function require the unique IDs for the case and the task, which can be looked up with taskList() at ADMIN > Settings > Web Services Test or by querying the wf_<WORKFLOW>.TASK.TAS_UID field in the database.
For example, the following trigger sends an email message to the next user who will be designated to work on the current case.
$aUser = PMFGetNextAssignedUser(@@APPLICATION, $taskId);
if (is_array($aUser) and count($aUser) > 0) {
PMFSendMessage(@@APPLICATION, "Mr. Boss <boss@example.com>", $aUser['USR_EMAIL'], '', '',
'You are assigned to next task', 'template.html');
}
else {
$g = new G();
$g->SendMessageText("Unable to lookup next assigned user!", "ERROR");
}
Remember that the PMFGetNextAssignedUser() function only works if the next task uses cyclical assignment. If the next task uses any other type of designation rule, it is necessary to use the following method.
For Next Tasks with Any Type of Designation Rule
The designated user for the next task can be looked up in the wf_<WORKSPACE>.APP_DELEGATION.USR_UID field in the database with a trigger which fires after derivation of the previous task. At that point, the next task has already been created in the database, although still in the previous task. This method works for tasks with any type of designation rule.
For example, the following trigger sends an email message to the next user who will be assigned to work on the current case.
//lookup the user assigned to the next task in the case
$query = "SELECT USR_UID FROM APP_DELEGATION WHERE APP_UID='$caseId' AND
DEL_INDEX=(SELECT MAX(DEL_INDEX) FROM APP_DELEGATION WHERE APP_UID='$caseId')";
$result = executeQuery($query);
$aUser = userInfo($result[1]['USR_UID']);
$to = $aUser['mail'];
PMFSendMessage(@@APPLICATION, "Mr. Boss <boss@example.com>", $to, '', '',
'You are assigned to next task', 'template.html');
Emailing the Next Designated Users of Parallel Tasks
The previous code example will have problems if the next tasks are parallel tasks, because their index numbers might not be the maximum index number. In that case, search for particular task IDs in the wf_<WORKSPACE>.APP_DELEGATION.TAS_UID field in the database. Task IDs can be found with the taskList() at ADMIN > Settings > Web Services Test or by querying the wf_<WORKFLOW>.TASK.TAS_UID field in the database.
For example, the following trigger code fired after derivation of the previous task will look up the next tasks in the process, which are three parallel tasks with the unique IDs "8494848774f28459638eb76005941643", "3466222164f2951faaf2915011308833" and "2935650394f297698b78467062625755":
$caseId = @@APPLICATION; //lookup the user assigned to the next task in the case(TAS_UID='8494848774f28459638eb76005941643' OR '3466222164f2951faaf2915011308833'
OR '2935650394f297698b78467062625755')";
$aUsers = executeQuery($query) or die("Error executing query: \n$query");
if (is_array($aUsers) and count($aUsers) > 0) {
$to = '';
foreach ($aUsers as $aUser) {
$aInfo = userInfo($aUser['USR_UID']);
$to .= ($to == '' ? '' : ', ') . $aInfo['mail'];
}
PMFSendMessage(@@APPLICATION, "Mr. Boss <boss@example.com>", $to, '', '',
'You are assigned to the next tasks', 'template.html');
}
Emailing all Assigned Users for a Task
Sending out an email to all users in the assignment pool for a specified task can be useful, especially for self-service tasks, where a user is not automatically designated for a task, so all the available users in the assignment pool should be informed that a new case is available.
To send an email to all assigned users for a specified task, first look up the unique ID for the task either by using the taskList() web service test or by querying the database:
SELECT CON_ID FROM CONTENT WHERE CON_CATEGORY='TAS_TITLE'
With the unique ID for the task, then look up all the users which are assigned to that task in the wf_<WORKSPACE>.TASK_USER table. If a group is assigned to the task, then also look up all the members of that group in the wf_<WORKSPACE>.GROUP_USER table.
In this example, an email is sent to all users which are assigned to the "Review Proposal" task, which has a unique ID of "2180652364e08ac6275dbb7037406882":
$assignedUsers = array(); //empty array to hold the UIDs of the assigned users to the task
$userQuery = "SELECT USR_UID FROM TASK_USER WHERE TAS_UID = '$taskId' AND TU_RELATION = 1";
$groupQuery = "SELECT GU.USR_UID FROM GROUP_USER GU, TASK_USER TU WHERE
TU.TAS_UID = '$taskId' AND TU.TU_RELATION = 2 AND TU.USR_UID = GU.GRP_UID";
$users = executeQuery($userQuery);
if (is_array($users) and count($users) > 0) {
foreach ($users as $user)
$assignedUsers[] = $user['USR_UID'];
}
$users = executeQuery($groupQuery);
if (is_array($users) and count($users) > 0) {
foreach ($users as $user)
$assignedUsers[] = $user['USR_UID'];
}
$assignedUsers = array_unique($assignedUsers); //eliminate any duplicates in array
$emailTo = "";
foreach ($assignedUsers as $assignedUser) {
$aUser = userInfo($assignedUser);
$emailTo .= (empty($emailTo) ? "" : "," ) . $aUser['mail'];
}
if (!empty($emailTo)) {
PMFSendMessage(@@APPLICATION, 'boss@example.com', $emailTo, '', '',
"New self-service case to be claimed", 'unassignedCase.html');
}
Emailing All Assigned Users to the Next Task(s)
Like the previous example, an email can be sent out to all the users in the assignment pool for the next task(s) in the process. Unlike the previous example, the unique ID of the task(s) does not need to be known, since they are automatically looked up in the ROUTE table, based upon the current task which is stored in the @@TASK system variable.
//lookup next task(s), if the current task isn't a final task
$tasks = executeQuery("SELECT ROU_NEXT_TASK FROM ROUTE WHERE TAS_UID='$taskId' AND ROU_NEXT_TASK<>'-1'");
$taskList = ''; //build list of next task(s)
foreach ($tasks as $task) {
$taskList .= (empty($taskList) ? '' : ', ') . "'" . $task['ROU_NEXT_TASK'] . "'";
}
$assignedUsers = array(); //empty array to hold the UIDs of the assigned users to the task
$userQuery = "SELECT USR_UID FROM TASK_USER WHERE TAS_UID IN ($taskList) AND TU_RELATION = 1";
$groupQuery = "SELECT GU.USR_UID FROM GROUP_USER GU, TASK_USER TU WHERE
TU.TAS_UID IN ($taskList) AND TU.TU_RELATION = 2 AND TU.USR_UID = GU.GRP_UID";
$users = executeQuery($userQuery);
if (is_array($users) and count($users) > 0) {
foreach ($users as $user)
$assignedUsers[] = $user['USR_UID'];
}
$users = executeQuery($groupQuery);
if (is_array($users) and count($users) > 0) {
foreach ($users as $user)
$assignedUsers[] = $user['USR_UID'];
}
$assignedUsers = array_unique($assignedUsers); //eliminate any duplicates in array
$emailTo = "";
foreach ($assignedUsers as $assignedUser) {
$aUser = userInfo($assignedUser);
$emailTo .= (empty($emailTo) ? "" : "," ) . $aUser['mail'];
}
if (!empty($emailTo)) {
PMFSendMessage(@@APPLICATION, 'boss@example.com', $emailTo, '', '',
"New self-service case to be claimed", 'unassignedCase.html');
}
Emailing all Participants in a Case
An email can be sent out to all the users who have participated in a specified case to keep them apprised of the progress of that case.
To send an email to all users who have participated in a case, first look up the unique ID for the case in one of the following ways:
- Use the @@APPLICATION system variable for the current case.
- Look up the case with the caseList() web service.
- Look up the case in the wf_<WORKSPACE>.APPLICATION.APP_UID or wf_<WORKSPACE>.APP_DELEGATION.APP_UID field with an SQL query.
With the unique ID for the case, look up all the users who have been assigned to the case in the wf_<WORKSPACE>.APP_DELEGATION.USR_UID field and add them to the list of email recipients.
In this example, an email is sent to all users have participated in the current case:
$users = executeQuery("SELECT DISTINCT USR_UID FROM APP_DELEGATION WHERE APP_UID = '$caseId'");
if (is_array($users) and count($users) > 0) {
$emailTo; //empty string to hold the emails of the participants in case
foreach ($users as $user) {
$aUser = userInfo($user['USR_UID']);
$emailTo .= (empty($emailTo) ? "" : "," ) . $aUser['mail'];
}
PMFSendMessage(@@APPLICATION, 'boss@example.com', $emailTo, '', '',
"Update on Case Progress", 'caseStatus.html');
}
In this example, an email is sent to all users have participated in the current case and all master process or subprocess cases associated with the current case:
$query = "SELECT DISTINCT USR_UID FROM APP_DELEGATION WHERE APP_UID =
(SELECT APP_UID FROM SUB_APPLICATION WHERE APP_UID = '$caseId' OR APP_PARENT = '$caseId')";
$users = executeQuery($query);
if (is_array($users) and count($users) > 0) {
$emailTo; //empty string to hold the emails of the participants in case
foreach ($users as $user) {
$aUser = userInfo($user['USR_UID']);
$emailTo .= (empty($emailTo) ? "" : "," ) . $aUser['mail'];
}
PMFSendMessage(@@APPLICATION, 'boss@example.com', $emailTo, '', '',
"Update on Case Progress", 'caseStatus.html');
}
Emailing Members of a Group
In this example, the members of a group are looked up in the ProcessMaker database and an email is sent to each member of a group named "employees".
$query = "SELECT DISTINCT GU.USR_UID FROM CONTENT AS C, GROUP_USER AS GU WHERE " .
"C.CON_CATEGORY='GRP_TITLE' AND C.CON_VALUE='$groupName' AND C.CON_ID=GU.GRP_UID";
$result = executeQuery($query);
if (!is_array($result) or count($result) < 1) {
$g = new G();
$g->SendMessageText("Unable to find any users in group '$groupName'.", "WARNING");
}
else {
$to = '';
foreach ($result as $record) {
$aInfo = userInfo($record['USR_UID']);
if (empty($to))
$to = $aInfo['mail'];
else
$to .= ', ' . $aInfo['mail'];
}
PMFSendMessage(@@APPLICATION, 'boss@example.com', $to, '', '',
"Work for $dptName", 'positiveExpense.html');
}
Emailing Members of a Department
Sending an email to all members of a department is very similar to sending an email to members of a group, but query the USERS.DEP_UID field.
In this example, the members of department named "Sales" are looked up in the ProcessMaker database and an email is sent to all members:
$query = "SELECT DISTINCT U.USR_UID FROM USERS AS U, CONTENT AS C WHERE " .
"C.CON_CATEGORY='DEPO_TITLE' AND C.CON_VALUE='$dptName' AND C.CON_ID=U.DEP_UID";
$result = executeQuery($query);
if (!is_array($result) or count($result) < 1) {
$g = new G();
$g->SendMessageText("Unable to find any users in department '$dptName'.", "WARNING");
}
else {
$to = '';
foreach ($result as $record) {
$aInfo = userInfo($record['USR_UID']);
if (empty($to))
$to = $aInfo['mail'];
else
$to .= ', ' . $aInfo['mail'];
}
PMFSendMessage(@@APPLICATION, 'boss@example.com', $to, '', '',
"Work for $dptName", 'positiveExpense.html');
}
Emailing Users with a Role
Sending an email to all users with a specified role requires first looking up the unique ID for the role in the rb_<WORKSPACE>.ROLES table and then querying the wf_<WORKSPACE>.USERS.USR_ROLE field for that unique ID.
In this example, the users with the "PROCESSMAKER_MANAGER" role are looked up in the ProcessMaker database and an email is sent to all those users:
$roleQuery = executeQuery("SELECT ROL_UID FROM ROLES WHERE ROL_CODE='$roleCode'", 'rbac');
$roleUid = $roleQuery[1]['ROL_UID'];
$result = executeQuery("SELECT USR_UID FROM USERS WHERE USR_ROLE='$roleUid'");
if (!is_array($result) or count($result) < 1) {
$g = new G();
$g->SendMessageText("Unable to find any users with role '$roleCode'.", "WARNING");
}
else {
$to = '';
foreach ($result as $record) {
$aInfo = userInfo($record['USR_UID']);
if (empty($to))
$to = $aInfo['mail'];
else
$to .= ', ' . $aInfo['mail'];
}
PMFSendMessage(@@APPLICATION, 'boss@example.com', $to, '', '',
"Meeting for all managers next Friday", 'managersMeeting.html');
}
Emailing when Cases are Canceled/Paused/Reassigned
In version 2.5.0 and later ProcessMaker provides a way to set a trigger to fire when a case is opened, deleted, canceled, reassigned or paused.
In earlier versions, ProcessMaker does not provide a way to fire a trigger these actions occur in a case. The only way to get around this problem is to add code directly to the functions Cases::deleteCase, Cases::cancelCase(), Cases::pauseCase, Cases::unpauseCase() or Cases::reassignCase() which are defined in the file workflow/engine/classes/class.case.php.
For example, to send an email notification to the next user when a case is reassigned to him/her, the following code could be added to the end of the Cases::reassignCase() function:
$aUser = userInfo($newUserUID);
PMFSendMessage($sApplicationUID, "admin@example.com", $aUser['mail'], '', '',
"Assigned to the case!", "someTemplate.html");
Debugging Email Notifications
Email notifications can fail for a number of reasons. If emails aren't being received, it is recommended to check the following issues in order to figure out what is causing the problem.
First, check the configuration to connect to the email server and make sure that the email server is functioning by pinging it. Also make sure that the ProcessMaker server is configured to periodically execute cron.php, so the emails will get sent.
Check the PMFSendMessage() Return Value
If the email was sent out by PMFSendMessage() in a trigger, then check the return value. If 0, then there is probably a problem in the parameters for the function. Perhaps one of the email addresses is not recognized as an email address. Perhaps the name of the template file was misspelled. Remember that template names are case sensitive.
Assign the return value of the PMFSendMessage() function to a case variable and run a case with the debugger turned on to see the return value.
Check the APP_MESSAGE table
Check whether a record has been written to the wf_<WORKSPACE>.APP_MESSAGE table in the database. (To avoid logging in MySQL from the command line, phpMyAdmin can be used to view the database from a web browser.)
Every email message to be sent out will be stored in the wf_<WORKSPACE>.APP_MESSAGE table in the database. When the record is first written to the database, the APP_MSG_SENT field will be set to the current datetime. (Note that the APP_MSG_SENT field doesn't indicate the time when the message was sent to the email server.) When the email message is sent to the email server by the cron.php script, the APP_MSG_STATUS field will change from "pending" to "sent".
Check the Output of cron.php
When the cron.php script is executed, it sents every message in the wf_<WORKSPACE>.APP_MESSAGE table whose status is "pending" to the email server. cron.php keeps a log of its activities. If emails were sent out, a record should be written in the shared/log/cron.log file. If an error occurred while trying to send out emails, a record should be written to the shared/log/cronError.log file.
If the log files don't indicate anything, execute cron.php manually from the command line and check the output.
Log Module to manage notifications
Available Version: From 2.5
On previous versions of ProcessMaker, when an email was sent it was difficult to have log or registry of which mails were sent or not; even using the APP_MESSAGE to control mails, filter them by process, status or dates was not optimized. From this version, log of all mails sent inside a process was added, this is optimized emulating APP_MESSAGE inside this log, allowing to search emails according to different search parameters added. Basically, the following notifications will be stored inside it:
In case of sending emails using notifications with PMFSendMessage() function, on this function it is possible to add a parameter which will decided if the message will be displayed or not on the log list.
Only users with PROCESSMAKER_ADMIN and PROCESSMAKER_MANAGER role will have access to the email log.
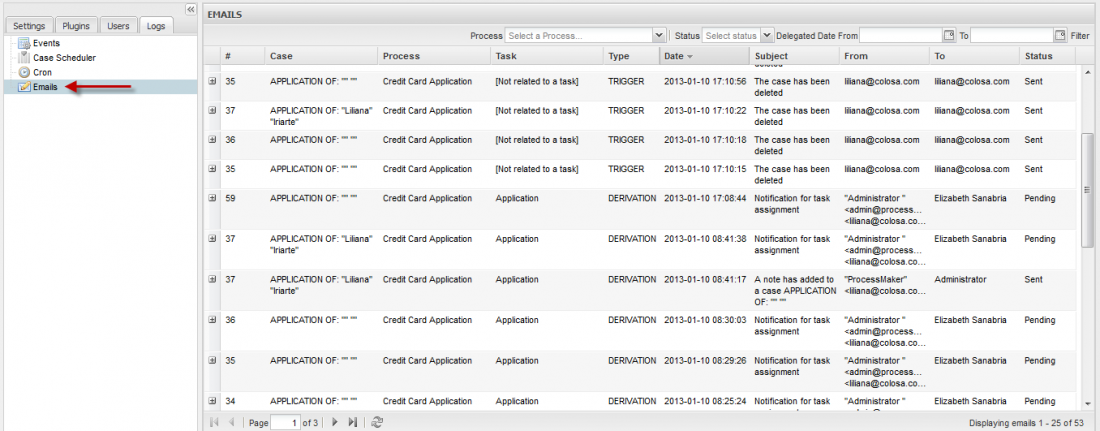
When emails are sent, their registry are stored at ADMIN > Settings > Logs > Emails
Email Log Options
Once an email has sent, it will be stored on APP_MESSAGE and displayed on the log list with the following description:
- #: it will displays the number of the case where the email was sent.
- Case: it displays the name of the case where the email was sent.
- Process: name of the process where the email was sent.
- Task: name of the task where the email was configured to be sent.
- Type: it displays the type of notification, there are two types Trigger if email was sent using a trigger, using for example PMFSendMessage() function; and Derivation it the email was sent using a Tasks Notification or a Case Note.
- Date: Date when email was sent.
- Subject: The subject (title) of the email.
- From: The email address of the person who sends out the email.
- To: The email address to whom the email is sent.
- Status: It displays the status of the message, if the email was sent its status will be Sent otherwise Pending. This status can be changed in case a lot of mails are on queue and they weren't sent correctly, if this value is changed, it will be also changed on APP_MESSAGE table.
Below each email description, a preview of the message body is displayed, click on ![]() icon to expand the information, to contract it click on
icon to expand the information, to contract it click on ![]() icon.
icon.

In case of the above example, email was sent by adding a case note.
If the template is created with some styles, font size, color, etc. this format will be displayed on the preview, in the example below an event was executed, and its template was created using some styles:

Searching Emails
One of the advantage of the email log, is the possibility to search an email depending on a criteria selected, the search criteria are:
- Process: search by process name or by all processes created on the current workspace.
- Status: search by status: pending, sent or both.
- Delegate Date From: To: search by date on which email was sent.


