- Response values
- PHP
- GET Requests
- POST Requests
- PUT Requests
- DELETE Requests
- PHP pmRestRequest() Function
- PHP Calling REST Endpoints Best Practices
- JavaScript
- GET Requests
- PUT Requests
- JavaScript
pmRestRequest()Function - Javascript Calling REST Endpoints Best Practices
- Source Code for Endpoints
- Testing Endpoints
Once an access token is obtained from OAuth2.0, the ProcessMaker REST endpoints can be called using that access token. This page explains how to call REST endpoints using PHP, standard JavaScript and JQuery (which is a library of JavaScript).
Because there is a lot of code involved in sending out each HTTP request and processing the response, it is recommended to create a custom function named pmRestRequest() that will handle the REST requests. Using this function will simplify your code and help avoid duplication and errors.
Response values
When a REST request is successful, it will set the HTTP status code to 200 (OK) or 201 (Created). It is a good idea to always check whether a REST request was successful after executing it.
ProcessMaker REST endpoints have response values that will return JSON (JavaScript Object Notation) strings, which need to be decoded. In PHP, the response value can be decoded using json_decode().
In JavaScript, the JSON.parse() function can be used to decode JSON strings if using a recent web browser that supports JSON (Internet Explorer 8+, Firefox 3.1+, Chrome 3+, Safari 4.0.3+ and Opera 10.5+). For older browsers, eval() needs to be used, although it is not as safe. It is recommended to check whether the JSON object exists before calling the JSON.parse() method:
...
oRet = (JSON) ? JSON.parse(req.responseText) : eval(req.responseText);
Errors
If ProcessMaker detects an error in a REST request, the HTTP status code will be set to 400 (Bad Request) and the following error object will be returned:
error: {
code: 400,
message: "error-message"
}
}
If unable to handle the error, it is recommended to display the error to the user so someone can be contacted to fix the problem.
If an error occurs that isn't handled by ProcessMaker, then the HTTP status code will be set to another number and there will be no response value. For example, if the endpoint is misspelled or doesn't exist, the status code will be 404 (Not Found). If the workspace is misspelled or doesn't exist, the status code will be 503 (Service Unavailable). In these cases it is recommended to print the status code so the user can figure out what the problem is.
Expired Authorization
If the access token has expired or is invalid, the HTTP status code will be set to 401 (Unauthorized) and the following error object will be returned:
error: {
code: 401,
message: "Unauthorized"
}
}
PHP
The cURL library in PHP can be used to call ProcessMaker REST endpoints. For each REST request, the configuration of the HTTP header is different, depending on whether the method is GET, POST, PUT or DELETE.
All requests of a ProcessMaker REST endpoint need to include the access token in the HTTP header. For example, if the access token is "38d25eab20873124becc8948df03e14519f93695", then it is included in the header in this manner:
curl_setopt($ch, CURLOPT_HTTPHEADER, array("Authorization: Bearer 38d25eab20873124becc8948df03e14519f93695"));
GET Requests
To call a GET endpoint using cURL and get the response object and HTTP status code:
For example, to get print a list of all the active ProcessMaker users:
$accessToken = isset($_COOKIE['access_token']) ? $_COOKIE['access_token'] : getAccessToken();
$ch = curl_init($pmServer . "/api/1.0/workflow/users");
curl_setopt($ch, CURLOPT_HTTPHEADER, array("Authorization: Bearer " . $accessToken));
curl_setopt($ch, CURLOPT_RETURNTRANSFER, true);
$aUsers = json_decode(curl_exec($ch));
$statusCode = curl_getinfo($ch, CURLINFO_HTTP_CODE);
curl_close($ch);
if ($statusCode != 200) {
if (isset ($aUsers) and isset($aUsers->error))
print "Error code: {$aUsers->error->code}\nMessage: {$aUsers->error->message}\n";
else
print "Error: HTTP status code: $statusCode\n";
}
else {
foreach ($aUsers as $oUser) {
if ($oUser->usr_status == "ACTIVE") {
print "{$oUser->usr_firstname} {$oUser->usr_lastname} ({$oUser->usr_username})\n";
}
}
}
POST Requests
POST variables can either be sent as a string in application/x-www-form-urlencoded format (which is the default standard for form data) or as a JavaScript Object Notation (JSON) string, which is more precise and recommended.
To send a POST request in application/x-www-form-urlencoded format, create an associative array where each key is the name of a POST variable. This associative array is included with the request by using the CURLOPT_POSTFIELDS option in the curl_setopt() function. If it is an array or object, curl_setopt() will automatically convert it into a string.
If the POST variables contain an array within an array (which may happen with a few endpoints such as /cases/ and /cases/{app_uid}/variables), then the http_build_query() function needs to be used to convert the array into a string and URL-encode it.
Note: One of the problems with using http_build_query() is that ProcessMaker REST endpoints often interpret numbers as strings, which can cause problems when REST endpoints do error checking. If a REST endpoint complains about a variable which requires an integer, then it is recommended to pass the POST variables as a JSON string. The other problem is when sending a file in one of the POST variables. If sending a file, it is recommended to NOT pass the POST variables through http_build_query().
To send the POST variables as a JSON string, create an associative array where each key is the name of a POST variable. Then, use PHP's json_encode() function to convert it into a JSON string.
Converting to UTF-8
If the values of the POST or PUT variables do not use the UTF-8 character set, then they first need to be converted to UTF-8 using the mb_convert_encoding() function. For example, if converting from ISO-8859-15 to UTF-8:"position" => "Lingüista español",
"associate" => "José Ibáñez"
);
foreach($aVars as $key => $value) {
$aVars[$key] = mb_convert_encoding($value, 'UTF-8', 'ISO-8859-15');
}
PUT Requests
PUT requests are similar to POST requests. The command curl_setopt($ch, CURLOPT_CUSTOMREQUEST, "PUT") is used to change the request from POST to PUT. Like POST requests, it is recommended to use the http_build_query() function to convert the array of PUT variables into a string and URL-encode it:
Example:
The following example changes the status of a user to "VACATION" and sets the replacement user:
$userId = "75740355754dd28ba73d7d6082172937"; //set to the unique ID of a user
$accessToken = isset($_COOKIE['access_token']) ? $_COOKIE['access_token'] : getAccessToken();
$postParams = array(
'usr_status' => "VACATION",
'usr_replaced_by' => "14680180454ca4477335a27034362107"
);
$ch = curl_init($apiServer . "/api/1.0/workflow/user/" . $userId);
curl_setopt($ch, CURLOPT_HTTPHEADER, array("Authorization: Bearer $accessToken"));
curl_setopt($ch, CURLOPT_RETURNTRANSFER, true);
curl_setopt($ch, CURLOPT_CUSTOMREQUEST, "PUT");
curl_setopt($ch, CURLOPT_POSTFIELDS, http_build_query($postParams));
$oResult = json_decode(curl_exec($ch));
$statusCode = curl_getinfo($ch, CURLINFO_HTTP_CODE);
if (isset($oResult) and isset($oResult->error)) {
print "Error in $apiServer: \nCode: {$oResult->error->code}\nMessage: {$oResult->error->message}\n";
}
elseif (isset($oResult) and isset($oResult->usr_uid)) {
print "User '{$oResult->usr_uid}' updated:\n";
print_r($oResult);
}
else {
print "Error updating user: HTTP status code: $statusCode\n";
}
curl_close($ch);
DELETE Requests
To send a DELETE request:
Most DELETE requests don't have a response value, so make sure to check whether the HTTP status code is 200 to determine whether the request was successful.
Example:
This example deletes a user:
$userId = "75740355754dd28ba73d7d6082172937"; //set to a user's ID
$accessToken = isset($_COOKIE['access_token']) ? $_COOKIE['access_token'] : getAccessToken();
$ch = curl_init($apiServer . "/api/1.0/workflow/user/$userId");
curl_setopt($ch, CURLOPT_HTTPHEADER, array("Authorization: Bearer $accessToken"));
curl_setopt($ch, CURLOPT_TIMEOUT, 30);
curl_setopt($ch, CURLOPT_RETURNTRANSFER, true);
curl_setopt($ch, CURLOPT_CUSTOMREQUEST, "DELETE");
$oResult = json_decode(curl_exec($ch));
$statusCode = curl_getinfo($ch, CURLINFO_HTTP_CODE);
if ($statusCode != 200) {
if (isset($oResult) and isset($oResult->error)) {
print "Error in $apiServer: \nCode: {$oResult->error->code}\nMessage: {$oResult->error->message}\n";
}
else {
print "Error: HTTP status code: $statusCode\n";
}
}
curl_close($ch);
PHP pmRestRequest() Function
The best way to avoid code duplication is to create a generic function that can handle ProcessMaker REST requests. This function will set the headers depending on the HTTP method and execute the request using cURL. If an error occurs, it will print the error. Then, it returns an object containing the HTTP status code and the response object.
/*Function to call a ProcessMaker REST endpoint and return the HTTP status code and
response if any.
Parameters:
$method: HTTP method: "GET", "POST", "PUT" or "DELETE"
$endpoint: The PM endpoint, not including the server's address and port number.
Ex: "/api/1.0/workflow/cases"
$aVars: Optional. Associative array containing the variables to use in the request
if "POST" or "PUT" method.
$accessToken: Optional. The access token, which comes from oauth2/token. If not defined
then uses the access token in $_COOKIE['access_token']
Return Value:
object {
response: Response from REST endpoint, decoded with json_decode().
status: HTTP status code: 200 (OK), 201 (Created), 400 (Bad Request), 404 (Not found), etc.
} */
function pmRestRequest($method, $endpoint, $aVars = null, $accessToken = null) {
global $pmServer;
if (empty($accessToken) and isset($_COOKIE['access_token']))
$accessToken = $_COOKIE['access_token'];
if (empty($accessToken)) { //if the access token has expired
//To check if the PM login session has expired: !isset($_COOKIE['PHPSESSID'])
header("Location: loginForm.php"); //change to match your login method
die();
}
//add beginning / to endpoint if it doesn't exist:
if (!empty($endpoint) and $endpoint[0] != "/")
$endpoint = "/" . $endpoint;
$ch = curl_init($pmServer . $endpoint);
curl_setopt($ch, CURLOPT_HTTPHEADER, array("Authorization: Bearer " . $accessToken));
curl_setopt($ch, CURLOPT_TIMEOUT, 30);
curl_setopt($ch, CURLOPT_RETURNTRANSFER, true);
$method = strtoupper($method);
switch ($method) {
case "GET":
break;
case "DELETE":
curl_setopt($ch, CURLOPT_CUSTOMREQUEST, "DELETE");
break;
case "PUT":
curl_setopt($ch, CURLOPT_CUSTOMREQUEST, "PUT");
case "POST":
curl_setopt($ch, CURLOPT_POST, 1);
curl_setopt($ch, CURLOPT_POSTFIELDS, http_build_query($aVars));
break;
default:
throw new Exception("Error: Invalid HTTP method '$method' $endpoint");
return null;
}
$oRet = new StdClass;
$oRet->response = json_decode(curl_exec($ch));
$oRet->status = curl_getinfo($ch, CURLINFO_HTTP_CODE);
curl_close($ch);
if ($oRet->status == 401) { //if session has expired or bad login:
header("Location: loginForm.php"); //change to match your login method
die();
}
elseif ($oRet->status != 200 and $oRet->status != 201) { //if error
if ($oRet->response and isset($oRet->response->error)) {
print "Error in $pmServer:\nCode: {$oRet->response->error->code}\n" .
"Message: {$oRet->response->error->message}\n";
}
else {
print "Error: HTTP status code: $oRet->status\n";
}
}
return $oRet;
}
The pmRestRequest() function can be passed an access token to use when calling the REST endpoint. If the access token is not included as a parameter in the function, then pmRestRequest() uses the access token that is saved as a cookie. If the access token doesn't exist or has expired, then the pmRestRequest() function redirects to a web page where the user can enter their credentials to log into ProcessMaker. If doing automatic logins with saved credentials, then change this code to call pmRestLogin() directly.
After calling the REST endpoint, the pmRestRequest() function checks for errors in the response and prints them to inform the user of the problem. Then, it places the response and HTTP status code from the endpoint call in a object that is returned. When calling pmRestRequest(), check that the status code is 200 (or 201 for some endpoints) to make sure that there were no errors and then process the response.
For example, to call the GET /api/1.0/{workspace}/users endpoint using the pmRestRequest() function and print out a list of users:
if ($oRet and $oRet->status == 200) {
foreach ($oRet->response as $oUser) {
print "{$oUser->usr_firstname} {$oUser->usr_lastname} ({$oUser->usr_username})\n";
}
}
To log into ProcessMaker and then call the pmRestRequest() function using the access token that was obtained while logging in:
$oRet = pmRestRequest("GET", '/api/1.0/workflow/users', null, $oToken->access_token);
if ($oRet and $oRet->status == 200) {
foreach ($oRet->response as $oUser) {
print "{$oUser->usr_firstname} {$oUser->usr_lastname} ({$oUser->usr_username})\n";
}
}
PHP Calling REST Endpoints Best Practices
These are examples of best ways to call REST endpoints:
Using the plugin
In this option, create a plugin that has the functions you need. For this example, this plugin has the functions pmRestLogin, pmRestRefresh and pmRestRequest. Follow these steps to use this sample plugin:
1. Download this plugin as a sample with these three functions. This plugin contains the following class file that contain these functions:
global $pmServer;
global $pmWorkspace;
$pmServer = "http://10.100.64.7:13300";
$pmWorkspace = "workflow";
// Optional, these values can be here or can be send from case variables - Start
global $pmClientId;
global $pmClientSecret;
global $pmUsername;
global $pmPassword;
$pmClientId = "x-pm-local-client";
$pmClientSecret = "179ad45c6ce2cb97cf1029e212046e81";
$pmUsername = "admin";
$pmPassword = "admin";
// Optional, these values can be here or can be send from case variables - End
function pmRestLogin($clientId, $clientSecret, $username, $password) {
global $pmServer, $pmWorkspace;
$postParams = array(
'grant_type' => 'password',
'scope' => '*', //set to 'view_process' if not changing the process
'client_id' => $clientId,
'client_secret' => $clientSecret,
'username' => $username,
'password' => $password
);
$ch = curl_init("$pmServer/$pmWorkspace/oauth2/token");
curl_setopt($ch, CURLOPT_TIMEOUT, 30);
curl_setopt($ch, CURLOPT_POST, 1);
curl_setopt($ch, CURLOPT_POSTFIELDS, $postParams);
curl_setopt($ch, CURLOPT_RETURNTRANSFER, true);
$oToken = json_decode(curl_exec($ch));
$httpStatus = curl_getinfo($ch, CURLINFO_HTTP_CODE);
curl_close($ch);
if ($httpStatus != 200) {
print "Error in HTTP status code: $httpStatus\n";
return null;
}
elseif (isset($oToken->error)) {
print "Error logging into $pmServer:\n" .
"Error: {$oToken->error}\n" .
"Description: {$oToken->error_description}\n";
}
else {
//At this point $oToken->access_token can be used to call REST endpoints.
//If planning to use the access_token later, either save the access_token
//and refresh_token as cookies or save them to a file in a secure location.
//If saving them as cookies:
setcookie("access_token", $oToken->access_token, time() + 86400);
setcookie("refresh_token", $oToken->refresh_token); //refresh token doesn't expire
setcookie("client_id", $clientId);
setcookie("client_secret", $clientSecret);
//If saving to a file:
//file_put_contents("/secure/location/oauthAccess.json", json_encode($tokenData));
}
return $oToken;
}
function pmRestRefresh($clientId=null, $clientSecret=null, $refreshToken=null) {
global $pmServer, $pmWorkspace;
$clientId = ($clientId === null and isset($_COOKIE['client_id'])) ? $_COOKIE['client_id'] : $clientId;
$clientSecret = ($clientSecret === null and isset($_COOKIE['client_secret'])) ? $_COOKIE['client_secret'] : $clientSecret;
$refreshToken = ($refreshToken === null and isset($_COOKIE['refresh_token'])) ? $_COOKIE['refresh_token'] : $refreshToken;
$aVars = array(
'grant_type' => 'refresh_token',
'client_id' => $clientId,
'client_secret' => $clientSecret,
'refresh_token' => $refreshToken
);
$ch = curl_init("$pmServer/$pmWorkspace/oauth2/token");
curl_setopt($ch, CURLOPT_TIMEOUT, 30);
curl_setopt($ch, CURLOPT_POST, 1);
curl_setopt($ch, CURLOPT_POSTFIELDS, $aVars);
curl_setopt($ch, CURLOPT_RETURNTRANSFER, true);
$oToken = json_decode(curl_exec($ch));
$httpStatus = curl_getinfo($ch, CURLINFO_HTTP_CODE);
curl_close($ch);
if ($httpStatus != 200) {
print "Error in HTTP status code: $httpStatus\n";
}
elseif (isset($oToken->error)) {
print "Error logging into $pmServer:\n" .
"Error: {$oToken->error}\n" .
"Description: {$oToken->description}\n";
}
else {
//Save access token as a cookie that expires in 86400 seconds:
setcookie("access_token", $oToken->access_token, time() + 86400);
//If saving to a file:
//file_put_contents("/secure/location/oauthAccess.json", json_encode($oToken));
}
return $oToken;
}
function pmRestRequest($method, $endpoint, $aVars = null, $accessToken = null) {
global $pmServer;
if (empty($accessToken) and isset($_COOKIE['access_token']))
$accessToken = $_COOKIE['access_token'];
if (empty($accessToken)) { //if the access token has expired
//To check if the PM login session has expired: !isset($_COOKIE['PHPSESSID'])
header("Location: loginForm.php"); //change to match your login method
die();
}
//add beginning / to endpoint if it doesn't exist:
if (!empty($endpoint) and $endpoint[0] != "/")
$endpoint = "/" . $endpoint;
$ch = curl_init($pmServer . $endpoint);
curl_setopt($ch, CURLOPT_HTTPHEADER, array("Authorization: Bearer " . $accessToken));
curl_setopt($ch, CURLOPT_TIMEOUT, 30);
curl_setopt($ch, CURLOPT_RETURNTRANSFER, true);
$method = strtoupper($method);
switch ($method) {
case "GET":
break;
case "DELETE":
curl_setopt($ch, CURLOPT_CUSTOMREQUEST, "DELETE");
break;
case "PUT":
curl_setopt($ch, CURLOPT_CUSTOMREQUEST, "PUT");
case "POST":
curl_setopt($ch, CURLOPT_POST, 1);
curl_setopt($ch, CURLOPT_POSTFIELDS, http_build_query($aVars));
break;
default:
throw new Exception("Error: Invalid HTTP method '$method' $endpoint");
return null;
}
$oRet = new StdClass;
$oRet->response = json_decode(curl_exec($ch));
$oRet->status = curl_getinfo($ch, CURLINFO_HTTP_CODE);
curl_close($ch);
if ($oRet->status == 401) { //if session has expired or bad login:
header("Location: loginForm.php"); //change to match your login method
die();
}
elseif ($oRet->status != 200 and $oRet->status != 201) { //if error
if ($oRet->response and isset($oRet->response->error)) {
print "Error in $pmServer:\nCode: {$oRet->response->error->code}\n" .
"Message: {$oRet->response->error->message}\n";
}
else {
print "Error: HTTP status code: $oRet->status\n";
}
}
return $oRet;
}
2. It is important for you to set the URL and workspace that you are using in the $pmServer and $pmWorkspace variables. After this plugin is installed the three functions are available for any trigger. This is a good way to avoid instancing.
3. The way to use this functions now would be the following:
4. Change the variables values with your own information.
These variables can also be added like global variables like so:
global $pmClientSecret;
global $pmUsername;
global $pmPassword;
$pmClientId = "x-pm-local-client";
$pmClientSecret = "179ad45c6ce2cb97cf1029e212046e81";
$pmUsername = "admin";
$pmPassword = "admin";
Later you can use these lines in triggers this way:
Using the trigger
You can call REST endpoints with triggers by using the following lines:
echo ($pmServer.$endpoint);
if (empty($accessToken) and isset($_COOKIE['access_token']))
$accessToken = $_COOKIE['access_token'];
if (empty($accessToken)) { //if the access token has expired
//To check if the PM login session has expired: !isset($_COOKIE['PHPSESSID'])
header("Location: ./../login/login"); //change to match your login method
die();
}
//add beginning / to endpoint if it doesn't exist:
if (!empty($endpoint) and $endpoint[0] != "/")
$endpoint = "/" . $endpoint;
$ch = curl_init();
curl_setopt($ch, CURLOPT_URL, $pmServer . $endpoint);
curl_setopt($ch, CURLOPT_HTTPHEADER, array("Authorization: Bearer " . $accessToken));
curl_setopt($ch, CURLOPT_TIMEOUT, 30);
curl_setopt($ch, CURLOPT_RETURNTRANSFER, true);
$method = strtoupper($method);
switch ($method) {
case "GET":
curl_setopt($ch, CURLOPT_CUSTOMREQUEST, "GET");
break;
case "DELETE":
curl_setopt($ch, CURLOPT_CUSTOMREQUEST, "DELETE");
break;
case "PUT":
curl_setopt($ch, CURLOPT_CUSTOMREQUEST, "PUT");
case "POST":
curl_setopt($ch, CURLOPT_POST, 1);
curl_setopt($ch, CURLOPT_POSTFIELDS, http_build_query($aVars));
break;
default:
throw new Exception("Error: Invalid HTTP method '$method' $endpoint");
return null;
}
$ret = curl_exec($ch);
$oRet = new StdClass;
$oRet->response = json_decode($ret);
$oRet->status = curl_getinfo($ch, CURLINFO_HTTP_CODE);
curl_close($ch);
if ($oRet->status == 401) { //if session has expired or bad login:
header("Location: ./../login/login"); //change to match your login method
die();
}
elseif ($oRet->status != 200 and $oRet->status != 201) { //if error
if ($oRet->response and isset($oRet->response->error)) {
print "Error in $pmServer:\nCode: {$oRet->response->error->code}\n" .
"Message: {$oRet->response->error->message}\n";
}
else {
print "Error: HTTP status code: $oRet->status\n";
}
}
return $oRet;
};
$oRet = $pmRestRequest('GET', "http://172.16.3.42:3220",'/api/1.0/workflow322/users', null, "8c6a4327b3125c41e7300bf3b95908c1503a8176");
if ($oRet and $oRet->status == 200) {
foreach ($oRet->response as $oUser) {
print "{$oUser->usr_firstname} {$oUser->usr_lastname} ({$oUser->usr_username})\n";
}
}
Include this function in every trigger that needs to access the REST API. Change the information in $pmRestRequest with your information in order for this to work.
You can also create a public file and use this function from there.
JavaScript
In standard JavaScript, the XMLHttpRequest() method can be used to call a ProcessMaker REST endpoint. XMLHttpRequest() is available in Internet Explorer 7+, FireFox, Chrome, Opera 8+, Safari 1.2+ and iCab 3.0+. In Internet Explorer 5, 5.5 and 6, ActiveXObject("Microsoft.XMLHTTP") can be used instead of XMLHttpRequest().
Examples are listed below of GET, POST, PUT and DELETE requests, but the easiest way to implement REST is to use the generic pmRestRequest() function below that can handle all the HTTP methods and does standard error checking.
GET Requests
This JavaScript example creates a array of active users. It obtains the list of all the users in the workspace and stores it in an array named aUsers. Then it loops through the array and checks whether the user's status is "ACTIVE". If so, it adds the user's UID and username to a new array named aActiveUsers.
pmWorkspace = "workflow"; //set to the workspace of your ProcessMaker server
function getUsers() {
if (getCookie("access_token") == false || getCookie("PHPSESSID") == false) {
location.window.href = "login.html";
return;
}
var req = new XMLHttpRequest();
req.open("GET", $pmServer + "/api/1.0/" + $pmWorkspace + "/users", true);
req.setRequestHeader("Authorization", "Bearer " + getCookie('access_token'));
req.onreadystatechange = function() {
if (req.readyState==4) {
if (req.status==200) {
var aActiveUsers = [];
var aUsers = JSON.parse(req.responseText);
for (var i = 0; i < aUsers.length; i++) {
if (aUsers[i].usr_status == "ACTIVE") {
aActiveUsers.push({
'uid': aUsers[i].usr_uid,
'username': aUsers[i].usr_username
});
}
}
}
else {
alert("Error status code: " + req.status);
}
}
req.send(null);
}
PUT Requests
To do PUT requests in JavaScript, place the parameters in an object and then use encodeURIComponent() to encode them so they can be sent in the HTTP header with URL-encoding:
"variable1": "value1",
"variable2": "value2"
};
for (var v in oVars) {
if (oVars.hasOwnProperty(v))
oVars[v] = encodeURIComponent(oVars[v]);
}
The following example changes the status of a user to "VACATION" and sets the user who will replace this user when they goes on vacation.
$userId = "75740355754dd28ba73d7d6082172937"; //set to the unique ID of a user
var oVars = {
'usr_status': "VACATION",
'usr_replaced_by': "14680180454ca4477335a27034362107"
};
for (var v in oVars) {
if (oVars.hasOwnProperty(v))
oVars[v] = encodeURIComponent(oVars[v]);
}
var req = XMLHttpRequest();
req.open('PUT', pmServer + '/api/1.0/workflow/user/' + userId, true);
req.setRequestHeader("Authorization", "Bearer " + getCookie("access_token"));
var sVars = JSON.stringify(oVars);
req.setRequestHeader('Content-type','application/json; charset=utf-8');
req.setRequestHeader('Content-length', sVars.length);
req.onreadystatechange = function() {
if (req.readyState==4) {
if (req.responseText) {
//use JSON.parse() to decode response text if the web browser supports it:
oResult = (JSON) ? JSON.parse(req.responseText) : eval(req.responseText);
if (req.status == 401) {
window.location.href = login.html;
}
else if (req.status != 200 && req.status != 400) {
alert("Error status code: " + req.status);
}
else if (req.status == 400) {
alert("Error Code: " + oResult.error.code + "\nMessage: " + oResult.error.message);
}
else {
//nothing required if success
}
}
}
req.send(null);
JavaScript pmRestRequest() Function
The best way to avoid code duplication is to create a generic JavaScript function called pmRestRequest() that can handle ProcessMaker REST requests. This function will set the HTTP headers depending on the HTTP method and then execute the call using XMLHttpRequest(). If an error occurs, it will display the error to the user.
//function to read cookie by name. If it returns false, then the cookie doesn't exist.
//if it returns "", then the cookie exists, but has no value.
function getCookie(name) {
function escape(s) {
return s.replace(/([.*+?\^${}()|\[\]\/\\])/g, '\\$1');
};
var match = document.cookie.match(RegExp('(?:^|;\\s*)' + escape(name) + '=([^;]*)'));
return match ? match[1] : null;
}
//Global variables set by synchronous call to last REST endpoint:
var oResponse = null; //response object returned by REST endpoint and decoded with JSON.parse():
var httpStatus = null; //HTTP status code of call to REST endpoint
/*function to call a ProcessMaker endpoint. If a synchronous call, it sets the global variables
httpStatus to the HTTP status code and oResponse to the decoded JSON response string.
Parameters:
method: HTTP method: "GET", "POST", "PUT" or "DELETE"
endpoint: The PM endpoint, not including the server's address and port number.
Ex: "/api/1.0/workflow/cases"
asynchronous: Optional. Set to true if asynchronous request. If false (the default value), then
processing waits until the HTTP request completes, which means the browser freezes.
oVars: Optional. Object containing variables to use in the request if "POST" or "PUT" method.
func: Optional. Custom function to be called after the endpoint request, whose first parameter
is the response object and the second parameter is the HTTP status code. */
function pmRestRequest(method, endpoint, asynchronous, oVars, func) {
//set optional parameters:
asynchronous = (typeof asynchronous === 'undefined') ? false : asynchronous;
oParams = (typeof oParams === 'undefined') ? null : oParams;
func = (typeof func === 'undefined') ? null : func;
while (!getCookie("access_token")) {
pmRestLogin();
}
if (typeof XMLHttpRequest != "undefined") {
var req = XMLHttpRequest();
}
else {
try { //for IE 5, 5.5 & 6:
var req = new ActiveXObject("Microsoft.XMLHTTP");
}
catch (e) {
alert ("Error: This browser does not support XMLHttpRequest.");
return;
}
}
req.open(method, pmServer + endpoint, asynchronous);
req.setRequestHeader("Authorization", "Bearer " + getCookie("access_token"));
sVars = null;
method = method.toUpperCase().trim();
switch (method) {
case "GET":
case "DELETE":
break;
case "PUT":
//URL encode the values of any variables in oVars:
if (oVars) {
for (var v in oVars) {
if (oVars.hasOwnProperty(v))
oVars[v] = encodeURIComponent(oVars[v]);
}
}
case "POST":
var sVars = JSON.stringify(oVars);
req.setRequestHeader('Content-type','application/json; charset=utf-8');
req.setRequestHeader('Content-length', sVars.length);
break;
default:
alert("Error: Invalid HTTP method '" + url + "'.");
return;
}
req.onreadystatechange = function() {
if (req.readyState == 4) { //the request is completed
var status = req.status;
var oResp = null;
if (req.responseText) {
//use JSON.parse() to decode response text if the web browser supports it:
oResp = (JSON) ? JSON.parse(req.responseText) : eval(req.responseText);
}
if (!asynchronous) {
httpStatus = status;
oResponse = oResp;
}
if (status == 401) {
window.location.href = "login.html";
return;
}
else if (oResp && oResp.error) {
var msg = "Error code: " + oResp.error.code + "\nMessage: " + oResp.error.message;
alert(msg);
//throw error if wanting to handle it:
//throw new Error(msg);
}
else if (status != 200 && status != 201) {
alert("HTTP status error: " + req.status);
//throw error if wanting to handle it:
//throw new Error("HTTP status error: " + req.status);
}
if (func) { //call custom function to handle response:
func(oResp, status);
}
}
};
if (asynchronous) {
req.timeout = 20000; //timeout after 20 seconds
req.ontimeout = function() { alert("Timed out calling " + $endpoint); };
}
req.send(sVars);
}
Executing pmRestRequest() Asynchronously
The REST endpoint can be called synchronously or asynchronously using the pmRestRequest() function. It is recommended to call it asynchronously, since it doesn't freeze the web browser while waiting for a response from the ProcessMaker server. If calling asynchronously and needing to process the response, then a custom function should be defined to process the response and pass this function as the last parameter of the pmRestRequest() function. The first parameter of the custom function should be the response object returned by the endpoint, and the second parameter should be the HTTP status code of the endpoint request.
For example, to print the list of users with "ACTIVE" status in the <body> of the current web page, define a custom function named printUserList and pass it as the last parameter in the pmRestRequest() function. Notice that the custom function's name printUserList is passed as a parameter, not printUserList(), since the function's reference is passed and not executed.
if (status != 200)
return;
list = "Active users:\n<ol>\n";
for (var i = 0; i < aUsers.length; i++) {
if (aUsers[i].usr_status == "ACTIVE") {
list += '<li>' + aUsers[i].usr_firstname + ' ' + aUsers[i].usr_lastname +
'(' + aUsers[i].usr_username + ')</li>\n';
}
}
var p = document.createElement('p');
p.innerHTML = list + "</ol>\n";
document.body.appendChild(p);
}
pmRestRequest('GET', '/api/1.0/workspace/users', true, null, printUserList); //execute when page loads
Executing pmRestRequest() Synchronously
Executing the REST call asynchronously can be difficult if doing a whole series of actions in a row. In some instances it may necessary to execute REST requests synchronously so that things can happen in a sequence. Just remember that doing this will freeze the web browser while waiting for the response from the ProcessMaker server.
After pmRestRequest() is called synchronously, the HTTP status code from the endpoint request will be set in the global variable httpStatus and the response object will be placed in oResponse. Check these variables to see the result of the REST request.
For example:
if (httpStatus == 200 and oResponse) {
var aUsers = oResponse;
list = "Active users:\n<ol>\n";
for (var i = 0; i < aUsers.length; i++) {
if (aUsers[i].usr_status == "ACTIVE") {
list += '<li>' + aUsers[i].usr_firstname + ' ' + aUsers[i].usr_lastname +
'(' + aUsers[i].usr_username + ')</li>\n';
}
}
var p = document.createElement('p');
p.innerHTML = list + "</ol>\n";
document.body.appendChild(p);
}
Javascript Calling REST Endpoints Best Practices
The easiest way to call REST endpoints is by using Javascript with Jquery. For example to obtain the access_token with the endpoint http://[pm-server]/[workspace]/oauth2/token (POST) use the following steps:
1. In a Javascript file use the following lines:
method = "POST";
clientID = "Your Client ID";
clientSecret = "Your Client Secret";
user = "Your username";
password = "Your username";
$.ajax({
url: url,
type: method,
data: JSON.stringify({
"grant_type": "password",
"scope": "",
"client_id": clientID,
"client_secret":clientSecret,
"username": user,
"password": password
}),
async: false, //with false => sync ; true => async
contentType: "application/json",
success: function (data, textStatus) {
console.log(data);
},
error: function (xhr, textStatus, errorThrown) {
console.log(textStatus);
}
});
2. Replace the {server} and {workspace} with the IP address of your server and the workspace where you will use this REST API.
3. In the method section you need to use one of the three possible methods (POST, GET, PUT), for this example it would be the method POST.
4. In order to obtain the access_token we need the information of the clientID and Client Secret. Please check this link and enter these information when you receive it.
5. Enter the user name and the password of the user with which you are going to request the access_token.
6. Use TRUE or FALSE if you want to sent asynchronously or synchronously the requests respectively.
Take in mind that if you chose synchronous requests that may temporarily lock the browser disabling any action while the request is active.
If you want to display in console you can use this lines instead:
method = "GET";
accessToken = "Your access Token"
callbackSuccess = function (data){
var i;
for (i=0; i<data.length ; i++){
console.log(data[i].usr_firstname);
}
}
callbackError = function (data){
console.error(data);
}
$.ajax({
url: url,
type: method,
async: false, // true
beforeSend: function (xhr) {
xhr.setRequestHeader("Authorization", "Bearer " + accessToken);
},
contentType: "application/json",
success: function (data, textStatus) {
callbackSuccess(data);
},
error: function (xhr, textStatus, errorThrown) {
callbackError(textStatus);
}
});
Source Code for Endpoints
If in doubt about what parameters are accepted by an endpoint, all the endpoints and their GET parameters are listed in the file:
<INSTALL-DIRECTORY>/shared/compiled/routes.php (version 3.0.1.8 and earlier)
<INSTALL-DIRECTORY>/shared/sites/workspace/routes.php (version 3.1 and later)
The routes.php file is automatically generated the first time the REST API is called (or the first time it is called after the compiled cache is deleted).
The source code for the endpoints is located in the directory:
<INSTALL-DIRECTORY>/workflow/engine/src/ProcessMaker/Services/Api
When the endpoints are executed, they call internal classes and functions used in ProcessMaker. When in doubt about the functioning of an endpoint, check the source code of the endpoint and use a search tool such as grep to find the internal classes and functions that it calls.
For example, the endpoint GET /api/1.0/{workspace}/cases calls the Cases::doGetCasesListToDo() method, which is defined in:
workflow/engine/src/ProcessMaker/Services/Api/Cases.php
That method in turn calls the Cases::getList() method, which is defined in:
workflow/engine/src/ProcessMaker/BusinessModel/Cases.php
That method in turn calls the Applications::getAll() method, which is defined in:
workflow/engine/classes/class.applications.php
Testing Endpoints
Using Postman
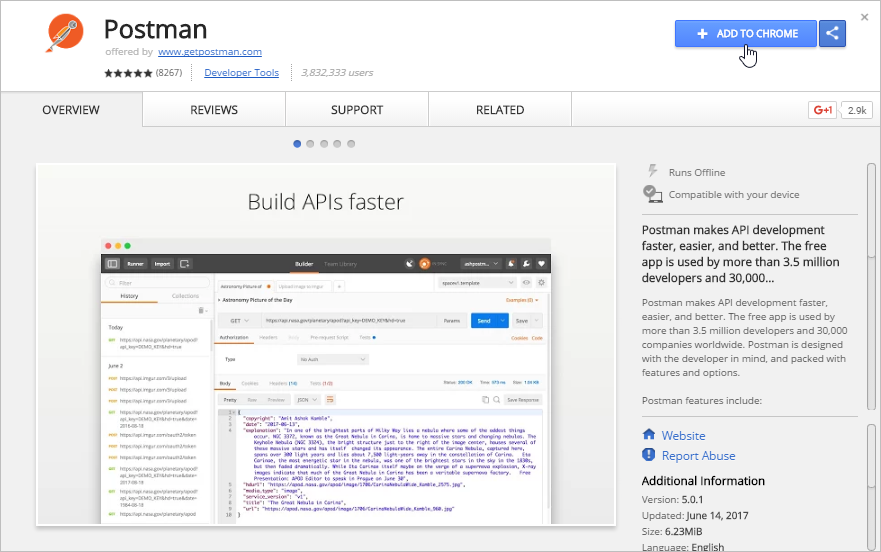
Postman is is a popular API client that makes it easy test ProcessMaker APIs. To use it, first install the Google Chrome browser, and then install the Postman Chrome extension by going to the Chrome Web Store and clicking on the Add to chrome button.
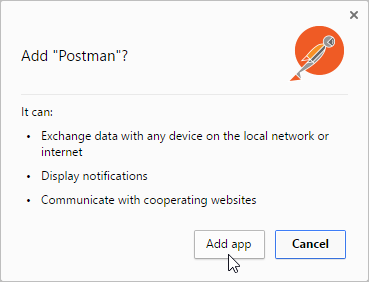
A window will be displayed asking for permission to add the extension. Click on the Add app button.
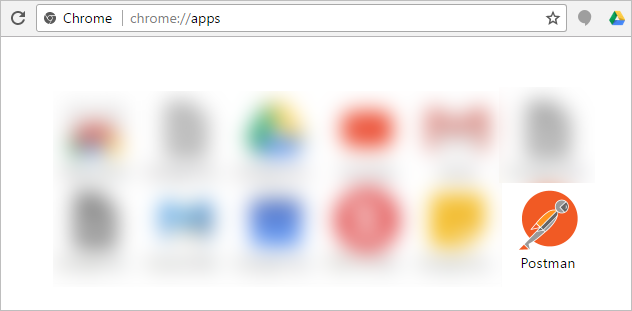
Once installed, the Chrome browser’s Apps page (chrome://apps/) will open displaying the Postman logo in the list of installed extensions. Click on the Postman icon.
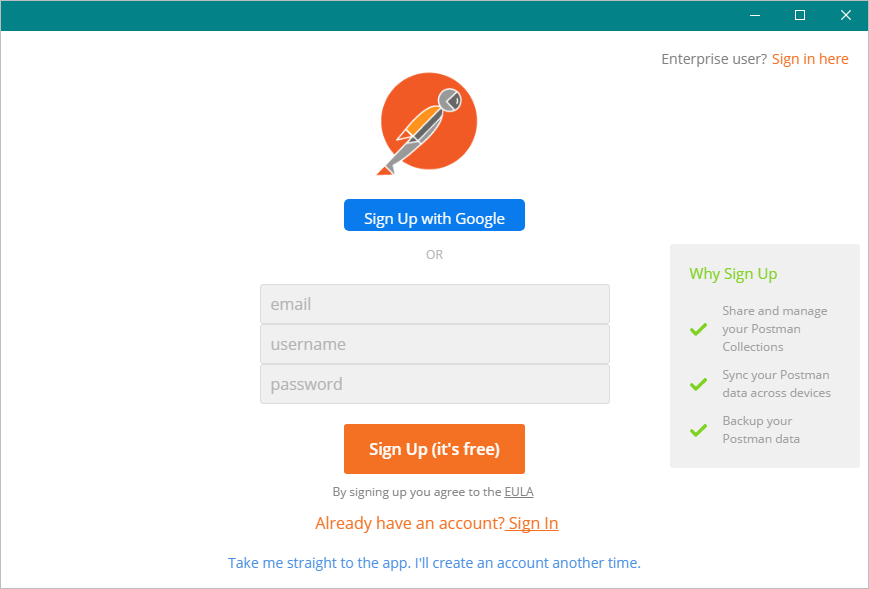
On the login screen, the user can access Postman using his/her Google account, or by creating a new Postman account. To create or use an account later, just click the Take me straight to the app link.
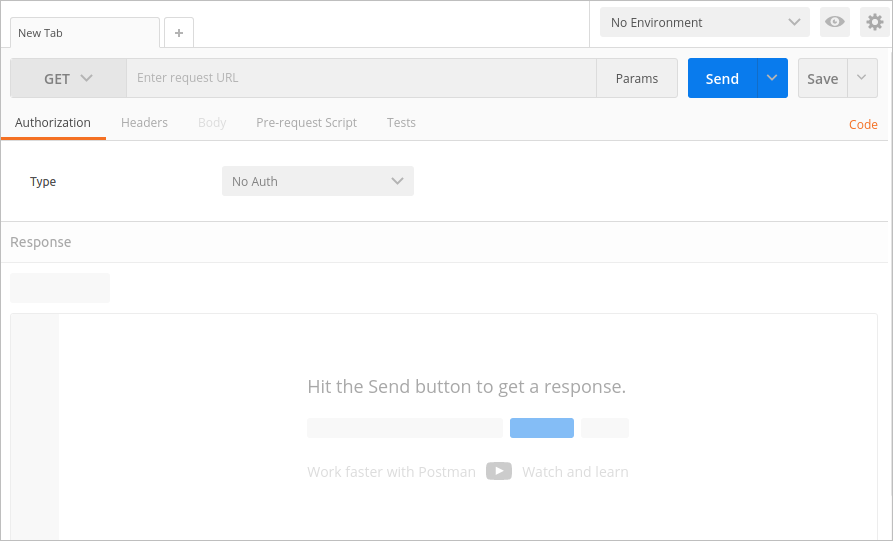
Once logged in, the Postman’s GUI will be displayed. In the top menu, there is a field where the API request can be entered. To the left of the request field, there is a menu where the desired method can be selected (GET, POST, PUT, DELETE, etc). Underneath the request field, there are tabs that can be used to add authorization credentials, headers, a body, and pre-request scripts. On the right side of the request field is the Save button, which saves your API requests for future use.
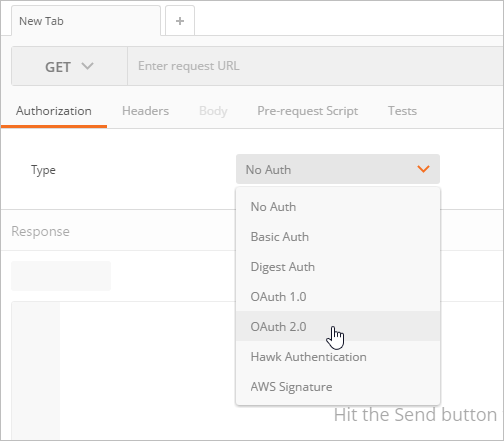
Before performing any API requests, it is necessary to get an authorization token. Therefore, go to the Authorization tab, click on the Type dropdown and select Oauth 2.0.
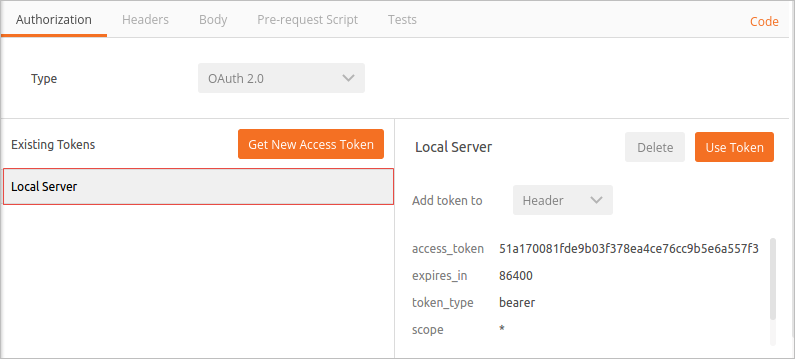
Click the Get New Access Token button.

The Get New Access Token window will be displayed.
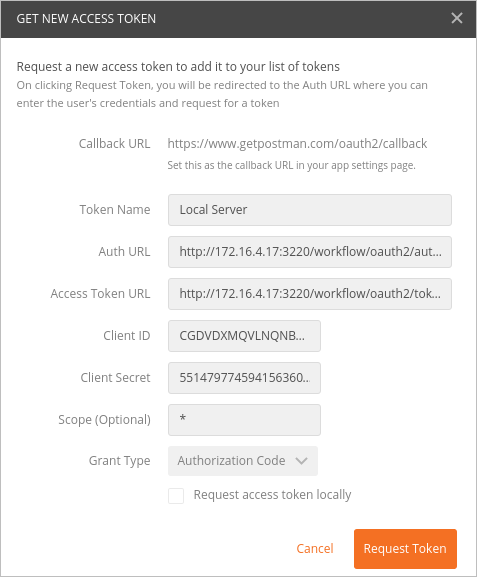
Where:
- Token Name: A name that identifies the token.
- Auth URL: The authorization URL, which must be set to:
http://<processmaker-server>:<port>/<workspace>/oauth2/authorize - Access Token URL: The URL where an access_token can be obtained, which must be set to:
http://<processmaker-server>:<port>/<workspace>/oauth2/token - Client ID: The Client ID code, which was given when registering the application.
- Client Secret: The Client Secret code, which was given when registering for the application.
- Scope (Optional): The scope that determines which endpoints can be accessed: * (all endpoints), edit_process (access to endpoints to change processes), view_process (access to endpoints to view but not change processes).
- Grant Type: The grant type, which must be authorization_code. The authorization_code type is a two step process where the user logs in and then gives authorization to the external application to access ProcessMaker.
- Request Access Token Locally: If your OAuth2 provider is not publicly accessible (hosted locally or on your intranet), make sure the Request Access Token Locally option is checked.
Once the information is set, click the Request Token button. If everything is set up properly, the login screen of ProcessMaker will be displayed. Remember that to execute endpoints, the user's role must be assigned with the PM_FACTORY permission.
After logging in, the window will be redirected to the OAuth2.0 authorization screen, where the user may authorize the external application to access ProcessMaker. If the user clicks on Accept, a token with the "bearer" type will be generated.

The new authorization token will be listed under the Existing Tokens list, ready to be used to test a ProcessMaker endpoint.
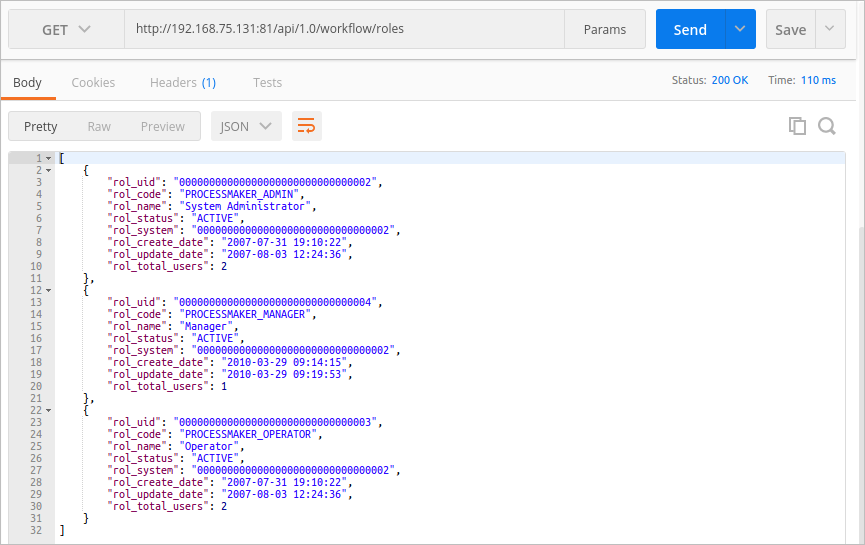
Let's retrieve the list of a ProcessMaker workspaces using the GET /roles endpoint.
Enter the endpoint URL where it says "Enter request URL" and select the GET method on the left side of that field.

Then, go to the Authorization tab and select the token we got before. The token's information will be displayed at the right side of the window. Select "Header" in the Add token to dropdown and click on Use Token.
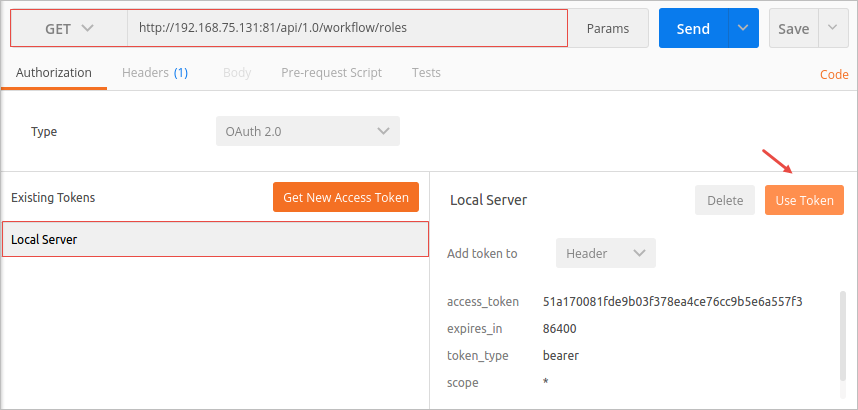
The token key and value will be added inside the Header tab.
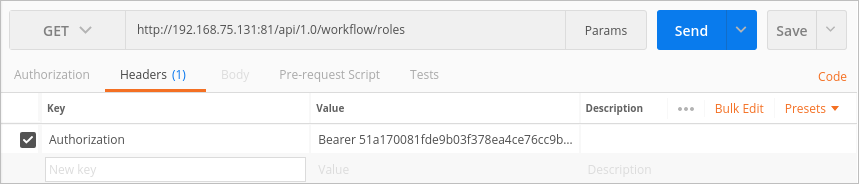
Click the Send button to call the endpoint. The response will be displayed in the Body section in JSON format.
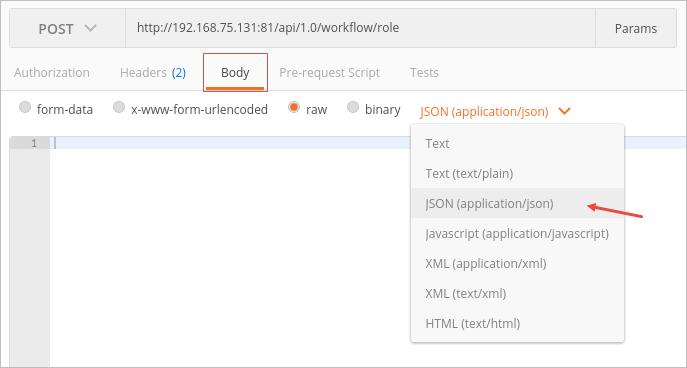
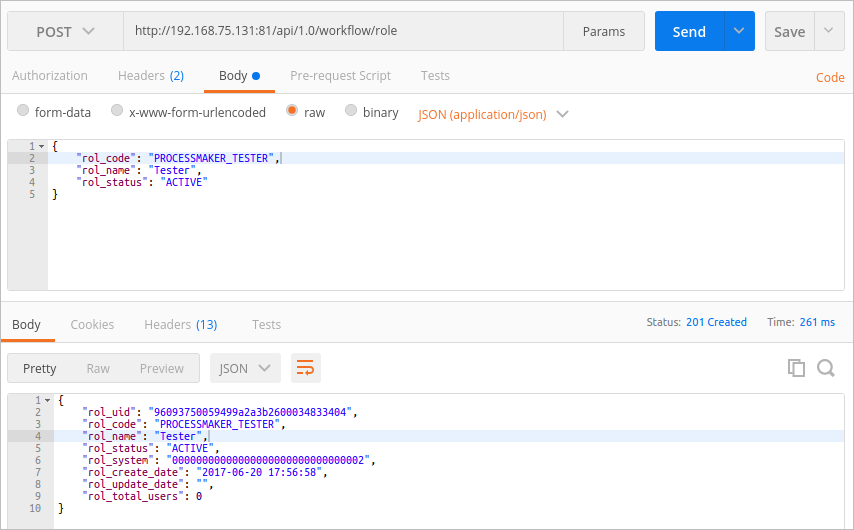
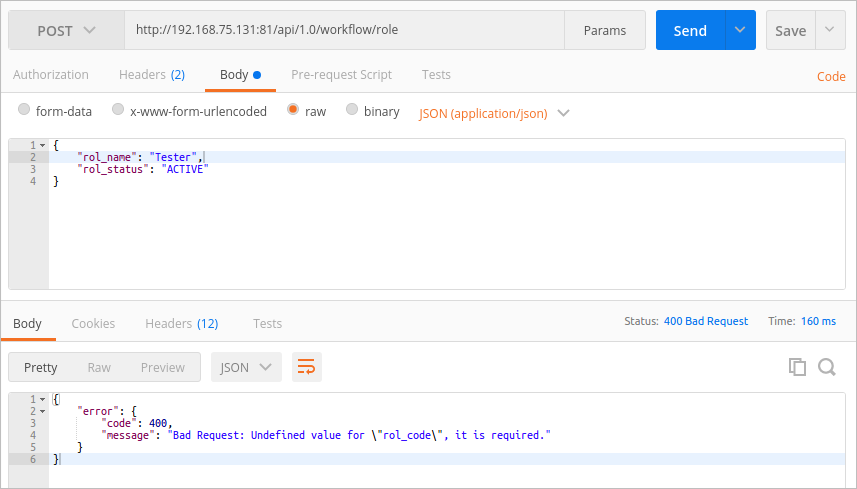
Create a new role using the POST /role endpoint. Change the method from GET to POST and change the URL to http://<processmaker-server>:<port>/api/1.0/<workflow>/role. The Body section will become available. Select raw to set the formatting type to JSON (application/json).
Then, enter the JSON request body. To create a new role named "Tester", place a json code like the one below:
"rol_code": "PROCESSMAKER_TESTER",
"rol_name": "Tester",
"rol_status": "ACTIVE"
}
Once done, click the Send button to execute the request. The response will display information about the new role created.
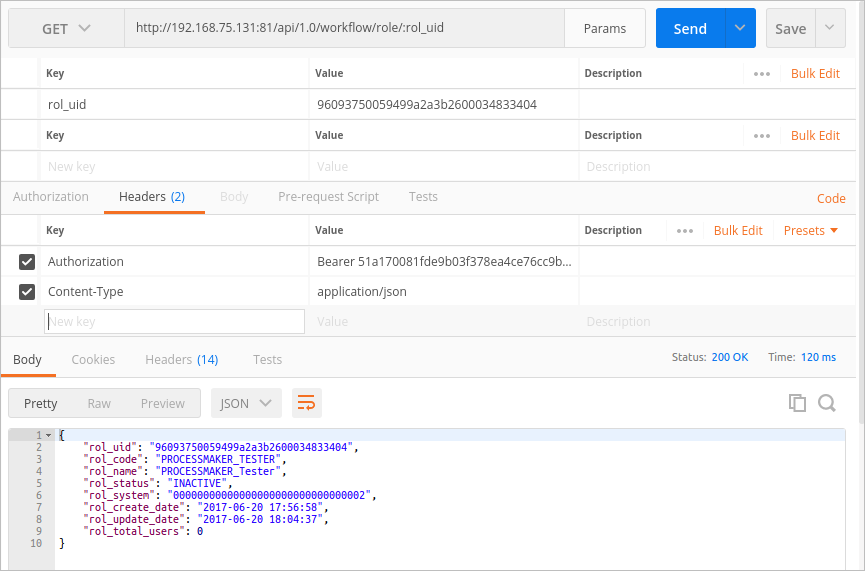
Some API endpoints use path variables, such as the GET /role/{rol_uid}, which has the path parameter {rol_uid}. This parameter can be set to ":rol_uid" to be automatically included in the Path editor. Click on the Params button to open the data editor and check that the parameter is already entered as the key. Update the value as needed. In this case, the value is the rol_uid of the rol created before. Then, click on Send and the information will be displayed in the Body section.
In the case there is an error when executing an endpoint, the error message will be displayed in the Body section to help the user.
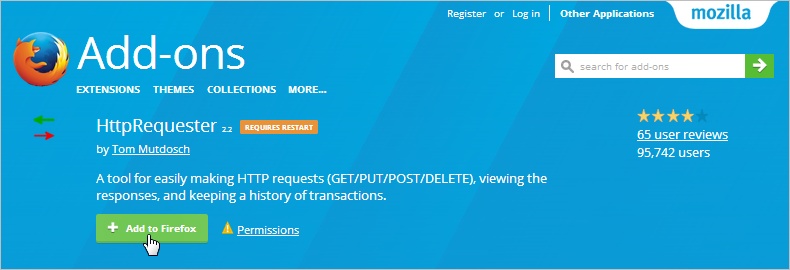
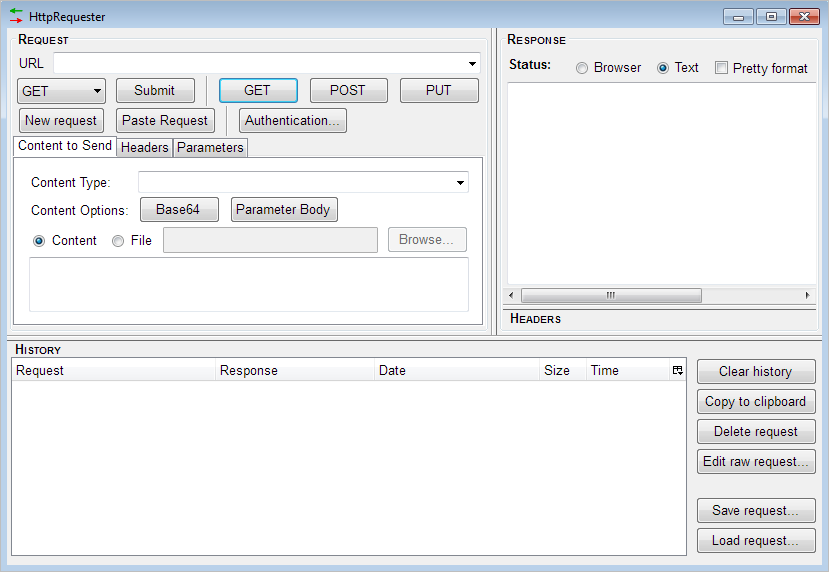
Using HttpRequester
HttpRequester is a simple tool that allows the user to test ProcessMaker endpoints. To use it, it is necesary to install Firefox, then install the HttpRequester add-on by searching for it add-on in Firefox and clicking the Add to Firefox button.
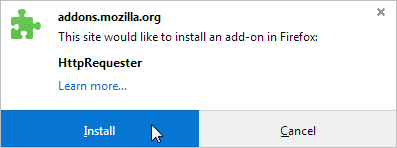
A popup message will be displayed to confirm the installation. Click on Install to proceed.
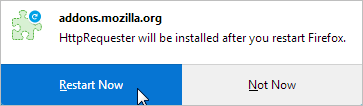
After the installation, a popup message will ask the user for permission to restart the browser.
Once the browser is restarted, the HttpRequester icon will be shown next to the browser's search box.

Click the icon to open the HttpRequester window.
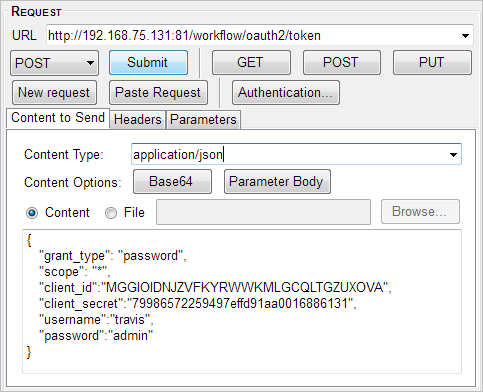
Before testing any API endpoint, it is necessary to get an authorization token to access ProcessMaker endpoints. HttpRequester doesn't use Oauth2 to request a token with an authorization code grant type from ProcessMaker, such as in Postman. Nevertheless, the token can be obtained using the password grant type with the endpoint:
- POST
http://<processmaker-server>:<port>/<workspace>/oauth2/token
In HttpRequester, place the URL shown above in the URL field.

Then, copy and paste the following code into the Content box, but do not forget to replace the information with your own user credentials and the client_id and the client_secret of your own application.
"grant_type": "password",
"scope": "*",
"client_id":"MGGIOIDNJZVFKYRWWKMLGCQLTGZUXOVA",
"client_secret":"79986572259497effd91aa0016886131",
"username":"travis",
"password":"admin"
}
- grant_type: Must be set to password.
- scope: The scope that determines which endpoints can be accessed: * (all endpoints), edit_process (access to endpoints to change processes), view_process (access to endpoints to view but not change processes).
- client_id: The Client ID code, which was given when registering the application.
- client_secret: The Client Secret code, which was given when registering for the application.
- username: The username of the ProcessMaker user who will execute the endpoint.
- password: The password of the user.
Once the code is placed, verify that the Content Type is set to "application/json" and click on Submit.
The request may take a few seconds. Once completed, the request will be listed in the History box.
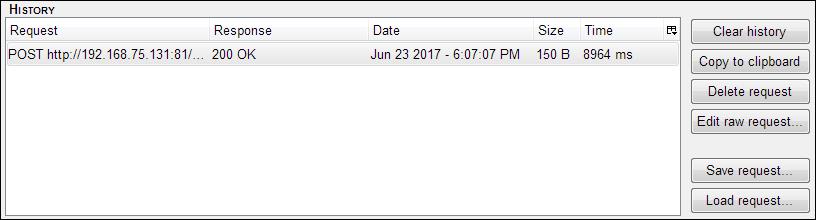
Double click on it to see the information retrieved.
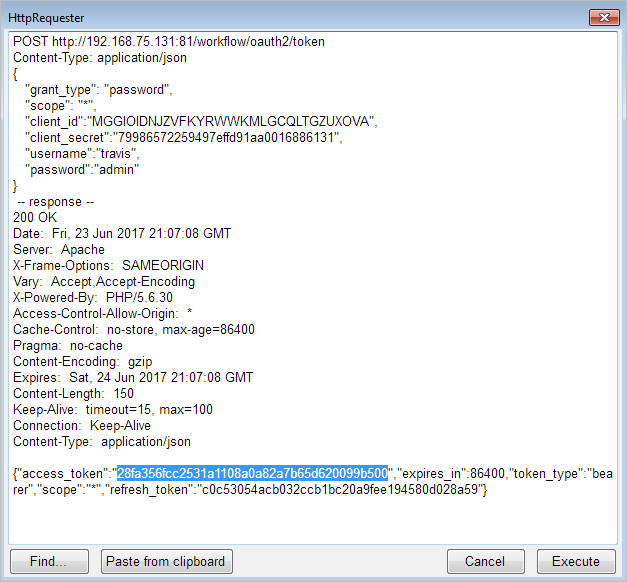
Copy the value of the access_token parameter (the number marked in blue in the image above), since this value will be used to test other endpoints. In this example, the access token is "28fa356fcc2531a1108a0a82a7b65d620099b500".
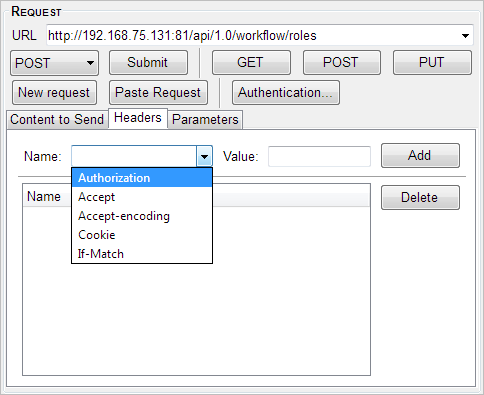
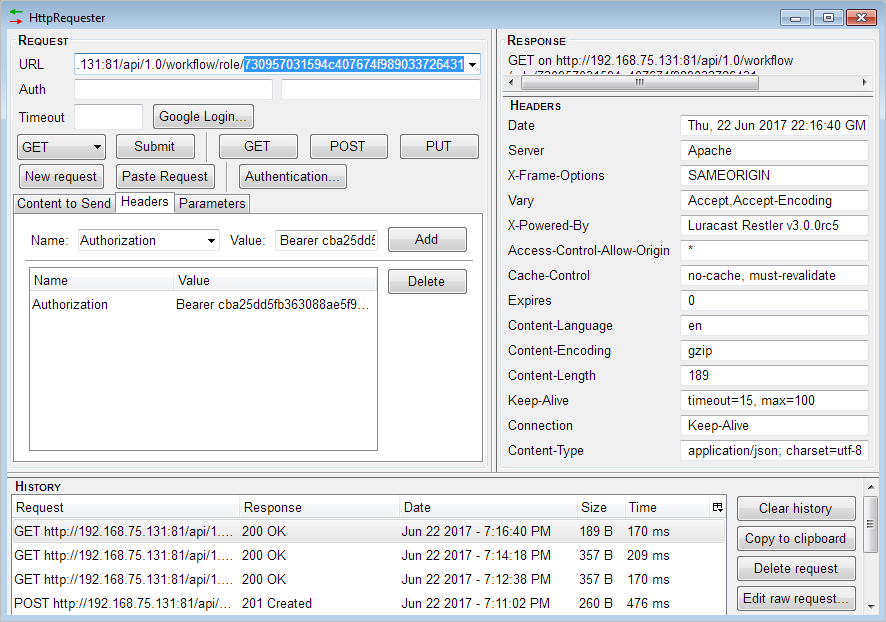
Now, let's retrieve the list of roles in a ProcessMaker workspace using the GET /roles endpoint. Place the URL of the endpoint in the URL field, and in the Headers tab select the Authorization option in the Headers tab.
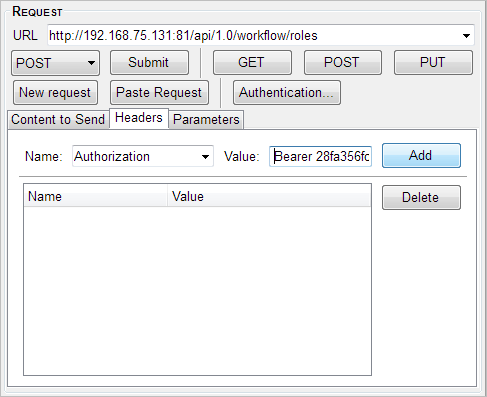
The access token we retrieved before will be placed as the value of the header to give access to our request to the endpoint. In the Value field, write the word Bearer followed by the access token, as in:
Then, click on Add.
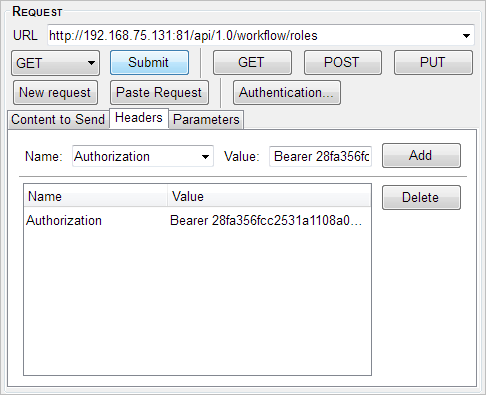
The header will be added to the endpoint. Finally, click on Submit to make the request.
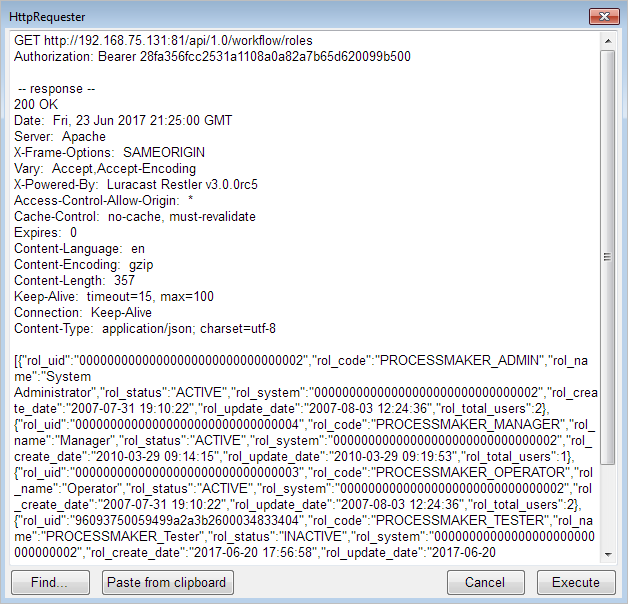
The results of the request will be listed in the History box.

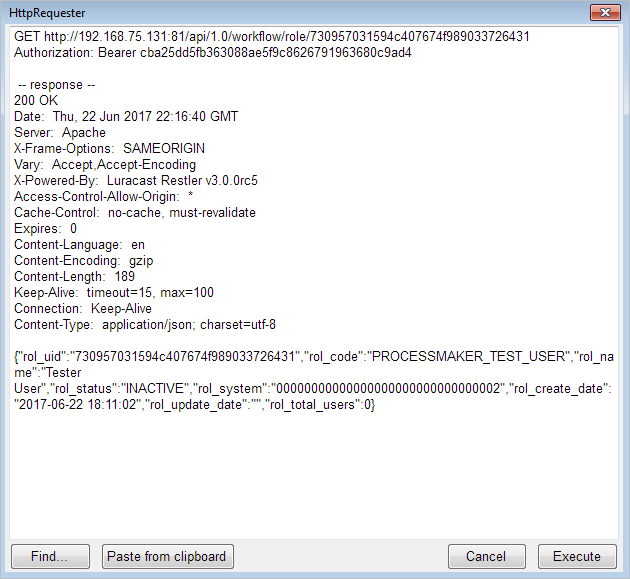
Double click on it to see the role list.
To make another request, click on New Request and complete the fields using the endpoint's information. For example, to make a POST request to create a new role, select the POST method, and place the endpoint URL and the request body in JSON format into the Content box. Finally, click on Submit.
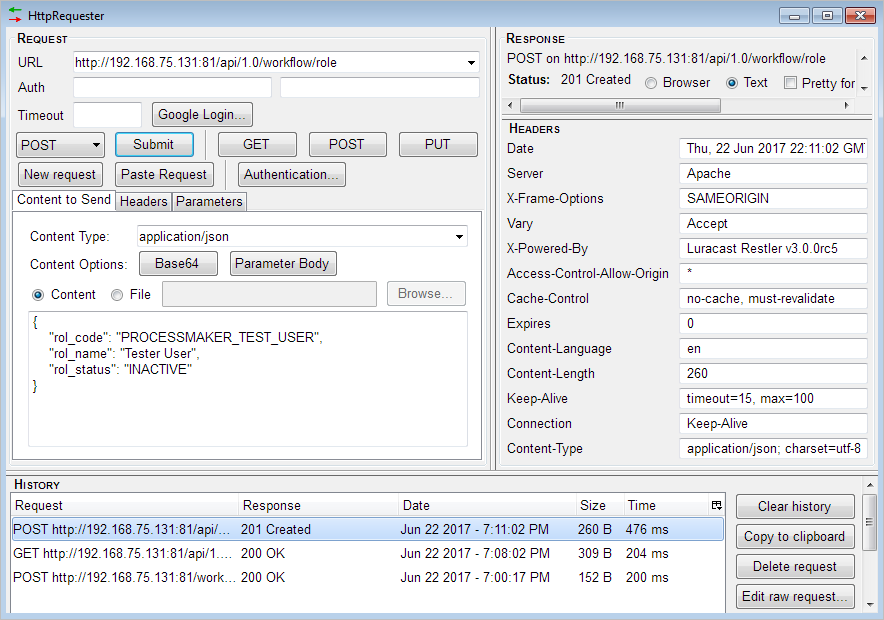
The request results will be listed. Double click on it to see the information.
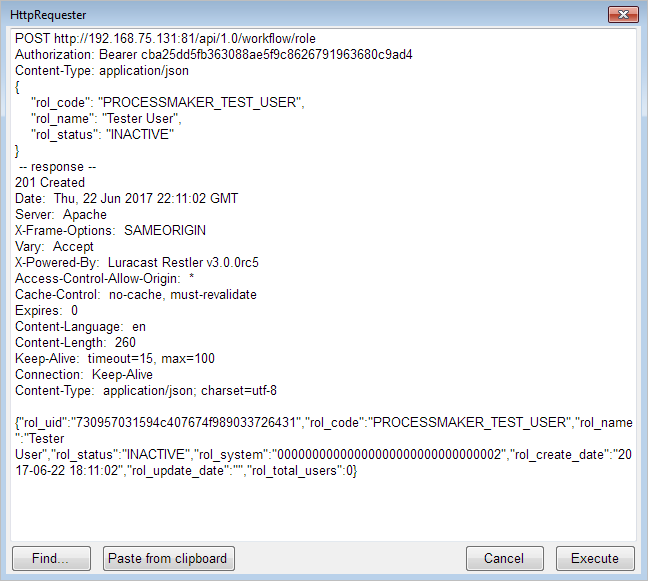
In cases where the endpoint has path parameters, the path parameters must be included manually. For example, to see the information about one particular role, the rol_uid parameter will have to be included manually right after the URL, as shown in the image below.
Then, click on Submit as before and double click on the result listed to see the endpoint information.