- Overview
- Output Document Management
- Creating Output Documents
- Editing Templates
- Editing the HTML Code
- Inserting Images
- Inserting Form Fields
- Inserting Variables Inside Form Fields
- Inserting Page Breaks
- Page Headers and Footers (HTML2PDF Library)
- Page Numbers and File Information (HTML2PDF Library)
- Formatting Documents to Display Content in RTL
- Custom fonts in Output Documents
- Considerations for Custom Fonts in Output Documents
- Add a new custom font
- Remove a registered font
- List Registered Fonts
- Errors with Output Documents
- Error While Generating PDF Documents
- Variables are not Inserted
- Output Document is Empty
- Error in HTML2PDF
- Using Non US-ASCII Characters in Output Documents
- Output Documents in Multiple Languages
- Inserting Output Documents into a Process
- Output Documents Examples
- Simple Output Documents Example
- Output Documents Example with HTML
- Output Document Example When Working With Grids
- Restrict Output Document Links
- Output Document Storage
- Output Document Definitions
- Output Document Files
- Generated Output Documents in the Database
- Upload Output Documents' Fonts through the Skins
- Accessing Output Document with Triggers
Overview
Output Documents are files generated while running a case, which are meant to be printed out or stored digitally outside ProcessMaker. Output Documents are useful for creating external records of case data, as well as creating formatted documents such as letters, bills and receipts. Output Documents are generated from HTML templates and can contain variables, which are auto-inserted when the Output Document is generated as a step when running a case. Output Documents are generated as PDF (Portable Document Format) and/or DOC (Word document) files, so they can be easily opened and printed using Adobe Acrobat and Microsoft Office (or alternatives such as Foxit Reader, Evince, Okular, WordPerfect, AbiWord and OpenOffice).
If the Output Document is generated as a PDF file, either the HTML2PDF (an old version of a PDF generator which is no longer recommended and is not available as of PHP 7.X, specifically as of ProcessMaker 3.3.0) or the TCPDF library can be used to generate the PDF file.
HTML2PDF can be used to insert some of the formatting options listed below, such as page breaks and headers and footers. The advantage of this library is that generates compressed PDF documents by omitting extra parameters in the code, which means that the PDF file will be smaller in size.
TCPDF is compatible with more recent versions of PHP and is recommended if the document that will be generated contains images or it is necesary to minimize the size of the file.
Output Document Management
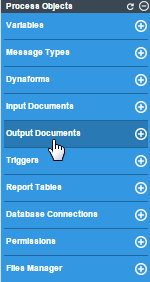
To see the list of output documents created in the process, click on the Output Documents option inside the Process Objects toolbox:
All the Output Documents will be listed:
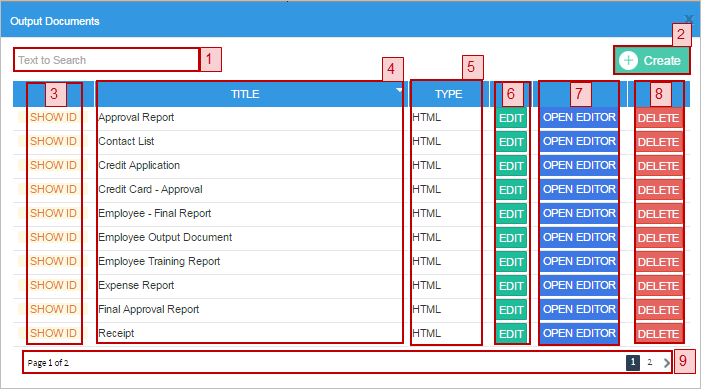
Where:
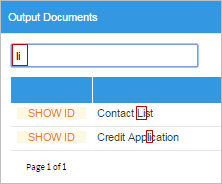
Search Field: Enter the title of an output document in this field. As the text is entered all coincidences will be filtered in the list below.
Create: Opens a window to create a new output document. It is possible to use either this option to create an output document or this option.
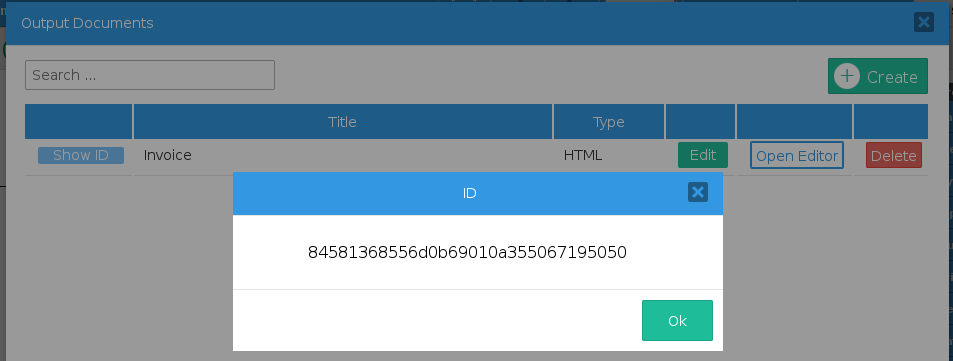
Show ID: Obtains the unique identification code of the output document. For instance, use this ID to create an output document using the PMFGenerateOutputDocument function.
Title: Shows the title of the output document created in the project. The list is sorted in ascending order by default, but it is possible to view the list of documents in descending order by clicking on the down triangle next to "Title".
Type: Shows the type of document, which always is HTML.
Edit: Opens a window to edit the corresponding output document.
Open Editor: Opens an editor to edit the document template. Note that this editor is different from the WYSIWYG HTML. The editor for the Open Editor option can use the configured custom fonts in Adding Fonts for the UTF-8 International Character Set.
Delete: Click this option to delete the output document. The following confirmation message will be shown:
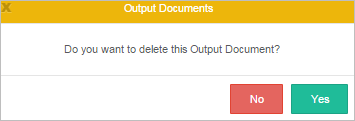
Select Yes to delete the output document and the flash message "Output document deleted successfully" will be shown in the upper part of the designer.
Pagination Control: When there are more than 10 documents created in the process, a new page is added to this window. To navigate through these pages use the > or < options. To view a specific page, click on the number of the page in the control.
Creating Output Documents
To create a new Output Document, open a project and go to the right side of the screen where the Process Objects toolbox is located. Hover the pointer of the mouse over the + icon and the Create option will be displayed to the left:
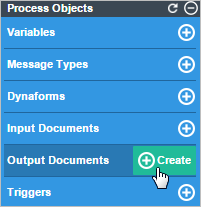
Click on the Create option and the following window will be displayed:
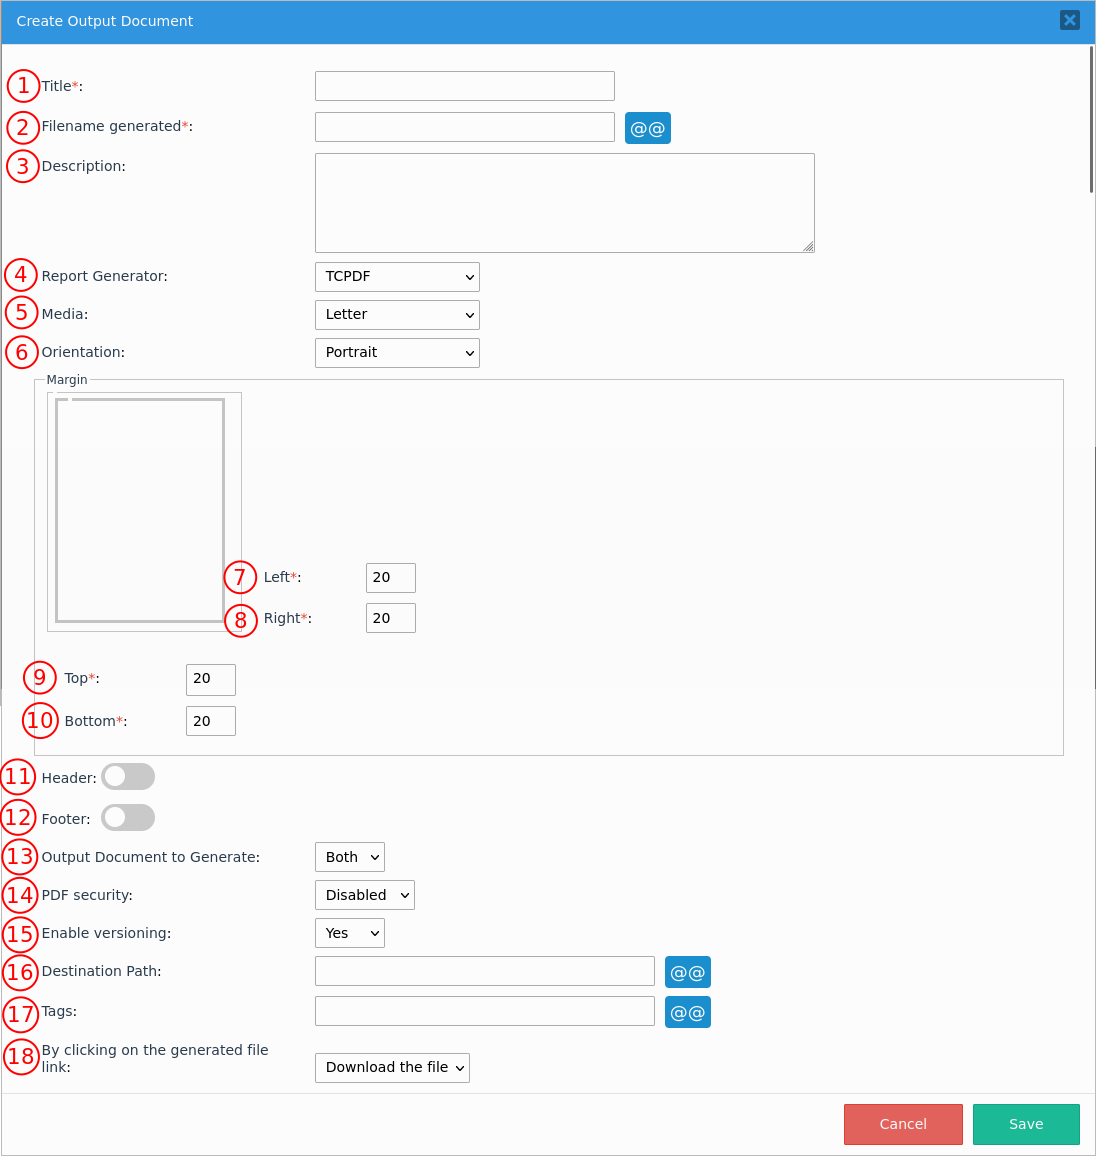
Where:
- Title: Adds a title that identifies the output document.
Filename generated: The file name to be generated when an output document is created while running cases.
Paths cannot be included in the file name, since output documents are stored in a standard location in the file system.
To include a system or case variable in the file name, click the [@@] button and select a variable. It is recommended to use only the
@#variable(the@#prefix) in file names and not@@variablebecause the Windows operating system can't handle file names that contain"(double quotation marks).Note: Considerations about characters in the file name generated:
- If the configured file name contains special characters (\ /: *? "<> |">) that are not supported by the operating system, the file name when generating the Output Document replaces the special character with underscores (_).
- Characters with an accent no longer are replaced by equivalent English characters.
- Double quotes are removed from the filename.
- The system reserved characters # % & $ { } [ ] ( ) are not replaced with underscores (_).
- Description: A small description about the document, which should inform the user about the general content or purpose of the document.
- Report Generator: Choose the TCPDF or HTML2PDF engine that will generate the output documents.
- Media: Select the paper size:
Paper Type Width (mm) Height (mm) Letter 216 279 Legal 216 357 Executive 184 267 B5 182 257 Folio 216 330 A0Oversize 882 1247 A0 841 1189 A1 594 841 A2 420 594 A3 297 420 A4 210 297 A5 148 210 A6 105 148 A7 74 105 A8 52 74 A9 37 52 A10 26 37 Screenshot640 640 480 Screenshot800 800 600 Screenshot1024 1024 768 - Orientation: Select the page orientation between Portrait or Landscape.
- Left: Size of the paper's left margin in mm.
- Right: Size of the paper's right margin in mm.
- Top: Size of the paper's top margin in mm.
- Bottom: Size of the paper's bottom margin in mm.
- Header: The Header setting is available as of ProcessMaker 3.7.6 for PDF documents with the TCPDF engine. Enable the Header toggle to display a header on the top of the page. The Header Settings displays.
Note: The Header works just with PDF documents. Future ProcessMaker versions will support Word documents.
Configure the following header settings:
- Header Title: Enter a text, or select a variable by clicking
@@to display a text title in the header.- Font Size: Select the text font size in PX from 8 up to a maximum of 72.
- Position X: Select the text left margin to the right in PX from 0 to any maximum number.
- Position Y: Select the text top margin to the bottom in PX from 0 to any maximum number.
- Header Logo: Enter the logo path and the logo name with
JPGorPNGextension, or select a variable by clicking@@to display a logo in the header. The image must be in the image folder.- Logo Width: Select the logo width in PX from 0 to the largest.
- Position X: Select the logo left margin to the right in PX from 0 to any maximum number.
- Position Y: Select the logo top margin to the bottom in PX from 0 to any maximum number.
- Page Number: Enable the Page Number toggle to set page numbers in the header.
- Pagination Title: Enter a text, or select a variable by clicking
@@to display a text in the pagination. - Total Number of Pages: Enable the Total Number of Pages toggle to display the total number of pages in the pagination.
- Position X: Select the pagination left margin to the right in PX from 0 to any maximum number.
- Position Y: Select the pagination top margin to the bottom in PX from 0 to any maximum number.
- Pagination Title: Enter a text, or select a variable by clicking
- Header Title: Enter a text, or select a variable by clicking
- Footer: The Footer setting is available as of ProcessMaker 3.7.6 for PDF documents with the TCPDF engine. Enable the Footer toggle to display a footer on the bottom of the page. The Footer Settings displays.
Note: The Footer works just with PDF documents. Future ProcessMaker versions will support Word documents.
Configure the following footer settings:
- Footer Title: Enter a text, or select a variable by clicking
@@to display a text title in the footer.- Font Size: Select the text font size in PX from 8 up to a maximum of 72.
- Position X: Select the text left margin to the right in PX from 0 to any maximum number.
- Position Y: Select the text top margin to the bottom in PX from 0 to any maximum number.
- Footer Logo: Enter the logo path and the logo name with
JPGorPNGextension, or select a variable by clicking@@to display a logo in the footer. The image must be in the image folder.- Logo Width: Select the logo width in PX from 0 to the largest.
- Position X: Select the logo left margin to the right in PX from 0 to any maximum number.
- Position Y: Select the logo top margin to the bottom in PX from 0 to any maximum number.
- Page Number: Enable the Page Number toggle to set page numbers in the footer.
- Pagination Title: Enter a text, or select a variable by clicking
@@to display a text in the pagination. - Total Number of Pages: Enable the Total Number of Pages toggle to display the total number of pages in the pagination.
- Position X: Select the pagination left margin to the right in PX from 0 to any maximum number.
- Position Y: Select the pagination top margin to the bottom in PX from 0 to any maximum number.
- Pagination Title: Enter a text, or select a variable by clicking
- Footer Title: Enter a text, or select a variable by clicking
- Output Document to Generate: Select whether the output document will be generated in DOC, PDF, or both formats.
- PDF Security: An option that allows passwords to be set for the generated PDF document and restricts how it may be used. Select one of the following options:
- Disabled: Default. No security will be applied to the generated PDF document.
- Enabled: If selected, the following security options are displayed:
- Open Password: Define a password to open the PDF document.
- Owner Password: Define a password to change the PDF document's permissions.
- Allowed Permissions: Select how the PDF document may be used. To select more than one option, hold down on the CTRL key while clicking the following options:
- Print: The document can be printed.
- Modify: The document can be edited.
- Copy: The document can be copied.
- Forms: The fields in the document may be filled in.
- Enable Versioning: Presents a dropdown with two options, which are "Yes" and "No". If "Yes" is chosen, then ProcessMaker will keep multiple versions of the output document. Versioning is useful if the same output document is created at multiple steps in a case. This option allows a record to be kept of how the document's data changes over the course of a case, which is useful for maintaining audit trails.
- Destination Path: Enter the name of the folder where the output document should be stored.
Click on the [@@] button to select a variable to use in the folder name. To specify a
subfolder inside other folders, enter a path to that folder, separating each folder with a / (forward slash).
For example: Invoices/@#USR_USERNAME/@#subject_@#date
To see a list of input documents, output documents and attached files found in each folder, go to HOME > Documents and click on the folder.
Note: The Destination Path is a virtual path and it does not effect where output documents are stored in the file system. All case files will be stored inside the path where ProcessMaker has been installed. - Tags: Enter the name of the identifying tag(s) that will be associated with this output document. To specify more than one tag name, separate each tag name with commas. Click on the [@@] button to select a variable to use in the tag name. Tags are really useful when looking for output documents in the ProcessMaker database.
- By clicking on the generated file link: Select whether the file will be downloaded or opened
in the browser window.
- Download the file: Download the file directly to the local computer. By choosing this option, the browser will automatically download the file. This is the recommended option when creating output documents.
- Open the file: Open the file in the browser window.
Note: If selecting this option when configuring an output document, take into consideration that the browser must be configured differently to open the files downloaded. To be able to open .pdf files, install Adobe Acrobat Reader. It is recommended to use the Download the file option to avoid the extra configuration that opening the file in the browser window requires.
Use TCPDF Generator
Usually when PDF Documents had more than 6 pages and were generated with the HTML2PDF library, they can't be created and downloaded producing an error in the HTML code. To improve the generation of PDF documents, the TCPDF generator was included inside ProcessMaker to allow users the creation and generation of PDF and DOC documents without having issues with the amount of pages created.
This generator supports UTF-8 Unicode and right-to-left languages. It also has backward compatibility with documents created in previous versions of ProcessMaker. This is a great enhancement, especially if documents with images in them need to be generated.
When an output document is being created, the new generator can be chosen using the option seen in the image below:

Use HTML2PDF Generator
Warning: As of ProcessMaker 3.3.0, the HTML2PDF does not work on installations over PHP 7.X. Please create Output Documents using TCPDF generator instead.
The HTML2PDF generator can be used to generate documents with less than 6 pages. The HTML2PDF generates compressed documents without configuring extra parameters into the code, which means that the PDF document generated will be smaller in size.
The HTML2PDF library allows users to:
- Add page and footers manually to the generate PDF Files.
- Add page numbers and file information to the generated output document.
To avoid errors using the HTML2PDF library, consider the following:
- Avoid the creation of spaces with the TAB key.
Note: The PDF and third-party DOC tools are generated by different libraries and do not have an exact counterpart when using HTML code.
Editing Templates
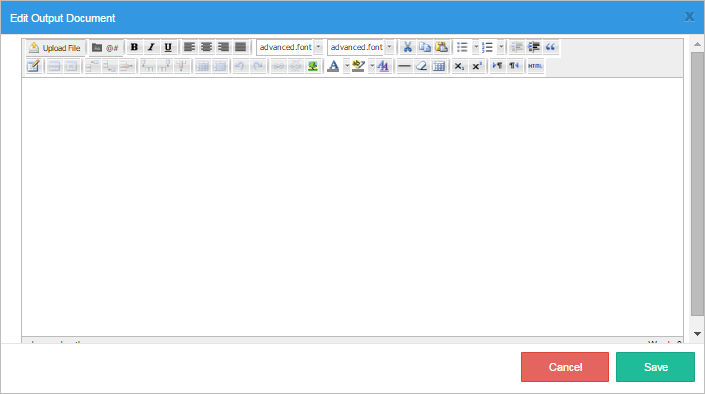
To edit the template of an output document, go to the Main Toolbox and click on Output Documents. A list of all the templates created for the process will appear there. Select the output document that needs to have its content edited and click on the Open Editor button. A new window will open where the document can be changed and corrected in any way that the user wants. There is also a small HTML button that the user can click to access the HTML code and format the document. Once the document is formatted, click on the Save button and a quick message will appear telling the user that all changes made were saved.

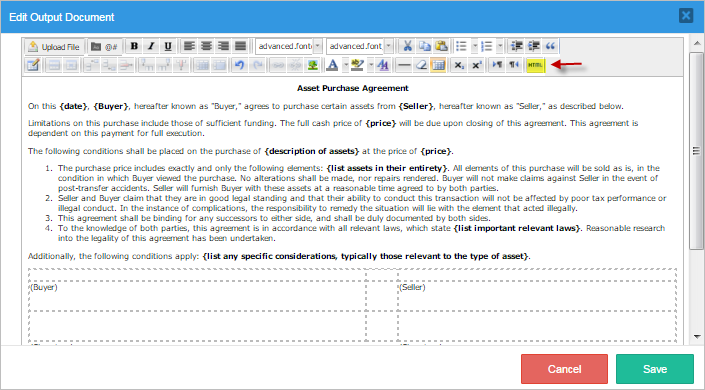
Enter the desired text into the Output Document template. Entering a hard return generates a new paragraph in the HTML, which inserts an extra blank line in the text. To enter a line break that doesn't insert a blank line in the text, press SHIFT + ENTER. The editor supports the standard key combinations of CTRL + C to copy, CTRL + X to cut, and CTRL + V to paste. Changes can be undone by pressing CTRL + Z. Multiple levels of undo are supported. After undoing changes with CTRL + Z, press CTRL + Y to redo the changes. When done editing the Output Document template, click Save to store the changes and then click on the close icon to close the editing window.
Inserting Variables
Case variables and system variables can be inserted into the text of an output document:
@#VARIABLE-NAMEinserts the value of the variable without any changes.@@VARIABLE-NAMEinserts the value of the variable enclosed in "" (double quotation marks). Any quotation marks inside the value can be escaped with backslashes, such as"Don\'t say \"hello\"".
If a variable is associated with a dropdown box, checkbox, checkgroup, radio group, suggest box, datetime or file control in a Dynaform, then there will be an additional variable named @#VARIABLE-NAME_label, which is created when the Dynaform is submitted. This variable holds the label of the selected option, which is displayed to the user, whereas @#VARIABLE-NAME holds the key of the selected option.
For example, a variable named "selectService" that is associated with a dropdown box might have a value of "accounting" in its @#selectService variable, but "Accounting and Tax Filing Service" in its @#selectService_label variable. For more information, see Inserting Variables.
Variables can be inserted in the Output Documents editing window.

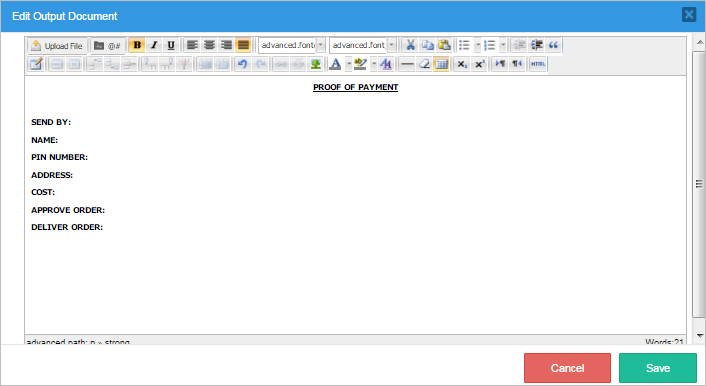
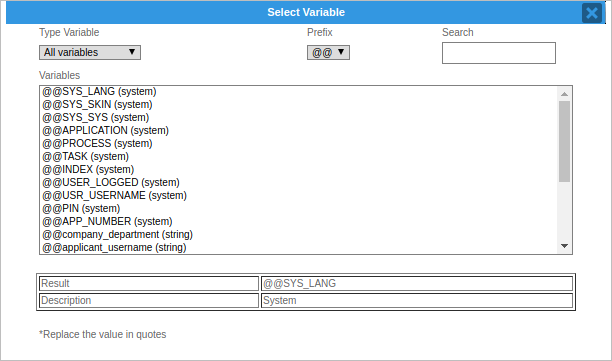
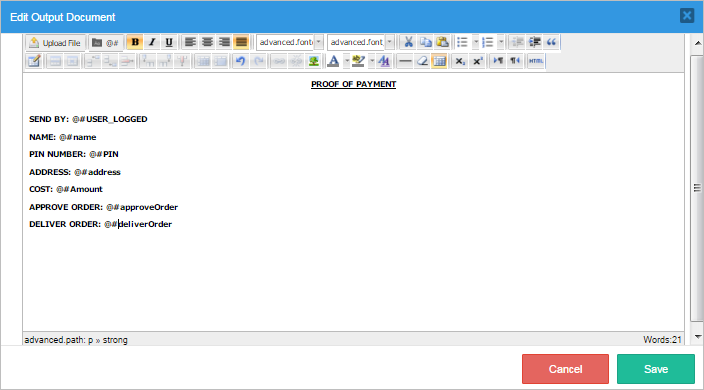
Now for the variables, next to the Bold property there is a variable picker. Click on it to choose variables to relate to the empty fields created. Select the variables with @# signs to add variables to the document with no changes. For example, Name will have the @#USR_USERNAME variable. Continue to add variables to the other fields, and then click on Save to store all changes made in the document.

Line Breaks in Textareas
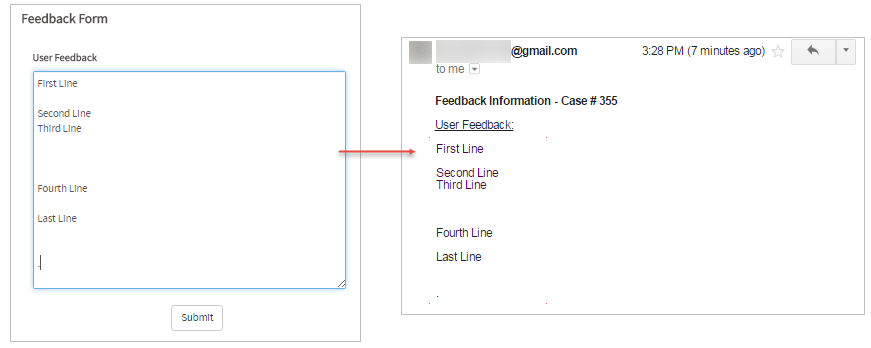
A textarea control allows more than one line of text to be input into a field. The information in this control is stored in one single line with \n as the representation for each line break, therefore, whenever using the Textarea's variable, the information will be displayed all together on the same line.

To preserve line breaks when showing the textarea information in messages, emails, etc. it is recommended to use the nl2br PHP function within a trigger.
For example, create the following trigger and place it after the Dynaform.
Remember that to insert the value of a variable without any changes, the prefix @# must be used before the name of the variable. In this case the textarea variable will be @#textareaVar, as explained in the Inserting Variables section.

The function will insert HTML line breaks before all new lines. Therefore, the e-mail will display the variable's information preserving the line breaks typed in the textarea.
Formatting Output Documents
ProcessMaker includes a new advanced editor for documents as seen in the image below:

This toolbar provides several options to clean up the document. To add formatting to output documents, the toolbar includes the following buttons:
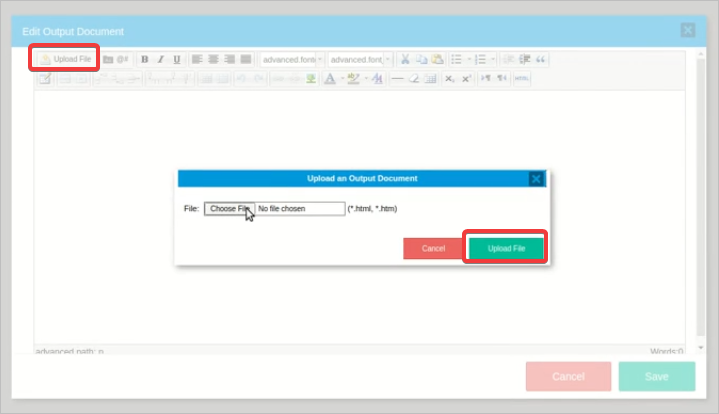
Upload File: Click on this button to upload a file with an .html or .htm extension.

Variable Picker: Choose the type and prefix of the variable to be called in the document.

 Bold: Bold the selected
text (a heavier weight). Shortcut: ctl + b
 Italics: Italicize
the selected text (inclined text). Shortcut: ctl + i
 Underline:
Underline the selected text. Shortcut: ctl + u
 Left align: Align the
selected text along the left-hand border.
 Center: Align the
selected text in the center.
 Right align:
Align the selected text along the right-hand border.
 Text Align: Justify the entire selected text.
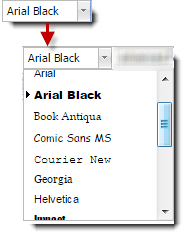 Font: Allows the user to choose one of many different fonts to customize the
document.
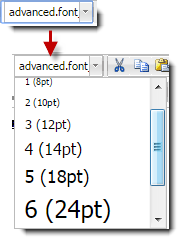 Font Size: Increases or decreases the font size of the selected text.
 Cut, Copy and Paste: Cut will remove the selected text from its position, while
Copy creates a duplicate. Paste copies text and inserts it into the document.
 Ordered List:
Insert an ordered list, which begins counting from 1.
 Un-ordered List:
Insert an unordered list, which uses bullet points instead of numbers.
 Outdent, Indent, Quote: Outdent and Indent will add a space to a selected text; outdent
will move the text toward the left marging and indent will move the text away from the left marging. Quote
works by selecting a text and aligning the text inside of quotation marks.
 Table Configuration: Creates and edits a table of as many rows and columns as needed,
can also insert more rows and columns or delete them. The columns in the table can be ordered, split or
merged as needed.
 Undo and Redo: Recover or revoke previous actions made in the document.
 Link and Image Configuration: These tools insert and edit links, as well as convert links
to normal text. An image can also be inserted or edited.
Note: Take into account that the source of the images inserted must be from a URL with an
httporhttpsprotocol. It is not possible to upload an image from a local source using this editor. To upload an image from a local resource, first upload it as a Public File and access it using this information. Font Color:
Change the color of the selected text.
 Text Highlight Color:
Change the highlight (background) color behind the selected text.
 Edit CSS Style: Contains more options to make more detailed edits to the text.
 Lines: Adds lines to mark different sections of the document
 Clear Formatting: Removes any formatting from the selected text.
 Grid Visual Help: Enables or disables the visual help grid in a selected table.
 Subscript and Superscript: Highlight a letter, number, symbol, or figure to
place it above the rest of the text (superscript) or below (subscript).
 Direction: Changes the direction of the text to left to right or right to
left.
  HTML: Edit the HTML code of the template.
Editing the HTML Code
For more control over the formatting of a template and the use of more advanced types of HTML elements such as images or tables, the HTML code can be directly edited by clicking on the HTML button in the toolbar. When done editing the HTML code, click on the Update button to save it and see the result in the document.
Take into account the following recommendations before editing HTML code:
Avoid inserting HTML formatting tags inside a variable name, because it make the variable unable to be recognized by ProcessMaker. For example, if bold tags are inserted inside the variable
@#USR_USERNAME, it becomes@#US<b>R_USER</b>NAME. Since ProcessMaker can't find find the variable@#US, it will print the variable name in the generated output document. To apply bold tag to a variable, instead, use the tags outside the variable like<b>@#USR_USERNAME</b>.- If you would like to insert reserved characters into your HTML code that is not related to variables, it is recommended to use HTML Character Entities. For example, to insert the less than character (<), write
<.
Inserting Images
These are the possible ways of how to insert an image in the output documents:
Provide The Image URL
Follow these steps to set the image in the output document:
-
Take the ProcessMaker logo on the wiki page as an example. The URL would be the following: http://wiki.processmaker.com/sites/default/files/full-logo.png.

-
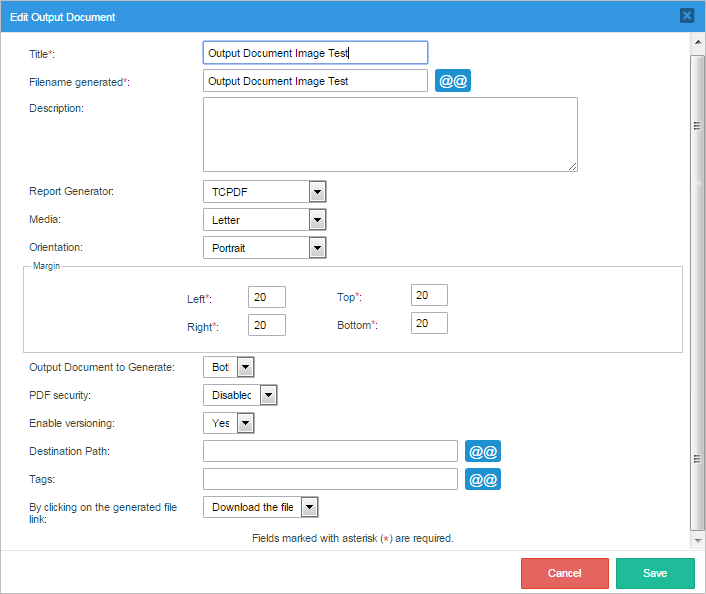
Create an output document, the image below shows how to configure it. Take into consideration that TCPDF needs to be selected in the Report Generator field to be able to see images.
-
Click on the Save button to create the output document and then add it to the Output Documents window.
-
On the Output Documents window, click on the Open Editor button to open a Word-like editor.

-
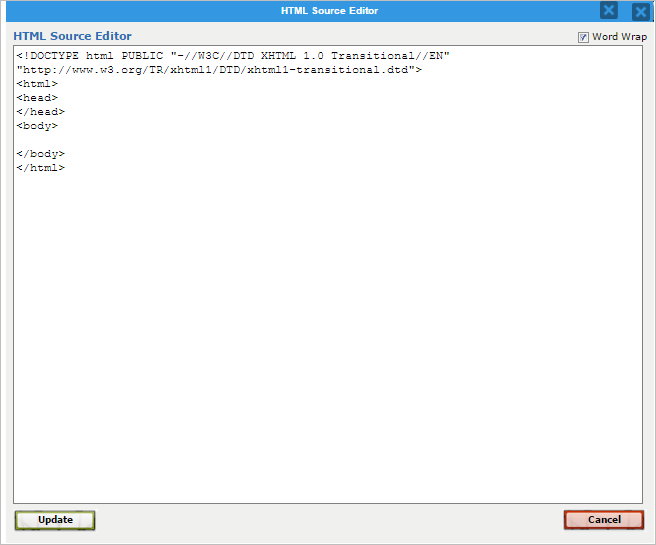
Click on the HTML button to open the HTML Source Editor window.
-
Add the following code to insert an image:
-
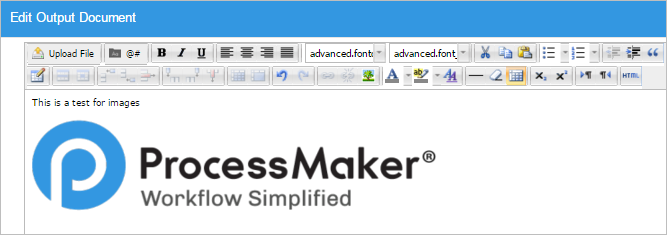
Notice that the src property or source of the image is the URL of the logo. After adding the code, click on the Update button to check if the image was properly uploaded. If the image is seen in the Edit Output Document window then it will be seen when running a case.

-
If there is an error then the following broken image will be shown in the editor. Check the code or image for any errors to be able to see it when running a case.
Upload The Image Directly
To insert directly an image into an output document, upload the image file into a public directory in the ProcessMaker server with the Process File Manager (or another publicly accessible location). Then insert the image source as explained in the section above.
Save The Encoded Base 64 Image From Trigger
Take note about the following considerations when working with encoded base 64 images:
- Base 64 SVG images are not directly supported.
- Provide a valid public path and also provide the proper file write permissions when saving the image.
- Provide height and width attributes in the HTML image tag.
- Base 64 images only display in a PDF document and not in a Word document.
Follow these steps to define a Base 64 image, upload and then set the image in the output document:
-
Create a trigger with a variable. This trigger defines a valid Base 64 image, puts it a random name to prevent overwriting, saves the image on a public ProcessMaker path and then defines a ProcessMaker variable with an HTML image tag with the source.
// This is a variable with the sample image on Base 64 format
$base64Image="PD94bWwgdmVyc2lvbj0iMS4wIiBlbmNvZGluZz0iVVRGLTgiIHN0YW5kYWxvbmU9Im5vIj8+PCFET0NUWVBFIHN2ZyBQVUJMSUMgIi0vL1czQy8vRFREIFNWRyAxLjEvL0VOIiAiaHR0cDovL3d3dy53My5vcmcvR3JhcGhpY3MvU1ZHLzEuMS9EVEQvc3ZnMTEuZHRkIj48c3ZnIHhtbG5zPSJodHRwOi8vd3d3LnczLm9yZy8yMDAwL3N2ZyIgdmVyc2lvbj0iMS4xIiB3aWR0aD0iMzM4IiBoZWlnaHQ9IjE5NCI+PHBhdGggZmlsbD0ibm9uZSIgc3Ryb2tlPSIjMDAwMDAwIiBzdHJva2Utd2lkdGg9IjIiIHN0cm9rZS1saW5lY2FwPSJyb3VuZCIgc3Ryb2tlLWxpbmVqb2luPSJyb3VuZCIgZD0iTSA0NyA0MyBjIDAgMC4xIC0wLjM1IDQuMjQgMCA2IGMgMC4yNiAxLjMxIDEuOTEgMi42NyAyIDQgYyAwLjUyIDcuNzQgMC40NSAxNy4zOSAwIDI2IGMgLTAuMjEgNC4wMyAtMC41NiA4LjQgLTIgMTIgYyAtNC45OCAxMi40NiAtMTEuMzQgMjUuNDYgLTE4IDM4IGMgLTQuODQgOS4xMSAtMTAuMyAxNy45MiAtMTYgMjYgYyAtMi4xMSAyLjk5IC01Ljg3IDUuMTYgLTggOCBjIC0xLjY5IDIuMjUgLTQuMSA4LjEyIC00IDggYyAwLjI3IC0wLjMzIDguOTUgLTEzLjM3IDE0IC0yMCBjIDUuODkgLTcuNzIgMTIuMzcgLTE0LjI2IDE4IC0yMiBjIDUuMTYgLTcuMSA4LjY3IC0xNS4wNCAxNCAtMjIgYyAxMi4xOSAtMTUuOTQgMjQuNDYgLTMwLjcyIDM4IC00NiBjIDEzLjE2IC0xNC44NSAyNS45NyAtMjguODUgNDAgLTQyIGMgNy4yNSAtNi44IDIyLjgyIC0xNy40NyAyNCAtMTggYyAwLjQ2IC0wLjIgLTMuNjUgNi45NSAtNiAxMCBjIC00LjI4IDUuNTYgLTguOTggMTAuNzMgLTE0IDE2IGMgLTguNjkgOS4xMiAtMTcuMjggMTYuODYgLTI2IDI2IGMgLTUuNzEgNS45OCAtMTAuMjIgMTIuMjIgLTE2IDE4IGMgLTkuMTcgOS4xNyAtMTguMzMgMTcuNzggLTI4IDI2IGMgLTMuNjUgMy4xIC04LjIyIDUuMTYgLTEyIDggYyAtMS40OCAxLjExIC00LjA1IDQuMTUgLTQgNCBjIDAuMSAtMC4zIDMuNTcgLTcuMTMgNiAtMTAgYyA0LjcyIC01LjU3IDEwLjM5IC0xMC44MiAxNiAtMTYgYyAzLjE4IC0yLjkzIDYuNDMgLTUuNzEgMTAgLTggYyA1Ljc0IC0zLjY5IDE2LjE0IC05Ljc3IDE4IC0xMCBjIDAuNzUgLTAuMDkgLTAuOTQgNS42MSAtMiA4IGMgLTEuNSAzLjM4IC0zLjY2IDYuODkgLTYgMTAgYyAtNS42OSA3LjU5IC0xMi40OCAxNC4zNiAtMTggMjIgYyAtMy4xMyA0LjMzIC01LjU3IDkuMTQgLTggMTQgYyAtMi4zIDQuNTkgLTYuMjMgMTIuODMgLTYgMTQgYyAwLjE0IDAuNjkgNS44IC0yLjE5IDggLTQgYyA4LjcgLTcuMTcgMTYuOSAtMTYuMiAyNiAtMjQgYyA1LjE0IC00LjQxIDEwLjcgLTcuNjkgMTYgLTEyIGMgNS42NCAtNC41OCAxMC4zIC05LjU0IDE2IC0xNCBjIDkuOTcgLTcuOCAxOS42MyAtMTQuOTMgMzAgLTIyIGMgNC40OSAtMy4wNiAxNC4zMSAtOC44OSAxNCAtOCBjIC0xLjA3IDMuMDYgLTE5LjA1IDMxLjc3IC0yOCA0OCBjIC0xLjc0IDMuMTUgLTIuOTggNi42IC00IDEwIGMgLTAuOTcgMy4yMiAtMiA3LjE4IC0yIDEwIGMgMCAxLjI0IDEuMTIgMy4xMiAyIDQgYyAwLjg4IDAuODggMi42OCAxLjgxIDQgMiBjIDIuOTUgMC40MiA3LjA1IDAuODggMTAgMCBjIDkuNTIgLTIuODYgMTkuNzIgLTguMjYgMzAgLTEyIGMgNC42MyAtMS42OCA5LjczIC0yLjI5IDE0IC00IGMgMi4xMSAtMC44NCAzLjkzIC0yLjk3IDYgLTQgYyAxLjgxIC0wLjkxIDYuMSAtMi4wNSA2IC0yIGMgLTAuMTcgMC4wOCAtNy43MiAxLjk4IC0xMCA0IGMgLTMuMDUgMi43MSAtNS43NCA3Ljg2IC04IDEyIGMgLTEuNjkgMy4wOSAtMy4yOCA2Ljc3IC00IDEwIGMgLTAuNTMgMi40IC0wLjMgOC4xNSAwIDggYyAwLjQxIC0wLjIgMi4zMSAtNi45MSA0IC0xMCBjIDIuMjYgLTQuMTQgNS43NCAtNy44NiA4IC0xMiBjIDEuNjkgLTMuMDkgNC4wOCAtMTAuMTcgNCAtMTAgYyAtMC4xMiAwLjI0IC00LjI4IDkuMTggLTYgMTQgYyAtMS42NCA0LjYxIC0yLjM2IDkuNDkgLTQgMTQgYyAtMS4wMSAyLjc3IC00LjExIDguMTEgLTQgOCBjIDAuMTQgLTAuMTQgMy42NiAtNi44NyA2IC0xMCBjIDcuNzIgLTEwLjMgMTYuMTEgLTE5LjQ4IDI0IC0zMCBjIDYuNDkgLTguNjYgMTcuMTYgLTI1LjA1IDE4IC0yNiBjIDAuMjIgLTAuMjUgLTAuOTkgNS42NCAtMiA4IGMgLTAuODkgMi4wNyAtMy4yOSAzLjg3IC00IDYgYyAtMi40NCA3LjMyIC02IDIyLjUxIC02IDI0IGMgMCAwLjUxIDQuNzcgLTMuNzkgNiAtNiBjIDEuODMgLTMuMyAyLjM3IC04LjEgNCAtMTIgYyAxLjcyIC00LjE0IDQuMjMgLTcuODEgNiAtMTIgYyAzLjY3IC04LjcxIDcuMTggLTE3LjE1IDEwIC0yNiBjIDEuODYgLTUuODYgMy4wMSAtMTIuMDggNCAtMTggYyAwLjMyIC0xLjkzIDAgLTYuMSAwIC02IGMgMCAwLjQyIC0wLjM0IDE1LjgzIDAgMjQgYyAwLjM0IDguMiAwLjY5IDE1Ljk2IDIgMjQgYyA0LjExIDI1LjE2IDkuODMgNDkuNTYgMTQgNzQgYyAwLjQ0IDIuNiAtMC4yNiA1LjM2IDAgOCBjIDAuNCA0LjAxIDEuNjYgNy45OCAyIDEyIGMgMC4zMyAzLjk3IDAuNDQgOC40NSAwIDEyIGMgLTAuMTcgMS4zMiAtMS4wMyAzLjIyIC0yIDQgYyAtMS45NCAxLjU2IC01LjM0IDMuNzYgLTggNCBjIC0xMC43IDAuOTcgLTIzLjkzIDAuODYgLTM2IDAgYyAtMTYuMjIgLTEuMTYgLTMxLjMgLTQuMTcgLTQ4IC02IGMgLTI3Ljc1IC0zLjA0IC01Mi43NCAtNC42NSAtODAgLTggYyAtMTEuNzEgLTEuNDQgLTIyLjMgLTQuMiAtMzQgLTYgYyAtNi4xNCAtMC45NCAtMTEuOTYgLTAuOTkgLTE4IC0yIGMgLTYuMTUgLTEuMDIgLTEyLjMxIC0yLjI1IC0xOCAtNCBjIC0yLjc2IC0wLjg1IC02LjA2IC0yLjQ0IC04IC00IGMgLTAuOTcgLTAuNzggLTIuMzIgLTMuMDQgLTIgLTQgYyAwLjcyIC0yLjE1IDMuNTIgLTYuNTggNiAtOCBjIDUuOCAtMy4zMiAxNC40NSAtNS42MSAyMiAtOCBjIDUuMzIgLTEuNjggMTAuNDYgLTMuMDMgMTYgLTQgYyA0NC45NiAtNy45IDg2LjEgLTE0LjA2IDEzMiAtMjIgYyAyNi41MSAtNC41OSA0OS43IC05Ljc5IDc2IC0xNCBsIDc0IC0xMCIvPjwvc3ZnPg==";
// Prevent the file overwriting for each session. In case of SVG images, enter svg instead of base64Image
$name = 'temporal' . rand() . ' . base64Image';
// Save the image in a public ProcessMaker path
file_put_contents(PATH_HTML . 'files/' . $name,base64_decode($base64Image));
// ProcessMaker variable that is called in the Output Document
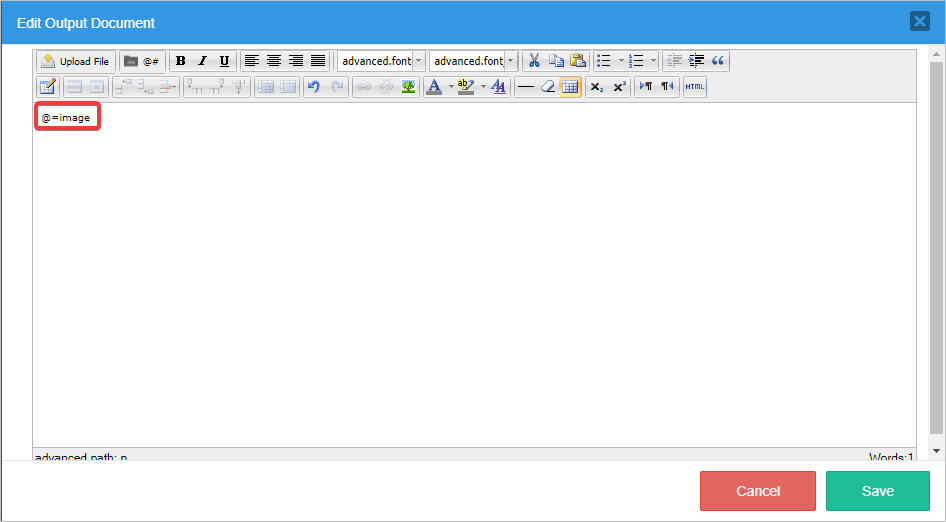
@=image = "<img src='/files/" . $name . "' width='150' height='50' />";Note: The generated file must have extension
svg. In this way, the src directive will be able to display the base 64 SVG image. -
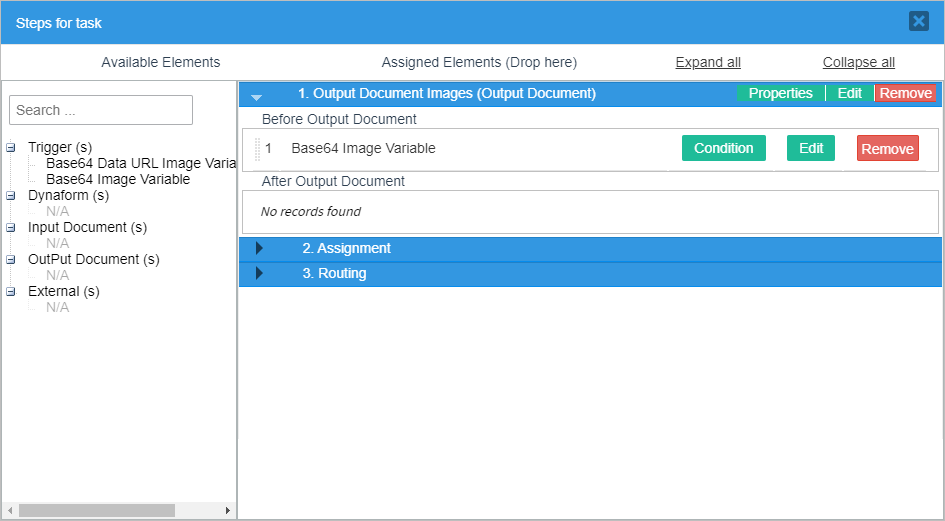
Create and assign the output document in the task. The output document must include the ProcessMaker variable.
-
Assign the trigger before the output document.
-
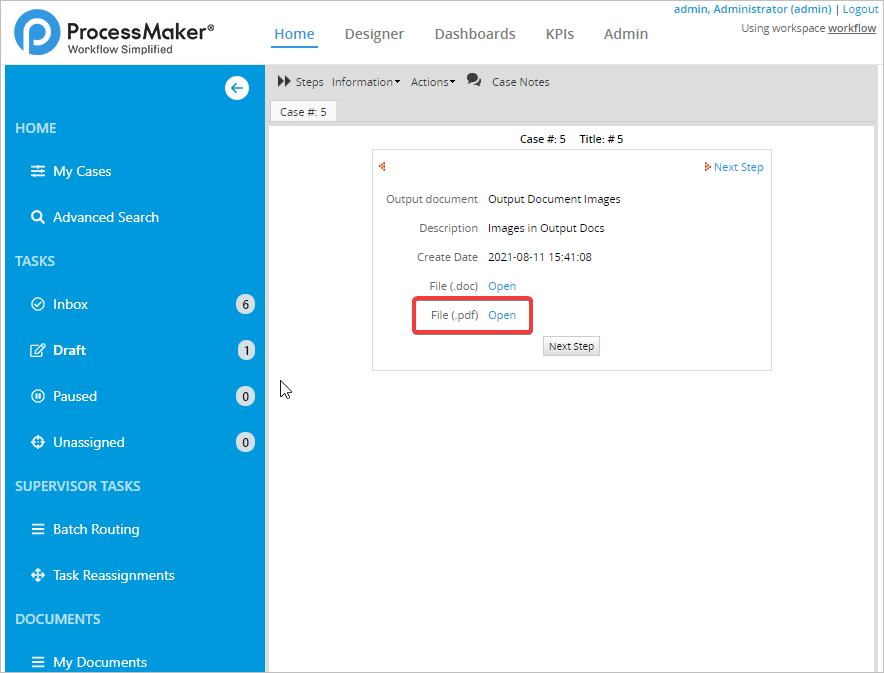
Open the case and then click on the .pdf link in the output document step.
-
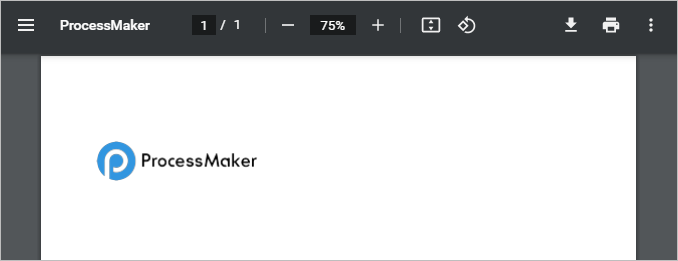
The image displays properly.
Inserting Form Fields
To insert form fields inside of an output document, edit the HTML code and create an HTML <form>. In that <form>, add <input>, <select>, and/or <submit> fields.
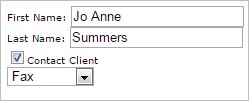
For example, this template code includes the <form>, <input> and <select> tags:
First Name: <input type="text" name="firstName" size="20" value="Jo Anne"><br>
Last Name: <input type="text" name="lastName" size="20" value="Summers"><br>
<input type="checkbox" name="contactClient" value="contact" checked>Contact Client<br>
<select name="howContact">
<option value="telephone">Telephone</option>
<option value="fax" selected>Fax</option>
<option value="email">Email</option>
</select><br>
</form>
When updated, the code will look like the image below, allowing the document to run with the user name and the name of the case started automatically filled in:
Note that these form fields are not interactive, so the content of the fields can not be edited.
Inserting Variables Inside Form Fields
Disclaimer: Notice TCPDF is in charge of interpreting any HTML code used for these kinds of Form Elements, but not ProcessMaker. Therefore, ProcessMaker is not liable for any changes that future versions of TCPDF have regarding HTML components and conversions when the Output Documents are generated.
System variables and case variables can be inserted inside form fields. For example, to insert the system variables @#USR_USERNAME and @#CaseStarted into fields named "username" and "timeStarted" respectively:

Warning: If inserting inside an <input> field, only reference variables as @#variable-name. Do NOT use @@variable-name, because it will insert a set of double quotation marks inside a set of double quotations marks, which will mess up the HTML tag.
For example, this bad template code:
will generate erroneous HTML code like:
Checkboxes in Output Documents
In an output document, there is a checkbox option to be marked or unmarked as a feature defined in its HTML code.
This checkbox is marked as follows:

In this example, the checkbox is not marked because there is no checked feature:

To use a case variable to mark a checkbox in an output document, place the case variable in the HTML code like this:
If the value of @#markContactClient is "checked" then the checkbox will be marked. If this value displays: "" (empty string), then it won't be marked in the output document.
Create a trigger that will set the value of @@markContactClient to "checked" or "", depending on the value of a checkbox in a Dynaform. Set this trigger to fire before the step that generates the output document.
For example, if the variable associated with the checkbox control in the Dynaform is "contactClient", then use this PHP code to check whether the checkbox is marked to set the value of @@markContactClient.
if (isset(@=contactClient) and !empty(@=contactClient) and @=contactClient[0] == 1) {
@@markContactClient = '<input type="checkbox" name="contactClient" value="contact" checked="checked">';
} else {
@@markContactClient = '<input type="checkbox" name="contactClient" value="contact">';
}
Note: Checkboxes have a value of array(1) if marked or array(0) if unmarked. Checkboxes inside grids are not placed inside arrays, so they have a value of 1 if marked or 0 if unmarked.
Checkgroups in Output Documents
A checkgroup can be created in HTML as a collection of individual checkboxes, so it is possible to create as many checkboxes in the Output Document as there are options in the checkgroup.
For example, a checkgroup is named "HowContact", with 3 options whose values are "fax", "telephone" and "email". To create this checkgroup in an Output Document, add these three checkboxes to the Output Document's HTML code:

Then create a trigger which fires before the Output Document to set the value of the @@CheckFax, @@CheckTelephone and @@CheckEmail variables, so they can be inserted in the generated Output Document later. The selected options in a checkgroup are stored in a case variable which separates each selected value with | (pipes). Use explode() to break it into an array and in_array() to check if the value is in the array.
For example:
if (in_array("fax", $aSelected))
@@CheckFax = "checked";
else
@@CheckFax = "";
if (in_array("telephone", $aSelected))
@@CheckTelephone = "checked";
else
@@CheckTelephone = "";
if (in_array("email", $aSelected))
@@CheckEmail = "checked";
else
@@CheckEmail = "";
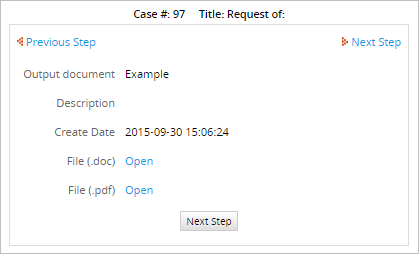
This is how the Output Document displays in a running process. This document has two types of files: .doc and .pdf. Once "Open" is selected for either of them the document will start an automatic download of the file.
Another example:
If you have a BPMN process in ProcessMaker 3.X, then the selected options in checkgroups are stored as an array (not a string separated by '|' like in classic processes), so you have to access them differently within the trigger.
First, create a checkgroup like this in your DynaForm:

With the following list of options:

The HTML code for your Output Document template should look like this:
Note: This HTML code must be declared inside a variable and then this variable must be included in the output document, you may not add the HTML code directly in the output document.
Then, create a trigger to set the value of the @@servicesHtml case variable which is used in your template, like this:
$fieldId = "servicesRequired"; //set to ID of checkbox group
$aFields = PMFDynaFormFields($formId, @@APPLICATION, @%INDEX);
@@servicesHtml = '';
foreach ($aFields as $aField) {
if ($aField->id == $fieldId) {
foreach($aField->options as $aOpt) {
$checked = '';
if (isset($aField->value) and is_array($aField->value) and
in_array($aOpt->value, $aField->value)) {
$checked = 'checked="checked"';
}
$val = $aOpt->value;
$label = $aOpt->label;
@@servicesHtml .= "<input type=\"checkbox\" value=\"$val\" $checked>$label\n";
}
}
}
Set this trigger to fire before the Output Document step in your process.
This trigger uses the PMFDynaFormFields() function to get the list of options in the checkgroup. It places the value and label for each option in the HTML code for a checkbox and appends that code to the @@servicesHtml case variable which is used in the Output Document template.
When a case is run, it will generate an Output Document file with the following checkgroup embedded in the document:

To try out this example, download and import the process here.
Note: The one drawback of this approach is that it doesn't work with a checkgroup whose list of options is dynamically generated from a variable or an SQL query. For a dynamically generated list of options, the only solution is to add JavaScript to the DynaForm which saves the list of options when the DynaForm is submitted as a JSON string in a hidden control. Then decode this JSON string instead of using the PMFDynaFormFields() function to get the list of options.
Inserting Page Breaks
To insert a page break on PDF and DOC files, an HTML element must be defined. This element uses its own style to make a page break.
Note: This HTML code cannot be placed directly in the Output Document template, because the HTML Editor automatically strips out any style information, so it needs to be inserted with a case variable in the template.
These steps explain an example of how to create a trigger and use a case variable to insert a page break.
-
Create a trigger with a variable, for example,
@@pageBreak. It contains the HTML element.@@pageBreak = '<p style="page-break-before: always;">'; -
Insert the
@#pageBreakvariable in the template file.
To insert a page break that will only appear in PDF files generated using the HTML2PDF library, edit the HTML code of the output document and add the HTML comment: <!--NewPage-->
Warning: The HTML2PDF is not available on installations over PHP 7.X, specifically as of ProcessMaker 3.3.0.
For example, use the following code:
Warning: The HTML2PDF is not available on installations over PHP 7.X, specifically as of ProcessMaker 3.3.0.
Output Documents do not have a property to add page headers and footer, but these can be added manually if using the HTML2PDF library to generate PDF files. To define a page header in an Output Document, edit the HTML code and add text between <!--header starts--> and <!--header ends--> tags. Note that these are custom comment tags used by HTML2PDF and these codes will be ignored in the DOC files and PDF files created with TCPDF.
For example:
To avoid the header being placed on top of content inside the Output Document, set the header above the content with a style setting such as top: -5mm;. However, make sure that the top margin of the Output Document is set to 5mm or larger.
To insert a page footer, edit the HTML code of the Output Document and add text between <!--footer starts--> and <!--footer ends--> tags. For example:
To avoid the footer being placed on top of content inside the Output Document, set the footer below the content with a style setting such as bottom: 5mm;. However, make sure that the bottom margin of the Output Document is set to 5mm or larger.
Note: The footer and header comments only work if using the HTML2PDF engine to generate the Output Document.
Page Numbers and File Information (HTML2PDF Library)
Warning: The HTML2PDF is not available on installations over PHP 7.X, specifically as of ProcessMaker 3.3.0.
If generating PDF files using the HTML2PDF library, it is possible to insert page numbers and file information in the generated Output Document, using the following directives:
| Directive | Description |
|---|---|
| ##PAGE## | Number of the current page. |
| ##PAGES## | Total number of pages in the generated PDF file. |
| ##FILENAME## | The URL where the source HTML is located, such as: http://example.com/files/98534779755ef0116e951f8051419251/outdocs/83393260655ef0978d76fd0041065478_2.html. This location cannot be used externally. It either has to be converted into a URL such as: http://example.com/sysworkflow/en/neoclassic/cases/cases_ShowOutputDocument?a=83393260655ef0978d76fd0041065478&v=4&ext=html Or a file location of the server, such as: /opt/processmaker/shared/sites/workflow/files/985/347/797/55ef0116e951f8051419251/outdocs/83393260655ef0978d76fd0041065478_4.html |
| ##FILESIZE## | The size of the HTML source file in bytes. |
| ##TIMESTAMP## | The time when the Output Document was generated in "YYYY-MM-DD HH:MM" format. |
For example the following code prints out the page number and the total pages in the footer of each page:
<html>
<head>
</head>
<body>
<p></p>
<!--footer starts-->
<div style="position: fixed; bottom: 5mm; width: 100%;">
<center>Generated: ##TIMESTAMP##<br />Page ##PAGE## / ##PAGES##</center>
</div>
<!--footer ends-->
<p>This is the first page</p>
<!--NewPage-->
<p>This is the second page</p>
<!--NewPage-->
<p>This is the third page</p>
</body>
</html>
At the bottom of each page will appear, the footer text will appear:

Formatting Documents to Display Content in RTL
To display right-to-left languages correctly, such as Arabic and Hebrew, read the following instructions:
For content inside paragraphs, add dir="RTL" to the <p> tags:
For content inside tables, add dir="RTL" to the <table> tags:
For example, the following output document template displays a table in right-to-left format:
The resulting output document will be generated as a .doc document

Custom fonts in Output Documents
Available Version: As of ProcessMaker 3.5.3.
Disclaimer:
Customers are responsible to add and install the proper fonts in a ttf file. It is recommended use the free fonts from https://fonts.google.com. Otherwise, use a license for a ttf file that is not included in the ProcessMaker Output Document fonts. If a unicode font is added incorrectly using the value TrueType, fonts in the generated PDF do not display correctly. The font should be removed and added again using the correct option such as --type=TrueTypeUnicode or --type=TrueType.
The following fonts are deprecated: Andale Mono, Arial, Arial Black, Book Antiqua, Comic Sans MS, Courier New, Georgia, Helvetica, Impact, Symbol, Tahoma, Terminal, Times New Roman, Trebuchet MS, Verdana, Webdings, Wingdings.
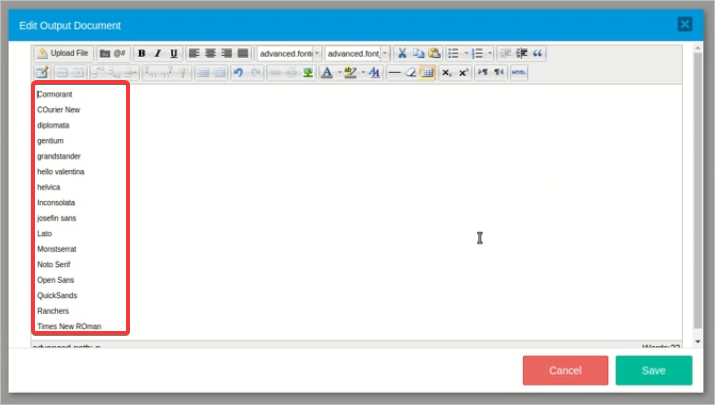
Other fonts were added, so this is a list of the fonts available by default in the Rich Text editor:
- Cormorant Garamond
- Courier New
- Gentium Book Basic
- Grandstander
- Helvetica
- Inconsolata
- Josefin Sans
- Lato
- Montserrat
- Noto Serif
- Open Sans
- Quicksand
- Times New Roman
Note: All family (regular, bold, italic and bold italic) is supported on the generated documents except Quicksand and Inconsolata. These last ones do not support italic and bold italic.
Optionally, add custom font styles to Output Documents into the Rich Text editor. Please take note about the following considerations:
- ProcessMaker does not provide licensed fonts that may be used in the output documents. Customers may include their own legally acquired fonts.
- It is recommended (but not mandatory) to use the Google Fonts, because all the fonts in their catalog are free and open source.
- This is a manual process and there is no a user interface to do add the fonts.
- Only True-Type Fonts (TTF) files can be added through the procedure described below.
- The Output Documents editor will reflect the changes.
- The HTML template editor will not reflect the changes.
- The fonts are available on the PDF generation.
- The fonts are available for all ProcessMaker workspaces.
Considerations for Custom Fonts in Output Documents
These are important considerations regarding functionality exceptions using custom fonts with output documents:
- Only TTF fonts files are supported.
- The registered fonts are available for all ProcessMaker workspaces.
- To register a "family" of fonts (Regular, Bold, Italic and Bold Italic), first you must register the Regular font with the option --tinymce in "true" value and the rest of the fonts with the "false" value because only the Regular font should be displayed in the fonts list in the rich editor. The association of a "family" font is made internally (TCPDF resolves this association). In order to add a new custom font or customize attributes or options when adding a new custom font, refer to the Add a new custom section.
- Sometimes the font names are displayed with a delay, this is because the font files must be downloaded by the browser.
- Some fonts in bold are seen slightly different in the rich editor. In the PDF generated document, these fonts look thicker.
- The fonts displayed in the default list can not be removed.
- If a Unicode font is registered incorrectly using the value "TrueType", the fonts in the PDF generated file will not be correctly displayed. In this case, the font should be removed and added again using the correct option.
- Fonts of Symbol type are not supported.
- The default fonts and the custom fonts added are only displayed in the Rich Editor for Output Documents. The Rich Editor templates or the editor for classic processes only display the previous fonts list.
- If the font file registered is the same to the default font family or a previous registered font (with other filename), the font will be registered anyway. TCPDF solves this conflict internally.
- When using the rich editor, the fonts are not applied correctly sometimes because of HTML coding compatibility. In this case, select the text which you have problem with and clean all the styles using the button remove format and reapply the desired font and size.

-
When an HTM or HTML template is uploaded into an Output Document and it contains the font tags with the added custom fonts, ProcessMaker does not recognize these fonts.
Add a new custom font
Follow these steps to add your custom fonts into the Output Document Rich Text editor:
-
Upload the custom TTF font file in the
shared/fontsfolder inside the ProcessMaker root path. -
Run the
processmakercommand using thedocuments-add-fontoption. To see detailed command options, seedocuments-add-font. For example, this is how a Moderno font is added using theprocessmakercommand:./processmaker documents-add-font Moderno.ttf "Moderno" -
Run the following command to apply more attributes in the font:
./processmaker documents-add-font --tinymce=<true|false> --type=<TrueType|TrueTypeUnicode> <ttf-file> <friendly-name> <additional-attributes>Read the following commands' attributes for deeper comprehension:
- Option --tinymce: To be displayed in the rich editor; the default value is "true". This option should be true for the main family font (usually the regular font).
- Option --type: The possible values are "TrueType" and "TrueTypeUnicode". While the default value is "TrueType", "TrueTypeUnicode" should be used if the font supports unicode characters (e.g. Japanese, Chinese, Russian, etc.).
- Required Argument ttf-file: The filename font which is case sensitive.
- Optional Argument friendly-name: By setting this argument, a friendly name can be displayed in the rich editor. If the option --tinymce is set with the "false" value, this argument is not considered.
- Optional Argument additional-attributes: If the font requires some extra values for the CSS properties (like unicode-range), define these arguments' values reviewing the resource: https://www.w3schools.com/cssref/css3_pr_font-face_rule.asp. If the option --tinymce is set with the "false" value, this argument is not considered.
-
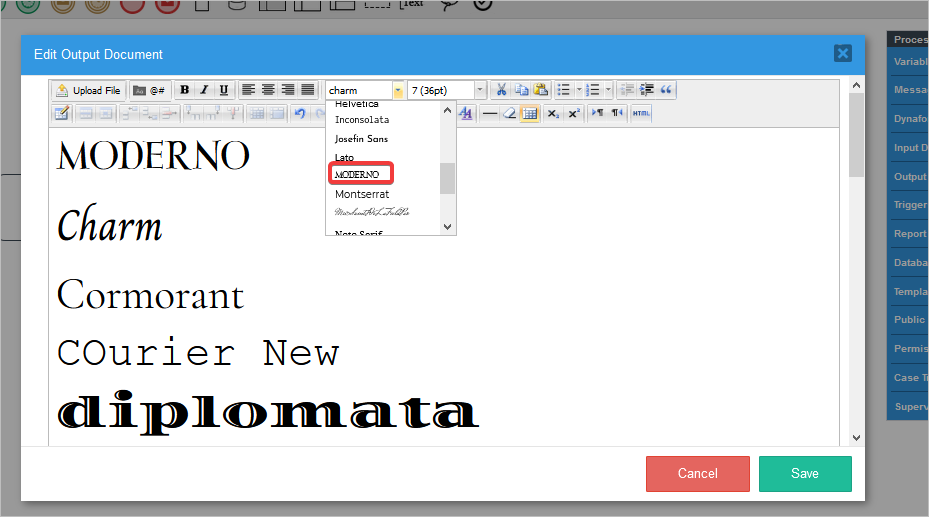
Verify that the added style is listing correctly inside the dropdown of the Output Documents editor. For example, in the following image, we can check that the Moderno font was successfully added:
Apply the font into the desired text in the editor.
Note: If a font filename does not exist in the rich text editor, a message will be displayed indicating the required font does not exist. For example: The font 'Aclonica.ttf' does not exist.
Additional Required Configuration When Using an NGINX Stack
When using an NGINX stack, the location of two PHP files must be included in the processmaker.conf configuration file:
Examples
In order to add a normal font, a unicode font with friendly name and a bold font like part of a family, follow the examples below:
Adding a normal font: Run the following command to add a normal font:
./processmaker documents-add-font Aclonica-Regular.ttf Adding a unicode font with friendly name: Run the following command to add a unicode font:
./processmaker documents-add-font --type=TrueTypeUnicode arialuni.ttf "Arial MS Unicode" Adding a bold font like part of a family: Run the following command to add a bold font like part of a family, without displaying the font in the TinyMCE editor.
./processmaker documents-add-font --type=TrueTypeUnicode arialuni.ttf "Arial MS Unicode"
Remove a registered font
Removing a registered font makes that font unavailable for PDF Output Documents and in the Rich Text editor.
Follow these steps to remove a registered font:
-
Run the
processmakercommand using thedocuments-remove-fontoption. To see detailed command options, seedocuments-remove-font. For example, this is how a Moderno font is removed using theprocessmakercommand:./processmaker documents-remove-font Moderno.ttf -
Verify that the added style is not in the the dropdown list of the Output Documents editor anymore.
List Registered Fonts
Run theprocessmaker command using the documents-list/registered-fonts option. To see detailed command options, documents-list/registered-fonts. For example, this is how a Moderno font is listed using the processmaker command:
Errors with Output Documents
Error While Generating PDF Documents
PHP version 5.4.0 or less must be installed to use the HTML2PDF library to generate PDF documents. Otherwise, a blank page will be generated. If a later version of PHP is installed, use the TCPDF library to generate output documents.
Variables are not Inserted
If variables are not inserted into an output document, then either:
- The variable name was not spelled correctly. Remember that system and case variable names are case sensitive. Re-check the spelling by looking at the field name in the Dynaform or the variable name in the trigger where it was defined.
- The case variable doesn't exist when the output document was created. If an output document references fields from a Dynaform used later in the process, then the case variable doesn't yet exist. Also, remember that case variables for each field in a Dynaform are only created when the Dynaform is submitted. If the user clicks on the Next Step link in a Dynaform whose Next Step Link property is set to "No Save & Continue", then none of the data in the Dynaform will be saved.
To determine what the problem is, run a case with the Trigger Debugger turned on and check whether the variables exist and what values they contain.
Output Document is Empty
If an empty Output Document is generated, then there probably wasn't enough session memory to properly generate the document. Large output documents may need more than 80MB of session memory. Try increasing PHP's memory_limit setting.
Error in HTML2PDF
Warning: The HTML2PDF is not available on installations over PHP 7.X, specifically as of ProcessMaker 3.3.0.
If an error message appears about a class in HTML2PDF saying "out of memory", then the pcre.backtrack_limit setting probably needs to be increased to allow bigger style definitions, larger template files and deeper levels of nested tables/divs. pcre.backtrack_limit is a new setting introduced in PHP 5.2.0.
Edit php.ini, which is the PHP configuration file on the server running ProcessMaker, and add/modify the following line to increase the backtrack_limit:
Then, restart Apache for the new setting to take effect.
Using Non US-ASCII Characters in Output Documents
Warning: The HTML2PDF is not available on installations over PHP 7.X, specifically as of ProcessMaker 3.3.0. In this case, follow TCPDF instructions.
To use characters inside an output document and generate documents in HTML2PDF (the old version), then follow the steps below to be able to open a document with Chinese, Arabic, Japanese and others characters successfully.
- Download this file (it will download automatically depending on your browsers configuration) to allow the use of characters inside an output document. The file that has been downloaded must be added into the following route in the ProcessMaker installation: [installation path]/thirdparty/html2ps_pdf/fonts. Remember to give the folder all the corresponding permissions.
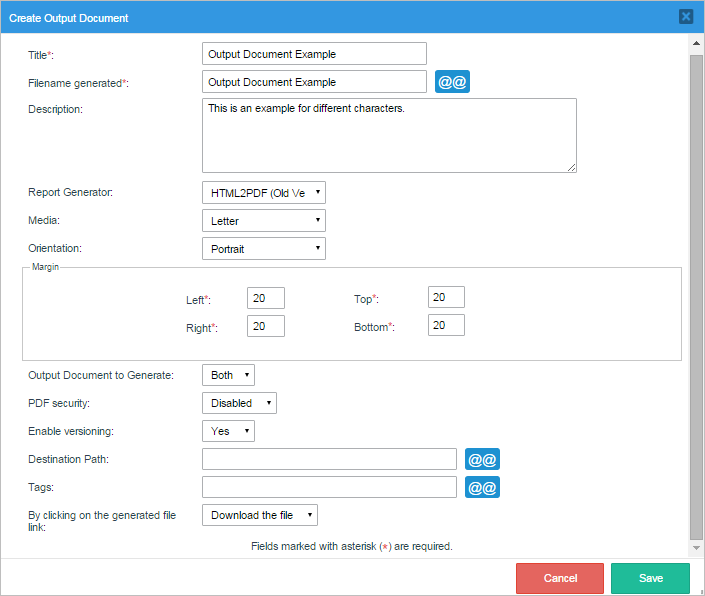
- Create an output document with the specifications shown in the image below. Notice that
"HTML2PDF" will be selected in the "Report Generator" field. Click on the Save button to store the document.
- Once saved, open the editor of the output document recently created by clicking on the
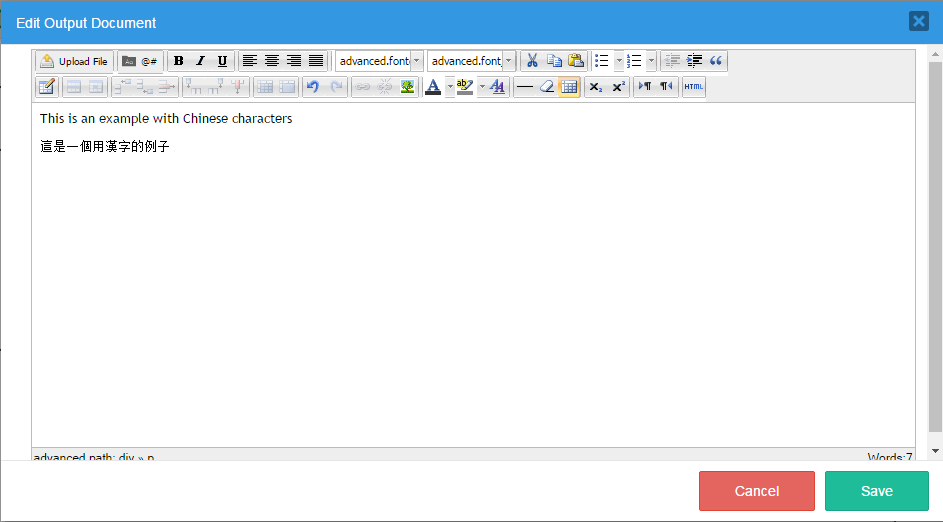
Open Editor button.

- Add text with Chinese characters such as: "This is an example with Chinese characters 這是一個用漢字的例子".
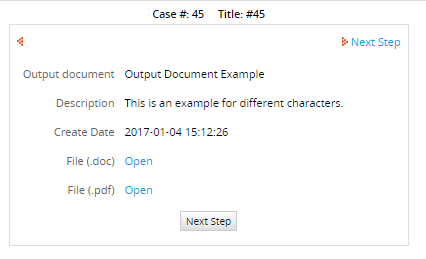
- When a case runs, both .doc and .pdf options will be available. Click on
the link to start the download of the documents.

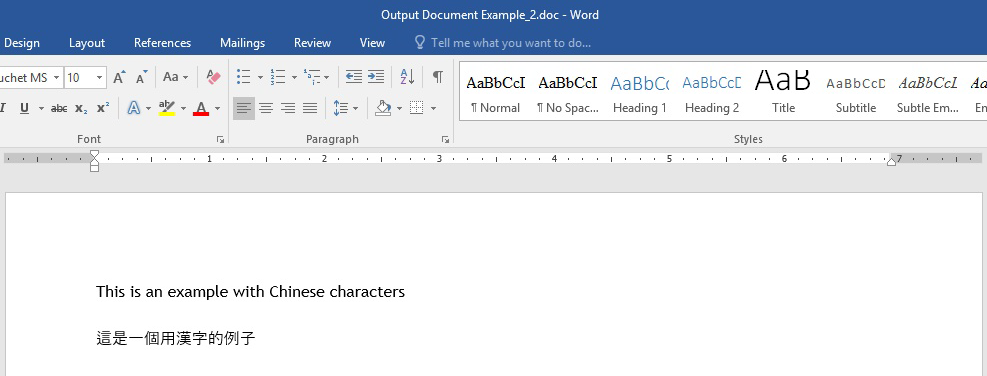
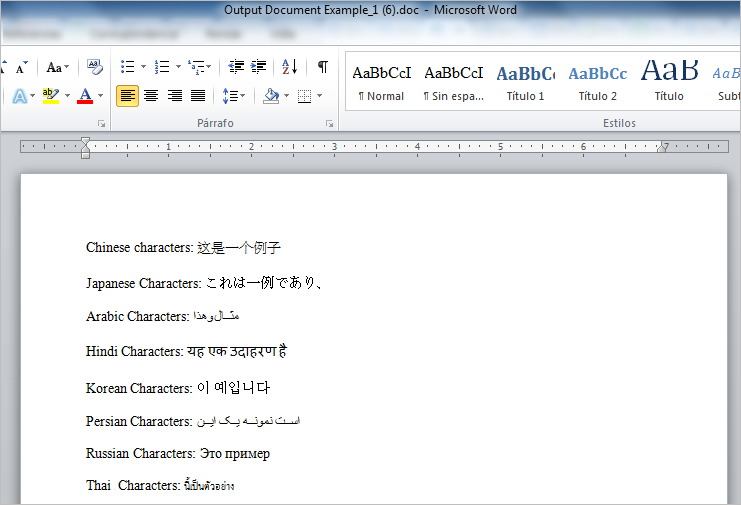
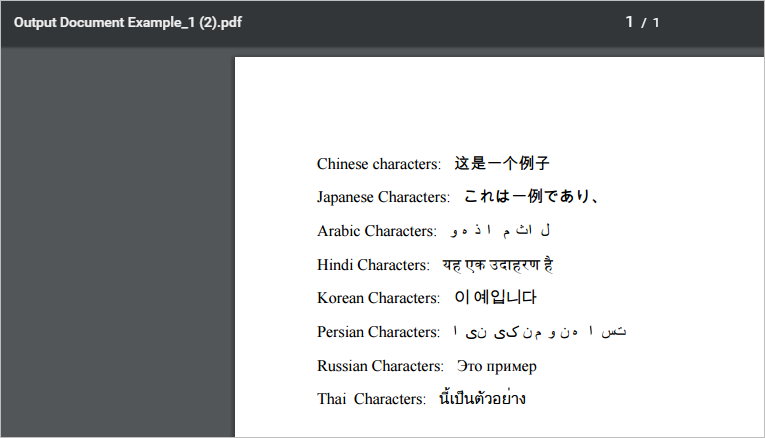
- Notice that when the documents are opened the characters will be displayed correctly in
both .doc and .pdf as seen in the images below.

- Other characters can also be added to output documents.
Output Documents in Multiple Languages
There are two ways to create an output document in multiple languages. The first way is to generate the output document's HTML content dynamically in a trigger based on the system language.
For example, the following trigger generates the HTML content dynamically in Spanish and English:
if (@@SYS_LANG == 'es' or @@SYS_LANG == 'es-ES')
{ @@fileContent = "<p><b>Nombre del Cliente:</b> ".@@clientName."</p>\n". "<p><b>Dirección del Cliente:</b> ".@@clientAddress."</p>\n"; }
else
//content in English:
{ @@fileContent = "<p><b>Client Name:</b> ".@@clientName."</p>\n". "<p><b>Client Address:</b> ".@@clientAddress."</p>\n"; }
Set this trigger to fire before the output document step. Then, place @#fileContent in the output document template. When the output document is generated while running a case, the content will automatically be inserted depending on the system language.
The other option is to create a separate output document for each language. Add each output document as steps in the task. Then, add conditions to execute the one output document which corresponds to the current system language and not execute the rest of the output documents.
For example, output document templates are created for both Spanish and English:

Both output documents are added as steps in a task and conditions are added to both to check the current system language.
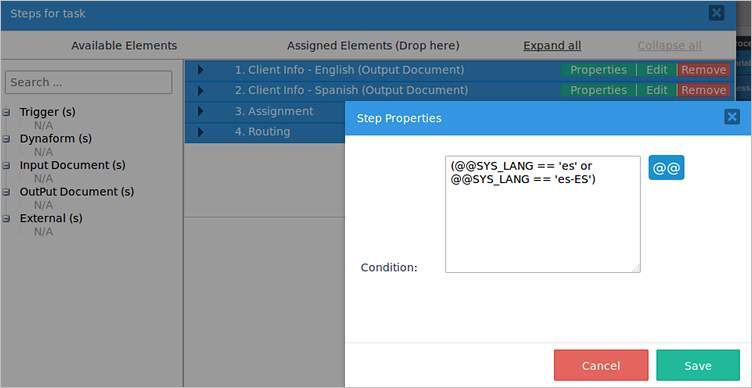
The following condition executes the Spanish output document:
And the following condition would execute the English output document step if the system language is not Spanish:
Inserting Output Documents into a Process
After creating an output document, decide where in a process the output document can be submitted. Remember that a task is a group of steps, so an output document must be added in a task. Read this documentation which explains how to add an output document as a step.
Output Documents Examples
Simple Output Documents Example
To create simple output documents, go to Output Documents in the main toolbox and click on Create. A new window will open where the information about the document must be filled in. After filling in all the necessary information, save the output document.
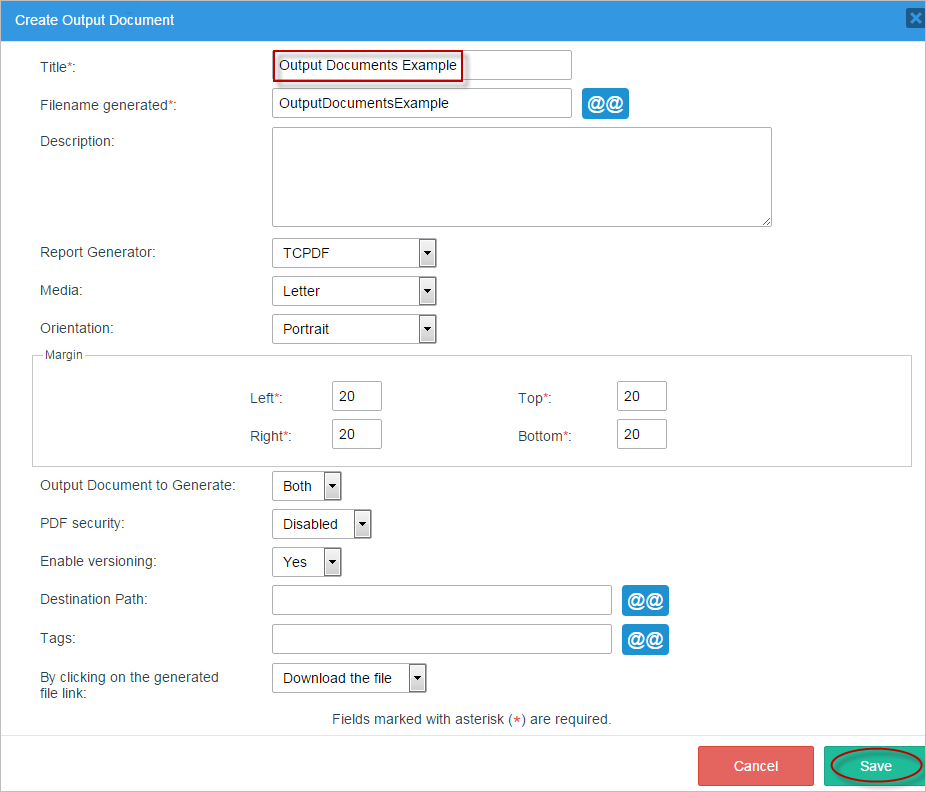
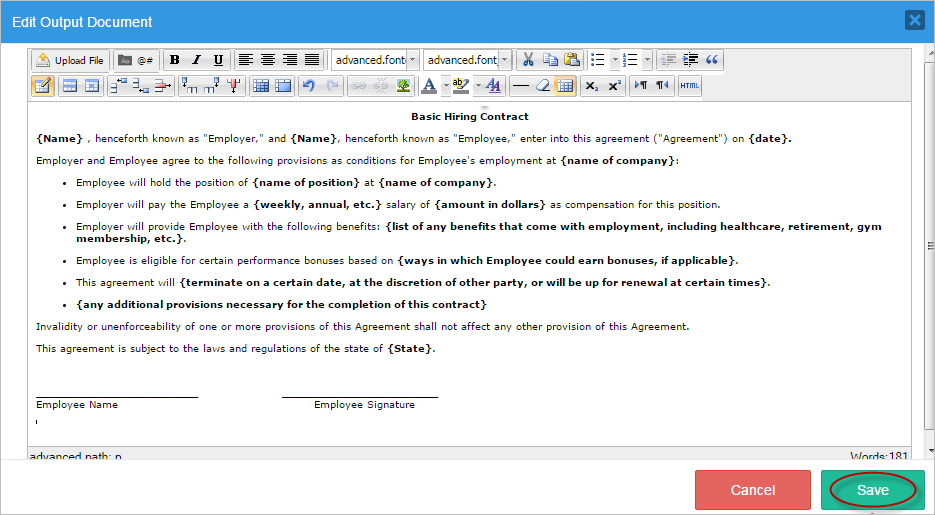
Once saved, the "Output Document Example" will appear in the Output Documents list, click on Open Editor to write a document in a Word-like environment. After it is saved, a quick message will appear saying the document has been edited successfully.

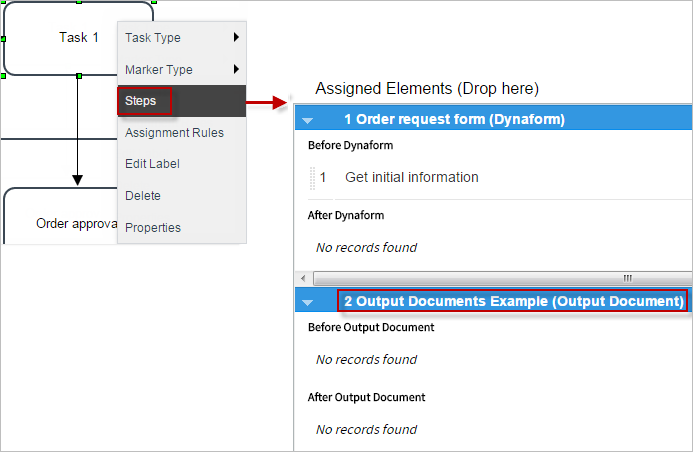
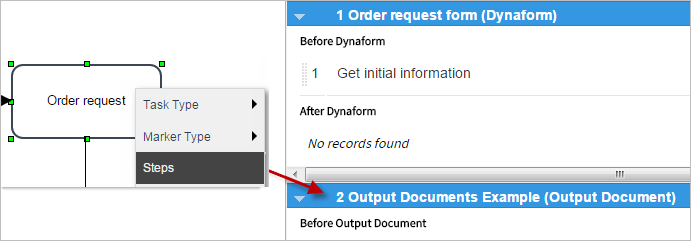
After saving it, go to the first task and right click on it to select Steps, then drag and drop the "Output Documents Example" to be shown after the Dynaform.
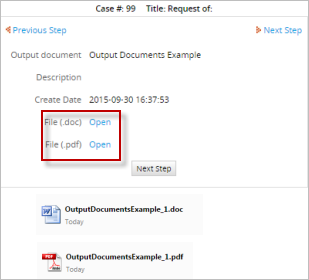
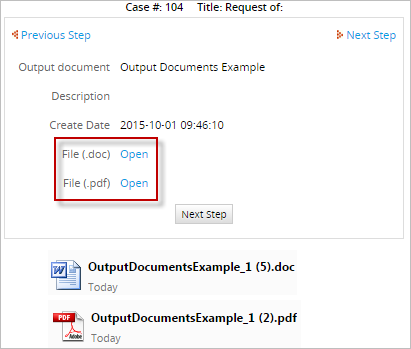
Now, to see what an output document looks like when a case is running, go to Home > New Case and double click on the process that contains the output document. In this case, the process "Copy of Purchase Request" is being used as an example. Once the initial information about the client is filled in, the next step is to view the document. As the image below shows, the document is generated in .doc and .pdf.

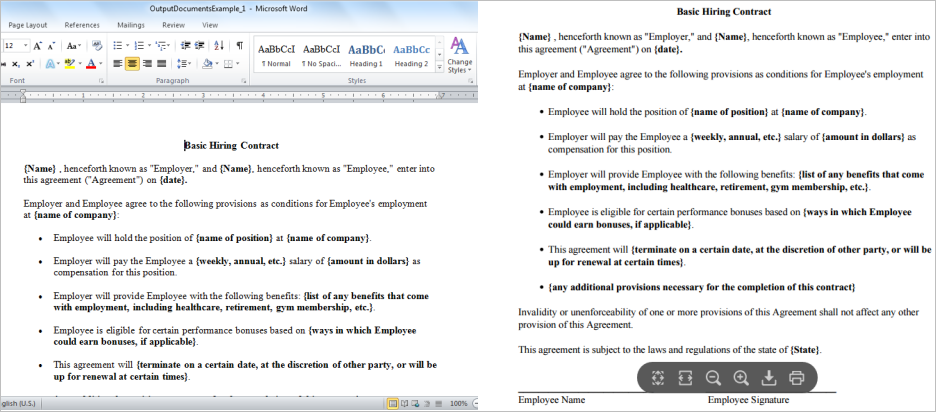
The image below shows how both documents look in both .doc and .pdf formats.
Output Documents Example with HTML
To create an example with HTML, first create four variables: "name" (String), "email" (String), "address" (String) and "currentDate" (Datetime). These variables will be stored in all the fields of the Dynaform that we will create next.
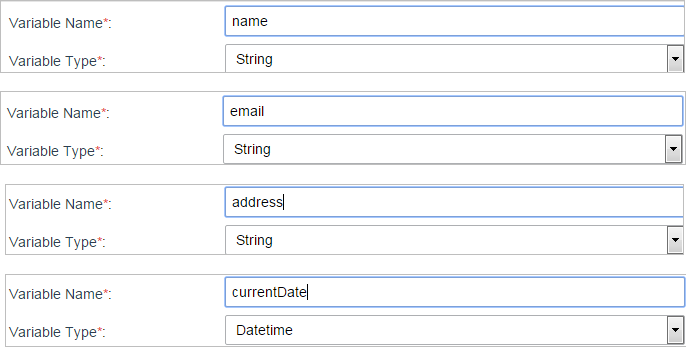
Now, create a Dynaform with fields that have names corresponding to the variable, the Dynaform and the soon to be created output document. Don't forget to create a Submit button to go onto the next task.

Save the Dynaform "Order request form" to add it as a step in the task that will be worked on.

It's time to create an output document with the name "Output Documents Example". Locate the HTML button and click on it. It will open an HTML Source Editor where code can be added. Try adding this code for this particular example:
<html>
<head>
</head>
<body>
<p></p>
<div style="font-family: 'Trebuchet MS', Arial, Helvetica, sans-serif; font-size: 13px;">
<p><img src="http://www.processmaker.com/uploads/processmaker_logo_nobg300.png" width="300" height="72" /></p>
<p style="color: #009; font-weight: bold;">NEW YORK<br />Brooklyn, NY, 11238, USA</p>
<p style="text-align: center; text-decoration: underline; font-size: 20px;">PROOF OF PAYMENT</p>
<p>Sent by: @#USR_USERNAME</p>
<p>Name: @#name</p>
<p>Email: @#email</p>
<p>Address: @#address</p>
<p>Current date: @#currentDate</p>
<p>Status: Approved</p>
<p></p>
</div>
</body>
</html>
</body>
</html>
When the code is ready to be executed click on Update to save it.
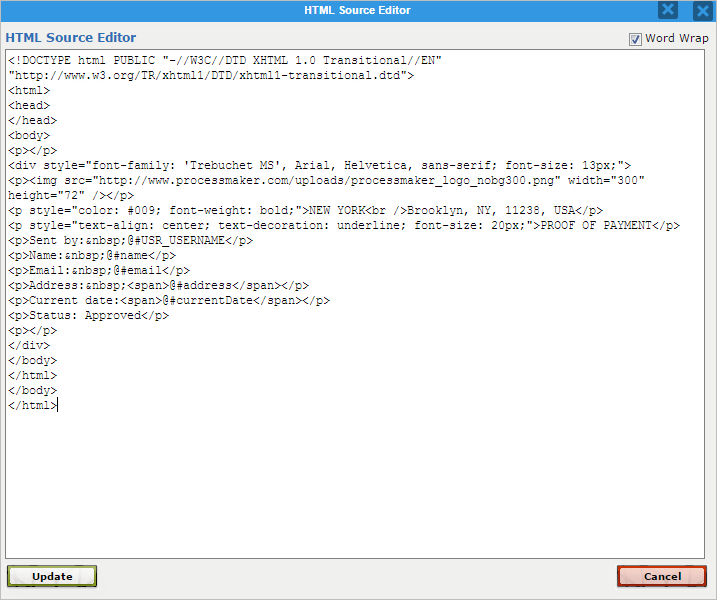
The result of this HTML Code will be:
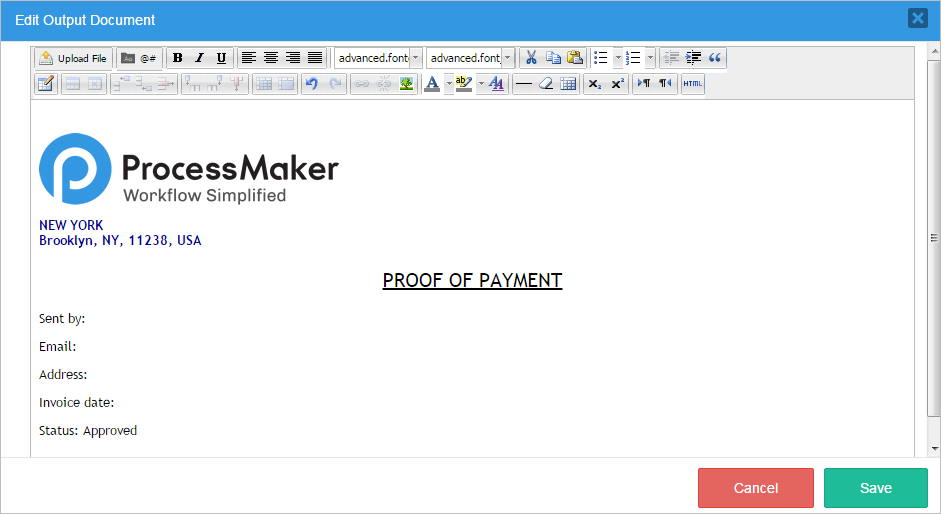
This example was designed to use variables that will automatically display the saved responses from the Dynaform fields in the Output Document. Go to the variable picker in the Output Document editor, and choose the prefix "@#" to insert the value of the variable without any changes. Insert the variables that belong to each field, as seen in the image below.
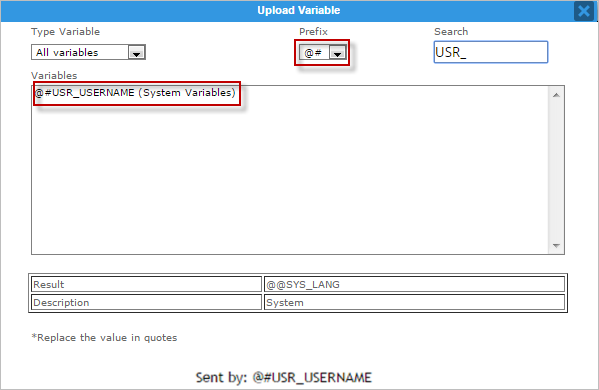
After adding all the variables to each field, the output document is ready to be assigned to a task. Save it, and it will appear in the list with the other Output Documents.

Choose the first task and right click on it to show its properties, then click on Steps to add the output document after completing the Dynaform, as seen in the image below.
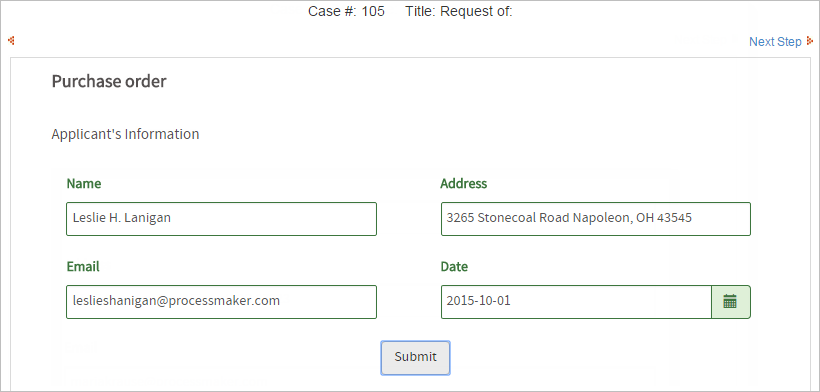
To test if it works, go to Home > New Case and start the process "Copy of Purchase Request" by double clicking it. Fill the information in the form and click Submit to see the output document.
The next window will show that there is an output document before moving on to the next task, and that there are two files generated in .doc and .pdf.
Once Open is clicked for either document, an automatic download of the output documents will start and will be saved in the Download folder. Open them to see that the document has the information required in the HTML Code and is calling all the variables added in the Dynaform.
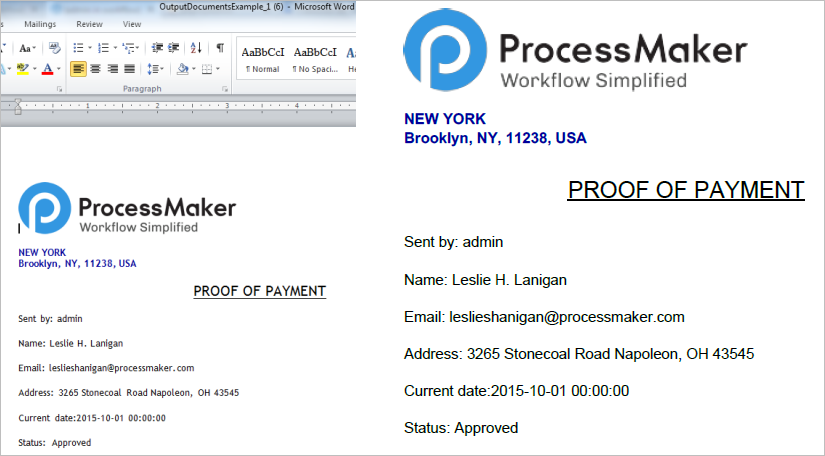
Note: Spaces between lines can vary in the downloaded Output Documents in both formats (DOC and PDF).
Output Document Example When Working With Grids
When working with grids on Output Documents, they must be called and built in a Trigger. The edition of grids and also the use of any tag, for example,<!--@>GRID-VARIABLE-NAME--> in the WYSIWYG of the Output Documents is not recommended because when using HTML tags, they do not save properly on the database.
The following example can be applied on a Trigger to populate grid content using HTML code defined on a grid.
$grid.= '<tr>';
$grid.= '<td>' . $row['oeJan'] . '</td>';
$grid.= '<td>' . $row['oeFeb'] . '</td>';
...
$grid.= '</tr>';
}
@=contentGrid = $grid;
After the grid is populated, the variable is ready to work on the Output Document just by calling the variable on the editor.
Restrict Output Document Links
When an output document is generated inside a process, one or two links are generated to download and/or open the output document depending on the output document configuration.
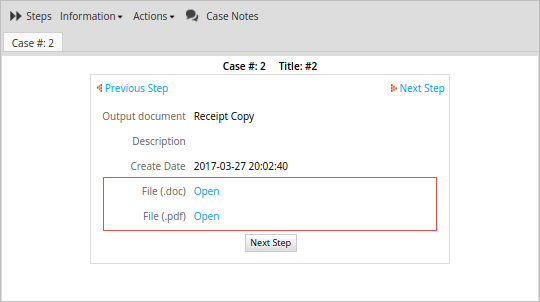
To restrict these output document links, configure the disable_download_documents_session_validation flag in the env.ini file of the workspace or the ProcessMaker instance.
If the flag is set to 1, the output document can be downloaded by any user with the link without restrictions.
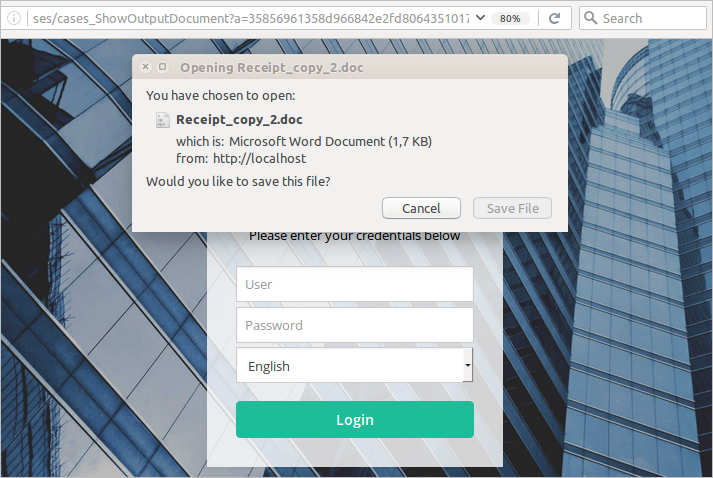
If set to 0 or not set, the user needs to be logged in to ProcessMaker with a valid active session and have the right user permissions to download the document. Otherwise, the following message will be displayed when accessing the link:
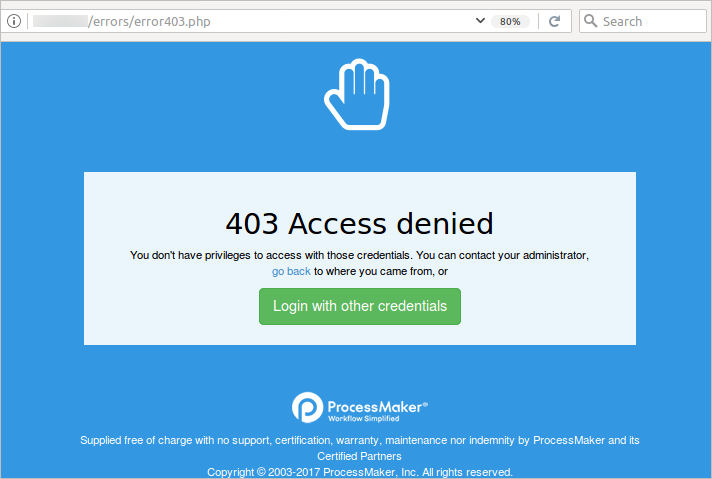
Click the Login with other credentials button to be redirected to the ProcessMaker login page. ProcessMaker will not redirect the user to the link after the user with the right permissions logs in, therefore, it is necessary to enter the output document link into the browser URL bar again.
Output Document Storage
Output Document Definitions
The definitions of output documents are stored in the wf_<WORKSPACE>.OUTPUT_DOCUMENT table in the MySQL database. This table, also contains the title, description, template and filename for output documents.
To find information such as the title, description, template and filename for output document, enter MySQL (either from the command line or with a graphical program such as phpMyAdmin) or access it through a function such as executeQuery() in a trigger. Search for a value of 'OUT_DOC_TITLE', 'OUT_DOC_DESCRIPTION', 'OUT_DOC_TEMPLATE', and 'OUT_DOC_FILENAME' in the wf_<WORKSPACE>.OUTPUT_DOCUMENT table. For example, to find all output document templates:

To find a specific output document template, specify its unique ID in the query:

To see all the information about a particular output document definition, search for its unique ID, which can either be found in the field wf_<WORKSPACE>.OUTPUT_DOCUMENT.OUT_DOC_UID or by opening the list of output documents inside ProcessMaker and clicking the Show ID link for an output document. Once the unique ID is known, it can be used in a SQL query:

Output Document Files
When output document files are generated while running a case, an HTML file is created based upon the output document's template. From that HTML file, a PDF and/or DOC file are created. (Actually the DOC file is really just HTML code inside a DOC container.)
Output document files are stored at:
The filename of output document files includes the unique ID for the case file (which is stored in the wf_<WORKFLOW>.APP_DOCUMENT.APP_DOC_UID field) and the version number, which starts counting from 1. Even if versioning isn't enabled, the filename will include "_1".
Linux/UNIX:
Note: The TCPDF library doesn't generate a separate HTML file.
For example:
Windows:
For example in Windows Vista and later:
To know more about case files stored in a series of 3 subdirectories, review Managing 32K Folders. This means that a directory using the case's unique ID, such as /a03459e1cb9824dac456780eca7b5cf6/ in the above example, becomes 3 subdirectories whose names are three characters in the case's unique ID, with the rest of the unique ID placed in the name of another subdirectory:
If accessing an output document file from a ProcessMaker trigger or plugin, it is recommended to use the defined constant PATH_DOCUMENT, to set the location of the case files, such as "/opt/processmaker/shared/sites/workflow/files/" on a Linux/UNIX system, and PATH_SEP, which is "/" on Linux/UNIX systems and "\" on Windows systems to separate directories in the file system. The G::getPathFromUID() method may be used to break a unique ID number into subdirectories in this way if the system requires it. For example, to get an output document file with the case-file ID of 6960198894e6927e0a40b14004833875 and the version number 2 in the current case:
$OutDocPath = PATH_DOCUMENT . $g->getPathFromUID(@@APPLICATION) . PATH_SEP . "outdocs" . PATH_SEP . "6960198894e6927e0a40b14004833875_2.pdf";
G::getPathFromUID() exists before calling it.
$g = new G();
$caseIdPath = method_exists(G, "getPathFromUID") ? $g->getPathFromUID($caseId) : $caseId;
$OutDocPath = PATH_DOCUMENT . $caseIdPath . PATH_SEP . "outdocs" . PATH_SEP . "6960198894e6927e0a40b14004833875_2.pdf";
Changing the File Location
To store input and output document files in a different location, such as a NAS, then copy the contents of the files directory to the new location and then edit the source code in workflow/public_html/sysGeneric.php and change the location of PATH_DOCUMENT, which is defined in line 332:
For example, to store files on an NAS mounted drive at /media/nas/processmaker:
Make sure to include the forward slash in Linux/UNIX or the backward slash in Windows at the end of the path.
Note: Take into consideration that this change can only be done in the community edition of ProcessMaker, as this represents changes in the core and that is not allowed in enterprise editions.
Generated Output Documents in the Database
When an output document is generated when running a case, a new entry is added to the wf_<WORKSPACE>.APP_DOCUMENT table and a new unique ID is assigned to the generated Output Document. In addition, other entries like 'APP_DOC_TITLE','APP_DOC_FILENAME' and 'APP_DOC_COMMENT' are added to the table.
If inside a trigger or using an external application or script, the unique ID for an output document file can be found with the outputDocumentList() web service. Inside a trigger or a Dynaform, the unique IDs for all generated output documents can be looked up with the following SQL query:
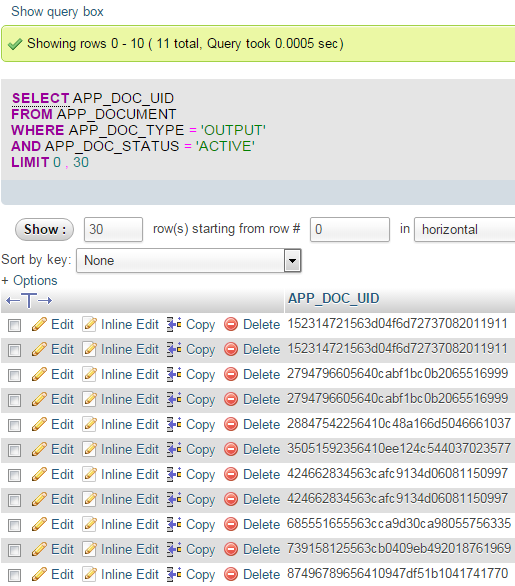
To find the generated output documents for a specified case:
AND APP_DOC_TYPE='OUTPUT' AND APP_DOC_STATUS='ACTIVE'
To find a specific output document for a specified case, which was uploaded by a specified user:
AND APP_DOC_TYPE='OUTPUT' AND APP_DOC_STATUS='ACTIVE'
AND DOC_UID='<OUTPUT_DOC_UID>' AND USR_UID='<USER_UID>'
Output documents can be marked by tags, which provide an easy way to find related output documents under HOME > Documents. The tags are stored in the wf_<WORKSPACE>.APP_DOCUMENT.APP_DOC_TAGS field for each generated output document file and multiple tags are separated by commas. To find all generated output document files for a case with a specified tag:
AND APP_DOC_STATUS='ACTIVE' AND APP_DOC_TAGS LIKE '%<TAG>%'
To find all generated output documents created between a certain date range:
AND APP_DOC_CREATE_DATE>='<YYYY-MM-DD HH:MM:SS>' AND APP_DOC_CREATE_DATE<='<YYYY-MM-DD HH:MM:SS>'
AND APP_DOC_STATUS='ACTIVE'
To find the unique IDs of all the generated files of a specified output document definition and their filenames used under HOME > Documents (not its real filename in the file system), query the wf_<WORKSPACE>.APP_DOCUMENT table:
WHERE APP_DOC_STATUS='ACTIVE' AND APP_DOC_TYPE='OUTPUT'
To find the unique IDs of all the generated output documents of a specified user and their filenames used under HOME > Documents:
AND APP_DOC_STATUS='ACTIVE' AND APP_DOC_TYPE='OUTPUT'
To find the unique IDs of all the generated output documents of a specified case and their filenames used under HOME > Documents:
AND APP_DOC_STATUS='ACTIVE' AND APP_DOC_TYPE='OUTPUT'
Upload Output Documents' Fonts through the Skins
Follow these steps to add a new font through the skins in ProcessMaker.
Download the new skin exported from ProcessMaker.
Uncompress the .tar file.
Create a folder name fonts if it is not created yet.
Add all the required TTF font files in the fonts folder.
Import information back in ProcessMaker and the fonts will be moved to a specific folder in ProcessMaker for new fonts.
Results
It is necessary to add the fonts' files in the fonts folder.
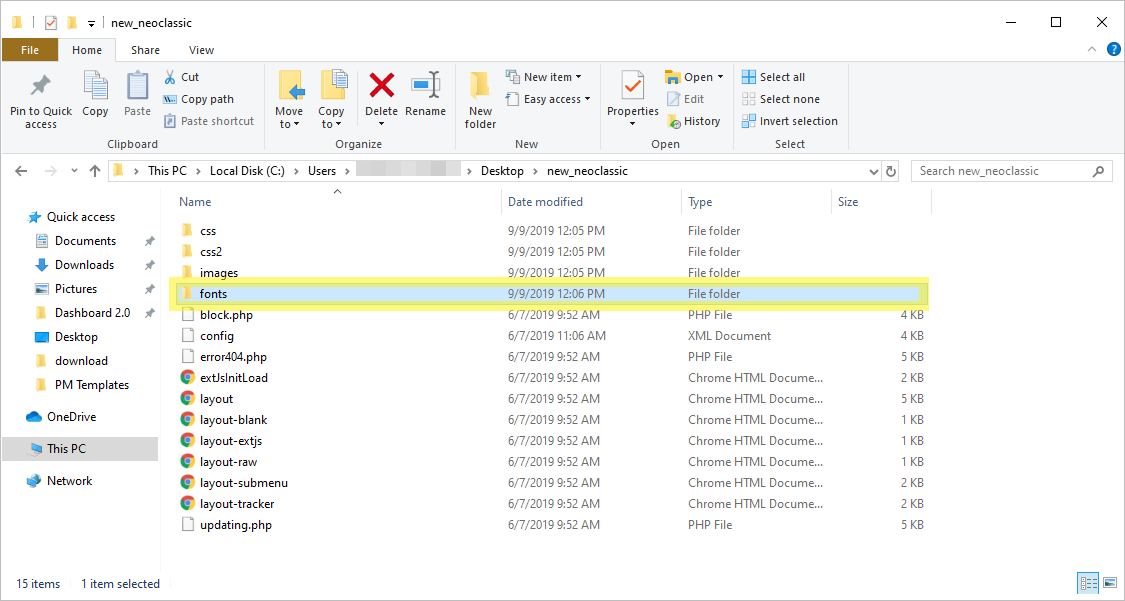
Warning: After a new skin is imported into ProcessMaker, it should copy the font files into the main fonts path "shared/fonts". The fonts are added cumulative.
If a font with the same name and extension is uploaded, it has to replace the older fonts.
The fonts are registered manually by the IT Manager after the skin file is uploaded (It happens because ProcessMaker requires tp set the correct values for the options and arguments used in ProcessMaker commands).
Execute this command to convert a ttf file to a valid TCPDF font and a TinyMCE Rich Text Editor property:
ProcessMaker Function:
./processmaker documents-add-font --tinymce=<true|false> --type=<TrueType|TrueTypeUnicode> <ttf-file> <friendly-name> <additional-attributes>Select the font uploaded in the Rich text editor. When the font is added, it is listed in the rich text editor selecting the dropdown.
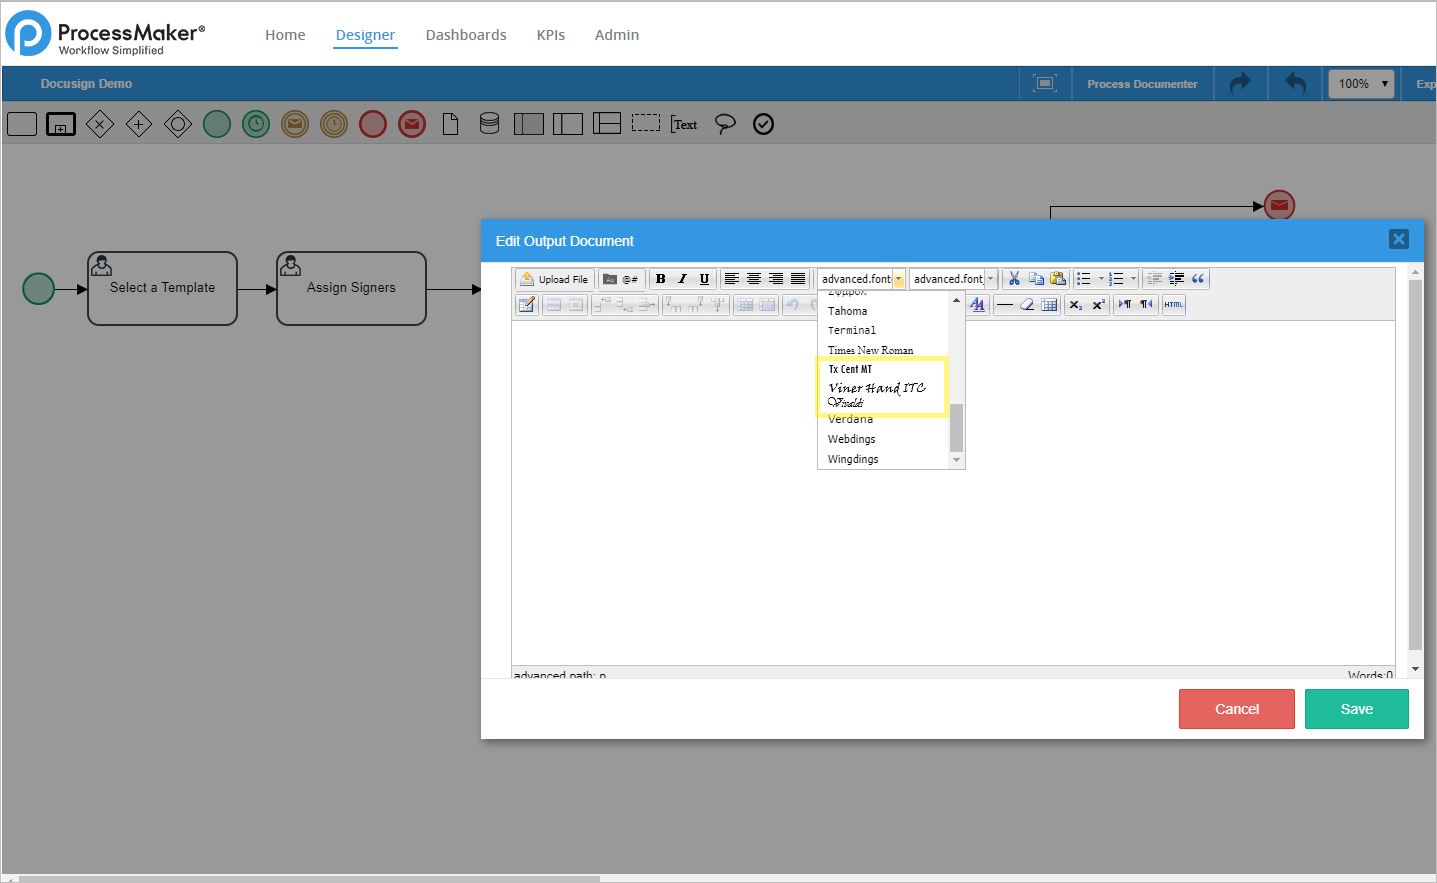
When generating the PDF file, the text uses the defined font.
Accessing Output Document with Triggers
Links to Output Documents in Dynaforms
Trigger code can be used to look up information about an output document file in the database and construct the address to download the file.
First, add two link controls to a Dynaform for the PDF and DOC of an output document file:
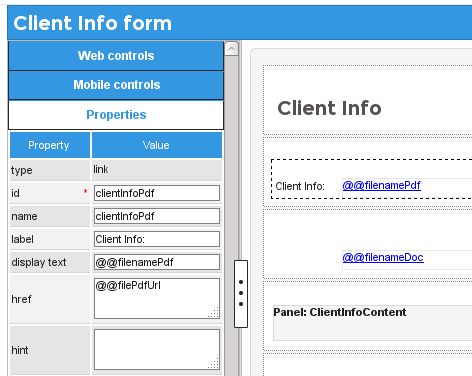
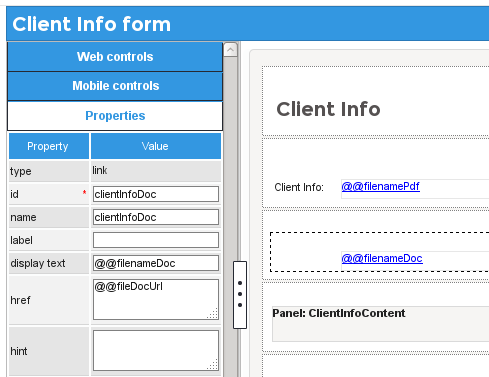
In the properties of the link to the PDF file, set its display text property to the @@filenamePdf variable and set its href property to the @@filePdfUrl variable. Likewise, in the properties of the DOC file, set its display text property to the @@filenameDoc variable and set its href property to the @@fileDocUrl variable.
Then, create the following trigger, which looks up information about the latest version of the output document file in the APP_DOCUMENT table and its filename in the CONTENT table in the database:
$docId = '30671206456bbc811c7dd13078044406';
$caseId = @@APPLICATION;
$query = "SELECT APP_DOC_UID AS FILE_ID, APP_DOC_FILENAME, DOC_VERSION AS VERSION
FROM APP_DOCUMENT WHERE APP_UID='$caseId' AND DOC_UID='$docId'
AND APP_DOC_STATUS='ACTIVE' AND APP_DOC_TYPE='OUTPUT'
ORDER BY DOC_VERSION DESC";
$result = executeQuery($query);
if (!is_array($result) or count($result) == 0) {
die("Error: Unable to find Output Document file for case $caseId.");
}
$fileId = $result[1]['FILE_ID'];
$filename = $result[1]['FILENAME'];
$version = $result[1]['VERSION'];
@@filePdfUrl = "http://{$_SERVER['SERVER_NAME']}:{$_SERVER['SERVER_PORT']}/sys" . @@SYS_SYS .
"/neoclassic/en/cases/cases_ShowOutputDocument?a=$fileId&v=$version&ext=pdf";
@@fileDocUrl = "http://{$_SERVER['SERVER_NAME']}:{$_SERVER['SERVER_PORT']}/sys" . @@SYS_SYS .
"/neoclassic/en/cases/cases_ShowOutputDocument?a=$fileId&v=$version&ext=doc";
@@filenamePdf = "{$filename}_{$version}.pdf";
@@filenameDoc = "{$filename}_{$version}.doc";
This trigger code sets the values of the variables that are inserted into the properties of the link controls when the Dynaform is generated. Make sure to change the $docId to the unique ID of the output document. Then, set this trigger to fire before the Dynaform.
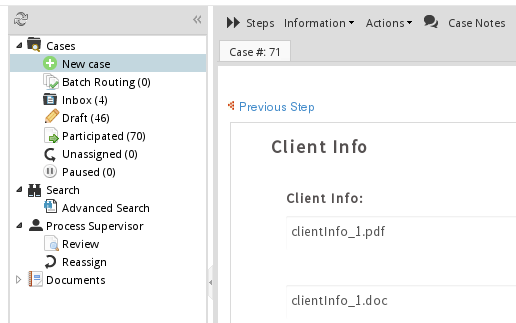
When a case is run, the filenames and the URLs of the PDF and DOC files should be automatically inserted into the links in the Dynaform.
Generating Output Documents
The PMFGenerateOutputDocument() function can be called in a trigger to generate an output document in the current case. The PMFGenerateOutputDocument() function doesn't return any information about the generated file, but afterwards the executeQuery() function can be used to look up this information in the wf_WORKSPACE.APP_DOCUMENT table. Information, such as the filename, file version, the user who generated the file, and datetime when generated, can be obtained with a complex database query as shown in the previous example, but it is much simpler to use the AppDocument::Load() method to obtain this information.
Example:
This example (which can be downloaded by right clicking this link and saving it) shows how to generate an output document and display a link to the generated file in a subsequent Dynaform, so a separate step to create an output document is not necessary.
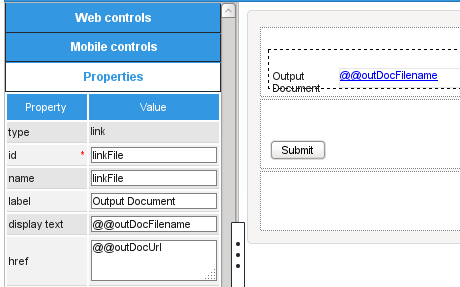
First, create two string variables named outDocUrl and outDocFilename, which will be used to pass the web address and filename of the generated file to the Dynaform. Then, create a Dynaform that has a link control. In the properties of that link control, set the display text property to @@outDocFilename and the href property to @@outDocUrl.
Then, create an output document and get its Unique ID number by clicking on its Show ID button:
Then, create a trigger with the following code that generates the output document and looks up information about the generated PDF file:
$outDocId = '84581368556d0b69010a355067195050';
$caseId = @@APPLICATION;
PMFGenerateOutputDocument($outDocId);
//retrieve info from the database about the generated output document file
$query = "SELECT APP_DOC_UID FROM APP_DOCUMENT WHERE APP_UID='$caseId' AND
DOC_UID='$outDocId' AND APP_DOC_STATUS='ACTIVE'";
$result = executeQuery($query);
if (!is_array($result) or count($result) == 0) {
die("Error: Unable to find generated Output Document in database.");
}
$d = new AppDocument();
$aFile = $d->Load( $result[1]['APP_DOC_UID'] );
//change from 'http://' to 'https://' if using SSL
//change 'pdf' to 'doc' for MS Word file
@@outDocUrl = 'http://' . $_SERVER['SERVER_NAME'] .
// ':' . $_SERVER['SERVER_PORT'] . //uncomment if needing a port number
'/sys'. @@SYS_SYS . '/en/neoclassic/cases/cases_ShowOutputDocument?a=' .
$aFile['APP_DOC_UID'] . '&v='. $aFile['DOC_VERSION'] . '&ext=pdf';
@@outDocFilename = $aFile['APP_DOC_FILENAME'] .'_'. $aFile['DOC_VERSION'] .'.pdf';
$outDocId variable to the output document's unique ID. The address in @@outDocUrl may also need to be adjusted if using https or if using a port number. In this example, the link is
for a PDF file, but to link to an MS Word file change the file extension from .pdf to .doc.
Set the above trigger to fire before the
Dynaform.
When a case is run, the filename for the generated output document file should be displayed in the link field.

Convert Output Documents to Text Files
The following example shows how to convert an output document file into a text file and display it in a Link control in a subsequent Dynaform so the user can download the text file.
In this example, the pdftotext command from Poppler is used to convert an output document's PDF file into a text file. Poppler has to be installed separately on the ProcessMaker server. On most Linux/UNIX servers, it is available to be installed in the poppler-utils package. For Windows machines, Poppler can be downloaded here. To avoid installing a separate program, it is also possible to convert the output document's HTML file into text with the strip_tags() function, so this example can be modified to work without Poppler.
First, create an output document in the process and get its ID number, which in this example is "233815488585c62af61e2a6077136729".
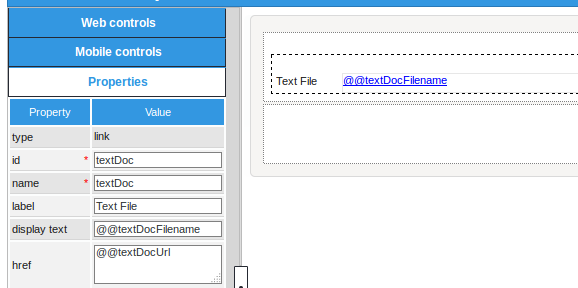
Then, create a Dynaform with a Link control. In the Link properties, set the display text to @@textDocFilename and the href to @@textDocUrl.
Finally, create the following trigger:
$outDocId = '233815488585c62af61e2a6077136729';
PMFGenerateOutputDocument($outDocId);
//retrieve info from the database about the generated output document file
$caseId = @@APPLICATION;
$query = "SELECT APP_DOC_UID, DOC_VERSION FROM APP_DOCUMENT
WHERE APP_UID='$caseId' AND DOC_UID='$outDocId' AND
APP_DOC_STATUS='ACTIVE' ORDER BY APP_DOC_CREATE_DATE DESC";
$result = executeQuery($query);
if (!is_array($result) or count($result) == 0) {
die("Error: Unable to find generated Output Document in database.");
}
//get the filename of the uploaded document:
$d = new AppDocument();
$aFile = $d->Load($result[1]['APP_DOC_UID'], $result[1]['DOC_VERSION']);
$originalFilename = $aFile['APP_DOC_FILENAME'].'_'.$aFile['DOC_VERSION'];
$filename = $result[1]['APP_DOC_UID'].'_'.$result[1]['DOC_VERSION'];
$g = new G();
$path = PATH_DOCUMENT. $g->getPathFromUID($caseId) .PATH_SEP. "outdocs" .PATH_SEP. $filename .'.pdf';
$tempFile = tempnam(sys_get_temp_dir(), $originalFilename.'_');
//convert PDF to text file:
exec("pdftotext $path $tempFile.txt", @=aOutput);
//upload temporary text file to current case
$params = array (
'ATTACH_FILE' => new CurlFile($tempFile.'.txt'),
'APPLICATION' => @@APPLICATION,
'INDEX' => @%INDEX,
'USR_UID' => @@USER_LOGGED,
'DOC_UID' => '-1',
'APP_DOC_TYPE' => 'ATTACHED',
'TITLE' => '',
'COMMENT' => ''
);
$domain = ($g->is_https() ? 'https://' : 'http://') . $_SERVER['SERVER_NAME'];
//add if needing a port number: .':'. $_SERVER['SERVER_PORT']
$uploadUrl = $domain.'/sys'.SYS_SYS.'/'.SYS_LANG.'/'.SYS_SKIN.'/services/upload';
//upload text file created from output document
ob_flush();
$ch = curl_init();
curl_setopt($ch, CURLOPT_URL, $uploadUrl);
curl_setopt($ch, CURLOPT_RETURNTRANSFER, 1);
curl_setopt($ch, CURLOPT_POST, 1);
curl_setopt($ch, CURLOPT_POSTFIELDS, $params);
// curl_setopt ($ch, CURLOPT_SSL_VERIFYHOST, 1); //Uncomment for SSL
// curl_setopt ($ch, CURLOPT_SSL_VERIFYPEER, 1); //Uncomment for SSL
$response = curl_exec($ch);
curl_close($ch);
//delete temporary text files:
unlink($tempFile);
unlink($tempFile.'.txt');
if (strpos($response, 'uploaded successfully') === false) {
die($response);
}
//lookup uploaded text file in the database:
$query = "SELECT APP_DOC_UID, DOC_VERSION FROM APP_DOCUMENT
WHERE APP_UID='$caseId' AND DOC_UID='-1' AND APP_DOC_STATUS='ACTIVE'
ORDER BY APP_DOC_CREATE_DATE DESC";
$result = executeQuery($query);
@@textDocUrl = $domain.'/sys'.SYS_SYS.'/'.SYS_LANG.'/'.SYS_SKIN.
'/cases/cases_ShowDocument?a='. $result[1]['APP_DOC_UID'] .
'&v='. $result[1]['DOC_VERSION'];
@@textDocFilename = basename($tempFile.'.txt');
Change the ID number of the output document to match your process. Set this trigger to execute before the Dynaform.
This trigger first uses PMFGenerateOutputDocument() to create the output document files. Then, it searches for the newly generated file in the APP_DOCUMENT table in the database to get its unique ID and version number. With that information, it calls the AppDocument::Load() method to get the filename of the generated file and construct the path where the file is stored on the ProcessMaker server.
The trigger then uses the tempnam() function to create a temporary file on the ProcessMaker server that will hold the text file. Then, it uses the exec() function to make a system call for the pdftotext program to convert the output document's PDF file into a text file.
The temporary text file is then uploaded to /services/upload as a new document in the case. The APP_DOCUMENT table is queried again to find the ID number and version number of this new document file. The URL to download the text file is placed in the @@textDocUrl variable and the filename of the text file is placed in the @@textDocFilename variable.
When a case is run and the Dynaform with the Link field is displayed, the user can click on the link to download the text file.

For a sample process containing this code, download and install output_document_to_text_file-3.pmx (right click and select "Save Link As").


