- Overview
- Creating a Grid
- Grid Editor Toolbar
- Grid Properties in a Dynaform
- Redisplaying Grid Data
- HTML in Grids
- Conditions Editor Tab
- Accessing Grids with JavaScript
- Examples
- Hiding a Grid
- Hiding/Showing a grid column
- Summing a grid column
- Advanced calculations with grid columns
- Changing the color to draw attention
- Adding Grid Rows
- Executing Code When Adding a Row
- Deleting Grid Rows
- Executing Code When Deleting a Row
- Changing the Numbers Labeling Rows
- Setting Styles of Grid Fields in a Column
- Using Row Numbers
- Maximum Number of Rows in a Grid
- Accessing Grids with PHP
- Reading from Grids
- Looping through a Grid
- Writing to Grids
- Appending New Rows
- Inserting New Rows
- Removing Rows From Grids
- Clearing a Grid
- Copying Grids
- Populating Whole Grids
- Setting a Fixed Number of Empty Rows
- Populating Grids with a Database Query
- Saving Grids to an External Database
- Using Grids as Serialized Strings
Overview
The ![]() grid object embeds an existing grid form inside a master (normal) form. Grids are a type of form which presents data in a tabular format consisting of columns and rows. The grid object in a master form offers controls to add and delete rows in a grid. It also displays the results of aggregate functions (such as the sum function) in the grid form.
grid object embeds an existing grid form inside a master (normal) form. Grids are a type of form which presents data in a tabular format consisting of columns and rows. The grid object in a master form offers controls to add and delete rows in a grid. It also displays the results of aggregate functions (such as the sum function) in the grid form.
Note that the grid form must already exist before it can be embedded in the master form, so create the grid form before trying to define a grid object in a master form. The grid object adds certain controls, but the width and appearance of grids are defined in their separate form.
Any changes to grids, such as inputting data and adding and deleting rows, are not saved until the master form is submitted (either by clicking a submit button or by clicking the Next Step link in a form whose Next Step Link property is set to the option "Save & Continue").
Note: It is not possible to add more than 30000 rows in a Grid.
Creating a Grid
- Go to DYNAFORMS
- Select Blank Dynaform and a new window with the information of the new Dynaform will display. On the dropdown selectGrid as the image below
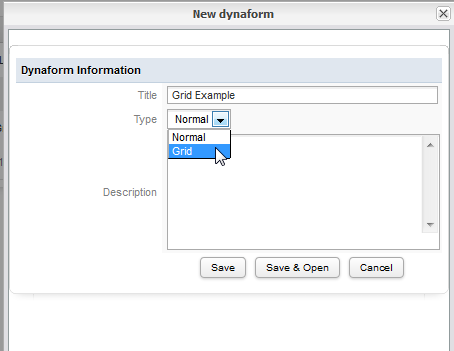
Click Save and Open if the new grid will be edited or save to edit the grid later.
Grid Editor Toolbar
The Grid Editor provides the same toolbar than the Dynaform editor toolbar, the difference is the grid editor toolbar has less buttons to add. Similarly to the Dynaform editor, this grid editor manage objects so they can be added whether using the Preview mode, editing code, viewing the field list, or setting the form properties. Unlike the Process Map toolbar which uses drag-and-drop icons, the icons in the Grid Editor toolbar are activated by a single mouse click over the icons.
![]()
Note: Check on each description the version on which each object is available.
 Save. Click to save the Grid.
 Save as. Click to save a copy of the Grid.
 Text Field. Add a textbox to the Grid, which is designed to input one line of text.
 Currency. Add a currency textbox to the Grid, which restricts the input to numbers.
 Percentage. Add a percentage textbox to the Grid, which restricts the input to numbers to form percentages.
 Textarea. Add a textarea to the Grid, which is designed to input more than one line of text into a form. The number of lines and width of the textarea can be specified, and scrollbars will automatically appear to allow for greater space if more text is entered.
 Dropdown. Add a dropdown box to the Grid. Dropdown boxes allow the user to select from a list of predetermined options which drop down. They occupy less space than a listbox, but only allow a single value to be selected.
 yesno. Add a Yes/No dropdown box, which is designed to present a binary "Yes"/"No" option to the user. Unlike checkboxes, Yes/No dropdowns can be used in grids.
 Date. Add a date selector to the Grid, which does not allow the user to directly enter the date like a normal textbox. Instead clicking on the box opens a calendar where the user can select the date. This helps standardize date formats and eliminates many careless errors. Date selectors also offer another button to clear the date.
 Hidden. Add a hidden field to the DynaForm. Hidden fields allow for unseen variables to be added to the DynaForm. They are often used when needed to pass extra data to JavaScripts or when needing a space to store data which shouldn't be seen by the user.
 Link. Add a link to the Grid. Links can either be hyperlinks to external web pages, or an internal link to another DynaForm.
 File. Add a file to the Grid, which provides a dialog box to upload a file. The files can either be an Input Document (since version 1.2-2467) or an undetermined file.
 Checkbox. Available from version 2.0.38. Add a checkbox field to the Grid. Checkboxes offer a binary on/off choice and are square in appearance with a check mark when activated (on). Checkboxes are convenient for allowing users to activate an option with a single click of the mouse and they are recommended over Yes/No dropdown boxes in most cases.
 Suggest Box. Available from version 2.5. Add a suggest box to the Grid. A Suggest box allows any value to be entered into the field like a traditional textbox, but they also provide a list of suggested values which is filtered as the user types.
- Files. Available from version 2.5. File objects allow files to be uploaded to a DynaForm and attached to the current case. Clicking on a file object opens a dialog box to upload a file. For each row added on a grid a new File could be added.
Grid Properties in a Dynaform
- Field Name *Required
- Grid
- Add new rows
- Delete rows
Grid property
Selects an existing grid form to embed in the master (normal) form.
XML Definition:
- <NAME type="grid" xmlgrid="PROCESS-UID/GRID-FORM-UID" ...>...NAME>
Add new rows
If activated, this option places a New link in the upper left corner of the grid, which allows users to add new rows (records) to the grid form.
XML Definition:
- <NAME ... addrow="0|1" ...>...NAME>
Delete rows
Adds a Delete link to the right of each row, allowing the user to delete rows in the grid.
XML Definition:
- <NAME ... deleterow="0|1" ...>...NAME>
Remember that it is NOT possible to delete the first row of a Grid, if you are trying to delete it the following message will display:
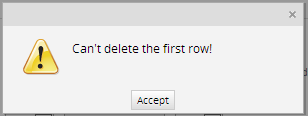
However, from version 2.5.2, the delete row option will clear data from the last grid row left, so If you click on Delete the following message will display:
![]()
Define a grid as view mode
If you embed a grid inside the master dynaform, by default the following attributes will be:
btn_cancel="Cancel" required="0" readonly="0" savelabel="0"/>
But what happen if you need to reuse the grid in other dynaform and display data inserted as view mode? ... As you can see, there's no mode attribute inside, so at the end of the attributes add mode='view' the grid will display as follows:

Aggregate functions
| Used by: textbox, currency, percentage. |
Aggregate functions can be added to fields in grid form to sum or calculate the average of a column of numbers in a grid. The aggregate functions only display their calculations when a grid form is embedded in a master form.
If a grid field contains in its XML definition function="sum", the entire column will be summed and the result displayed below the column with the ? sign. Likewise, if function="avg", the column will be averaged and the result displayed with the X sign. (Currently sum and avg are the only two available aggregate functions.)
XML Definition:
- <dynaForm type="grid" ...>
- <NAME type="text|currency|percentage" ... function="sum|avg" ...>...</NAME>
- </dynaForm>
The results of these sum and average calculations are rounded to two decimal digits. They are stored in a hidden field with the ID "form[SYS_GRID_AGGREGATE_grid-name_field-name]". They are displayed in text with the ID "form[SYS_GRID_AGGREGATE_grid-name__field-name]". Note the double underscore between the grid and field names. They can be accessed through their ID with JavaScript. For example, the field named "MyField" in a grid named "MyGrid" could be accessed:
var y = getField("SYS_GRID_AGGREGATE_MyGrid__MyField").innerHTML;
If the result needs to be used in a later trigger or condition, the case variable @@SYS_GRID_AGGREGATE_MyGrid_MyField will be created when the DynaForm is submitted.
Formulas
| Used by: textbox, currency, percentage. |
Textboxes, currency boxes and percentages boxes which are in grids can have their values calculated by custom formulas. The formulas can include numbers and standard mathematical operators for addition +, subtraction -, multiplication *, division /, and modulus % (remainder from division), as well as parentheses () to group operators. The values stored in textboxes, currency boxes, percentage boxes and dropdown boxes can also be referenced in the formulas through their field names, as long as their values are numerical. If the contents of a referenced field are non-numerical characters, the field with the formula will display "NaN", which stands for "Not a Number". Only fields which are in the same row in the grid can be referenced in formulas.
The formulas can NOT include incrementors ++, decrementors --, literal strings, function calls such as Math.pow(), nor mathematical constants such as Math.PI. Fields which contain unrecognized elements will be displayed as blank. The formulas round their results to two decimal digits. The results will be displayed, ignoring the settings in the mask, validate, read-only and mode properties. The user, however, can enter input into the field, overwriting the results. Set the fields to read-only to prevent the user from changing the results of formulas.
To add a formula to a textbox, currency or percentage box, edit the XML definition of the field to add the formula.
XML Definition:
- <dynaForm type="grid" ...>
- <NAME type="text|currency|percentage" ... function="FORMULA" ...>...</NAME>
- </dynaForm>
Examples:
- formula="3.14 * radius * radius"
- formula="Price * (Quantity + 2)"
- formula="(total+400.35)/2 - discount*0.15"
Redisplaying Grid Data
With normal fields, the data in a field from one DynaForm can easily be redisplayed in a later DynaForm simply by reusing the same field name. For instance, DynaForm_1 has the fields "LastName", "FirstName", "Address" and "City". If the data from the fields "LastName" and "FirstName" need to be displayed in DynaForm_2, then simply create two fields in that form named "LastName" and "FirstName".
The same principal applies when redisplaying grid data from one DynaForm to a subsequent DynaForm. To redisplay the grid data from a previous DynaForm, embed a grid object using the same field name as in previous DynaForm. Moreover, the field names inside of the grid also have to be the same as in the previous DynaForm, in order for the data to be properly redisplayed. If the grids in the two DynaForms have exactly the same structure, then the same grid form can be embedded in both master DynaForms.
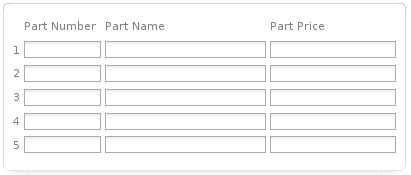
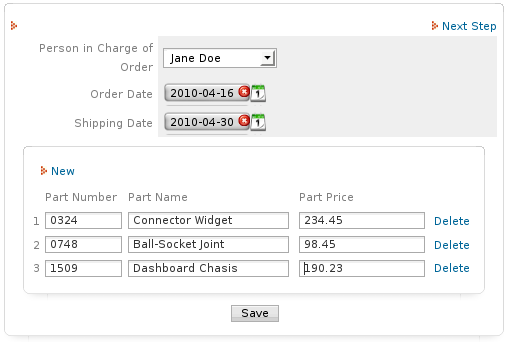
For example, a company needs to display the details of a parts order in multiple DynaForms in a process. The following grid DynaForm named "PartsGrid" is created, containing fields named "PartNumber", "PartName" and "PartPrice":
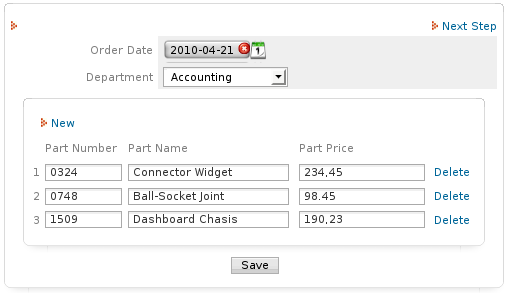
In the first master DynaForm, a grid object is created with the field name of "PartDetails" and it is based on the grid form "PartsGrid":
To redisplay the data from that grid in a subsequent master DynaForm, a grid object is created with the same field name "PartDetails" and it is also based on the same grid form "PartsGrid":
It is also possible to redisplay grid data in subsequent DynaForms, when the structure of the grid is different. In this case, the data will be transfered from one grid to a subsequent grid as long as the same field names are maintained inside both grids. If the field names inside the subsequent grid are different, then the data from the first grid will not be redisplayed in the second grid.
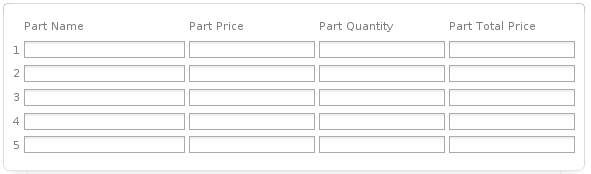
For instance, the company in the previous example needs to redisplay the same grid data, but remove the field "PartNumber" and add the fields "PartQuantity" and "PartTotalPrice" to the grid in the second DynaForm. A second grid DynaForm named "OrderPartsGrid" is created containg the fields "PartName", "PartPrice", "PartQuantity", "PartTotalPrice":
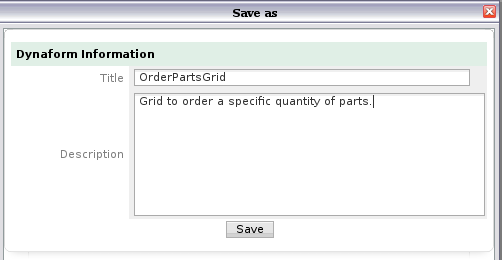
To create this second grid DynaForm in version 1.2-2985 and later, open the "PartsGrid" DynaForm and click on the ![]() Save As button. Give it the name "OrderPartsGrid" and then save the new grid DynaForm.
Save As button. Give it the name "OrderPartsGrid" and then save the new grid DynaForm.
Then open the "OrderPartsGrid" form and remove the "PartNumber" field and add the "PartQuantity" and PartTotalPrice" fields.
If using a version prior to 1.2-2985, which doesn't have the ![]() Save As option, copy the XML code for the fields "PartName" and "PartPrice" from the first grid DynaForm to the second grid DynaForm.
Save As option, copy the XML code for the fields "PartName" and "PartPrice" from the first grid DynaForm to the second grid DynaForm.
Then go to the second master DynaForm and create a grid object with the same field name of "PartDetails". However, this grid object is based upon the "OrderPartsGrid", rather than the "PartsGrid":
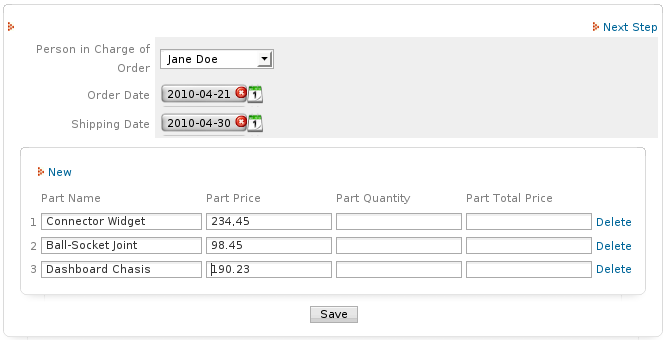
Now the data entered into the fields "PartName" and "PartPrice" is redisplayed in the second master DynaForm, but the data in the fields "PartQuantity" and "PartTotalPrice" is new.
HTML in Grids
Even HTML tab is available until version 2.0.45 this tab is ineffectual, since it is not possible to modify HTML inside grids. Grids are tables structured so the size of their fields will will depend on the size you set on their XML attributes; if the grid is larger than the Dynaform, you must adjust the size of the Dynaform master modifying the XML as follows:
mode="" nextstepsave="prompt" printdynaform="0">
That is the header of the Dynaform, so modify the width according to your needs.
From version 2.5 html tab was removed, and the grid width can be adjust with the width of the main form, by going to the properties of the main Dyanform where grid was embedded.
Conditions Editor Tab
Although this tab was included inside the grid editor, it was not working properly. Check this documentation if you need to use the Conditions Editor.
Note: To avoid confusions, form version 2.5.2 this tab was removed from the grid designer.

Accessing Grids with JavaScript
Grids are constructed inside an HTML whose id is the field name for the grid object found inside the master DynaForm. To access the grid with JavaScript, use the field name for the grid object in the master DynaForm, not the name of the grid form.
Note: JavaScript code must be added inside the master form not inside the grid form.
A field inside a grid has an id like: form[grid-name][row-number][field-name]
Where:
- grid-name is the name of the grid object in the master DynaForm.
- row-number is an integer which starts counting from the number 1.
- field-name is the name of a field in a grid row.
For example: form[clientsGrid][2][clientName]
A field in a grid can be accessed as:
Or:
Or:
To get the value of a grid field:
Or:
Or:
To set the value in a grid field:
To get the number of rows in a grid:
To get the value of an aggregate function (such as sum or avg) for the column of a grid field:
To set the value of an aggregate function for the column of a grid field, both the hidden field where the value is stored and the text where the value is displayed have to be set:
getField("SYS_GRID_AGGREGATE_grid-name__field-name").innerHTML = "x";
Note the double underscore in the name of the hidden field.
Examples
See the example code to set a grid to view mode and Customized Messages for Required Fields.
Hiding a Grid
It is possible to hide or show the table which holds a grid with the standard hidden(), hiddenById(), visible(), and visibleById() functions. For example to hide a grid "myGrid" whenever a checkbox named "myCheckbox" is checked:
if (getField("myCheckbox").checked)
hiddenById("myGrid");
else
visibleById("myGrid");
}
leimnud.event.add(getField("myCheckbox"), 'change', hideGrid);
hideGrid(); //execute when the DynaForm first loads
However, the hidden() and visible() functions will only hide the table holding the grid and not the frame around it. The frame is found inside of an HTML DIV with a class name of "grid", so it is possible to hide a grid by setting the display property of this DIV to "none". Use the getElementsByClassNameCrossBrowser() function to find the grid.
In this example, the first grid in a DynaForm is hidden whenever a checkbox named "myCheckbox" is checked:
var elements = getElementsByClassNameCrossBrowser("grid", null, "div");
if (getField("myCheckbox").checked)
{
elements[0].style.display="none";
hiddenById("myGrid");
}
else
{
elements[0].style.display="";
visibleById("myGrid");
}
}
leimnud.event.add(getField("myCheckbox"), 'change', hideGrid);
hideGrid(); //execute when the DynaForm first loads
To hide the second grid in a DynaForm use elements[1]; for the third grid use elements[2]; etc.
Hiding/Showing a grid column
The entire column in a grid can be hidden by setting style.display to "none" for the table cells which hold the grid field in each row. Likewise, the same table cells can be redisplayed by setting style.display to "" (empty string).
For example, when the user selects the option "email_client" in the "contactMethod" dropdown box, the "emailAddress" column is displayed in a grid named "contactsGrid". If any other option is selected in the dropdown box, then the "emailAddress" column is hidden in the grid.
var display = '';
//find the column number for the emailAddress field:
var colNo = getGridField("contactsGrid", 1, "emailAddress").parentNode.cellIndex;
rows = document.getElementById("contactsGrid").rows;
if (getValueById("contactMethod") == 'email_client')
display = 'none';
for (i=0; i < rows.length; i ++)
rows[i].cells[colNo].style.display= display;
}
To create a generic function to hide a column:
var colNo = getGridField(gridName, 1, fieldName).parentNode.cellIndex;
rows = document.getElementById(gridName).rows;
for (i=0; i < rows.length; i ++) {
rows[i].cells[colNo].style.display= "none" ;
}
}
hideColumn('usersGrid', 'selectUser'); //call the function
Summing a grid column
ProcessMaker provides a way to sum or take the average of a currency or percentage column in a grid. However, JavaScript code needs to be added if only summing certain fields based upon a condition.
In the following example of a grid named "expensesGrid", only the "amount" fields should be summed, if the "select" field is checked. In this example, the calculateTotal() function is called when any value inside the grid changes. All grid fields are placed inside an HTML table whose ID is the name of the grid field, so it can be accessed withdocument.getElementById("table-name")
var nRows = Number_Rows_Grid("expensesGrid", "amount");
var total = 0;
for (var i = 1; i <= nRows; i++) {
if (getGridField("expensesGrid", i, "select").checked &&
getGridField("expensesGrid", i, "amount").value != "")
{
total += parseFloat(getGridField("expensesGrid", i, "amount").value);
}
}
getField("total").value = total;
};
document.getElementById("expensesGrid").onchange=calculateTotal; //execute when value in grid's HTML table changes
calculateTotal(); //execute when DynaForm loads
Remember: Grids are referenced in JavaScript by the name of the field which holds the grid embedded in the master form. Do NOT use the name of the separate grid form.
Advanced calculations with grid columns
The following function calculates the compound annual growth rate for a grid which contains the fields "Date" and "Amount":
var totalRows = Number_Rows_Grid("MyGrid", "Date");
if (totalRows < 2) // can't calculate the CAGR without at least two dates
return 0;
var startDate, endDate, curDate, startAmt, endAmt;
//Loop to find the starting and ending dates
for (var i = 1; i <= totalRows; i++)
{
curDate = new Date(getGridValueById("MyGrid", i, "Date"));
if (!startDate || curDate.getTime() < startDate.getTime())
{
startDate = curDate;
startAmt = parseFloat(getGridValueById("MyGrid", i, "Amount"));
}
if (!endDate || curDate.getTime() > endDate.getTime())
{
endDate = curDate;
endAmt = parseFloat(getGridValueById("MyGrid", i, "Amount"))
}
}
//calculate difference between startDate & endDate as a fraction of a year
//1 year = 365 days * 24 hours * 60 minutes * 60 seconds * 1000 milliseconds
var diff = endDate.getTime() - startDate.getTime();
diff = diff/(365 * 24 * 60 * 60 * 1000);
return Math.pow(endAmt/startAmt, 1/diff) - 1;
}
Changing the color to draw attention
If needing to change the color to draw the user's attention, the style of objects in the grid can be changed. In this example, the font color of the "amount" field in a grid named "expensesGrid" is changed to red if it's value is over 500.
The highlightOvercharge() function is called when the value of a grid field changes.
function highlightOvercharge() {
var nRows = Number_Rows_Grid("expensesGrid", "amount");
for (var i = 1; i <= nRows; i++) {
if (parseFloat(getGridField("expensesGrid", i, "amount").value) >= 500)
getGridField("expensesGrid", i, "amount").style.color = "red";
else if (getGridField("expensesGrid", i, "expAmount").value == '')
getGridField("expensesGrid", i, "amount").style.color = "black";
else
getGridField("expensesGrid", i, "amount").style.color = "black";
}
};
document.getElementById("expensesGrid").onchange = highlightOvercharge; //execute when value of field in grid changes
highlightOvercharge(); //execute when DynaForm loads
}
To change the border color of a grid field to red:
To change the background color of the entire row to red:
Adding Grid Rows
The grid.addGridRow() method can be used to add rows to grids. To obtain the grid object, use the getObject() function.
For example, to add a row to a grid named "accountsGrid" when the user clicks on a button named "addRow":
getObject("accountsGrid").addGridRow();
}
Executing Code When Adding a Row
To make code execute when a row is added to a grid, set an event handler for the grid's onaddrow event. The row number of the new row is passed as the first parameter to the event handler function. The grid object can be referenced as: grid_grid-name
Note: In order to execute onaddrow event, it must be assigned when the Dynaform is loading (dynaformOnload), otherwise it won't work.
For example, when a new row is added to a grid named "ExpGrid", this code copies the value from the "ExpDate" field in the previous row to the "ExpDate" field in the new row:
grid_ExpGrid.onaddrow = function(iRow) {
getGridField("ExpGrid", iRow, "ExpDate").value = getGridField("ExpGrid", iRow-1, "ExpDate").value;
}
}
For example, each row in a grid named "ExpGrid" has a yes/no box named "approved" and a textarea named "comments". When the user selects "yes" in the "approved" box, the "comments" field for that row will appear. When selecting "no", the "comments" field will disappear for that row:
function showHideComments(iRow) {
if (getGridField("ExpGrid", iRow, "approved") == "1")
visible(getGridField("ExpGrid", iRow, "comments"));
else
hidden(getGridField("ExpGrid", iRow, "comments"));
}
//When form loads, loop through all existing rows, setting the event handler for "approved":
var totalRows = Number_Rows_Grid("ExpGrid", "approved");
for (var iRow = 1; iRow <= totalRows; iRow++) {
getGridField("ExpGrid", iRow, "approved").onchange = function(iRow) {
if (getGridField("ExpGrid", iRow, "approved") == "1")
visible(getGridField("ExpGrid", iRow, "comments"));
else
hidden(getGridField("ExpGrid", iRow, "comments"));
}
}
//set the event handler when the user adds a row:
grid_ExpGrid.onaddrow = function(iRow) {
getGridField("ExpGrid", iRow, "approved").onchange = function(iRow) {
if (getGridField("ExpGrid", iRow, "approved") == "1")
visible(getGridField("ExpGrid", iRow, "comments"));
else
hidden(getGridField("ExpGrid", iRow, "comments"));
}
}
}
var dynaformOnload = whenReady;
Note: If error messages appear indicating that fields don't yet exist, try enclosing the code inside the dynaformOnload variable, to ensure that the DynaForm has fully loaded before trying to set the event handler.
Deleting Grid Rows
The grid.deleteGridRow() method can be used to delete rows to grids. The first parameter is the row number to delete and the second parameter is a boolean indicating whether to display a confirmation message to the user to delete the row. To obtain the grid object, use the getObject() function. Note that the first row in a grid can not be deleted, so its fields can only be set to empty strings.
For example, to delete the last row in a grid named "accountsGrid" without a confirmation message.
getObject("accountsGrid").deleteGridRow(lastRow, true);
Executing Code When Deleting a Row
To make code execute when a row is deleted (either by a user or by a script), set an event handler for the grid's ondeleterow event:
... // code to execute when row is deleted
}
Note: If error messages appear indicating that fields don't yet exist, try enclosing the code inside the dynaformOnload variable, to ensure that the DynaForm has fully loaded before trying to set the event handler.
Changing the Numbers Labeling Rows
The number labeling each row is located inside a table cell whose class is named "GridLabel". The getElementsByClassNameCrossBrowser() function can be used to obtain all the cells in the grid table which hold the row numbers.
For example, to remove the numbers labeling each row in the grid, set an event handler for the onaddrow event which removes the numbers. For example to remove the row numbers in a grid named "ExpGrid":
var rowNoCells = getElementsByClassNameCrossBrowser("GridLabel", getField("ExpGrid"), "td");
var len = rowNoCells.length;
for (var i = 0; i < len; i++) {
rowNoCells[i].innerHTML = '';
}
}
removeRowNos();
grid_MyGrid.onaddrow = removeRowNos;
The cell holding the row number can also be accessed as cell 0 from row 1 on in the table holding the grid. For example, to set the first row in a grid named "ExpGrid" to have the label "A" instead of the number "1":
For example, a grid named "carPartsGrid" is populated with a list of car parts when its DynaForm loads. Each row has a hidden field named "serialNo". The following code replaces all the row numbers with the serial number for each car part when the DynaForm loads:
for (var i = 1; i <= totalRows; i++) {
document.getElementById("carPartsGrid").tBodies[0].rows[i].cells[0].innerHTML =
getGridField("carPartsGrid", i, "serialNo").value;
}
Setting Styles of Grid Fields in a Column
If the grid fields in a column need to use certain style setting, such as the font family, font size, font color, background color, alignment, etc., then all the fields in that column need to have their .style object modified. First, use a for loop to set the style of all the field in the existing rows. Then, use the onaddrow() method to set the style for any new rows which are added by the user.
For example, if the "amount" field in a grid named "ExpensesGrid" needs to have its font changed to Courier, its font size set to 10pts, its font color changed to red, its background color changed to yellow, and its alignment changed to right:
obj.style.fontFamily="Courier";
obj.style.fontSize="10pt";
obj.style.color="red";
obj.style.backgroundColor="yellow";
obj.style.textAlign="right";
}
//change style in existing rows:
var totalRows = Number_Rows_Grid("ExpensesGrid", "amount");
for (var i = 1; i <= totalRows; i++) {
setStyles(getGridField("ExpensesGrid", i, "amount"));
}
//set field style for any new rows added by user:
grid_ExpensesGrid.onaddrow = function(iRow) {
setStyles(getGridField("ExpensesGrid", iRow, "amount"));
}
Using Row Numbers
If needing to know which row the user is currently interacting with, then set an event handler for the grid fields which examines the id of the current field to extract the row number from theid. The row number can be found with this code in an event handler:
For example, a grid named "orderItems" has an "amount" field and a "subtotal" field. To make the "subtotal" field automatically calculate the "amount" in the current row plus the "amount" in the previous row, create an event handler function addAmounts() which references the row number and adds the amounts:
var iRow = parseInt(this.id.match(/\]\[(\d+)\]\[/)[1]);
if (iRow > 1) { //if not the first row, then add:
var cur = parseFloat(this.value);
var prev = parseFloat(getGridField("orderItems", iRow - 1, "amount").value);
getGridField("orderItems", iRow - 1, "subtotal").value = cur + prev;
}
}
//set event handler for all existing rows in the grid:
var totalRows = Number_Rows_Grid("orderItems", "amount");
for (var i = 1; i <= totalRows; i++) {
getGridField("orderItems", i, "amount").onchange = addAmounts;
}
//set event handler for fields in rows which are added:
grid_orderItems.onaddrow = function(rowNo) {
getGridField("orderItems", rowNo, "field1").onchange = addAmounts;
}
Maximum Number of Rows in a Grid
To set a maximum of rows in a grid, replace the onclick event handler for the "New" link in a grid. For example to limit the "clientsGrid" to a maximum of 3 rows:
if (Number_Rows_Grid("clientsGrid", "firstName") < 3)
getObject("clientsGrid").addGridRow();
else
alert("No more than 3 clients are allowed!");
}
Accessing Grids with PHP
When a master DynaForm is submitted which contains a grid object, a case variable is created for the grid with field name of the grid object found in the master DynaForm. This case variable contains an associative array of associative arrays. The outer associative array has keys which start counting from the number 1 (not 0 like a normal array). Each row in the grid is stored as an inner associative array where the grid field names are the keys and the entered data are the values.
Remember: The grid case variable will NOT use the name the grid form. Instead, it uses the field name of the grid object found in the master DynaForm.
Reading from Grids
To access the value stored in a particular field in a grid, reference it as:
Remember:
- The case variable for a grid is the name of the grid field which is embedded in a master DynaForm.
- The row numbers start counting from the number 1 (not 0 like a normal array).
- The names of grid fields are case sensitive and they are strings which must be enclosed in quotation marks.
For example, to read the values stored in grid fields named "model", "price" and "quantity" in the first and second rows of a grid named "OrderList":
$price1 = @=OrderList['1']['price'];
$quantity1 = @=OrderList['1']['quantity'];
$model2 = @=OrderList['2']['model'];
$price2 = @=OrderList['2']['price'];
$quantity2 = @=OrderList['2']['quantity'];
Looping through a Grid
Use a for or foreach loop to pass through each row in the grid and read its values.
For example, this trigger code sends an email to supervisor if the "price" in any row in the "OrderList" grid is greater than $300:
for ($cnt = 1; $cnt <= $tot; $cnt++) {
if (int(@=OrderList[$cnt]['price']) > 300) {
PMFSendMessage(@@APPLICATION, "admin@example.com", "supervisor@example.com",
"", "", "Please verify large order", "expensiveOrder.html");
break;
}
}
The same code can be written more simply with a foreach loop:
if (int($row['price']) > 300) {
PMFSendMessage(@@APPLICATION, "admin@example.com", "supervisor@example.com",
"", "", "Please verify large order", "expensiveOrder.html");
break;
}
}
Writing to Grids
To change the values of grid fields, simply assign new values to the fields.
For example, if a grid named "OrderList" has the fields named "model", "price" and "quantity", then the values in the first two rows of the grid can be set in a trigger:
@=OrderList['1']['price'] = 0.99;
@=OrderList['1']['quantity'] = 3;
@=OrderList['2']['model'] = 'Acme White-Out';
@=OrderList['2']['price'] = 2.05;
@=OrderList['2']['quantity'] = 2;
Appending New Rows
New rows can be appended to grids by adding associative arrays with the field names as the keys. For example:
@=OrderList[$maxRowNo + 1] = array('model'=>'Sharpie Pencil Pack', 'price'=>1.59, 'quantity'=>5);
@=OrderList[$maxRowNo + 2] = array('model'=>'Precision 12in Ruler', 'price'=>2.79, 'quantity'=>1);
Inserting New Rows
New rows can be inserted into grids, but the subsequent rows will have to be renumbered.
For example, to insert a new row as the fourth row, the current fourth row will need to be renumbered as the fifth row and all subsequent rows will need to increase their keys by 1 as well:
$newRow = array('model' => @@NewModel, 'price' => @#NewPrice, 'quantity' => @%NewQuantity);
$totOld = count(@=OrderList); //total rows in the old grid
$iOld = $iNew = 1; //incrementers for old and new grids
$newGrid = array();
for (; $iOld <= $totOld; $iOld++, $iNew++) {
if ($iOld == 4)
$newGrid[$iNew++] = $newRow;
$newGrid[$iNew] = @=OrderList[$iOld];
}
@=OrderList = $newGrid;
To insert a new row, maintaining alphabetical order in the "model" field:
$totOld = count(@=OrderList); //total rows in the old grid
$iOld = $iNew = 1; //incrementers for old and new grids
$newGrid = array();
for (; $iOld <= $totOld; $iOld++, $iNew++) {
if (@=OrderList[$iOld]['model'] > $newRow['model'])
$newGrid[$iNew++] = $newRow;
$newGrid[$iNew] = @=OrderList[$iOld];
}
@=OrderList = $newGrid;
Removing Rows From Grids
To remove a particular row from a grid, delete the associative array for the row with PHP's unset() function. Then, all subsequent rows in the grid need to be renumbered.
In this example, the second row in the "OrderList" grid is deleted:
In this example, any rows in the "OrderList" grid whose "amount" field is greater than 100 are removed:
Clearing a Grid
To clear an entire grid, set it to NULL. For example, to clear the "OrderList" grid:
Copying Grids
A grid can be redisplayed in a subsequent DynaForm by reusing the same name for the grid in the subsequent DynaForm. However, if needing to create a second copy of a grid, simply copy the case variable for the grid to another case variable:
If needing to copy fields out of one grid to another grid, then loop through the grid and copy the field values.
For example, the "PriceList" grid has the "modelNo", "description", "supplier" and "listPrice" fields. Using data from the "PriceList" grid, a new grid named "OrderList" needs to be created with fields named "model", "price", and "quantity". The following trigger will loop through the "PriceList" grid, copying the "modelNo" and "listPrice" fields into the "model" and "quantity" fields in the new "OrderList" grid. The "quantity" field will also be created in the new grid, with values which are empty strings.
Populating Whole Grids
A new grid can be populated by assigning an associative array of associative arrays to the case variable for the grid.
For example, to populate a grid named "EmployeesGrid" with the fields "Name", "Salary" and "HireDate":
Setting a Fixed Number of Empty Rows
To force a grid to have a fixed number of empty rows, uncheck the options Add Rows and Delete Rows when defining the grid object, so the user can not change the number of rows in the grid. Then, fire a trigger before the DynaForm, which prepopulates the grid with empty rows:
For example, to populate 3 empty rows in a grid named "EmployeesGrid" with the fields "Name", "Salary" and "HireDate":
The number of rows in a grid can be set by a number from a case variable. For example, if the number of employees was placed in a field named "NumberEmployees" from a previous DynaForm, then a trigger could create that many rows in the "EmployeesGrid":
Populating Grids with a Database Query
A grid can also be populated by a database query, since SELECT statements with executeQuery() return records as an array of associative arrays, which is the same format used by grids. As long as the database has the same field names as the grid field names, the data will be displayed correctly in the grid. Remember that field names are case sensitive.
For example, the values in the "EmployeesGrid" can be set by querying a table named Employees which also has the fields Name, Salary and HireDate.
Remember to assign the result of a SQL query to the name of the grid object which is embedded in a master DynaForm. It is always a good idea to error check the result of a SQL query to make sure that it returns an array with at least one row before assigning it to the grid object. If the database uses different field names than the grid field names, then use AS to rename the fields. For example, if an external database with the table EMPLOYEES contains the fields FULL_NAME, STARTING_SALARY and HIRE_DATE, then those fields can be renamed to match the field names in the “EmployeesGrid”:
Saving Grids to an External Database
To write the rows in a grid to an external database, loop through the grid and use an SQL INSERT statement to write each row to the database. For example, if writing the rows of the "EmployeesGrid" grid to the same external database as in the example above:
foreach (@=EmployeesGrid as $row) {
$query = "INSERT INTO EMPLOYEES (FULL_NAME, STARTING_SALARY, HIRE_DATE) " .
"VALUES ( '{$row['Name']}', {$row['Salary']}, '{$row['HireDate']}' )";
executeQuery($query, $db);
}
Note: The values for character (string), date and datetime fields should be enclosed in single quotation marks. In the above example, the "FULL_NAME" field is a char (string) field, so its value is enclosed in single quotes. The "STARTING_SALARY" field is a floating point number, so its value does not need to be enclosed in quotation marks. The "HIRE_DATE" is a date field, so its value needs to be enclosed in single quotation marks in the format 'YYYY-MM-DD' (which is a format supported by most databases). If the external database is Oracle, then useDATE 'YYYY-MM-DD'
When inserting an element from an associative array inside a double quoted string, the variable needs to be enclosed inside curly brackets:
"...{$variable['element_key']}..."
To enclose that element inside of single quotes as a string, date or datetime value:
"...'{$variable['element_key']}'..."
Using Grids as Serialized Strings
A grid can be converted into a serialized string with PHP's serialize() or json_encode() functions. serialize() is a more accurate way to serialize objects and arrays, but it is only useful, if planning on decoding the serialized string with PHP. To decode the string with another language, such as JavaScript, it is better to use json_encode(), since almost all languages support the JSON format.
Serialization can be useful in a number of situations:
- Saving a grid to a single field in a database.
- Passing a grid to a hidden field in a DynaForm.
- Passing a grid as a GET or POST variable to a WWW form.
- Passing a grid with the getVariables() and sendVariables() web services.
Saving Serialized Grids to Databases
Let's consider the first situation, when needing to store a grid in a single field in a database. Use PHP's serialize() and addslashes() functions to convert the grid into a string that can be saved to a database.
For instance, the following Trigger code stores a grid named "DetailsGrid" to the CONTACTS.CLIENTS.DETAILS field in an external database:
$CaseId = @@APPLICATION; //UID for the current case
$sGrid = addslashes(serialize(@=DetailsGrid));
executeQuery("INSERT INTO CLIENTS (ID, DETAILS) VALUES ('$caseId', '$sGrid')", $db);
Use PHP's unserialize() function to convert a serialized grid back into an array of associative arrays, so it can be assigned to a grid in a DynaForm.
For instance, to retrieve the serialized grid from an external database in the example above and assign it to a grid named "ReviewGrid":
$CaseId = @@APPLICATION; //UID for the current case
$result = executeQuery("SELECT DETAILS FROM CLIENTS WHERE ID='CaseId'", $db);
if (is_array($result) and count($result) > 0)
@=ReviewGrid = unserialize($result[1]['DETAILS']);
Passing Serialized Grids to a DynaForm
If needing to use the data from a grid (or a database query) in a DynaForm, but not wanting to display that grid to the user, it may be useful to pass the grid as a serialized string to the DynaForm. First, create a hidden field in the DynaForm to hold the grid. Then, fire a trigger before the DynaForm is displayed, to convert the grid into a serialized string with json_encode()and save it to the case variable for the hidden field.
For example, a grid named "AccountsGrid" needs to be passed to a hidden field named "sAccounts" in a DynaForm, so that fields from that grid can be used to populate a dropdown box. First, create the following trigger which will be set to fire before the DynaForm is displayed:
Passing Database Queries to a DynaForm
Since database queries returned by executeQuery() have the same structure as grids, the same code above can be used to pass database queries to DynaForms. For example:
if (is_array($result) and count($result) > 0)
@@sAccounts = json_encode($result);
Populating Dropdowns from a Serialized Grid or Query
Then, the following JavaScript code in the DynaForm decodes the JSON string in "sAccounts" field when the DynaForm is loaded. In JSON, there are no associative arrays, so it is decoded as an object of objects for each row in the grid, where each grid field name (and its value) is a member of the object. In this example, the "AccountsGrid" has the fields "accountId" and "accountName", which are used to populate the values and labels of options in the "SelectAccount" dropdown box:
getField("SelectAccount").length = 0; //remove all existing options
var aAccounts = eval('(' + getField("sAccounts").value + ')');
if (typeof aAccounts == 'object') {
var opt;
for (var i in aAccounts) {
opt = document.createElement("OPTION");
opt.value = aAccounts[i].accountId;
opt.text = aAccounts[i].accountName;
getField("SelectAccount").options.add(opt);
}
}
}
Note: Using eval() to decode JSON strings is a possible security hole because it allows for code injection attacks, so it is recommended to use JSON.parse() if the content of a grid is filled by a user. JSON.parse() is available in FireFox 3.5+ and Internet Explorer 8+, but the json2.js code file will have to be imported if using older web browsers.
Populating Grids from a Serialized Grid or Query
Similar code to the above example could be used to populate a grid from a serialized grid or serialized database query. For example, the same trigger code above passes a serialized grid to the hidden field named "sAccounts". Then the following JavaScript code in a DynaForm unserializes the hidden field as an object and uses its information to populate a grid named "newAccountsGrid" which has the fields "accId", "accName" and "createDate":
var grd = getObject("newAccountsGrid");
//remove all existing rows in the grid (except the first one):
var i = Number_Rows_Grid("newAccountsGrid", "accId");
for (; i > 1; i--)
grd.deleteGridRow(i, true);
//The first row can't be deleted, so clear the fields in the first row:
for (i = 0; i < grd.aFields.length; i++)
getGridField("contactsGrid", 1, grd.aFields[i].sFieldName).value = "";
//unserialize the hidden field as an object:
var oAccounts = eval('(' + getField("sAccounts").value + ')');
if (typeof oAccounts == 'object') {
for (var rowNo in oAccounts) {
if (rowNo != 1)
grd.addGridRow();
getGridField('newAccountsGrid', rowNo, 'accId').href = oAccounts[rowNo]["accountId"];
getGridField('newAccountsGrid', rowNo, 'accName').href = oAccounts[rowNo]["accountName"];
getGridField('newAccountsGrid', rowNo, 'createDate').href = oAccounts[rowNo]["created"];
}
}
}
populateGrid(); //execute when the DynaForm loads

