Overview
Titles and subtitles are used to group the fields under headings and provide information to the user as to the purpose of the form.
 Title
Title
A title is text which is designed to provide headings and alert the user to the general purpose of the DynaForm.
Properties
- Name *Required
- Label
- Enable Html
Name
Unlike normal field names, the names of titles and subtitles do not create case variables when the DynaForm is submitted, nor can they be accessed through JavaScript code with the getField() or getElementById() functions like other DynaForm Fields.
Label
By default, labels for titles appear in a light blue (#E0EFE6) background and are left-aligned in bold in 11px Sans Serif, which is the default font for all table elements in a DynaForms. The appearance of titles can be customized by activating the "Enable Html" option, which allows HTML formatting tags to be entered into the Label. For instance, a title's label could be centered and changed to brown and set to size 5 font (on the HTML scale from 1 to 7) with this text:
Title will be as follows:

CSS for Titles
The Enable Html option is good for customizing a single title, but to set a consistent style of titles for all DynaForms, it is recommended to change the Cascading Style Sheet (CSS) definition of form.formDefault .FormTitle in the style.css file for the current skin. For instance, this CSS definition would create the same output as the HTML above:
To set the default text used in forms (including the titles and subtitles), change the CSS definition for form.formDefault table.
 Subtitle
Subtitles are designed to label the minor sections of the form and to give instructions to the user.
Properties
- Name *Required
- Content
- Enable Html
Content
The Content property is the text to display for a subtitle.
A larger area is provided to input this text because subtitles can be used to give detailed instructions to the user and often require multiple lines. For long subtitles, it is a good idea to activate the "Enable Html" option and add HTML paragraphs <p> and line breaks <br> to break up long text.
XML definition:
CSS for Subtitles
By default, subtitles appear in normal-weight 11px Sans Serif font on a light grey (#D1DEDF) background. To customize the appearance of a single subtitle use HTML formatting in its Content, but to set a consistent style for all subtitles edit the Cascading Style Sheet definition of form.formDefault .FormSubTitle in the style.css file for the current skin:
Changing Title Labels with Triggers
If your forms can have multiple purposes depending upon the case, it may be helpful to be able to change the title to the form with PHP code in a trigger. For instance if the XML code for a title appears as:
<en>Purchase Request</en>
</ExpenseTitle>
Remove the title label from the definition and add a label property whose value is assigned by a variable, such as:
</ExpenseTitle>
In this case the label will be set by the variable @#MyTitle. Then create a hidden field by clicking on the ![]() icon and naming it a field name which is the same as the variable, which in this case would be "MyTitle". The hidden field will allow the variable @#MyTitle to be passed to the form.
icon and naming it a field name which is the same as the variable, which in this case would be "MyTitle". The hidden field will allow the variable @#MyTitle to be passed to the form.
Create a trigger which fires before the DynaForm which will set the value of the variable @@MyTitle. For instance, to choose between a title of "Purchase Request" and "Travel Request":
@@MyTitle = "Purchase Request";
else
@@MyTitle = "Travel Request";
Dynamic Titles with JavaScript
With JavaScript, the title of a DynaForm can be changed while using the form. A dynamic title allows the form to respond to the input of the user and adds an extra degree of interactivity.
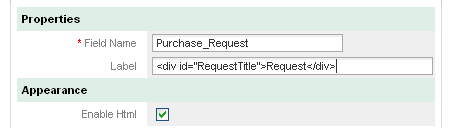
For instance, your "Request" form has a dropdown box named "RequestType" where the user can select the options "Purchase Request", "Travel Request" or "Vacation Request". The title of the form can change to reflect the option selected by the user. In the definition of the title object, activate the option "Enable Html" and change the title Label from "Request" to "Request".
Then create a new JavaScript object by clicking on the JS icon in the toolbar and add the code:
{
if (getField("RequestType").value == "Purchase_Request")
document.getElementById("RequestTitle").innerHTML = "Purchase Request";
else if (getField("RequestType").value == "Travel_Request")
document.getElementById("RequestTitle").innerHTML = "Travel Request";
else
document.getElementById("RequestTitle").innerHTML = "Vacation Request";
}
getField("RequestType").onchange = changeTitle;
Saving the Title Label as a Case Variable
It is possible to save the label of a DynaForm title as a case variable which can later be used in a condition or trigger code.
For instance, to save the title of the "Request" form used in the example above, create a Hidden field named "SaveTitle". Then create a JavaScript object named "SubmitCode" with the following code:
{
getField("SaveTitle").value = document.getElementById("RequestTitle").innerHTML;
return true;
}
leimnud.event.add(getField("RequestSubmit"), 'click', submitForm);
Then create a Submit button for the form named "RequestSubmit" with the property "Javascript to Execute On Click" set to "SubmitCode".

