![]() Plugin Version: 2.5.0
Plugin Version: 2.5.0
Overview
The Multiple Input Document Uploader is a plugin designed to upload one or more documents at the same time by using a user-friendly interface. When the plugin is enabled, a new interface is used for uploading, adding comments and deleting multiple files at the same time. When a file is uploaded as an Input Document, a progress bar is displayed to show what percentage of the file has been uploaded. The interface provides a preview of image files, as well as buttons to delete or cancel the upload of multiple documents at the same time.
The Multiple Input Document Uploader plugin offers the following options in its interface:
- Browse: Use this option to select file(s) to be uploaded in the process.
- Start/Upload All: Use these options to start uploading one or more files at the same time.
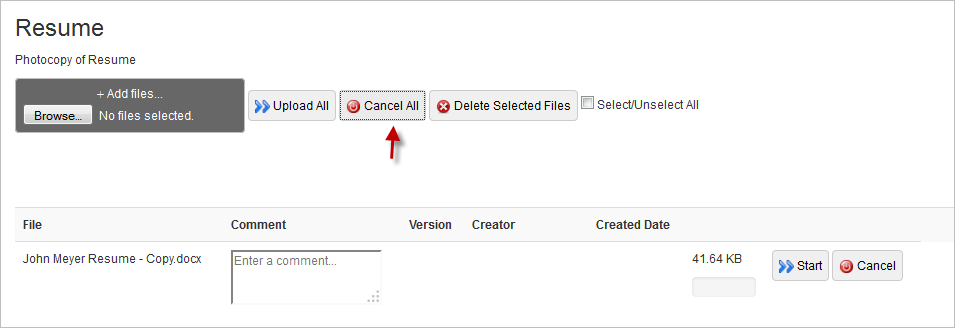
- Cancel/Cancel All: Use this option to cancel one or more uploads.
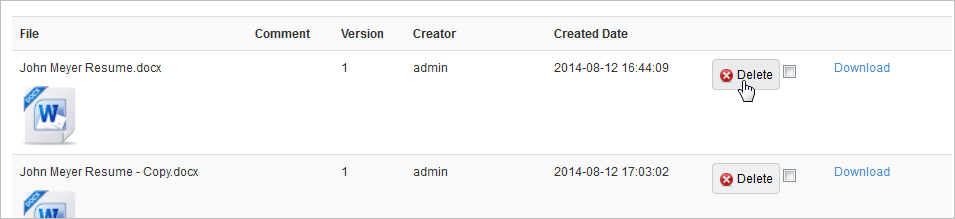
- Delete/Delete Selected Files: This option gives the possibility to delete one or more uploaded files.
In addition, this plugin offers the following options, once Input Document files have been uploaded:
- Versioning If Input Document versioning has been enabled, it will be possible to upload different versions of the same document and review the history of those documents. This will be detailed ahead.
- Multimedia preview: Displays a preview of image files or controls to play audio and video files before they are uploaded as Input Documents. If the file extension for the multimedia file is unknown, the image will be displayed with a question mark in it.
Requirements
ProcessMaker Requirements
- ProcessMaker v. 2.5.0 o later.
- Enterprise Plugin v. 3.0.1.7
Browser Compatibility
- Firefox v.41
- Chrome v.44
- Internet Explorer 11 (under these considerations)
Installation and configuration
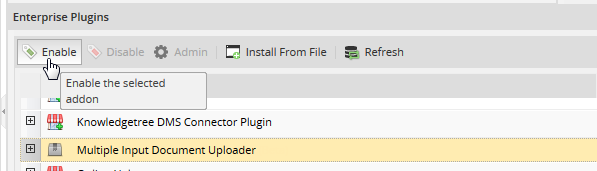
- Import the Multiple Input Document Uploader plug-in on the ADMIN tab.
- Enabled the Plug-in.
Considerations
- Only JPG, PNG and GIF images can be seen in the image viewer.
- Dragging & Dropping documents directly in the interface doesn't work if using Internet Explorer v. 8, 9 and 10.
- The size of the uploaded file is not visible if using Internet Explorer v. 8, 9 and 10.
- Selecting more than one documents to be uploaded at the same time does not work if using Internet Explorer v. 8, 9 and 10, because of a compatibility found between HTML5 and Internet Explorer. There are no problems concerning Internet Explorer v. 11.
- Modify the php.ini configuration file, if planning to upload larger documents.
Using the Multiple Input Document Uploader
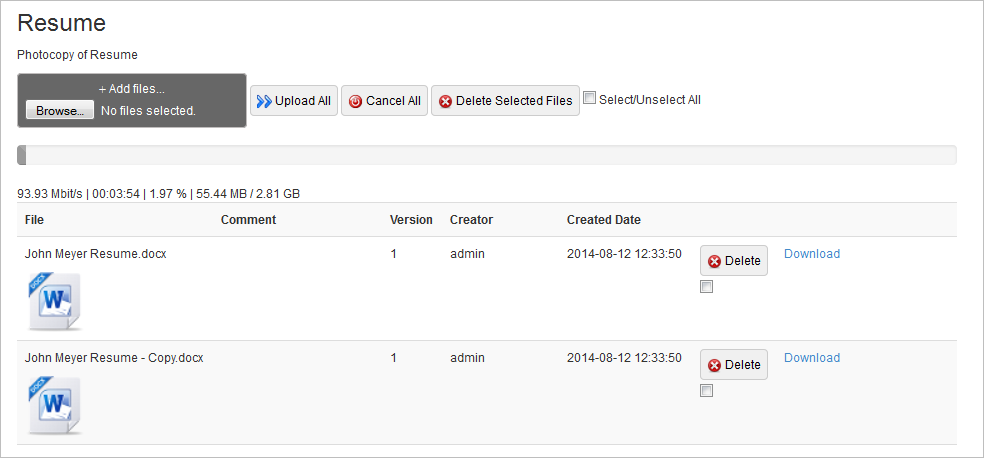
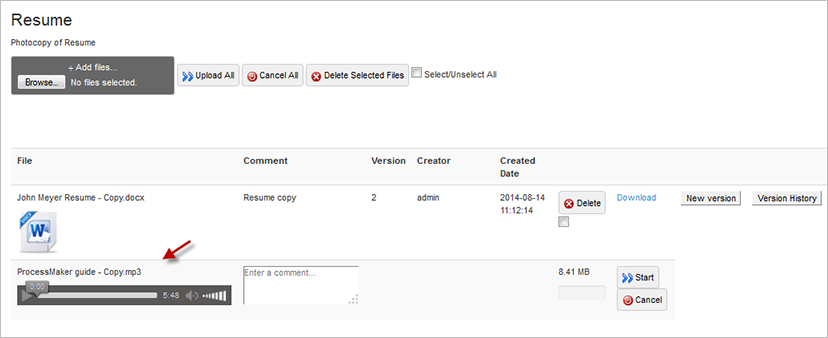
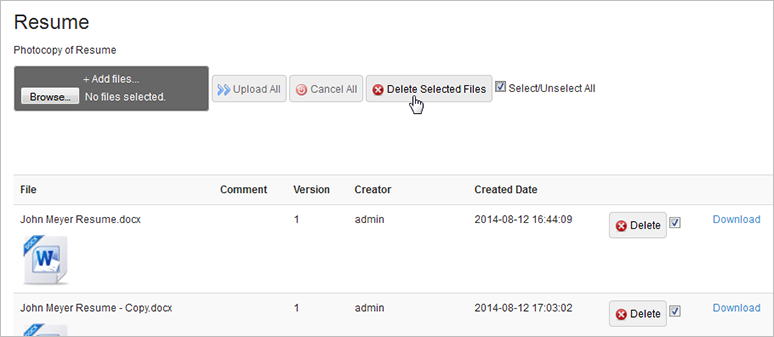
The interface for the Multiple Input Document Uploader plugin is displayed when executing a case with an Input Document step. To use this plugin, create an Input Document and add it as a step in a task. Then execute a case. When the case comes to an Input Document step, the new interface will appear to upload and manage multiple documents at the same time:
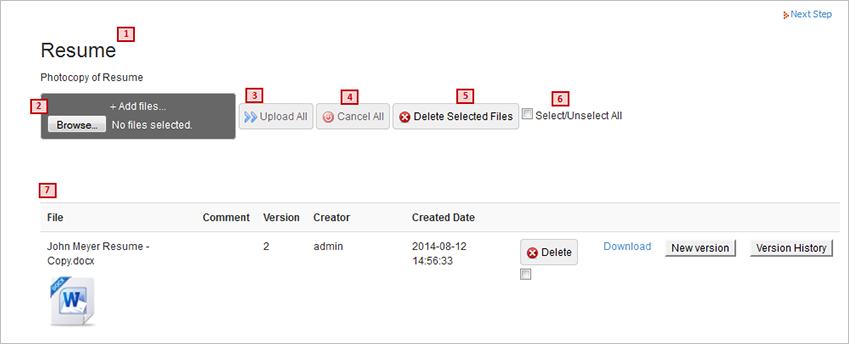
Where:
- Name and description (if existant) of the Input Document.
- Browse: Select file(s) to be uploaded.
- Upload All: Upload all selected files.
- Cancel All: Cancel the upload of all selected files.
- Delete Selected Files Delete all selected files.
- Select/Unselect all Select or unselect all documents in the list. First mark this option to select or unselect files, then click on the Delete Selected Files button.
- List of the Input Document files which have either been selected for upload or have already been uploaded:
- File: Name of the file.
- Comment: Comments introduced when the file was loaded.
- Version: Version of the file.
- Creator: Name of the user who uploaded the file.
- Created Date: Date when the file was uploaded.
- Delete: Option to delete the file.
- Download: Option to download the file.
- New Version: If versioning has been enabled, this option allows a new version of the file to be uploaded.
- Version History: If more than one version of an Input Document file has been uploaded, this option displays a list of the versions of an Input Document file.
Selecting Files
To select a file for upload, click on Browse button and select file(s) from the local computer. Files that have been selected will be displayed in the list of pending files to be uploaded.
In the Comment field, text can be entered to provide more information about the file or it can be left blank. The Version, Creator and Created Date will be filled as soon as the file(s) are uploaded.
Additional Input Document files can be added by clicking repeatedly on the Browse button or by selecting multiple files when browsing for files. To select multiple files, hold down on the CTRL key while selecting the files. To select all the files between two files, first select one file, then select a second file while holding down on the SHIFT key.
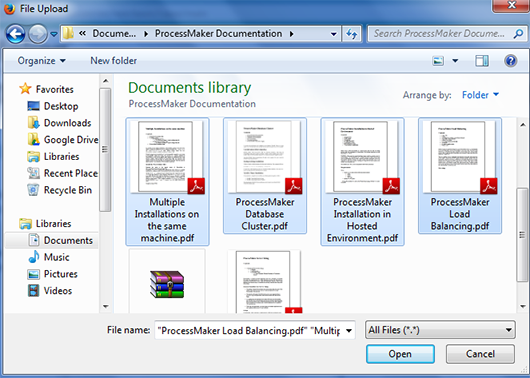
Files can also be selected by opening the file explorer for your computer and dragging files from the file explorer and dropping them in the list of pending files to upload.
The Input Documents files will be listed in the order which they were selected.
Uploading Files
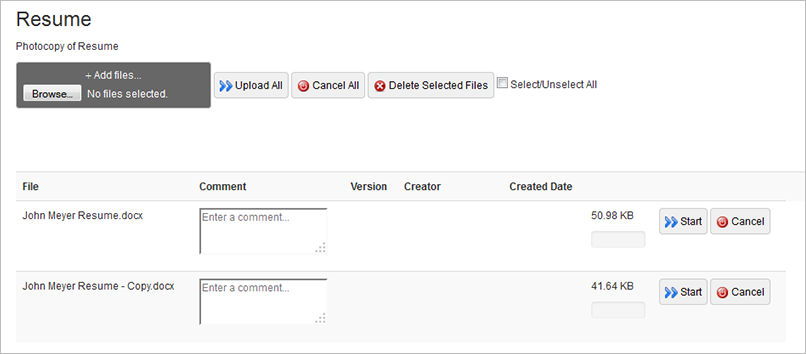
Once an Input Document file has been selected and is displayed in the list, click on the "Start" button to upload it separately.

A progress bar will show the progress of the upload. The following information will be available as soon as the file finishes uploading:

All pending files can be uploaded at the same time by clicking on the "Upload All" button. The progress bar will show the progress of the upload.
Warning: If the Next Step link is clicked while uploading file(s), the following message will be displayed:
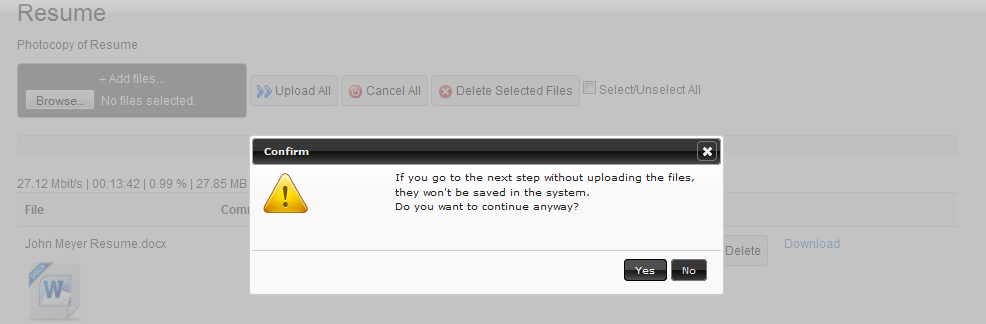
Selecting Yes will cancel the upload, deleting the selected files from the list. If the No option is selected, the files will continue uploading.
Previewing image files
Before an image file is uploaded, a preview of the image will be displayed under the file name. Common image formats such as JPEG, PNG, BMP and GIF are supported.
Double click on the image icon to view the image in its original size. This feature will help users check if the image file being uploaded is the correct one.
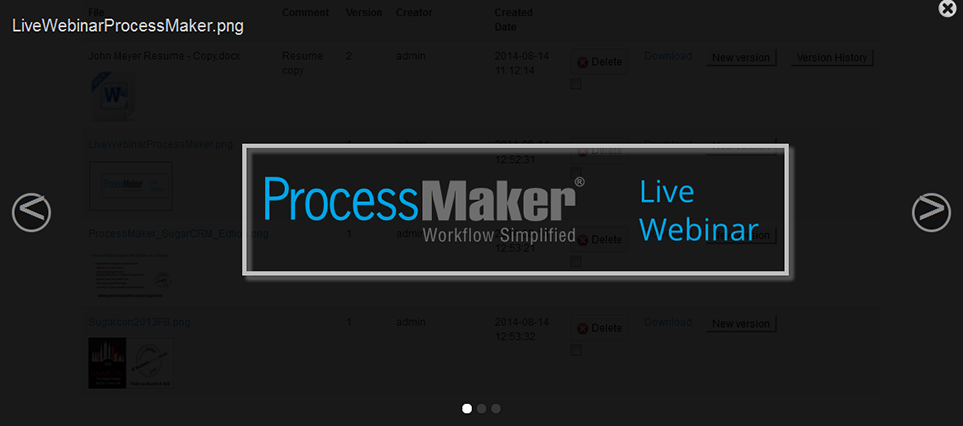
If more than one image file is selected for upload, navigate through them by using the left and right arrows or by clicking on the circles located at the bottom of the viewer:

Close the Image Viewer by clicking on the X option, located at the top-right corner of the screen.
Previewing Video and Audio files
Video and audio files can be played before being uploaded (as long as your web browser is configured to play the multimedia format). Note that once the video or the audio file is uploaded, it can't be reproduced.
Video files will appear with controls to play the video.

Likewise, audio files will display controls so they can be played:
Canceling a file upload
If a file needs to be canceled not only when it is listed in the interface but also while it is uploading, click on its corresponding Cancel option placed on the last column, it will immediately eliminate the file from the list.

Don't spend time cancelling files one by one, click on Cancel all option to cancel the uploading of all files listed in the interface.
Deleting files
Before a file is uploaded, it can be eliminated from the list of pending files, by clicking on its "Cancel" button. After the file has been uploaded, it can be deleted by clicking on its "Delete" button.
Multiple files can be deleted at a time, by marking the "Select/Unselect all" checkbox to select the files:
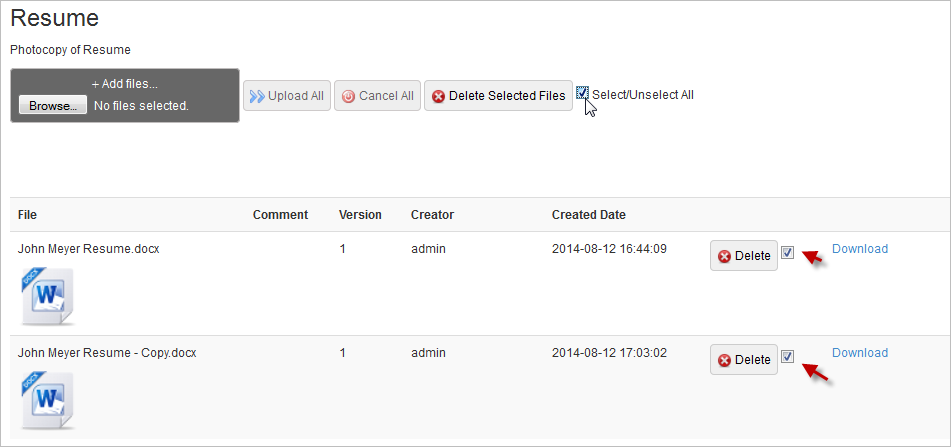
Then click on the "Delete Selected Files" button to delete all files at once:
Note: It is not necessary to add the DELETE permission to have the delete button, since it was required in previous versions of ProcessMaker.
Using Versioning
If versioning is enabled for the Input Document, different versions of the same document can be uploaded. Versioning is useful for maintaining an audit trail and allowing supervisors to see how Input Document files have changed over the course of a case.
If versioning is enabled, the "New Version" button will be displayed next to each document after it has been uploaded:

Click on the "New Version" button and the following window will display:
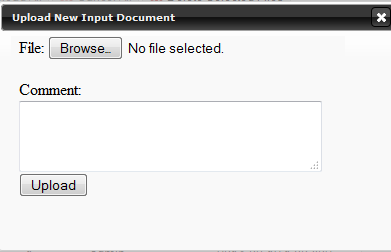
Click on the "Browse..." button to upload a new version of the document, and add comments if needed.
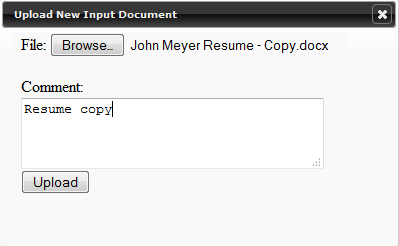
Finally, click on the "Upload" button to add the new version of the document. Note that the last uploaded version will be displayed in the list of files. If multiple versions of an Input Document file have been uploaded, then the "Version History" button will be displayed to the right of the file:

Version History
The Version History shows all versions for an uploaded file. Click on the "Version History" button to see detailed information about the different versions of an Input Document file:
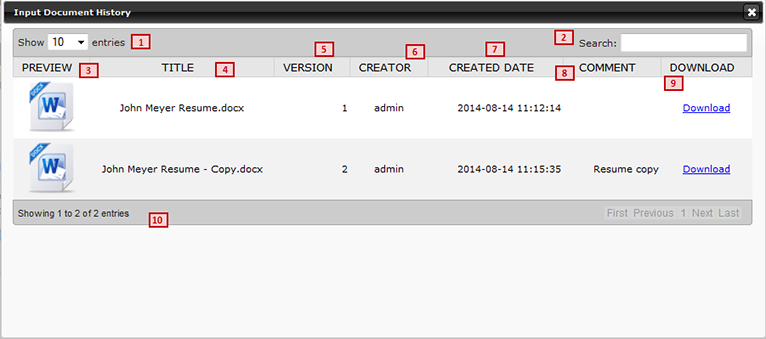
Where:
- Entries Shows the number of versions for an Input Document file. By default, it displays 10 versions per page.
- Search Filters the title of the file to be searched.
- Preview Displays a graphic for the type of file or a preview if an image file.
- Title: Displays the filename of the uploaded file.
- Version: The version number for the uploaded file. Version numbers are incremented by 1 every time a new version of an Input Document is uploaded.
- Creator: Name of the user who uploaded the file.
- Created date: Displays the date and time when the file was uploaded.
- Comment: Displays any comment added when the file was uploaded.
- Download: A link to download the file.
- Only 10 documents will be displayed at a time in the list. If there are more than 10 documents in the list, then use the pagination controls at the bottom of the list to access additional pages of documents.

