Please rate how useful you found this document:
Please rate how useful you found this document:
- Overview
- How the plugin works
- Scopes
- Requirements
- Restrictions
- Recommendations
- Secure Connections through TLS
- Installation and Configuration
- Outlook Configuration
- Install the plugin in ProcessMaker
- Install the Add-In for Outlook
- Reinstalling the Outlook Add-In
- Setup the Add-In for Outlook
- Interaction with Cases Lists
- Running Cases - Cases Menu
- Session Lost
Version: 3.2.0 | Release Notes
Warning: The Microsoft Outlook Connector plugin and the Outlook Add-In are deprecated because Office 365 replaces Outlook. Furthermore, Microsoft Office 365 no longer supports Internet Explorer 11. Therefore, ProcessMaker no longer supports Internet Explorer 11.
Overview
ProcessMaker InOutlook is a plugin created to allow standard ProcessMaker users to use ProcessMaker from within a Microsoft Outlook email client (versions 2013 and 2016) and through the standard browser interface.
How the plugin works
Outlook adds an extra folder labeled ProcessMaker inside Outlook. By clicking on its icon, it shows all user cases sorted into folders, based on the status of each case. This allows working and managing cases just as if the user was logged directly into the ProcessMaker workspace.
Dynaforms are available to the user via the current browser, for the user to interact with them as usual.
Scopes
This plugin allows users to perform only the following tasks from within the Outlook interface:
- Start a New Case.
- Review and attend to existing Cases in the Inbox.
- Save Drafts.
- Review Participated, Paused, and Unassigned Cases.
- All tasks are performed in the same way that they are performed through the web browser. Designers and Administrators should still enter via a web browser to perform their respective tasks.
- Cases Menu with the following options Steps, Information, Actions, Cases Notes.
- The execution of any rules set in the conditions editor
Requirements
- This version plugin is compatible with ProcessMaker Enterprise version 3.3.2 or higher with a proper license.
Supported Stacks
- This version plugin is compatible with PHP5.6.X or PHP 7.1.X.
- See this documentation to view the server configurations which are supported.
Browser Requirements
- See this documentation to view the browsers which are supported.
Restrictions
Please take into consideration the following restrictions:
- The Outlook Add-In is not compatible with Office365 because the Outlook Web Access (OWA) for Office365 has a different management in an Add-In.
- The Outlook Connector plugin does NOT support LDAP users.
Recommendations
- If using Outlook Connector v 2.0.6, please uninstall and reinstall the Add-In to see new added features.
- The Outlook Connector plugin must be updated in the server.
- Clear the ProcessMaker cache server right after installing the new version in the server.
- Even if you have more than one language installed on your server, the Outlook connector plugin will only display English at the moment of configuring the server data.
Secure Connections through TLS
As a security best practice, ProcessMaker recommends configuring only TLS 1.1 and superior for the Web Server API request, which can be set in Apache/NGINX as follows:
- For Apache, in the pmos.conf file, add the following line:
SSLProtocol all -SSLv3 -TLSv1 - For NGINX, in the processmaker.conf file, add the following line:
ssl_protocols TLSv1.1 TLSv1.2;
Installation and Configuration
For extra information check this documentation in the Manually set up Internet email.
Outlook Configuration
For this plugin to work properly, follow the next steps:
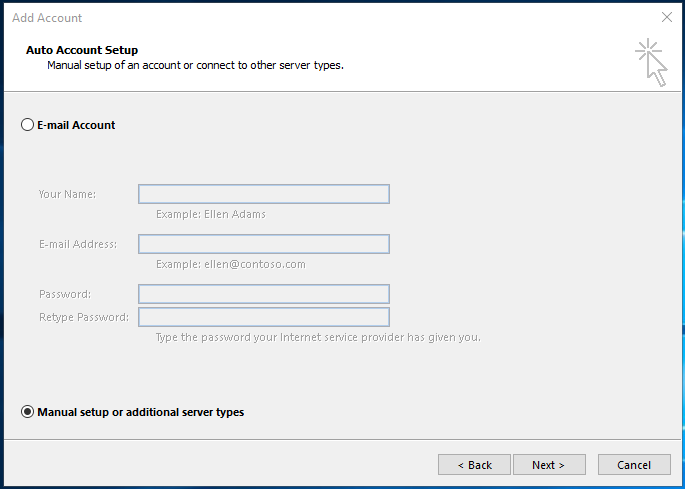
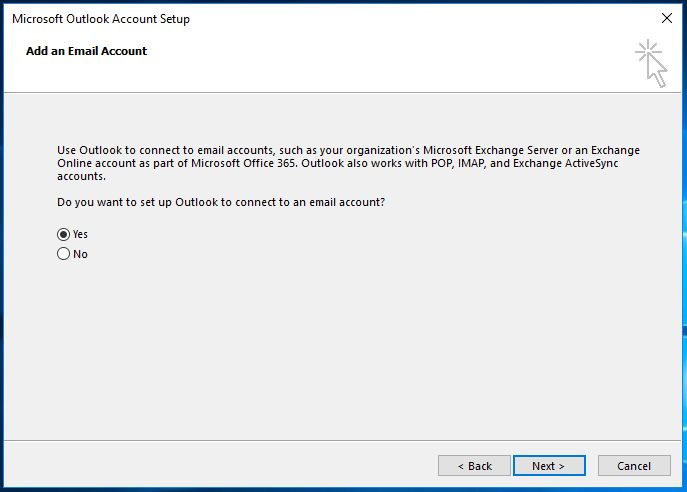
The Outlook account setup MUST be configured manually. This means that when adding a new Outlook account, the "Manually configure server settings or additional server types" option MUST be selected. If this mandatory manual configuration is not selected, the Add-In will not work.
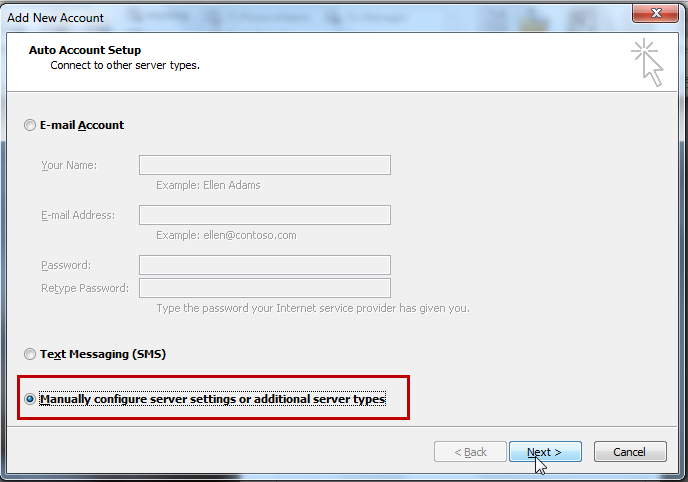
Click Next.
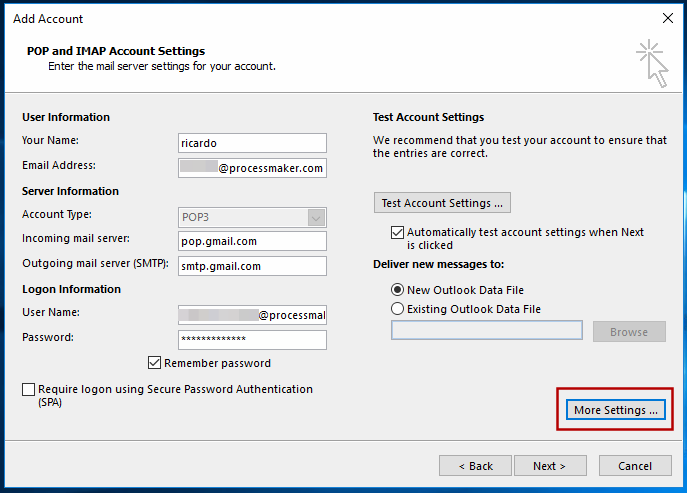
The Internet E-mail Settings screen displays, select the option to connect to a POP or IMAP email account serverThis configuration depends on the supported email server configuration for POP and IMAP. See this documentation to view how to configure some of the most used email servers.
After completing the configuration click More Settings to access the advanced configuration.
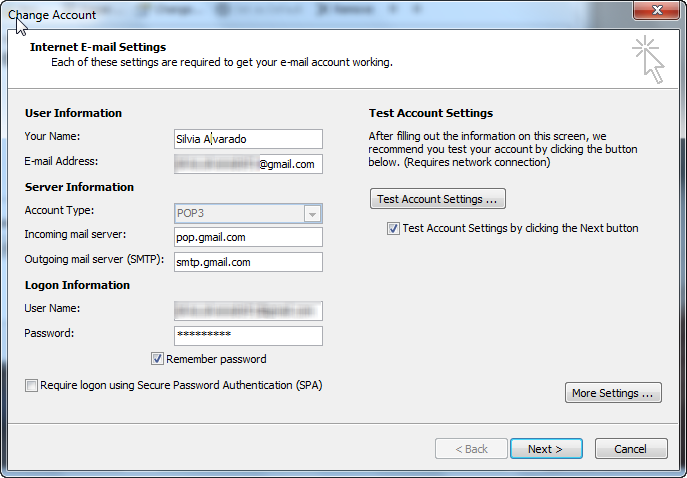
Note: It’s very important to make sure that the email server has POP and IMAP support. These options must be enabled so external programs such as Outlook can upload and download messages.
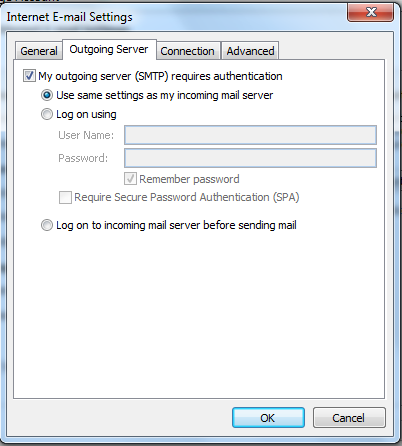
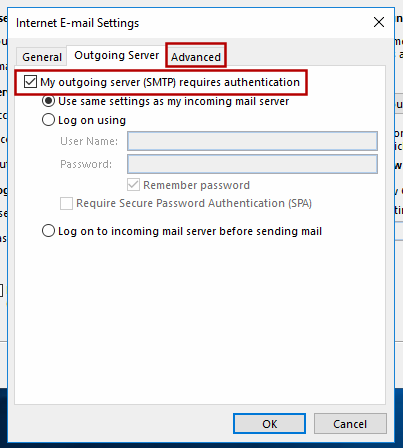
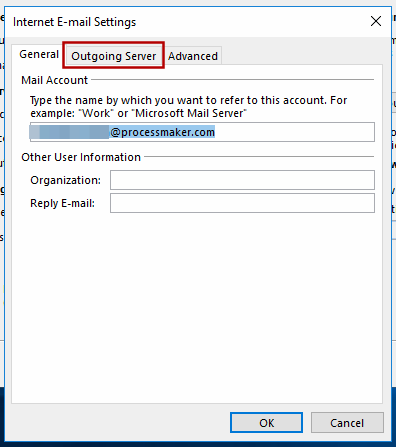
Inside the Internet Email Settings screen, choose the Outgoing Server tab and set it as the picture below:
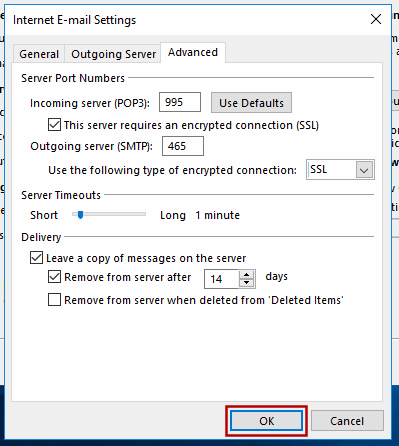
Go to the Advanced tab and set it as shown below:

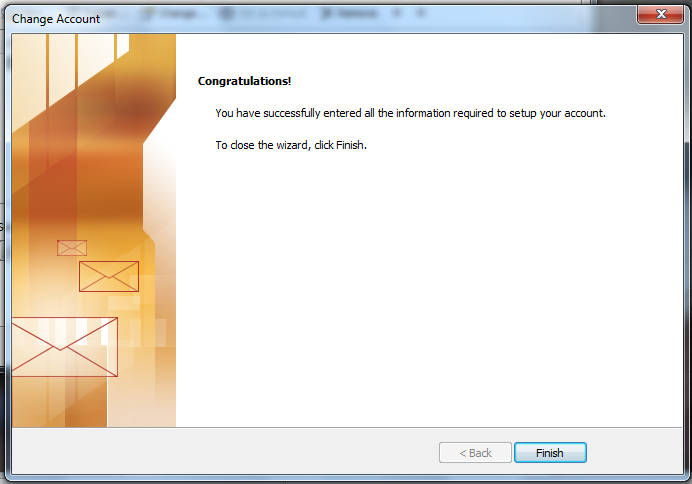
Click OK to close the window.
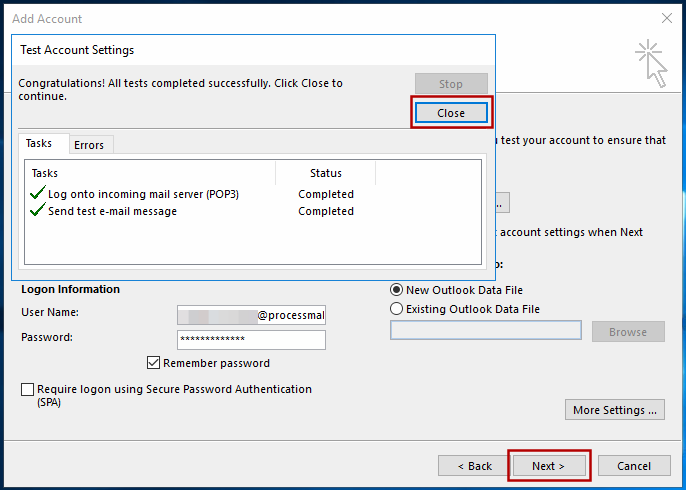
Click on Test Account Settings... to test the new configuration.
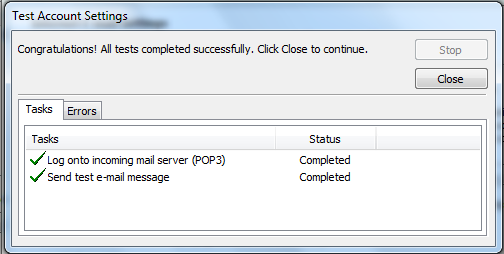
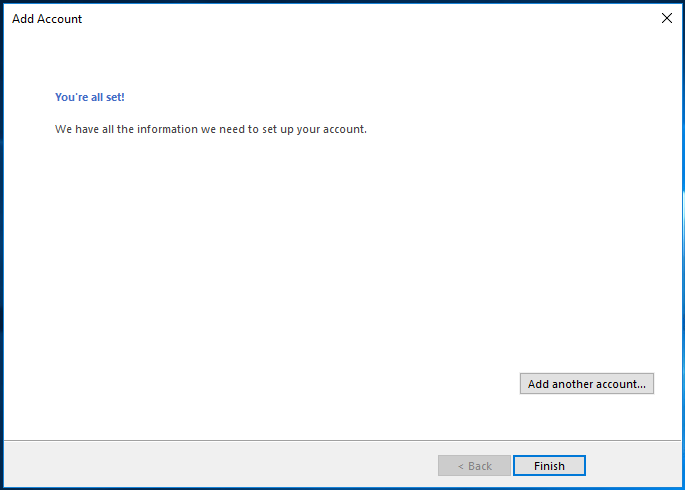
After all tests are complete, the account is configured. Click Close to exit.
Click Finish to exit the wizard.
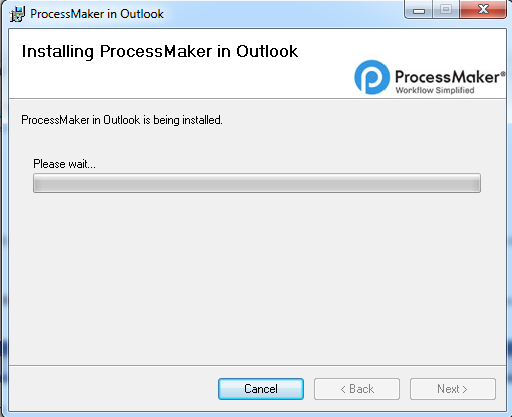
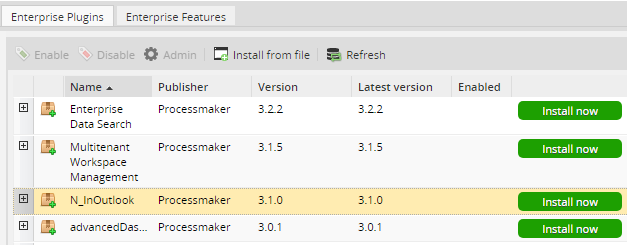
Install the plugin in ProcessMaker
The plugin will be available once the Enterprise Edition plugin with the corresponding license is imported. It's necessary to activate this plugin once it's installed, it does not need additional configuration on the server side, follow these steps:
- Open ProcessMaker and go to Admin > Plugins > Enterprise Manager.
- Install and enable the plugin N_InOutlook.


Install the Add-In for Outlook
Supported versions with the Enterprise plugin:
- Outlook Add-In for Outlook 2013
- Outlook Add-In for Outlook 2016
Note: The installers are available only to clients or partners who have the license and are not using the trial version of ProcessMaker.
Please download the ProcessMaker Add-In for Outlook.
Follow these steps to install the Outlook Add-In:
- Close the Outlook application if it is open.
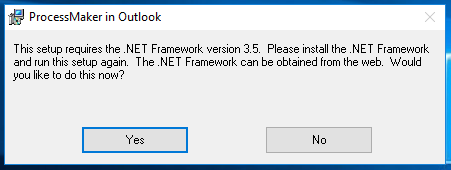
- Run the Add-In installer "setup.exe" which will check if .NET Framework is installed on the system, if .NET Framework is not installed, the following window displays:
- Click Yes to redirect you to the .NET Framework download page, download the 3.5 version and install the .NET framework.
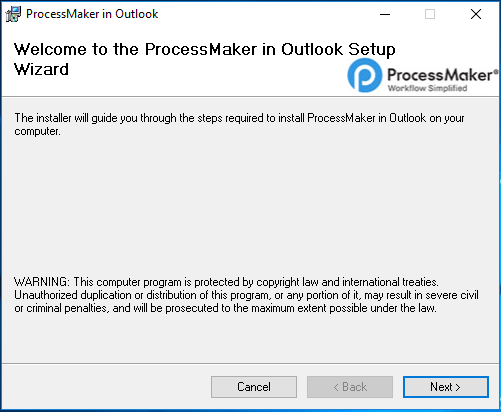
- Once the .NET Framework is installed and running, the setup will display the following installer window.
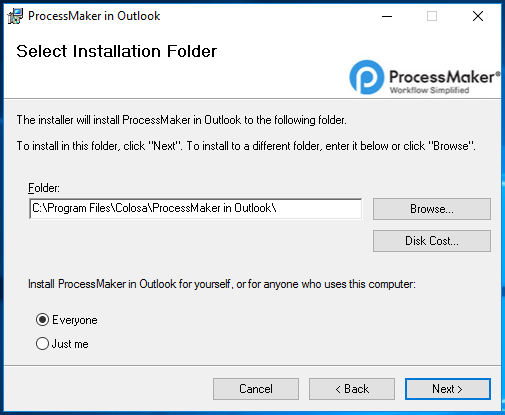
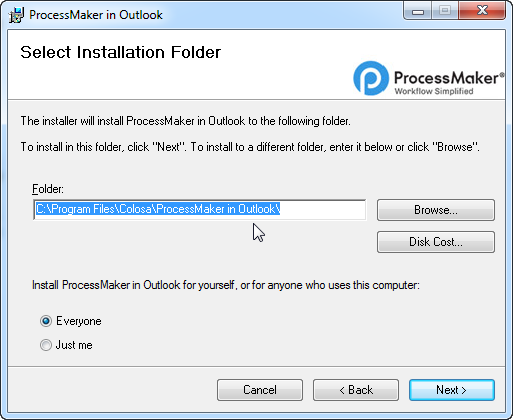
- Click Next and select a folder where the Outlook plugin will be installed.
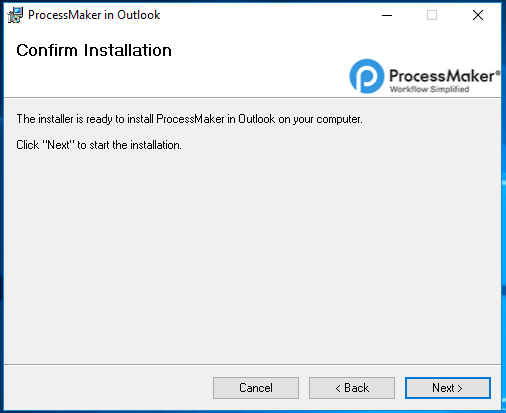
- Confirm the installation and click Next.
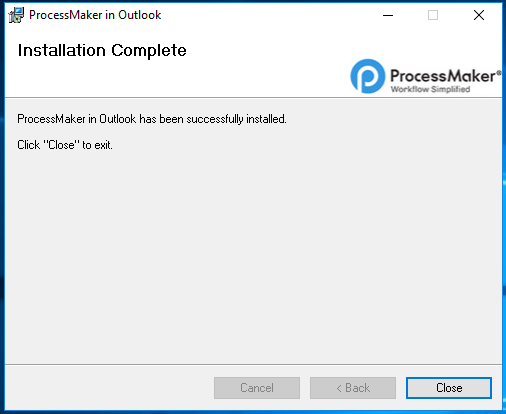
- Wait until the installation is finished and once the installation is complete, click Close to exit.
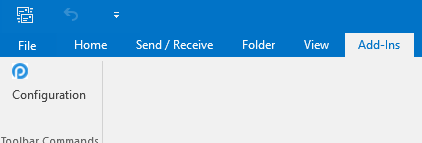
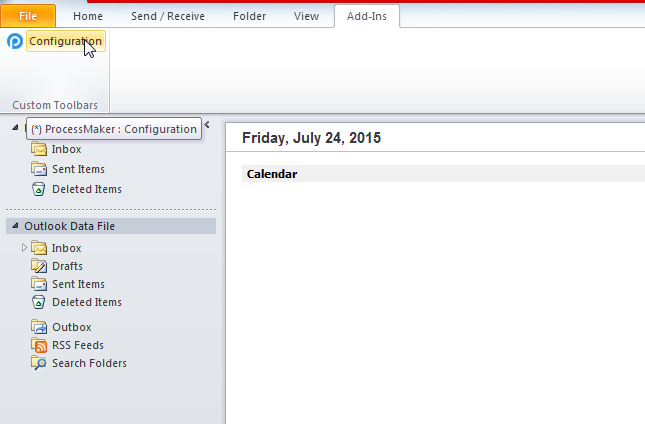
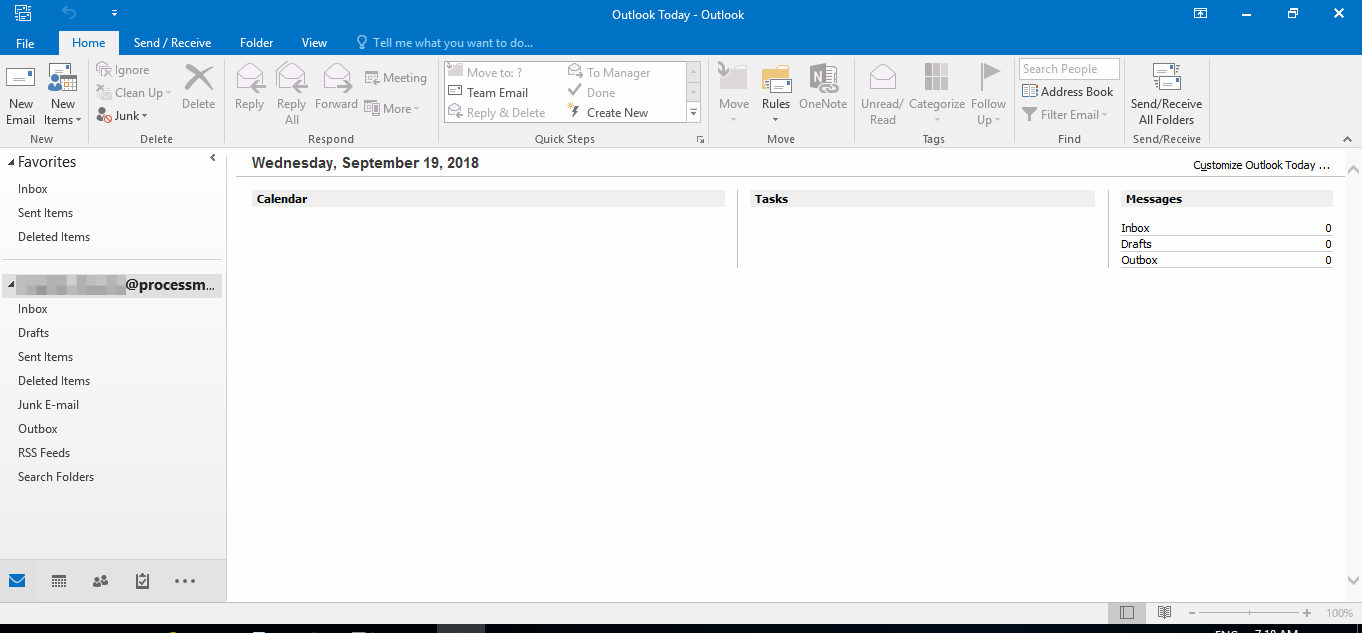
After the add-In is installed, open Outlook. A new tab labeled "Add-Ins" displays.
The Add-In tab displays two options:The ProcessMaker logo displaying the version of the Add-In.
The Configuration option.
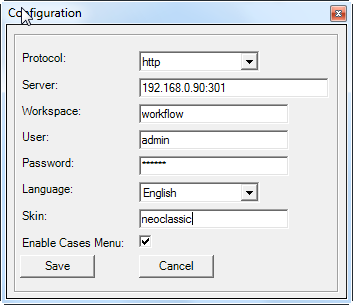
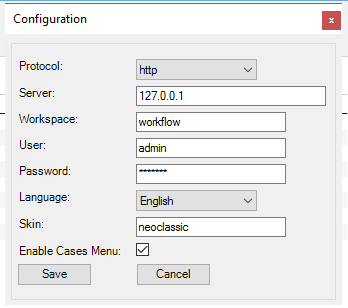
- Click the Configuration option. Enter the following information into the Configuration screen:
- IP address for the ProcessMaker server where you enabled the N_InOutlook plugin.
- ProcessMaker's credentials.
- ProcessMaker's workspace name.
ProcessMaker's skin.
Click Save. A new tab displays on the Outlook’s menu on the left side where ProcessMaker options display, including New Case, Inbox, Draft and others.

Reinstalling the Outlook Add-In
When updating the Outlook plugin to version to 2.0.6 or greater, it is necessary to uninstall the current Outlook Add-In and reinstall it to the last version one. To do this, follow the steps below:
Close Outlook.
Uninstall the Outlook previously installed, so Open Programs and Features by clicking the Start button, clicking Control Panel, clicking Programs, and then clicking Programs and Features, then look for the ProcessMaker in Outlook add-in and click Uninstall:

- Install the new version of Outlook Add-In.
Open your Microsoft Outlook, the Add-In must be included inside the Add-In tab:
Setup the Add-In for Outlook
After installing the Add-In, do the following:
Open Outlook and click Configuration.
A window appears to configure the data server and the user account to use it.
Where:
- Protocol: Choose between
httporhttps. - Server: Specify the name of the server.
- Workspace: Specify the name of the workspace.
- User: Enter the name of the user.
- Password: Enter the password of the user.
- Language: Choose between
SpanishorEnglish. - Enable Cases Menu: Check this option if you want to see the Case Menu when a case is being executed.
- Protocol: Choose between
When the Save button is pressed, it connects to the server to validate the user. If the validation was successful, the configuration window disappears and the system is ready to use.
Interaction with Cases Lists
It is possible to interact with cases (lists, steps, etc) in the same way as from the web application, but in a simpler and faster way, because the Add-In for Outlook records user information the first time and subsequently, it is useful to be used by the system without being authenticated every time.
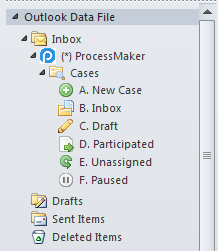
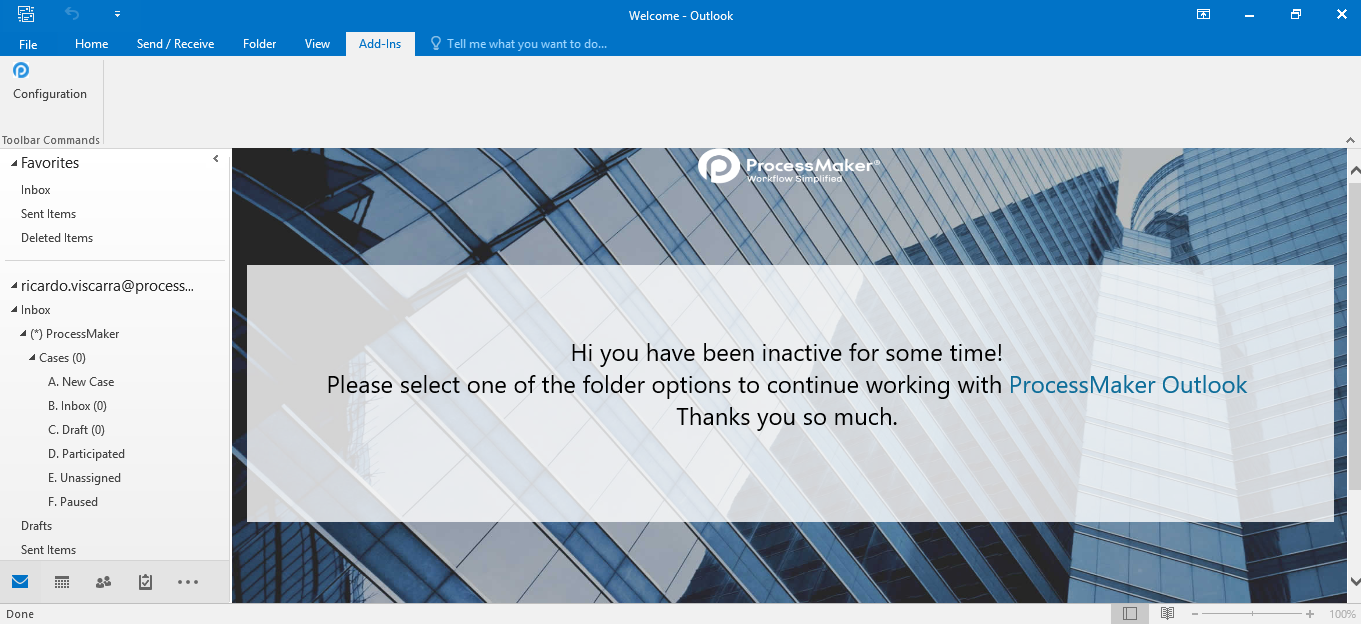
By clicking on the ProcessMaker folder, all the folders from the ProcessMaker workspace display:

Notice that the Folder Inbox shows the number of new cases that are pending review assigned to the current user.
All of the characteristics (forms, input documents, output documents, triggers, derivations, etc.) are fully functional from Outlook.
Due to performance, the number of cases in the Participated and Unassigned folders do not show unlike the Inbox and Draft folders which are displayed between parenthesis.
ProcessMaker
This folder contains essential information about the Outlook Connector Plugin:

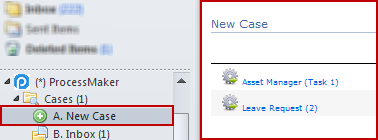
New Case
One of the main characteristics of this plugin is the possibility to start cases inside the Outlook application. By clicking on this option, all cases in which the user configured on the Outlook Settings participates are listed. (Don't forget that this user must be assigned to the initial task in order to start the case)

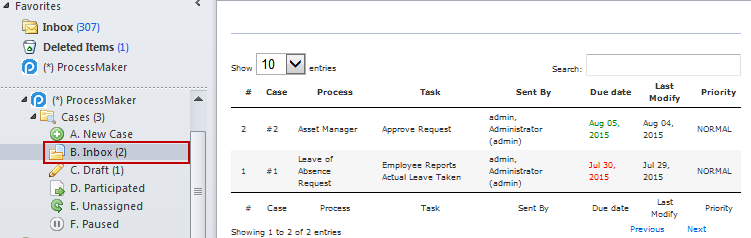
Inbox
All incoming cases will be stored in this folder as the following image displays:

Double click on the name of the case to open it.
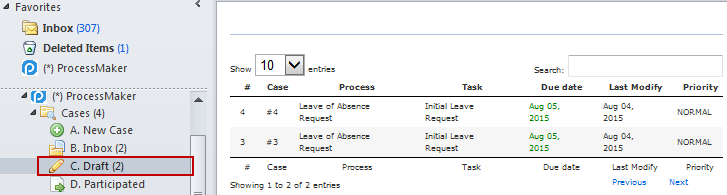
Draft
Includes cases that are being edited or advanced by the user but have not yet been submitted to the next task, check the following image:

Double click on the name of the case to open it
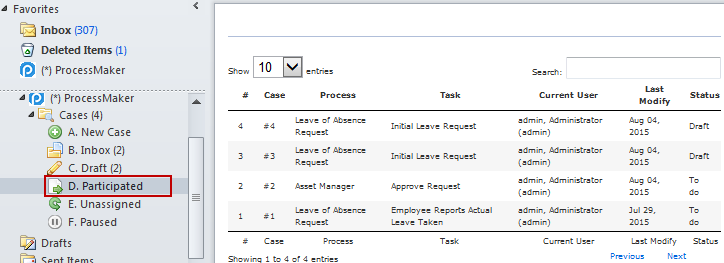
Participated
Includes all the cases that the user has been sent or participated in, check the following image:

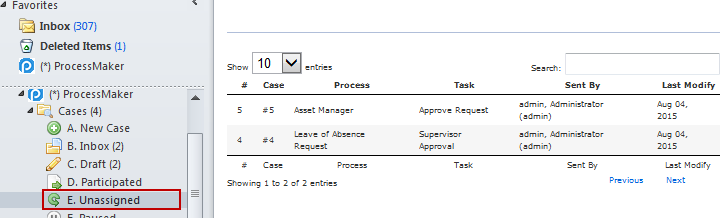
Unassigned
Includes all cases which are claimed by a pool of users assigned to the task, check the following image:

Paused
Includes a list of all cases which were paused during their execution. This gives users a quick view of their cases status since it is not possible to pause and unpause cases from the Outlook interface. Cases must be unpaused by going to ProcessMaker Interface.

Running Cases - Cases Menu
When running a case, the Case Menu with the four options found when running cases in ProcessMaker, you will find them at the top of the Menu like the one shown in the illustration below.
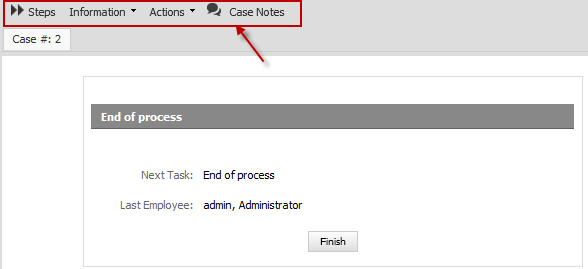
This functionality can be configured when ProcessMaker server is configured inside the Outlook, it means that the user can decide if whether the Cases Menu will display it or not. This is practically the same as the one you will find in ProcessMaker. Next you will find a brief explanation of each one of these options:
Steps
It shows all the Dynaforms, Output and Input Documents assigned in the current task, so they can be accessed easily. For more information about this, check Cases documentation.
Information
It shows all the information of the current process, if you click the down arrow you will find the following options:
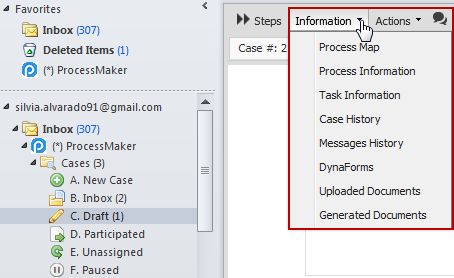
- Process Map: Click on the Process Map option and a new tab opens next to the current case, showing the Process Map of the current process which is being executed.
- Process Information: Click on the Process Information option and a new window with the information of the current process will display.
- Task Information: Click on Task Information and a new window with the information of the current task displays.
- Case History: Click Case History and a brief description of the cases displays.
- Messages History: Click Messages History and it shows all the email notifications sent during the process.
- Dynaforms: Click Dynaforms to display all the dynaforms defined in the process. Users must have Process Permissions to see the list of dynaforms.
- Uploaded Documents: Click Uploaded Documents to show all the allowed documents uploaded by any input document defined during the process.
- Generated Documents: Click Generated Documents to show all the allowed documents generated by any output document defined during the process.
Actions
Users can execute the following actions:
- Pause: The current case in execution can be paused. By clicking on the calendar icon, a calendar will display in which the date of the unpaused case must be defined.
- Delete: It deletes the current case, ONLY if the user has the correct permissions to delete it.
- Cancel: It cancels a case.
- Reassign: A selected case from the list can be reassigned, it means that the owner of a case will change. If a different user different to admin needs to reassign a case, then assign this user a role with the PM_REASSIGNCASE
Case Notes
Case Notes are used to add comments and observations about cases, which can be read by anyone who has rights to open the case.
Session Lost
In the case when OutLook lost the session a message will display.

In order to recover the session the user only needs to open any folder and OutLook will reload the connection.
Insert Images:


Version Info:
*3.6|;*3.5|;*3.4|;*3.3|
Please rate how useful you found this document:
Please rate how useful you found this document:
- Overview
- Requirements
- Advanced Triggers
- PMFCloneAndRestartCase()
- PMFCrudTable()
- Function Definition
- Example 1: Inserting a record in a table
- Example 2: Updating a record in a table
- Example 3: Deleting a record in a table
- PMFGeneratePdf()
- PMFGetCaseNumber()
- PMFGetFieldsOfDynaform()
- PMFGetGroupsOfUser()
- PMFGetInputsDocumentsOfCase()
- PMFGetRolUser()
- PMFGetUserReportsTo()
- PMFGetUsersOfTask()
- PMFLoadGrid()
- PMFSetOnVacation()
![]() Plugin Version:
3.1.7
Plugin Version:
3.1.7
Overview
The PowerUp plugin includes 12 extra functions, which improve the generation of PDF documents, the loading of data inside a grid, the reassignment the cases of a user who is on vacation, and more. These extra functions make coding triggers easier and simpler, since they allow process designers to avoid using complicated internal classes and complex database queries.
Moreover, it offers three additional fields to Dynaforms, so that forms can display images, view documents and access the Input Document interface.
Requirements
ProcessMaker Compatibility
This plugin is fully compatible with:
- ProcessMaker 3.4.6 and later
Advanced Triggers
PMFCloneAndRestartCase()
PMFCloneAndRestartCase() makes an identical copy of a specified case, including all the data generated in the case. The copy of the case will be stored in the DRAFT folder. The status of the original case can changed to CANCELLED or PAUSED.
Note: System Variables, Input Documents, Output Documents and Case Notes won't be copied when the case is cloned. PMFCloneAndRestartCase() only clones the case variables stored in the <WORKSPACE>.APPLICATION.APP_DATA field.
Function Definition
Parameters:
- string appUid: The unique ID of the case to be cloned. To clone the current case, use the system variable @@APPLICATION.
- string statusCurrentCase: Optional parameter. Set the status of the original case, which can be "PAUSED" or "CANCELLED". If not included, set to '' (empty string) or only set to "", then the status of the original case will not change.
- string unPauseDate: Optional parameter. If the status of the original case is set to "PAUSED", then it will be unpaused on the specified date. Use the YYYY-MM-DD format, so July 1, 2015, would be "2015-07-01" If this parameter isn't included, set to '' (empty string) or only set to "", then the original case will be paused indefinitely until it is manually unpaused.
Return value:
- int. Returns the case number for the new case that was created.
If appUid is empty, PMFCloneAndRestartCase() returns false. If appUid isn't a valid case ID, then the function is caught by an exception and @@__ERROR__ will contain the message "The Application row '<CASE-UID>' doesn't exist!". To handle the exception, the function should be enclosed in a try{...} catch{...} clause.
Example
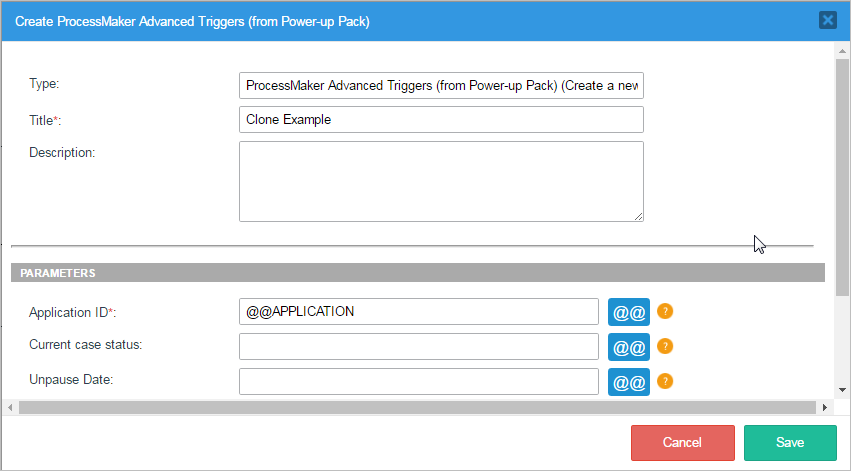
Create a trigger that clones the current case. Open a process for editing and go to the TRIGGERS tab. Click on the WIZARD button and then expand ProcessMaker Advanced Triggers, then select PMFCloneAndRestartCase (Create a new case based on the data of an already existing case) function:

Fill in the following parameters for the function:
The function definition will be:
@@return = PMFCloneAndRestartCase(@@APPLICATION, "", "");
This example uses the system variable @@APPLICATION, so the current case, which is #31, will be cloned:
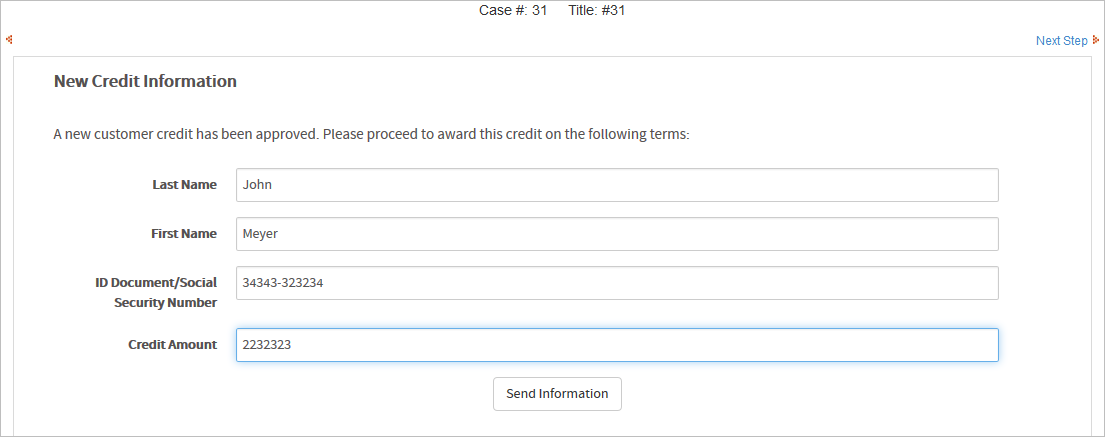
When checked in the the ProcessMaker debugger, a new case, whose case number is 32, was created:
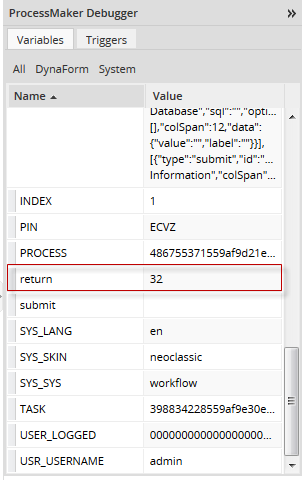
Both the original and the cloned cases are now found in the Draft folder

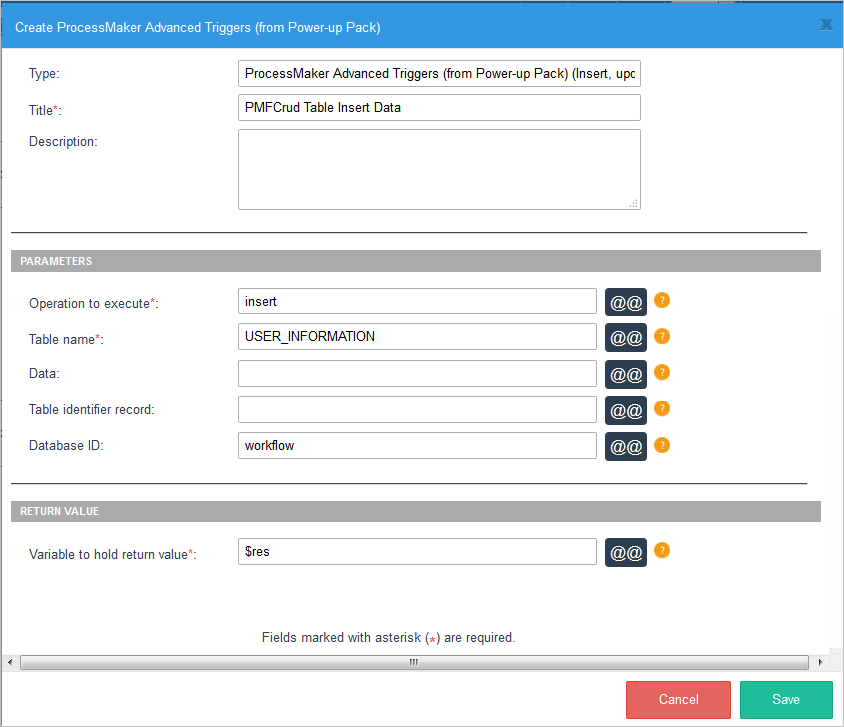
PMFCrudTable()
PMFCrudTable() inserts, updates or deletes a single record in a MySQL table. This function can be used with any MySQL table, including PMtables and Report Tables, but it will not work with any other type of database.
Function Definition
Parameters:
- string option. Define the type of SQL operation to execute. Possible values: 'insert', 'update' or 'delete'
- string table. Name of the table where the operation will take place. Note that MySQL table names are case sensitive by default in Linux/UNIX, but not case sensitive in Windows.
- array data. Optional parameter. Leave this parameter blank for delete operations. For insert and update operations, define an array of values that will be inserted or updated:
- array('value1', 'value2', ...)
- Do not include values for fields that are auto-incremented, and make sure that the values are listed in the same order as they are defined in the table. If the value is input by the user or contains single quotation marks, use mysql_real_escape_string() to escape single quotation marks and prevent SQL injection attacks. See the example below.
- string idTable. Optional parameter. The unique identifier of the record to be affected. This must be the value found in the primary key field of the table. This value must be specified for delete and update operations. For insert operations, this value may be left blank if the primary key field is auto-incremented by the database.
- string dbConectionUid. Optional parameter. The UID of the database connection where the operation will be executed, or one of the databases for the current workspace: 'workflow', 'rbac' or 'rp'. If not included, then it will be the current workflow database by default. See executeQuery() for more information.
Return value:
- int. Returns 1 if the operation was successful, or 0 if unsuccessful. If the database is not MySQL or an exception was thrown, then returns null. To check whether an exception was thrown while executing PMFCrudTable(), see Error Management.
PMFGeneratePdf()
PMFGeneratePdf() generates a PDF document with pagination and a footer. This only works with Output Documents using the TCPDF library.
Function Definition
Parameters:
- string outputID: The unique ID of the Output Document, which can be found by opening the process for editing, going to the Output Documents and clicking on the Show ID button for an Output Document. It can also found by following these instructions.
- string footerContent The content of the footer that will be placed at the end of the document. By default it will be enclosed in double quotes, i.e.: "ProcessMaker Documentation". To edit the source code you can also use simple quotes.
- string sApplication: Optional parameter. The unique ID of the case where the Output Document will be generated. If omitted or set to NULL, then an Output Document file will be created for the current case.
- int iDelegation: Optional parameter. The delegation index of the current task in the case. If omitted or set to NULL, then it will use the current task for the current case.
- string sUserLogged: Optional parameter. The unique ID of the user who will generate the PDF. This should be set to the user who is currently designated to work on the case. If omitted or set to NULL, then the user currently logged-in will be used.
Note: If you are using the
PMFGeneratePdf()function in a Script task, thesUserLoggedparameter is required. Otherwise, if there is no user UID, it must be defined as null.
Return value:
There is no return value.
Example
This example generates an Output Document in the current case with pagination and a footer.
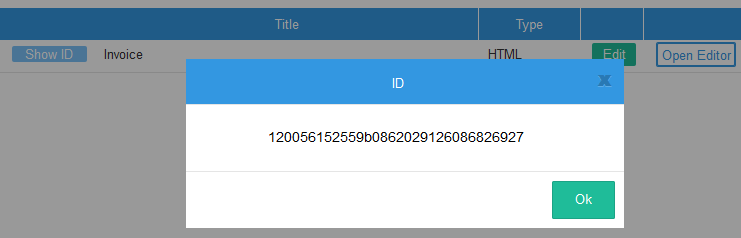
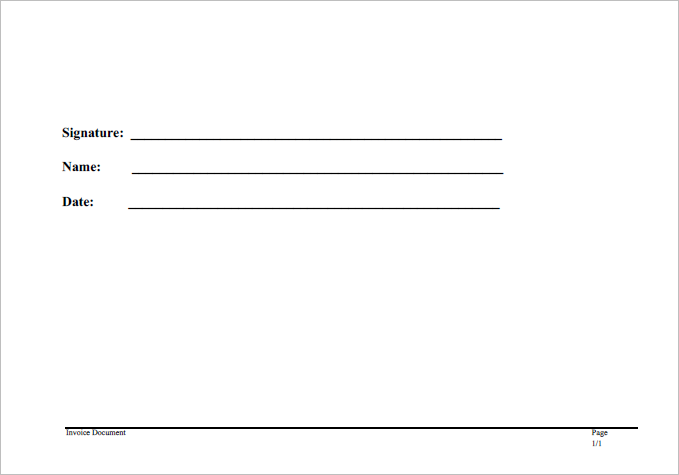
1. Create an Invoice document using the TCPDF engine. Add some content into the document. Then, get the Output Document's unique ID.
2. Create the trigger. Go to TRIGGERS, then click on the WIZARD button. Expand ProcessMaker Advanced Triggers, click on the PMFGeneratePdf (Generate PDF output document) function, and fill in the following information:

The trigger's source code will be:
PMFGeneratePdf ("120056152559b0862029126086826927", "Invoice Document", @@APPLICATION, 0, "");
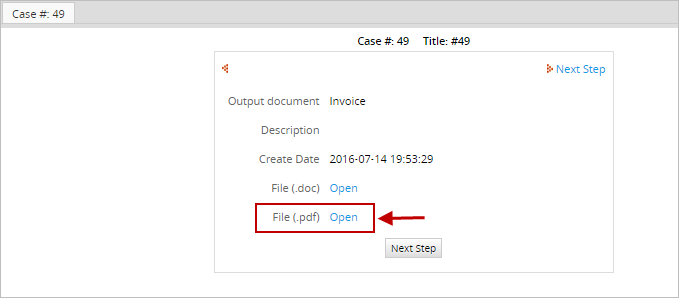
Then, assign the trigger to fire at some point during the process. Running the case, click on File (.pdf) Open to start downloading the PDF document.
Opening the generated PDF:
PMFGetCaseNumber()
PMFGetCaseNumber() returns the case number for a specified case. The case number is an integer, which increments by 1 for each new case in a workspace, so the case number for the first case is 1, the fifth case is 5, and the 623rd case is 623.
Function Definition
Parameters:
- string appUid: The unique ID of the case. To get the case number for current case, use the system variable @@APPLICATION.
Return Value:
- int: Returns the number of the case.
Example
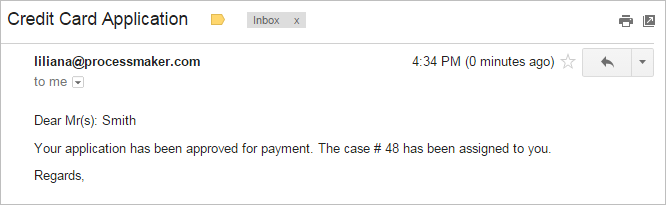
1. Let's create a simple process where you will obtain the case number and send it to the next person who will continue the case, which will help the next assigned user know which case number needs to be opened.
2. Now, let's create the trigger with the corresponding function. Go to the TRIGGERS tab, inside the process you are working on, and click on the WIZARD button. Select ProcessMaker Advanced Triggers and then look for the PMFGetCaseNumber (Get the application number (Case number)) function and fill it with the following information:
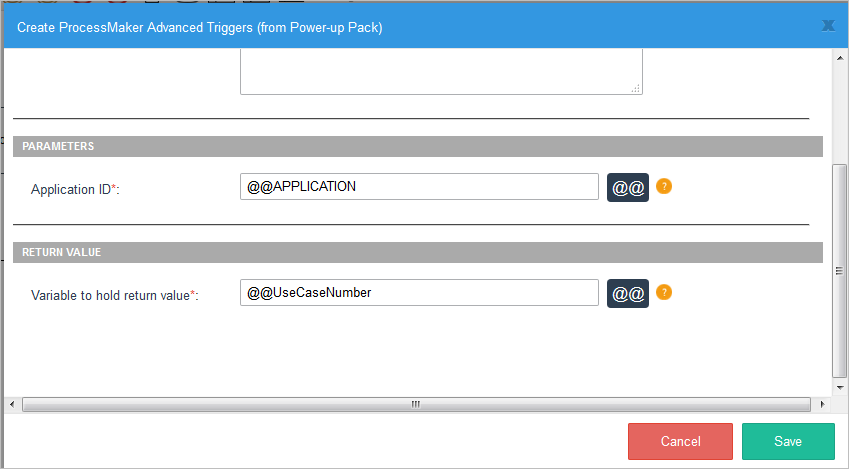
Its definition will be:
@@UseCaseNumber = PMFGetCaseNumber(@@APPLICATION);
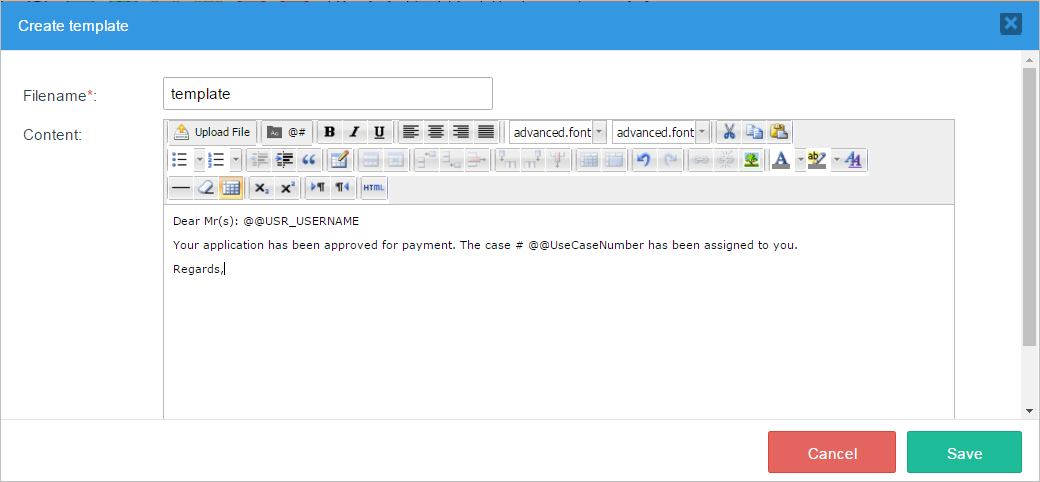
3. Then create an email template named template.html which uses the @@UseCaseNumber variable:
4. Then use the PMFSendMessage() function in order to send out an email in a subsequent trigger:
Replace liliana@colosa.com by your email. Additionally, before using PMFSendMessage, you must configure your Email Server.
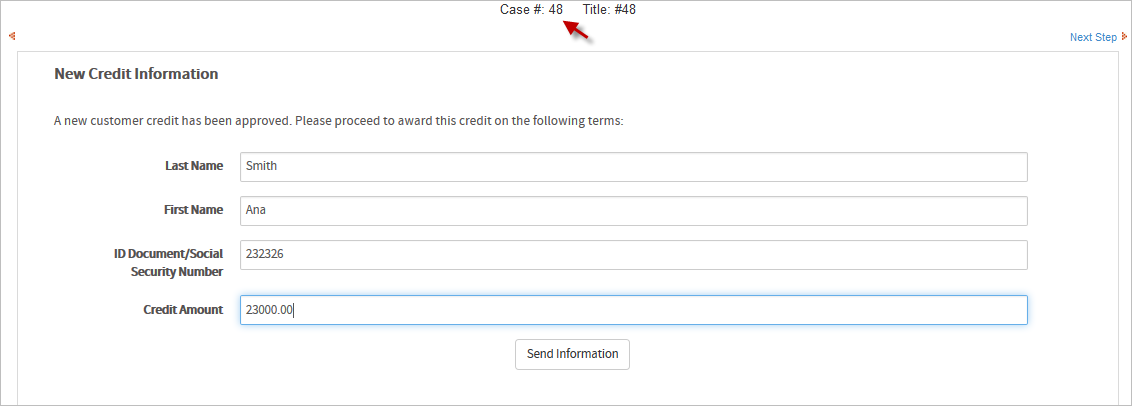
5. Inside the process, assign the trigger where the case number is obtained: before the Dynaform, and before the trigger to send mails after that. Executing case #48:
The email will be:
PMFGetFieldsOfDynaform()
PMFGetFieldsOfDynaform() returns information about the fields in a Dynaform, such as the field name, field type, and field label.
Function Definition
Parameters:
- string proUid: The unique ID of the process. For the current process, use the @@PROCESS system variable.
- string dynUid: The unique ID of the Dynaform whose list of fields will be retrieved.
Return Value:
An array, with the following structure:
Where:
- string FIELD_NAME: The field name, which is unique and identifies the field.
- string FIELD_LABEL: The field label, which is the text displayed on the Dynaform. Note that the value for hidden, javascript, image, documentviewer and inputdocview fields will be an empty string, because these fields do not have labels.
- string FIELD_TYPE: The field type: currency. percentage, password, suggest, textarea, title, subtitle, button, submit, reset, dropdown, yesno, listbox, checkbox, checkgroup, radiogroup, date, hidden, link, file, javascript, documentviewer, inputdocview or image.
Example
This example obtains a list of all the textbox fields in a Dynaform. First, get the unique ID for the Dynaform. Open the process which contains the Dynaform and go to the DYNAFORMS tab. In the list of Dynaforms, click on the Show ID button for the Dynaform.
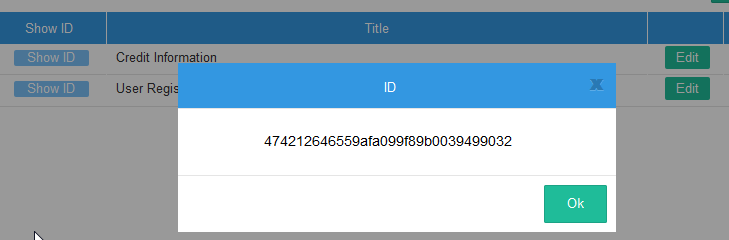
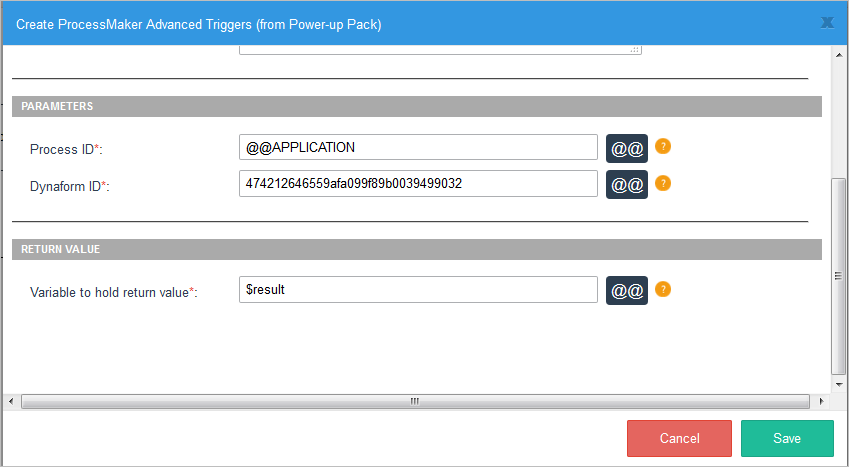
Now, create the trigger. Go to the TRIGGERS tab, then click on the WIZARD button. Select ProcessMaker Advanced Triggers and then look for the PMFGetFieldsOfDynaform (Return the fields of a Dynaform) function and fill in the following information:
Its definition will be:
$result = PMFGetFieldsOfDynaform(@@APPLICATION, "474212646559afa099f89b0039499032");
Then edit the trigger's source code by adding the code below the definition of PMFGetFieldsOfDynaform. This function can look through the list of returned fields and copy those fields, which are textboxes, to the @?TextboxList
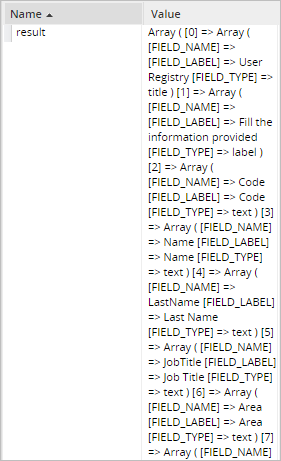
This trigger can be set to fire at any point in a process, since the fields in a Dynaform will not change. If the debugger is enabled, then the contents of the @?result can be seen when running a case:
PMFGetGroupsOfUser()
PMFGetGroupsOfUser() obtains a list of groups to which a user is assigned.
Function Definition
Parameters:
- string userUid: The user's unique ID, which can be found in the following ways:
- Get the UID of the currently logged-in user with the @@USER_LOGGED system variable or $_SESSION['USER_LOGGED'].
- Use the PMFUserList() or userList() web service.
- Query the wf_<WORKSPACE>.USERS.USR_UID field in the database with executeQuery().
- string statusGroup: Optional parameter. Group status. It can be ACTIVE, INACTIVE or ALL.
Return value:
array. If $userUid is not assigned a value, this function returns false. If the user doesn't exist or the user isn't assigned to any groups, then it returns an empty array. If the user is assigned to one or more groups, then it returns the following associative array:
Example
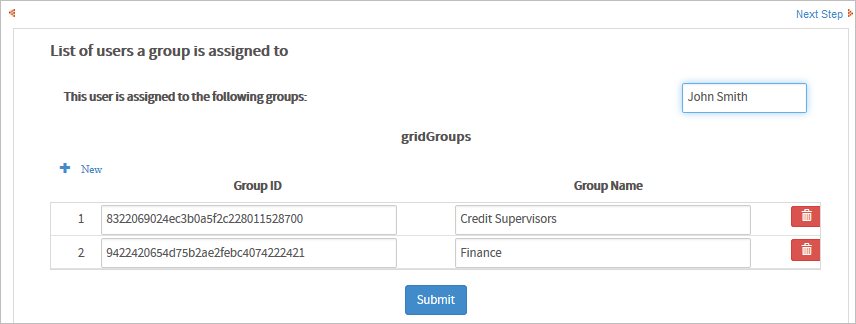
1. Create three groups and assign a user to them. Create a grid Dynaform with two fields: IDgroup and GroupName, both of them in view mode. Add the grid inside a Dynaform with a field name of "gridGroups".
2. Now, create a trigger which uses the PMFGetGroupsOfUser() function. Go to the TRIGGERS tab, then click on the WIZARD button. Expand ProcessMaker Advanced Triggers, click on the PMFGetGroupsOfUser (Return the group(s) of a user) function and fill in the following information:

Its definition will be:
$res = PMFGetGroupsOfUser(@@USER_LOGGED, "ACTIVE");
The following trigger code creates an array with the same structure as a grid. The trigger will set the contents of a grid named "gridGroups". Make sure to use the same name for the case variable and the field name of the grid object embedded in a master Dynaform. In this example, the function will return all ACTIVE groups.
Don't forget to create variables in order to associate them with the respective fields. For instance the following variables must be created: gridGroups and UserLogged. Associate gridGroups to the grid created, and UserLogged with the field where the logged user will appear. To do this, add the following code below the PMFGetGroupsOfUser function:
if (is_array($res)) {
$c = 1;
$array1 = array();
foreach ($res as $key=>$value) {
$array1[$c] = array('text0000000002' => $key, 'text0000000003' => $value);//Use the ID of each grid field
$c = $c + 1;
}
@@gridGroups = $array1;
}
@@Data = userInfo(@@USER_LOGGED);
@@UserLogged = @@Data['firstname'] . ' ' . @@Data['lastname'];
After running the case, the result will be:
Knowing a user's groups can be useful when doing value based assignment in a case.
PMFGetInputsDocumentsOfCase()
PMFGetInputsDocumentsOfCase() obtains the list of files uploaded for a case or for a particular Input Document in a case.
Function Definition
Parameters:
- string appUid: The unique ID of the case. For the current case, set to the @@APPLICATION system variable.
- string inputDocUid: Optional parameter. The unique ID of an Input Document. If not included, then all the files uploaded during the case will be returned, including both Input Document files and any files uploaded to a file field in a Dynaform.
Return value:
If no files are found, then returns an empty array. If files are found, then returns an array with the following structure:
- [0] array
- ( associative array
- string ['APP_DOC_UID']: The unique ID for the uploaded file.
- int ['DOC_VERSION']: The version number of the file. The first version is 1, the second is 2, etc.
- string ['DOC_UID']: The unique ID for the Input Document.
- string ['APP_DOC_COMMENT']: Comment entered by the user when the file was uploaded.
- string ['APP_DOC_FILENAME']: The original filename of the uploaded file.
- int ['APP_DOC_INDEX']: The index of the uploaded file. The first file for an Input Document is 1, the second is 2, etc.
- string ['TITLE']: The original filename, which is same as as ['APP_DOC_FILENAME'].
- int ['POSITION']: The number of the step when the file was uploaded. The first step in a task is 1, the second is 2, etc.
- string ['CONFIRM']: Message to confirm the deletion of the file in the current system language.
- string ['REPLACE_LABEL']: Label for the "replace" button, which is no longer used.
- string ['NEWVERSION_LABEL']: Label shown on the button to add "New Version" in the current system language.
- string ['VERSIONHISTORY_LABEL']: Label shown on the button to see the "Version History" in the current system language.
- string ['CREATOR']: The full name (first name and last name) of the user who uploaded the file.
- string ['APP_DOC_CREATE_DATE']: The datetime in the format YYYY-MM-DD HH:MM:SS when the file was uploaded. Ex: 2014-09-26 11:07:09
- string ['DOC_VERSION_LABEL']: The label shown for the version of the file, so the first version is '1', the second is '2', etc.
- string ['DOWNLOAD_LABEL']: The label for the "Download" button in the current system language.
- string ['DOWNLOAD_LINK']: The partial URL to download the file, using its APP_DOC_UID and DOC_VERSION numbers.
- Ex: 'cases_ShowDocument?a=106235827542580dfcfa708029871391&v=2'
- string ['COMMENT']: The file's comment, which is the same as ['APP_DOC_COMMENT'].
- )
- ...
An Input Document is identified by its DOC_UID and can have multiple files uploaded to it. Each new file uploaded to an Input Document has a different APP_DOC_UID. If a file has a new version, it will have the same APP_DOC_UID, but its APP_DOC_INDEX will be incremented by 1. In addition, all files, regardless of whether they are new files or another version of an existing file, are numbered in the order in which they were uploaded in the APP_DOC_INDEX.
For example, a user uploads two files to an Input Document with the DOC_UID '747284426542478ef3e1a97070179701'. The first file is "Expense Report Part1.doc" and the second file is "Expense Report Part2.doc". Then the user revises the first file and uploads a new version with the filename "Expense Report Part1-revised.doc". These 3 files would be listed as:
- First file: "Expense Report Part1.doc"
- Second file: "Expense Report Part2.doc"
- New version of first file: "Expense Report Part1-revised.doc"
Example
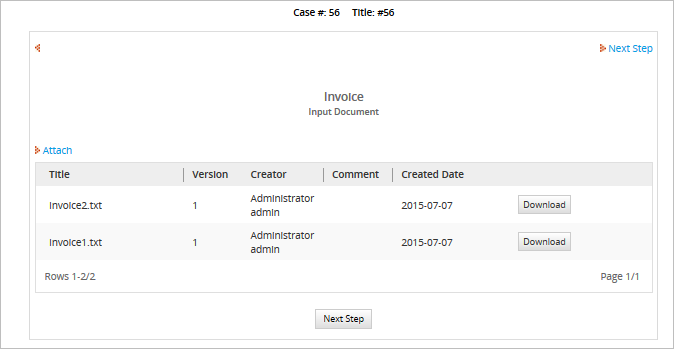
This example obtains files uploaded during the execution of a case.
1. Create an input document and assign it to a task. Then, create a trigger. Go to TRIGGERS, then click on the WIZARD button. Expand ProcessMaker Advanced Triggers, click on the PMFGetInputsDocumentsOfCase (Get the list of input documents that belong to a case) function and fill in the following information:
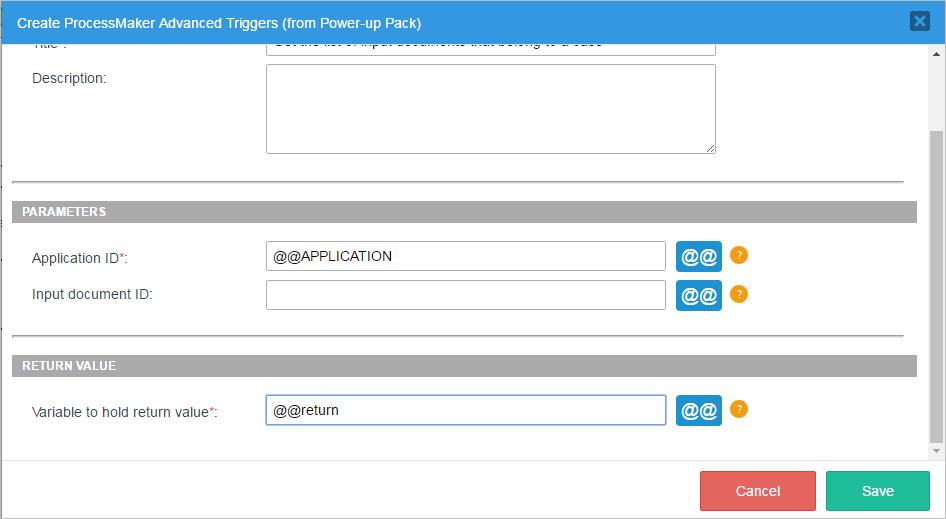
Its definition will be:
@@return = PMFGetInputsDocumentsOfCase(@@APPLICATION, "");
When the above trigger is executed, the list of Input Document files will be placed in an array in the @@return variable.
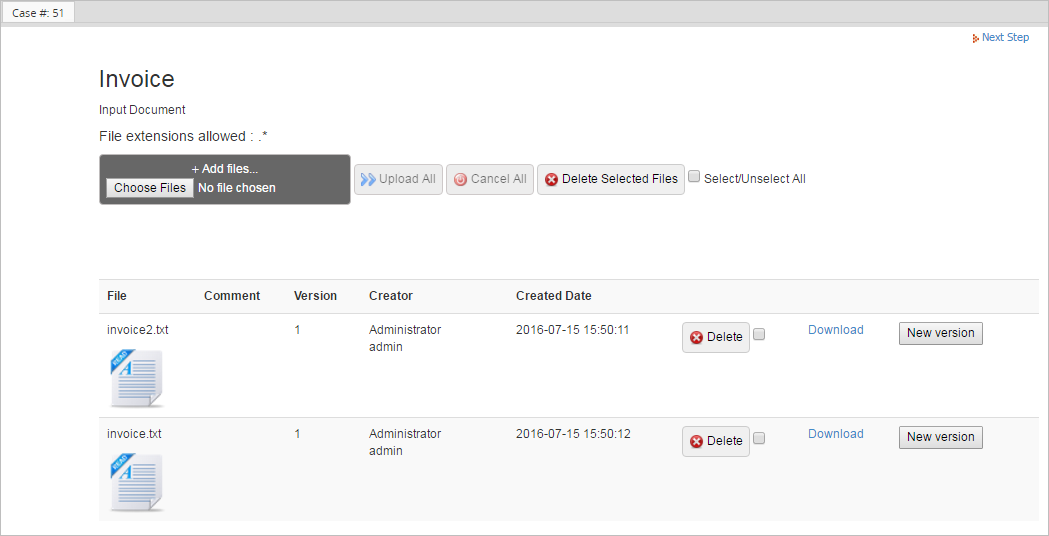
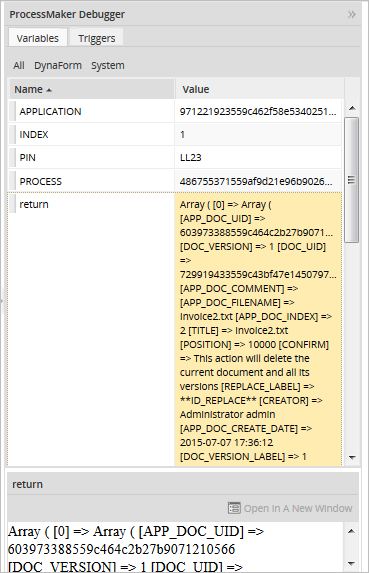
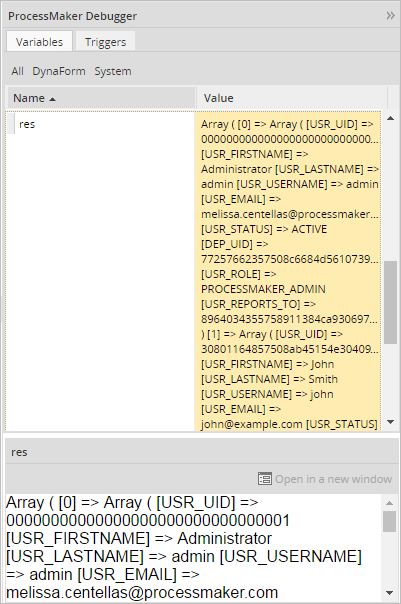
2. Set the trigger to fire after an Input Document. Enable ProcessMaker debugger in order to see the value of the @@return, while executing a case. In this example, two files are uploaded to the Input Document:
Click on next step, and look for the return variable in the debugger, which shows that two files were uploaded:
Create a download link
If the second parameter of the PMFGetInputsDocumentsOfCase() function isn't specified, then the function returns all the files uploaded to the case. To only get the files uploaded to a specific Input Document, set the second parameter to the Input Document UID. To get that ID, open a process for editing and go to the Input Documents tab. In the list of Input Documents, click on the Show ID button for a specific Input Document:
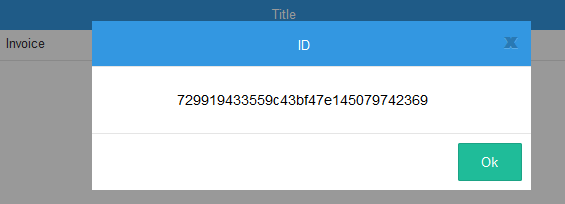
Then use that ID in the second parameter of the PMFGetInputsDocumentsOfCase() function.
In order to construct the complete URL to download a file, prepend "http://<IP-ADDRESS>/sys<WORKSPACE>/<LANG>/<SKIN>/case" to the DOWNLOAD_LINK. For example, if the DOWNLOAD_LINK is "cases_ShowDocument?a=106235827542580dfcfa708029871391&v=2", then prepend "http://www.myserver.com/sysworkflow/en/neoclassic/cases/" to create the complete URL.
In this example, the trigger searches for the last file uploaded to the Input Document with the ID '729919433559c43bf47e145079742369'. It cycles through all the files and looks for the one with the largest APP_DOC_INDEX. Then, it creates a complete URL to download that file, which is stored in the variable @@FileLink.
Do not forget to replace www.myserver.com with your ip or server addres, and replace sysworkflow with your workspace name.
$aFiles = PMFGetInputsDocumentsOfCase(@@APPLICATION, '729919433559c43bf47e145079742369');
//search for last uploaded file:
@@FileLink = '';
$lastIndex = 0;
foreach ($aFiles as $aFile) {
if ($lastIndex < $aFile['APP_DOC_INDEX']) {
$lastIndex = $aFile['APP_DOC_INDEX'];
@@FileLink = 'http://www.myserver.com/sysworkflow/en/neoclassic/cases/' . $aFile['DOWNLOAD_LINK'];
}
}
//search for last uploaded file:
@@FileLink = '';
$lastIndex = 0;
foreach ($aFiles as $aFile) {
if ($lastIndex < $aFile['APP_DOC_INDEX']) {
$lastIndex = $aFile['APP_DOC_INDEX'];
@@FileLink = 'http://www.myserver.com/sysworkflow/en/neoclassic/cases/' . $aFile['DOWNLOAD_LINK'];
}
}
The result will be:
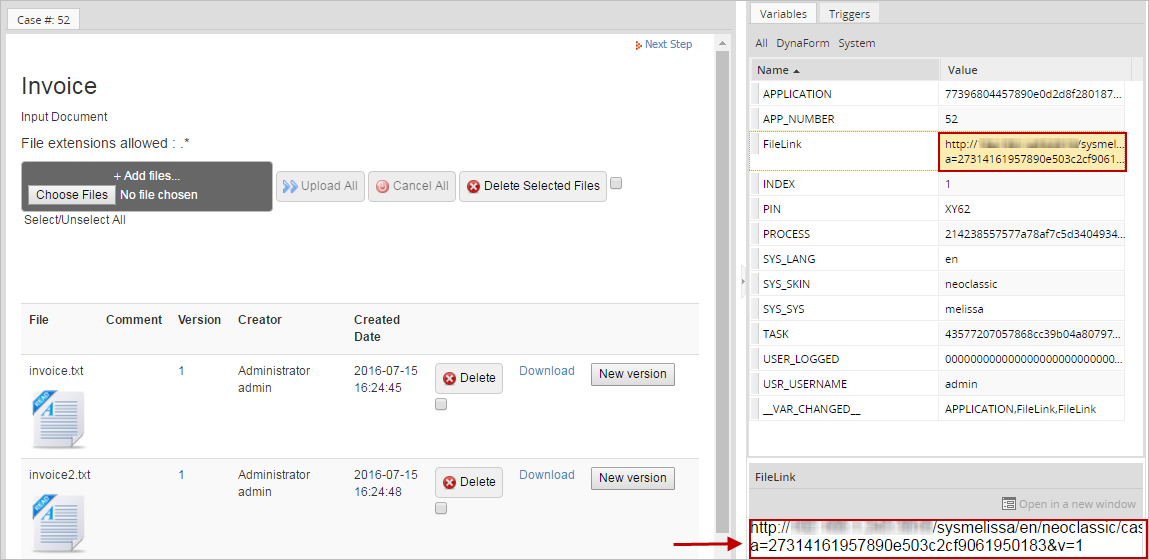
If a subsequent Dynaform has a link field named "FileLink", then it will use the URL set in the above trigger:

PMFGetRolUser()
PMFGetRolUser() obtains the role of a specified user.
Function Definition
Parameters:
- string userUid: The user's unique ID, which can be found in the following ways:
- Get the UID of the user currently logged-in with the @@USER_LOGGED system variable or $_SESSION['USER_LOGGED'].
- Use the PMFUserList() or userList() web service.
- Query the wf_<WORKSPACE>.USERS.USR_UID field in the database with executeQuery().
Return value:
string. It returns the name of the role.
Example
This example obtains the role a user belongs to. Create a Dynaform with a text field named "Usr_Role". Then, create the trigger with the corresponding function, so go to the TRIGGERS tab, then click on the WIZARD button. Expand ProcessMaker Advanced Triggers, click on the PMFGetRolUser (Obtain the role of a user) function and fill in the following information:
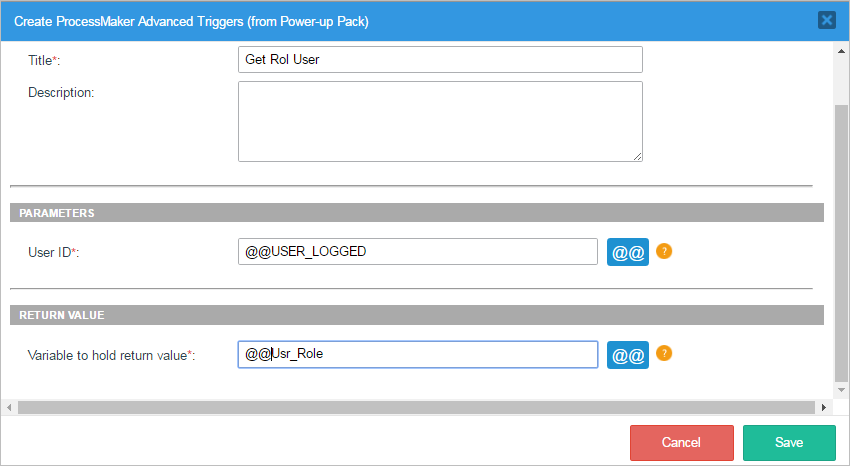
Its definition will be:
@@Usr_Role = PMFGetRolUser (@@USER_LOGGED);
Assign the trigger to fire before the Dynaform. When a case is executed, the user's role can be obtained:

This information may be used as a part of the user information displayed in a Dynaform. It can also be used in a condition to determine which tasks or steps are executed in the process.
PMFGetUserReportsTo()
PMFGetUserReportsTo() returns the unique ID of the supervisor of a specified user.
Function Definition
Parameters:
- string userUid: The user's unique ID, which can be found in the following ways:
- Get the UID of the user currently logged-in with the @@USER_LOGGED system variable or $_SESSION['USER_LOGGED'].
- Use the PMFUserList() or userList() web service.
- Query the wf_<WORKSPACE>.USERS.USR_UID field in the database with executeQuery().
Return value:
string. It returns the unique ID of the supervisor.
Example
This example uses the sample "Expense Report" process, to obtain the ID of the supervisor of the user who is executing the current case. That ID is used to send an email to the supervisor, to get the Cash Advance Approved.
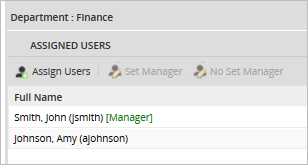
First create two users and assign them to a department and make one of them a Supervisor:
Then, inside the dynaform (in this case, the corresponding dynaform of the Expense report will be Cash Travel Advanced), create a hidden variable named IdSupervisor, there we will save the Supervisor ID that will be used in the trigger. In the following example, we will obtain the role the user belongs to, so, just create a Dynaform with a field name Usr_Role.
Then, create the trigger with the corresponding function, go to TRIGGERS inside the process you are working on, then click on the WIZARD button. Select ProcessMaker Advanced Triggers, look for the PMFGetUserReportsTo (Returns the user's supervisor) function and fill it with the following information:
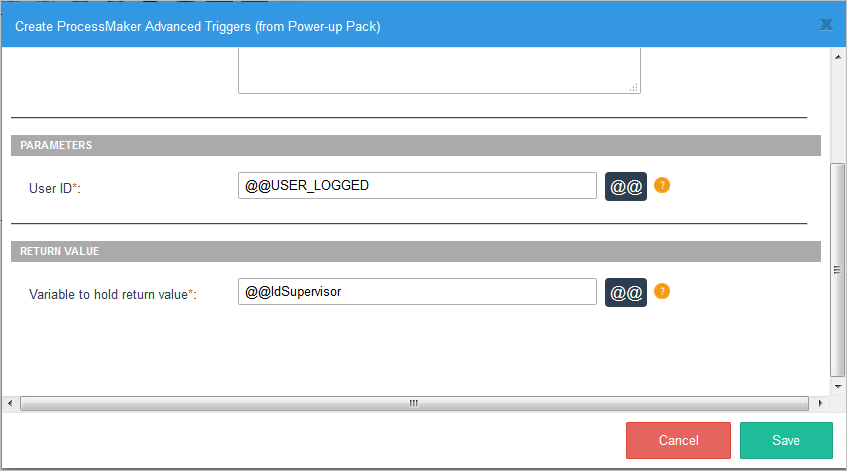
The function definition is saved to the variable @@IdSupervisor (the supervisor's ID):
@@IdSupervisor = PMFGetUserReportsTo (@@USER_LOGGED);
Below the PMFGetUserReportsTo() definition, the @@IdSupervisor variable is then used in the PMFInformationUser() function to look up the email address of the supervisor and send him/her an email. Also use the PMFSendMessage() function to send the email with the @@mail variable where you will get the supervisor's email:
Do not forget to configure your email server and replace 'liliana@colosa.com' by your personal email. Additionally, edit the template.html file in order to add information to send to the supervisor.
Assign this trigger to fire before the Dynaform. After starting the case, the following Dynaform will be used in order to send information for the corresponding approval:
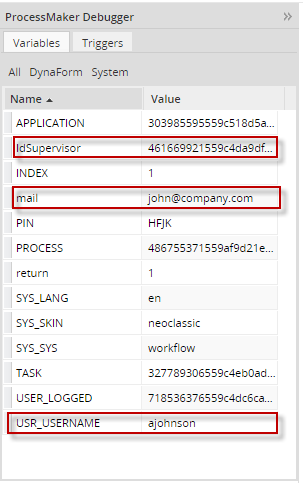
This will help us to know if the values are being used properly. For instance, the value can be used to send information to that supervisor.
PMFGetUsersOfTask()
PMFGetUsersOfTask() obtains a list of users assigned to a task, no matter what type of assignment rule the task has. This function also includes users assigned to the task as members of groups.
Function Definition
Parameters:
- string taskUid. The unique ID of the task, which can be found in the following ways:
- Use the @@TASK system variable for the unique ID of the current task.
- Use the PMFTaskList() function or taskList() web service.
- Query the wf_<WORKSPACE>.TASK.TAS_UID field in the database or get the starting task of the current process with the following query:
- "SELECT TAS_UID FROM TASK WHERE PRO_UID='" . @@PROCESS . "' AND TAS_START='TRUE'"
- string statusGroup. Optional parameter. Obtains groups with the specified status, which can be: 'ACTIVE', 'INACTIVE' or 'ALL'
- string statusUser. Optional parameter. Obtains users with the specified status, which can be: 'ACTIVE', 'INACTIVE' or 'ALL'
Return value:
The list of users is returned in an array of associative arrays:
Example
Let's display users who are assigned in a task.
First, create the trigger with the corresponding function. Go to TRIGGERS inside the process you are working on, then click on the WIZARD button. Expand ProcessMaker Advanced Triggers, look for the PMFGetUsersOfTask (Get a list of users assigned to a task) function and fill it with the following information:
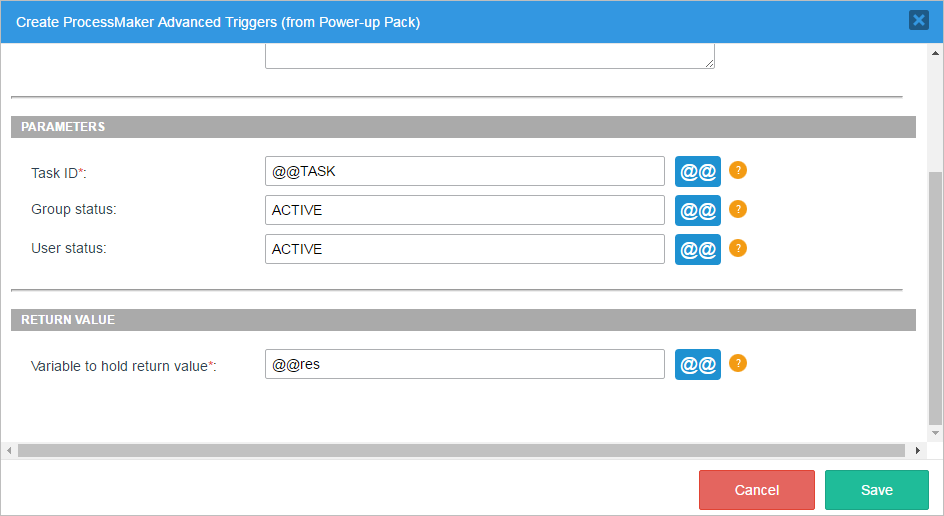
Its definition will be:
@@res = PMFGetUsersOfTask(@@TASK, "ACTIVE", "ACTIVE");
In the case of the example, the task ID will be defined inside the trigger, in our case it is @@TASK, the current task. We will get the information in the @@res variable. For this example, we use Active Groups and Users. In order to get the result you need to enable your debug mode.
Assign the trigger at any place in the process, depending on how [the process/the trigger] was designed; the important thing here is the result obtained. For example, there are three users assigned in the task, so when the process and trigger are executed, the following information will be obtained:
As it can be seen, the information of all users assigned to a task is displayed. This information can help to decide which user will get the next task when using value based assignment.
PMFLoadGrid()
PMFLoadGrid() populates a grid with data stored in a PM Table or other MySQL table in the wf_<WORKSPACE> database for the current ProcessMaker workspace.
Function Definition
There are two ways to call the PMFLoadGrid() function. The grid can be populated by either defining the gridFields parameter or by defining the gridName, proUid and dynUid parameters. If gridFields is an associative array of field names, then the first method will be used and the gridName, proUid and dynUid will be ignored.
Parameters:
- string sourceData: The name of the table to query or an SQL SELECT statement. Remember that PM Table names are in uppercase by default and PM Tables have 'PMT_' prepended, so a PM Table named "CLIENTS_INFO" will be 'PMT_CLIENTS_INFO'.
- array gridFields: Optional parameter. An associative array that maps the grid fields to their corresponding table fields. The keys in the array contain the names of the fields in a grid and their values are the corresponding names of the fields in the database table:
- array("grid-field1"=>"table-field1", "grid-field2"=>"table-field2", ...)
- Note that it is necessary to list all the fields to be retrieved, even if the field names in the grid are the same as the field names in the database table. If the gridName, proUid and dynUid parameters will be defined, then set this parameter to array(), which is an empty array.
- string gridName: Optional parameter. The field name of the grid in a master Dynaform. Do NOT use the name of the separate grid form.
- string proUid: Optional parameter. The unique ID of the process. To get the unique ID of the current process, use the @@PROCESS system variable.
- string dynUid: Optional parameter. The unique ID of the master Dynaform that contains the grid. To get this ID, open the process for editing, click on DYNAFORMS in the top bar and in the list click on the UID button for the Dynaform.
- string sortField: Optional parameter. The name of the field by which the grid will be sorted. If omitted or set to '' (empty string), then the rows will be left in the order retrieved from the database.
- string ord: Optional parameter. The order by which the grid will be sorted, which is 'ASC' (ascending order) by default. It can be either 'ASC' or 'DESC'.
Return value:
array. It returns data as a numbered array of associative arrays, where the keys in the associative arrays are the names of the fields in the grid. This is the same way that grids are represented in ProcessMaker:
Note that the array starts counting from 1, not 0 like a normal array. If the return value PMFLoadGrid() is assigned to a case variable that has the same name as the field name of a grid in a master Dynaform, then the grid will display the data returned by PMFLoadGrid().
PMFSetOnVacation()
PMFSetOnVacation() sets a user's status to VACATION and reassigns that user's cases to another user. Note that the user will not be able to run any more cases, until his/her status is set back to ACTIVE.
Note that only cases which have "TO_DO" status are reassigned. Cases with "DRAFT" status are not reassigned.
Function Definition
Parameters:
- string userUid. The unique ID of the user whose status will be changed to VACATION. The ID can be found in the following ways:
- Get the UID of the currently logged-in user with the @@USER_LOGGED system variable or $_SESSION['USER_LOGGED'].
- Use the PMFUserList() or userList() web service.
- Query the wf_<WORKSPACE>.USERS.USR_UID field in the database with executeQuery().
- string userReplacer . Optional parameter. The unique ID of the user who will replace the user who is on vacation and be reassigned to their cases. Make sure that this replacement user either has normal or ad hoc assignment to the tasks, so they are available to be reassigned. If this parameter is not defined, then the user selected in the Replace by field of the user's profile will be reassigned to the cases.
Note: The replaceBy parameter does not change the replaceby parameter value in the user profile. This parameter only applies to cases where the function is called.
Return value:
If the user to set on vacation or the replacement user do not currently have ACTIVE status, then returns a string with an error message. Otherwise, returns the following associative array:
Example
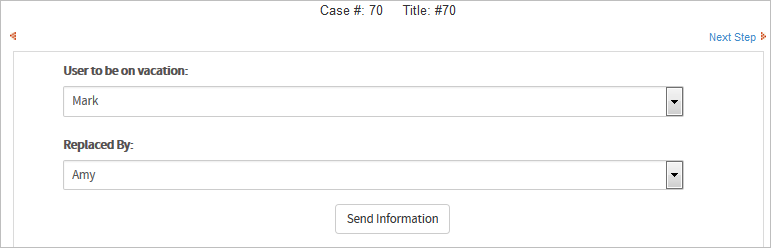
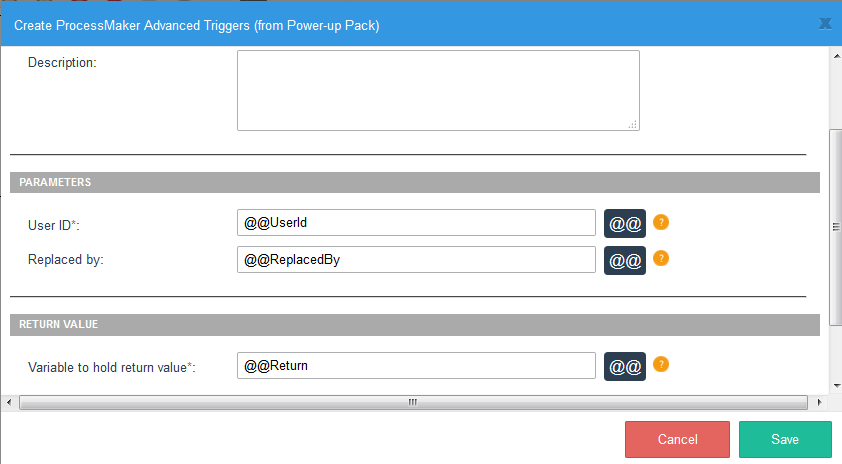
In the example below, we will create a Dynaform where you will be able to decide which person will replace the user on vacation.
Step 1: Let's create a Dynaform with two dropdown fields.
Then create two variables, UserId, ReplacedBy, for each respective field and add the following SQL statement:
SELECT USR_UID, USR_FIRSTNAME FROM USERS
Both variables must have the same SQL statement:
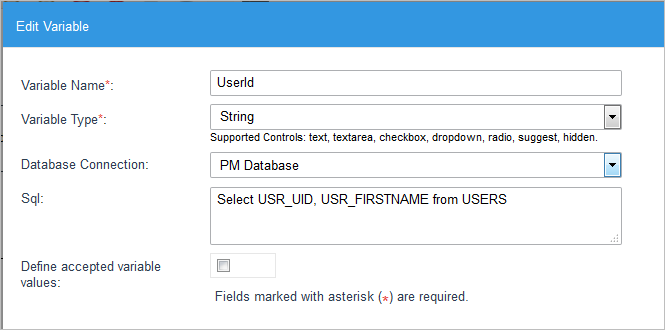
Then, each variable must be related to its corresponding Dynaform field.
Step 2: Create the trigger with the corresponding function, go to TRIGGERS inside the process you are working on, then click on the WIZARD button. Expand ProcessMaker Advanced Triggers, look for the PMFSetOnVacation (Change a user to ' on vacation' status) function and fill it with the following information:
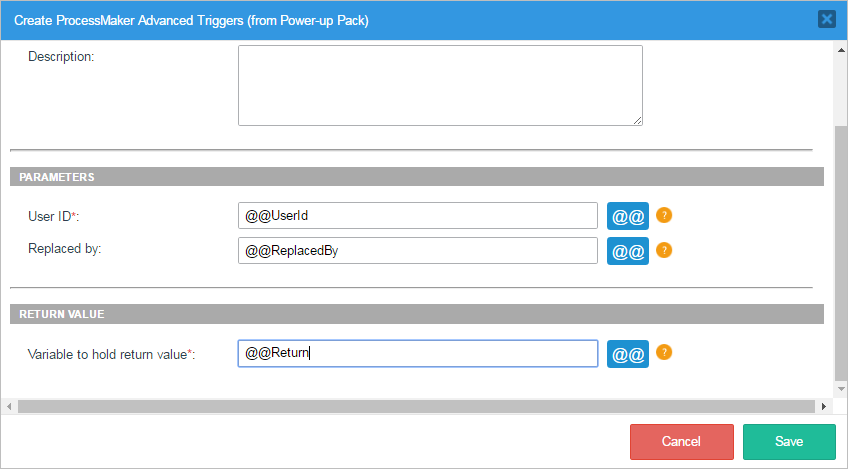
As you can see we are using Dynaform variables in both parameters.
Its definition will be:
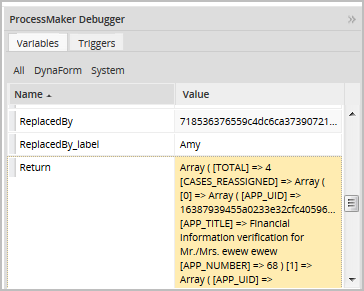
@@Return = PMFSetOnVacation(@@UserId, @@ReplacedBy);
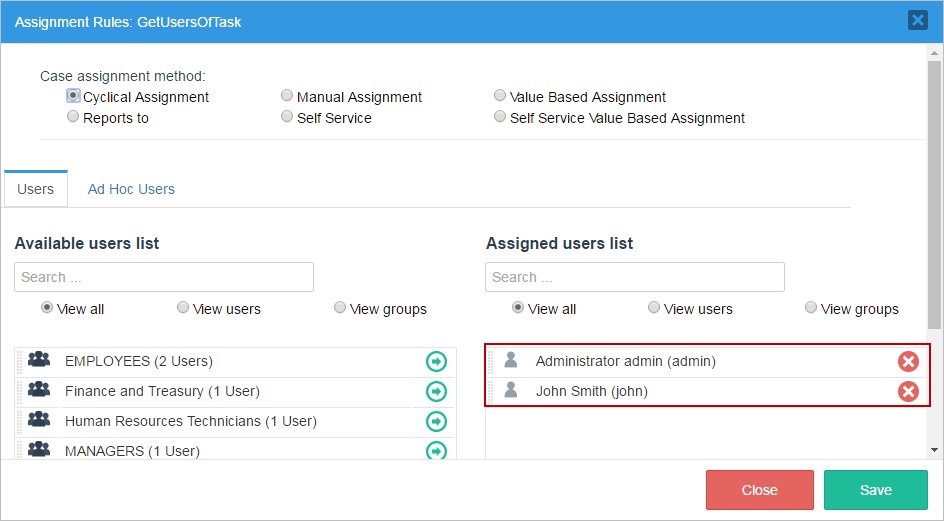
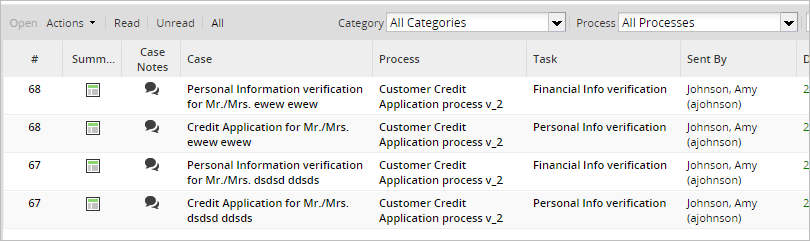
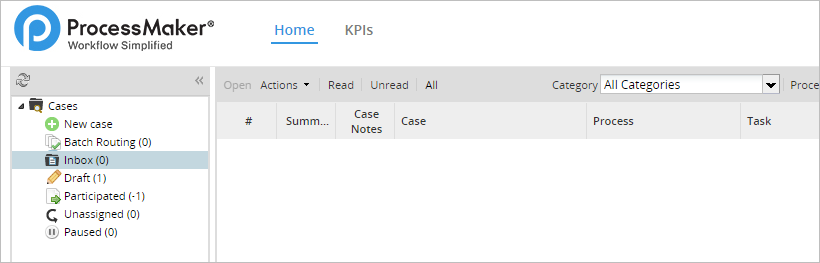
Step 3: Make sure you have pending cases for the users you are going to use. We will use two users, Amy Johnson and Mark Peterson. Logging in with Mark Peterson and going to his inbox, we will see 4 cases:
Then, execute a case. In the first field choose Mark Peterson, since he will be the person on vacation and will be replaced by Amy Johnson. This last user must be chosen on the second field:
Click on the Submit button, and if you have the debugger enabled, inside the return variable you will see the number of reassigned cases and their corresponding information:
Logging in with the user 'Mark Peterson', we will see that the inbox folder is empty:
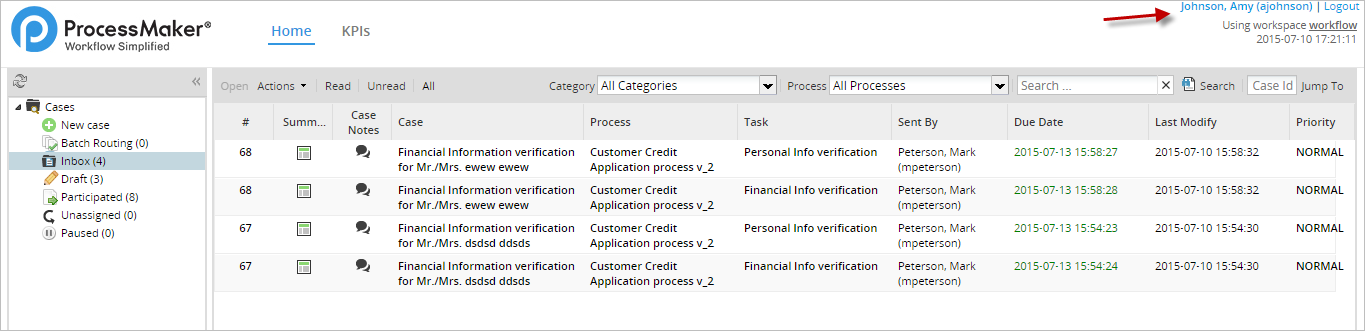
Finally, logging in as 'Amy Johnson', we will see all reassigned cases in her inbox folder:
Insert Images:


Version Info:
*3.8|;*3.7|;*3.6|;*3.5|;*3.4|;*3.3|;*3.2|;*3.1|;*3.0|;2.x|/index.php/ProcessMaker_PowerUp
Please rate how useful you found this document:
Please rate how useful you found this document:
Overview
The following list shows the feature comparison among versions 2.8 and 3.0.x (both Community and Enterprise editions).
| Feature | 2.8CE | 2.8EE | 3.0CE | 3.0EE |
|---|---|---|---|---|
| REST API | ||||
| Extended REST API Endpoints | x | x | x | x |
| OAuth 2.0 protocol support | x | x | x | x |
| Performance | ||||
| Code optimization - Up to 40% faster engine! | x | x | x | x |
| New Cases List. Each list has its own dedicate table | x | x | ||
| Supported Stacks | ||||
| Official Support for Internet Information Services (IIS) 7 or later | x | x | x | x |
| Support for PHP 5.4 | x | x | x | x |
| Official Support for Internet Explorer v. 10 and v.11 | x | x | x | x |
| Support for Windows Server 2012 | x | x | ||
| Support for Windows 8 | x | x | ||
| Support for IE 11 | x | x | ||
| Security | ||||
| Veracode security tests | x | x | ||
| Plugin/Trigger code scanner | x | x | ||
| Advanced Security Policies | x | x | ||
| Responsive DynaForm Designer | ||||
| Support for subforms within a form | x | x | ||
| Check if Javascript is running in the browser | x | x | ||
| Javascript extensions | x | x | ||
| Multilanguage | x | x | ||
| Add preview of forms in different platforms (desktop, tablet, phone) | x | x | ||
| Add permissions to view Dynaforms within Summary | x | x | ||
| Ability to manage permissions for each process designer | x | x | ||
| Web UX Scroll functionality for mobile devices | x | x | ||
| New jQuery BPMN 2.0 Process Designer | x | x | ||
| Support for extended BPMN 2.0 Elements | x | x | ||
| Import/Export of .bpmn files | x | x | ||
| New HTML5 RWD form designer with Bootstrap CSS | x | x | ||
| Single DB of ProcessMaker | x | x | x | x |
| Browser not recognizing PDF Output Document | x | x | x | x |
| Separation of Read & Write databases | x | x | ||
| Single database migration script | x | x | ||
| Ability to define indexes for report tables | x | x | ||
| Added support for executing a trigger when a case is unpaused | x | x | ||
| Officially supported browser detection at login | x | x | ||
| Visual condition check | x | x | ||
| Extension and size limit of Input Documents | x | x | ||
| Regular Expression validation on fields | x | x | ||
| Separation of variables from forms | x | x | ||
| Enterprise Features | ||||
| Strategic Dashboards (KPIs) | x | |||
| Audit log for any administration action | x | x | ||
| Enterprise Plugin integrated in the core | x | x | ||
| Send emails from multiple accounts - NO INTERFACE | x | x | ||
| Actions by Email | x | |||
| Batch Routing | x | |||
| Advanced LDAP/AD sync (new in version 3.0.1) | x | |||
| Windows Single Sign On (Without Plexcel) (new in version 3.0.1) | x | |||
| Secure User Password Hash (SHA 256 - Developed by NSA) | x | x | ||
| Second Database Connection | x | x | ||
| Enterprise Plugins | ||||
| Custom Case List Builder | x | x | ||
| Simple Reporting | x | x | ||
| Advanced Dashboards | x | |||
| Version Upgrade Manager | x | x | ||
| Case Scheduler FTP Monitor | x | x | ||
| External User Registration Wizard | x | x | ||
| Service Level Agreements Manager | x | x | ||
| Business Rules Engine | x | x | ||
| Enterprise Data Search | x | x | ||
| Advanced Performance Monitor Dashboards | x | |||
| Case Archive/Restore | x | x | ||
| Multi-Tenancy Management | x | x | ||
| Multiple Input Document Uploader | x | x | ||
| PowerUp | x | x | ||
| Advanced LDAP/AD sync (plugin until version 3.0.1) | x | x | ||
| Knowledgetree DMS Connector | x | x | ||
| SigPlus Signature Pads for Electronic Signatures | x | |||
| Single Sign-On with Active Directory (plugin until version 3.0.1) | x | x | ||
| Microsoft Outlook Connector | x | x | ||
| Pentaho Business Intelligence Connector | x |
Please rate how useful you found this document:
Please rate how useful you found this document:
Overview
To install ProcessMaker's mobile app on your Android or iOS device, check whether your device meets the minimum requirements, which are listed below.
Minimum Requirements
The ProcessMaker app supports the following configurations on smartphones:
| Operating System | Screen size |
|---|---|
| Android v. 4.4.4 and later | 3.7 inches or bigger |
| iOS 7.0 or later * (Including the following devices) | Any screen size |
| Iphone v.4 or later | |
| Ipad | |
| Iphone touch |
* Optimized for iPhone 5
Note: ProcessMaker Mobile version 1.0.8 only works with ProcessMaker version 3.0.1.7 or later.
Version Info:
2.4|/Mobile/Requirements_v2;2.x|/Mobile/Requirements;*1.x|/Mobile/MobileMinimumRequirements
Please rate how useful you found this document:
Please rate how useful you found this document:
Overview
Check new documentation about features and improvements added on version 2.5.1, as well as updated documentation related with fixed bugs. Documentation will be split into sections.
Process Permission
Message History Permission: A user or a group of users, depending on how the permission is set, will have access to resend messages sent during the execution of a process, and also will see the preview of each message sent.
Managing Cases
When a case is about to be paused, user will be able to select the hour when case will be paused.
Managing DynaForms
Adding subtitles inside a dropdown: The addition of subtitles will help users to categorize their queries, specially if they have to insert more than one query inside a dropdown.
Triggers
In the Trigger editor the following improvements has been included:
- Set colors according to the php function inserted
- Show a function list.
ProcessMaker Functions
It was not possible to create a new case using the PMFNewCaseImpersonate when the process has various starting tasks, now the taskid was added as a parameter to indicate which is the task to be used to start a new case impersonating.
Commands to execute
./processmaker migrate-cases-folders To manage the issue with 32k folders, this command migrates documents inside ProcessMaker Folders .
Consulting ProcessMaker Databases
SEQUENCE table was created in order to avoid the creation of duplicate cases.

