Please rate how useful you found this document: 
Average: 2.4 (7 votes)
Please rate how useful you found this document: 
Average: 2.4 (7 votes)

Overview

Follow these generic instructions to install ProcessMaker 2.0 on a server running Linux or UNIX or Windows (XP, Server 2003, Vista, 7, 8 or Server 2008). Before installing ProcessMaker, check its Installation Requirements. After installation, see Additional Server Configuration.

Installing ProcessMaker

1. Go to http://sourceforge.net/projects/processmaker/files and download a recent tarball of ProcessMaker, which should be named processmaker-2.X.X.tar.gz The versions are numbered according to the pattern MAJOR.MINOR.REVISION, such as "2.0.36". 2. Move the processmaker-2.X.X.tar.gz file which was downloaded to the directory in your server where the ProcessMaker application will be stored. ProcessMaker can be installed in any directory which is not publicly accessible to the internet (so do NOT install it in /var/www in Linux/UNIX).

In Linux/UNIX, it is generally installed in the /opt directory, since it is an optional program which doesn't come from the standard repositories. In Windows XP and Server 2003, it is generally installed in the C:\Program Files directory.

In Windows Vista, 7, 8, and Server 2008, it is generally installed in the local directory of a user, such as C:/Users/USERNAME/processmaker, due to the new security restrictions which do not allow Apache to write to the C:/Program Files directory.

3. The code files are in tar.gz format and can be extracted using most compression tools, like the tar command in Linux/UNIX or WinRAR or 7-Zip in Windows. Linux/UNIX: tar -C /opt -xzvf processmaker-2.X.X.tar.gz MS Windows:

Use WinRAR or 7-Zip to extract the file processmaker-2.X.X.tar.gz

This will create a new processmaker directory, containing all the ProcessMaker files and directories, which should have the following contents:

gulliver     processmaker      rbac        shared
LICENSE.txt  processmaker.bat  README.txt  workflow

Setting File Permissions

After decompressing the ProcessMaker code, several of the subdirectories need to be made writable, so ProcessMaker running on Apache can write to them.

Linux/UNIX:
cd <INSTALL-DIRECTORY>/processmaker
chmod -R 770 shared
cd <INSTALL-DIRECTORY>/processmaker/workflow/engine/
chmod -R 770 config content/languages plugins xmlform js/labels

From version 2.0.40 give write permissions to:

 chmod -R 770 <INSTALL-DIRECTORY>/processmaker/workflow/public_html

From version 2.5.0 give write permissions to:

 chmod -R 770 <INSTALL-DIRECTORY>/processmaker/gulliver/js
 chmod -R 770 <INSTALL-DIRECTORY>/processmaker/gulliver/thirdparty/html2ps_pdf/cache  

Then, change the owner of the ProcessMaker files to the user who runs Apache. The name of this user varies from distribution to distribution:

Red Hat/CentOS/Fedora: chown -R apache:apache <INSTALL-DIRECTORY>/processmaker Debian/Ubuntu: chown -R www-data:www-data <INSTALL-DIRECTORY>/processmaker SUSE/OpenSUSE:
chown -R wwwrun:www <INSTALL-DIRECTORY>/processmaker
Windows:

Make the following directories writable. Right click on the following directories and choose the option Properties from the dropdown menu. In the "Properties" window, uncheck the option Read only:

<INSTALL-DIRECTORY>\processmaker\shared
<INSTALL-DIRECTORY>\processmaker\compiled
<INSTALL-DIRECTORY>\processmaker\workflow\engine\config\
<INSTALL-DIRECTORY>\processmaker\workflow\engine\content\languages\
<INSTALL-DIRECTORY>\processmaker\workflow\engine\js\labels\
<INSTALL-DIRECTORY>\processmaker\workflow\engine\plugins\
<INSTALL-DIRECTORY>\processmaker\workflow\engine\xmlform\
<INSTALL-DIRECTORY>\processmaker\workflow\engine\plugins\

From version 2.0.40 on, make the following directory writable:

<INSTALL-DIRECTORY>\processmaker\workflow\public_html\

From version 2.5.0 on, make the following directories writable:

<INSTALL-DIRECTORY>/processmaker/workflow/public_html
<INSTALL-DIRECTORY>/processmaker/gulliver/thirdparty/html2ps_pdf/cache

The last two are necessary to generate Output Documents.

Apache Configuration

Edit the file <INSTALL-DIRECTORY>/processmaker/etc/pmos.conf with a plain text editor (such as Notepad or Notepad++ in Windows or vim, nano or gedit in Linux/UNIX).

Modify the following virtual host definition to match your environment:

# Please change the IP address with your server's IP address and
  # the ServerName with you own subdomain for ProcessMaker.
  NameVirtualHost your_ip_address
  #processmaker virtual host
  <VirtualHost your_ip_address >
    ServerName "your_processmaker_domain"
    DocumentRoot /opt/processmaker/workflow/public_html
    DirectoryIndex index.html index.php
    <Directory  "/opt/processmaker/workflow/public_html">
       AddDefaultCharset UTF-8
       AllowOverRide none
       Options FollowSymlinks
       Order allow,deny
       Allow from all
       RewriteEngine on
       RewriteRule ^.*/(.*)$ sysGeneric.php [NC,L]
       ExpiresActive On
       ExpiresDefault "access plus 1 day"
       ExpiresByType image/gif "access plus 1 day"
       ExpiresByType image/png "access plus 1 day"
       ExpiresByType image/jpg "access plus 1 day"
       ExpiresByType text/css "access plus 1 day"
       ExpiresByType text/javascript "access plus 1 day"
       AddOutputFilterByType DEFLATE text/html
    </Directory>
  </VirtualHost>

Note: If using Apache 2.4, then change the following line from:

    Order allow,deny
    Allow from all

To:

    Require all granted

Also make sure that the Apache filter module is enabled in Apache 2.4 in order to prevent errors with the following line:

    AddOutputFilterByType DEFLATE text/html

Replace your_ip_address with the IP number or domain name of the server running ProcessMaker. If only planning on running and accessing ProcessMaker on your local machine, then use the IP address "127.0.0.1". If using ProcessMaker on a machine whose IP address might change (such as a machine whose IP address is assigned with DHCP), then use "*", which represents any IP address. If not using the standard port 80, then it is necessary to also specify the port number.

If your DNS or /etc/hosts has a defined domain for ProcessMaker, then use that domain for your_processmaker_domain. Otherwise, use the same IP address for your_processmaker_domain as was used for your_ip_address.

If ProcessMaker is installed in a location other than /opt/processmaker/ , then edit the paths to match where Processmaker is installed on your system.

For example, if running ProcessMaker on a Windows XP server at address 192.168.1.100 on port 8080 with a domain at processmaker.mycompany.com:
NameVirtualHost 192.168.1.100:8080
 #processmaker virtual host
 <VirtualHost 192.168.1.100:8080 >
   ServerName "processmaker.mycompany.com"
   DocumentRoot C:\Program Files\processmaker\workflow\public_html
   DirectoryIndex index.html index.php
   <Directory  "C:\Program Files\processmaker\workflow\public_html">
   ...

For example, if running ProcessMaker on a Linux server at address server1.example.com with a domain at pm.example.com:

 NameVirtualHost server1.example.com
 #processmaker virtual host
 <VirtualHost server1.example.com >
   ServerName "pm.example.com"
   DocumentRoot /opt/processmaker/workflow/public_html
   DirectoryIndex index.html index.php
   <Directory  "/opt/processmaker/workflow/public_html">
   ...

For example, if ProcessMaker is installed in the "/home/fred" directory on your local machine at port 8080 with an dynamic IP assigned by DHCP:

NameVirtualHost *:8080
 #processmaker virtual host
 <VirtualHost *:8080 >
   ServerName "*"
   DocumentRoot /home/fred/processmaker/workflow/public_html
   DirectoryIndex index.html index.php
   <Directory  "/home/fred/processmaker/workflow/public_html">
   ...

Note: It is also possible to define the virtual host for ProcessMaker directly in the Apache configuration by inserting the above VirtualHost definition in the Apache configuration file, which is generally named httpd.conf.

Then, copy the pmos.conf file to the following directory, where it will automatically be loaded by the Apache web server:

Generic Linux/UNIX:

/etc/httpd/conf.d/pmos.conf

Debian/Ubuntu:

/etc/apache2/sites-available/pmos.conf

Then issue the command:

a2ensite pmos.conf

Windows:

C:\wamp\bin\apache\apache2.2.8\conf\extra\pmos.conf

If using Windows, add the following line to the httpd.conf file, so that the ProcessMaker virtual configuration can proceed:

Include "C:\wamp\bin\apache\apache2.2.8\conf\extra\pmos.conf"

Note: If Apache is using the default port 80, then configure Skype and other programs to not use port 80. You can check whether a program is currently listening on port 80 with netstat -anb in Windows or netstat -tanp in Linux/UNIX.

To configure Skype to stop listening on port 80, go to Tools > Options. Under the Advanced section of the "Options" dialog box, select the Connection tab. Deselect the option Use port 80 and 443 as alternatives for incoming connections.

ProcessMaker Configuration

Open a web browser and enter the IP address (and port number if not using the default port 80) where ProcessMaker is installed. For instance, if ProcessMaker is installed at the address 192.168.10.100 with port 8080, then go to: http://192.168.10.100:8080

If using ProcessMaker on the local machine, then go to: http://127.0.0.1

The installation configuration page should appear to setup ProcessMaker. If the default Apache page appears, then first disable it and try again.
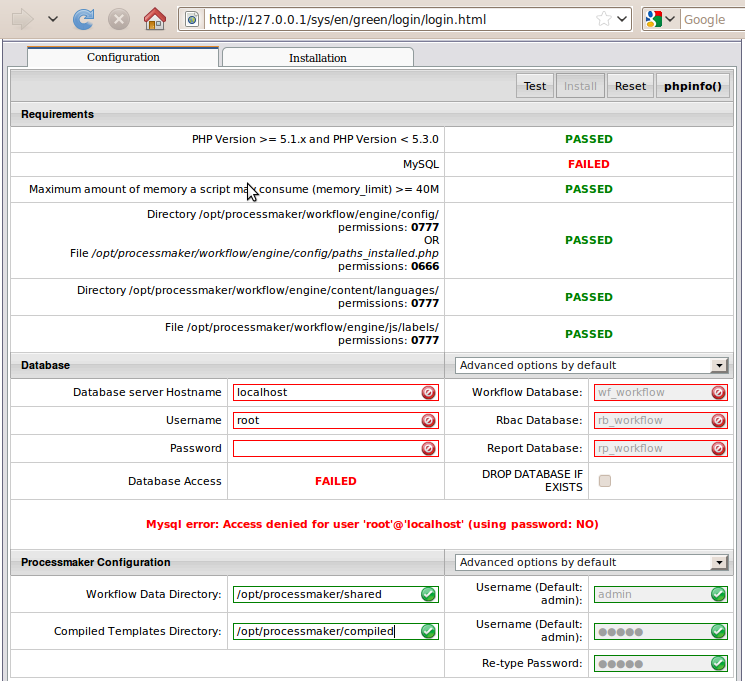
In the configuration page, enter in the username and password to access MySQL. This should be a user such as "root" who has privileges to create new MySQL databases. Click on the Test button to verify that ProcessMaker is configured properly. Green checkmarks will indicate that the settings work correctly:
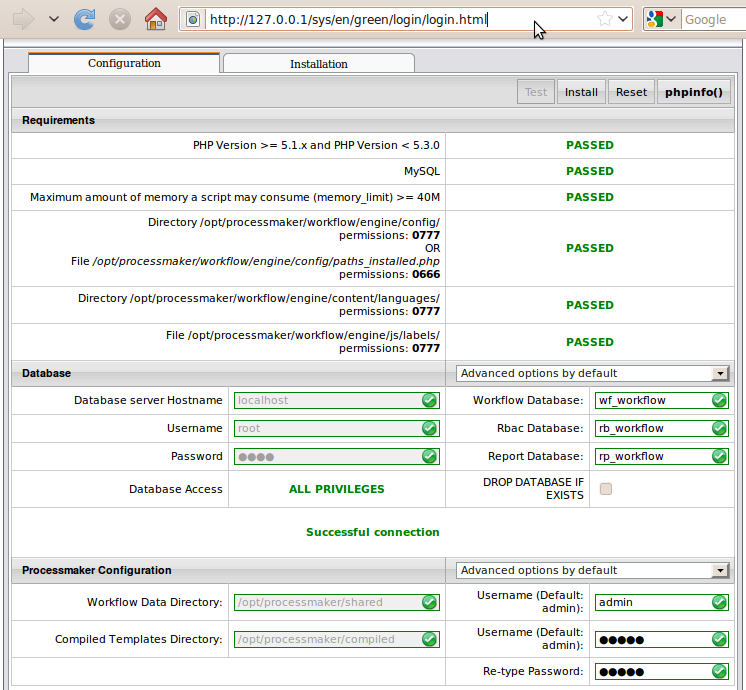
\

To change a setting after clicking Test, click on Reset. To change the default administrator username and password, select the option in the ProcessMaker Configuration section.

Important! The “admin” user will be able to access to all the features and functionality in your ProcessMaker installation, such as: system configuration, processes creation and editing, user and group management, case management, and report and dashboard oversight among others. Thus, it is strongly recommended you take care to configure a difficult-to-guess password for this account. Take a look at this list of password dos and don’ts. You may also consider using a strong password generator like this one.

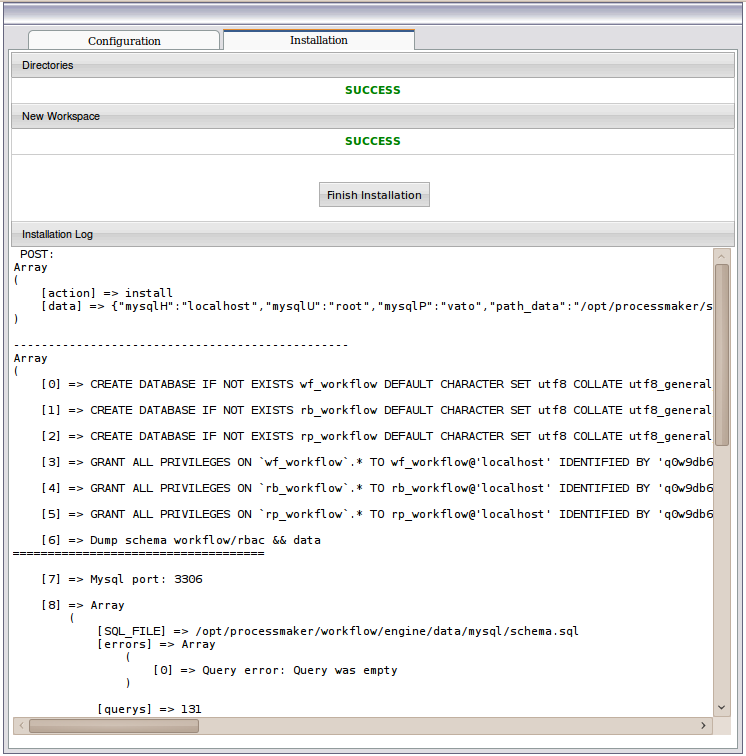
Once all the settings are properly configured click on Install to install processmaker. The installation screen should indicate SUCCESS. If errors arise, please check the file <INSTALL-DIRECTORY>/shared/log/install.log and visit the Processmaker forum to get support.
At the login screen, enter the Username of "admin" and the Password of "admin" and the Workspace name, which by default is "workflow". Once logged, it is strongly recommended to change the administrator credentials.

To login with a different workspace, language or skin, see the Login section.

If the ProcessMaker configuration screen appears the next time you try to login, press CTRL+SHIFT+r or CTRL+F5 to clear the web browser's cache.

Note: It is a good idea to reset the administrator's password to something more secure in the future before using ProcessMaker in production.

Additional Configuration

Additional aspects of ProcessMaker may need to be configured. See Additional Server Configuration and the Configuration section of the wiki. Most installations of ProcessMaker need to configure the following:

Setting the Time Zone

In ProcessMaker version 2.0.29 and later, the default time zone for the ProcessMaker server is set in the env.ini configuration file. If using a previous version of ProcessMaker, see Default Time Zone.

Configuring Email

If planning on sending out email notifications or enabling users to recover forgotten passwords, then see Email - Settings to configure ProcessMaker to use an email server.

Execution of cron.php

If planning on using email notifications, events or the case scheduler, then the server running ProcessMaker has to be configured to periodically execute the cron.php file. See Executing cron.php.

Errors during Installation

If an error occurs during the installation, check the installation log file:

 <PROCESSMAKER-INSTALL-DIRECTORY>/shared/log/install_log.log

Depending on the errors found in the installation log file, check the following files:

The Apache configuration file:

<APACHE-INSTALL-DIRECTORY>/httpd.conf

The ProcessMaker web site configuration file for Apache:

<APACHE-INSTALL-DIRECTORY>/conf.d/pmos.conf

The PHP configuration file:

<PHP-INSTALL-DIRECTORY>/php.ini

The MySQL configuration file:

<MYSQL-INSTALL-DIRECTORY>/my.ini

The ProcessMaker configuration file where components are installed:

<PROCESSMAKER-INSTALL-DIRECTORY>/workflow/engine/config/paths_installed.php

The ProcessMaker configuration file for database connections:

<PROCESSMAKER-INSTALL-DIRECTORY>/shared/sites/workflow/db.php

The ProcessMaker redirection to login screen:

<PROCESSMAKER-INSTALL-DIRECTORY>/processmaker/workflow/public_html/index.html

If the following error appears at the login screen:

This error indicates that the installer was unable to access the MySQL databases to install the translations. Make sure that the MySQL port (which is 3306 by default) isn't blocked by a firewall and MySQL is configured to accept connections from the server running Processmaker.

If the following error occurs during the "finalizing" stage on the wizard:

Could not execute query [Native Error: You do not have the SUPER privilege and binary logging is enabled (you *might* want to use the less safe log_bin_trust_function_creators variable)] [User Info: DROP TRIGGER IF EXISTS APP_DELEGATION_INSERT].

Add the following line inside the my.cnf file:

log-bin-trust-function-creators = 1
Insert Images: 
Please rate how useful you found this document: 
Average: 2.4 (5 votes)
Please rate how useful you found this document: 
Average: 2.4 (5 votes)

Overview

This document is a guide to upgrade ProcessMaker. The structure of the databases and the file locations may be changed from one version of ProcessMaker to the next, so do NOT try to use data from one version of ProcessMaker in a different version of ProcessMaker, without first following the upgrade procedure.

The upgrade procedure will update the processes and data to the new version. However, take into account the following considerations once the upgrade is completed:

About old processes:

  • Classic processes (created in the old designer in ProcessMaker 2) can be now used in version 3.0, but they will not be converted into BPMN processes. The only way to convert a classic process to a BPMN process is to manually recreate it in the new BPMN designer from scratch.
  • After upgrading to version 3.0, classic processes will automatically be opened in the old designer and they will work as expected, meaning that information related to users and cases won't be modified.
  • Classic processes that have been upgraded to version 3.0 can still be edited in the classic designer and cases can be executed. However, it is not possible to create new classic processes in version 3.0. Instead, all new processes will need to be created using the BPMN Designer.
  • The case list will show both cases created by classic processes and new BPMN processes, respecting their numbering.

About old Dynaforms:

  • Old Dynaforms cannot be converted into the new responsive forms. Instead, they will keep their old structure from the classic designer.

Requirements

See the requirements for ProcessMaker 3. Note that ProcessMaker version 3.0.1.7 or later requires PHP 5.4 or later. ProcessMaker version 3.0.1.8 and later requires PHP 5.5.33 or later, but this requirement can be relaxed. If using an older version of PHP, make sure to upgrade PHP before upgrading ProcessMaker.

Upgrading from a Community to an Enterprise Edition

This guide can also be used if planning to upgrade ProcessMaker from a Community to an Enterprise edition. Don't forget that a license is required in order to use the Enterprise Edition. For more information, see activating the Enterprise license.

Safety Precautions Before Upgrading

If using ProcessMaker in production, before upgrading ProcessMaker it is recommended to first install the new version of ProcessMaker on a separate test server (or in a separate port or domain on the same server) and import your processes onto the test server to verify that there are no incompatibilities.

Before upgrading, ALWAYS make a complete backup copy of the directory where ProcessMaker is installed and use mysqldump to make a complete backup of the database(s) used by each workspace. If an error arises, it will be possible to go back to the previous version of ProcessMaker and restore its data.

Warning: It is not very easy to restore a previous version of ProcessMaker with just a backup created with the processmaker workspace-backup command, so it is recommended to make full ProcessMaker backups using the method below.

Linux/UNIX:

Use the tar command to make an archive of the ProcessMaker installation directory, which is usually located at /opt/processmaker:

tar -czf BACKUP-FILE.tar.gz /opt/processmaker

To make a backup copy of the entire MySQL database:

mysqldump -u root -p -F -x -A > BACKUP-FILE.sql

In ProcessMaker 2.5.X and earlier, each workspace has three databases. To back up the three databases used by a workspace, such as the default "workflow" workspace:

mysqldump -u root -p -F -x --databases wf_workflow rb_workflow rp_workflow > BACKUP-FILE.sql

In ProcessMaker 2.8 and later, each workspace uses a single database. To back up just the database used by a ProcessMaker 2.8+ workspace, such as the default "workflow" workspace:

mysqldump -u root -p -F -x --databases wf_workflow > BACKUP-FILE.sql

Note: Workspaces that have been upgraded from version 2.5.X or earlier to version 2.8.X or later will continue to use 3 databases per workspace. If using the Enterprise Edition, it is possible to unify the 3 databases into 1 database per workspace by using the processmaker unify-database command.

Note: If unsure what the MySQL databases are named, login to MySQL and use the SHOW DATABASES command to see the available databases.

# mysql -u root -p mysql> show databases; mysql> quit;

Windows:

Open a command prompt window by going to Start > All Programs > Accessories > Command Prompt and navigate to the directory where the mysqldump command is located:

Windows Vista/7/8/10/Server 2008/2012: cd c:\Users\USERNAME\AppData\Roaming\ProcessMaker-X_X_X_X\mysql\bin Windows XP/Server 2003: cd "c:\Program Files\ProcessMaker-X_X_X_X\mysql\bin"

Then, use the mysqldump command to backup the MySQL databases as shown above for Linux/UNIX.

Restoring ProcessMaker if Problems Arise

If problems arise due to the upgrade, use the backup files to rollback to the previous version of ProcessMaker.

Linux/UNIX:

Login as "root" or the user with administrative powers and remove the ProcessMaker installation directory and replace it with the backup:

rm -fr /opt/processmaker tar -C /opt -xzf BACKUP-FILE.tar.gz

Then, restore the databases:

mysql -u root -p < BACKUP-FILE.sql

Windows:

Delete the current ProcessMaker installation directory, which by default is located at:

Windows XP/2003:

    c:\Program Files\ProcessMaker-X_X_X

Windows Vista/7/8/10/Server 2008/2012:

    c:\Users\USERNAME\AppData\Roaming\ProcessMaker-X_X_X

Then, decompress the backup copy of the previous version of ProcessMaker in the same location.

Decompressing the backup copy should restore all the previous files, including the MySQL database, because all its files are located inside the same directory as the ProcessMaker code. However, if ProcessMaker was manually installed and uses a separate installation of MySQL, then open a command prompt window (by going to Start > All Programs > Accessories > Command Prompt as the administrator user) and navigate to the directory where the mysql command is located:

cd "c:\Program Files\ProcessMaker-X_X_X\mysql\bin" or: cd c:\Users\USERNAME\AppData\Roaming\ProcessMaker-X_X_X\mysql\bin

Then, restore the MySQL databases:

mysql -u root -p < BACKUP-FILE.sql

Upgrading ProcessMaker

After making a backup copy of the existing installation of ProcessMaker, then the old version of ProcessMaker can be replaced with a new version. The upgrade procedure overwrites all existing source code, which is why ProcessMaker can't be upgraded from the graphical interface. Note that any custom changes made to the source code will be overwritten with each upgrade. After upgrading, use the processmaker upgrade script to update the database and file locations for the new version.

Upgrading the Source Code

After making a backup of the existing ProcessMaker installation, follow the steps below to install the new ProcessMaker source code, overwriting the old source code.

  1. Go to ProcessMaker SourceForge page and download a processmaker-X_X_X.tar.gz file, which has a new version of the ProcessMaker source code.
  2. Note: The blacklist.ini file (used by the Code Security Scanner) is autogenerated in the upgrade process. If a customized blacklist is currently being used, take care to backup the file before decompressing ProcessMaker.

  3. Decompress the processmaker-X.X.X.X.tar.gz file, overwriting the existing processmaker directory and all its contents, which is generally found at:

    Linux/UNIX:
        /opt/processmaker

    Windows XP/Server 2003:
        C:\Program Files\ProcessMaker-X_X_X\processmaker

    Windows Vista/7/8/10/Server 2008/2012:
        C:\Users\USERNAME\AppData\Roaming\ProcessMaker-X_X_X\processmaker

    Warning: DO NOT delete the old processmaker directory and then copy the new processmaker directory into the same place, because all the essential configuration information and all the uploaded input documents and attached files from the old installation will be lost. Instead, decompress the file so it will overwrite any existing files but won't effect any other files (such as the contents of the shared and workflow/engine/config directories and the workflow/engine/test/bootstrap/gulliverConstants.php file).

Linux/UNIX:

  1. Login as the "root" user (or use the sudo command). Then, use the tar command to overwrite the existing installation of ProcessMaker. Use the --overwrite option to replace the existing files and the -p option to preserve the permissions of existing files. Use the -C option to specify the parent directory where the processmaker directory is located.

    For example, to upgrade an installation of ProcessMaker located at /opt/processmaker with the file /root/processmaker-3.0.1.7.tar.gz:

    tar --overwrite -p -C /opt -xvzf /root/processmaker-3.0.1.7.tar.gz

    Note: If the ProcessMaker directory isn't named "processmaker", then temporarily rename it as "processmaker" so it will be correctly overwritten when the tar.gz file is decompressed. Then rename it back to its original name.

    For example, if ProcessMaker is installed at /usr/local/bin/pm, then rename it to /usr/local/bin/processmaker before overwriting the code files.

    mv /usr/local/bin/pm /usr/local/bin/processmaker
    tar --overwrite -p -C /usr/local/bin -xvzf /root/processmaker-3.0.1.7.tar.gz
    mv /usr/local/bin/processmaker /usr/local/bin/pm

  2. Then, issue the following commands so that ProcessMaker can access the necessary files when run by the Apache server:

    cd /opt/processmaker
    chmod -R 770 shared workflow/public_html gulliver/js gulliver/thirdparty/html2ps_pdf/cache
    cd workflow/engine/
    chmod -R 770 config content/languages plugins xmlform js/labels
  3. Finally, change the owner of the ProcessMaker files to the user who runs Apache. This user depends upon your distribution:

    Debian/Ubuntu:

    chown -R www-data:www-data /opt/processmaker

    RedHat/CentOS/Fedora:

    chown -R apache:apache /opt/processmaker

    SUSE/OpenSUSE:

    chown -R wwwrun:www /opt/processmaker

Windows:

Use a decompression program like WinRAR, which supports the tar.gz format, to decompress the source code and overwrite the existing processmaker directory, which by default is located at c:\Program Files\ProcessMaker-X_X_X\processmaker in Windows XP/Server 2003 or c:\Users\USERNAME\AppData\Roaming\ProcessMaker-X_X_X\processmaker in Windows Vista/7/8/10/Server 2008/2012.

Upgrading with Winrar

Upgrade ProcessMaker with Winrar by right-clicking on the processmaker-X.X.X.tar.gz file that was downloaded and selecting the option Extract here from the dropdown menu.

In the window prompt, select the Yes to All option to overwrite files and begin the extraction.

Modifying my.cnf file

binlog_format in MySQL 5.5.x or Greater

To avoid problems running triggers on MySQL 5.5 or greater, it should log by rows instead of by statements (which is the default).

Edit the MySQL configuration file, which is named my.cnf in Linux/UNIX and my.ini in Windows. Its location depends on the operating system.

Make sure that the following line appears in the MySQL configuration file:

binlog_format=row

For more information, see the MySQL documentation.

Upgrading the ProcessMaker Databases

After upgrading the ProcessMaker source code, then use the processmaker upgrade command to upgrade the three databases used by each ProcessMaker workspace. The databases have to be upgraded because the table structure may have been modified in the new version.

Go to the ProcessMaker installation directory and run the processmaker upgrade command from the command line.
Linux/UNIX:

Login as root (or use the sudo -i command), then:

cd /opt/processmaker
./processmaker upgrade

Note: If an error message appears, such as "/usr/bin/env: php: No such file or directory", then make sure that the PHP Command Line Interface is installed (whose package is named php-cli in Red Hat/CentOS/Fedora and php5-cli in Debian/Ubuntu). If PHP-CLI is already installed, then it is not installed in a location found in your $PATH, so use the full path when executing PHP-CLI:

cd /opt/processmaker
/usr/bin/php -f processmaker upgrade

Windows:

First, open a Command Prompt by going to Start > All Programs > Accessories > Command Prompt and navigate to the location where ProcessMaker installed. Then, run the processmaker upgrade command:

cd INSTALL-DIRECTORY\processmaker ..\php\php.exe -f processmaker upgrade

For example:

cd c:\Users\admin\AppData\Roaming\ProcessMaker-3_0_1_7\processmaker
..\php\php.exe -f processmaker upgrade

Changing the Apache Configuration

ProcessMaker 2.8.0 and later has a different VirtualHost configuration in Apache than in version 2.5.X and earlier. If upgrading to ProcessMaker 2.8.0 and later, it is necessary to change the rewrite rule in the VirtualHost configuration for ProcessMaker.

To change the rewrite rule, edit the pmos.conf file where the ProcessMaker VirtualHost is defined. Its location depends on your operating system:

Red Hat/CentOS/Fedora:
    /etc/httpd/conf.d/pmos.conf

Debian/Ubuntu/Mint:
    /etc/apache2/sites-available/pmos.conf

SuSE/OpenSUSE:
    /etc/apache2/conf.d/pmos.conf

Windows XP/Server 2003:
    c:\Program Files\ProcessMaker-X_X_X\apache\conf\pmos.conf

Windows Vista/7/8/10/Server 2008/2012:
    c:\Users\USERNAME\AppData\Roaming\ProcessMaker-X_X_X\apache\conf\pmos.conf

Open the pmos.conf file with a plain text editor and make sure the configuration is set as the following examples, depending on the Apache Version.

VirtualHost in Apache 2.2

If using Apache 2.2, then use the following VirtualHost configuration in the pmos.conf file. Replace your_ip_address and your_processmaker_domain with the IP address and domain name used by your ProcessMaker server:

# Please change the IP address with your server IP address and # the ServerName with your own subdomains. NameVirtualHost your_ip_address #processmaker virtual host <VirtualHost your_ip_address > ServerName "your_processmaker_domain" DocumentRoot /opt/processmaker/workflow/public_html <Directory /opt/processmaker/public_html/workflow> AddDefaultCharset UTF-8 AllowOverRide All Options FollowSymlinks Order allow,deny Allow from all RewriteEngine On RewriteCond %{REQUEST_FILENAME} !-f RewriteRule ^(.*)$ /app.php [QSA,L] ExpiresActive On ExpiresDefault "access plus 1 day" ExpiresByType image/gif "access plus 1 day" ExpiresByType image/png "access plus 1 day" ExpiresByType image/jpg "access plus 1 day" ExpiresByType text/css "access plus 1 day" ExpiresByType text/javascript "access plus 1 day" #Deflate filter is optional. It reduces download size, but adds slightly more CPU processing: AddOutputFilterByType DEFLATE text/html </Directory> </VirtualHost>

VirtualHost in Apache 2.4

If using Apache 2.4, then use the following VirtualHost configuration in the pmos.conf file. Replace your_ip_address and your_processmaker_domain with the IP address or domain name used by your ProcessMaker server:

#processmaker virtual host <VirtualHost your_ip_address > ServerName "your_processmaker_domain" DocumentRoot /opt/processmaker/workflow/public_html DirectoryIndex index.html index.php <Directory /opt/processmaker/public_html/workflow> Options Indexes FollowSymLinks MultiViews AddDefaultCharset UTF-8 AllowOverride All Require all granted ExpiresActive On <IfModule mod_rewrite.c> RewriteEngine On RewriteCond %{REQUEST_FILENAME} !-f RewriteRule ^.*/(.*)$ app.php [QSA,L,NC] </IfModule> #Deflate filter is optional. It reduces download size, but adds slightly more CPU processing: AddOutputFilterByType DEFLATE text/html </Directory> </VirtualHost>

Then restart the Apache web server for the changes to take effect.

If this change in the rewrite rule is not made, it will no longer be possible to access ProcessMaker in a web browser. Either the ProcessMaker login screen will not load or the following error will appear:

Upgrade the Databases

Note: In case of restoring a workspace backup from a different server, make sure the /shared/sites/<WORKSPACE>/db.php file content is properly defined to work in the new workspace server.

After upgrading the ProcessMaker source code, the MySQL database(s) used by ProcessMaker need to be upgraded as well. After changing to the ProcessMaker installation directory, run the processmaker database-upgrade command from the command line.

Linux/UNIX:

cd /opt/processmaker ./processmaker database-upgrade

Windows XP/Server 2003:

cd "c:\Program Files\ProcessMaker-X_X_X\processmaker" ..\php\php.exe -f processmaker database-upgrade

Windows Vista/7/8/10/Server 2008/2012:

cd "c:\Users\USERNAME\AppData\Roaming\ProcessMaker-X_X_X\processmaker" ..\php\php.exe -f processmaker database-upgrade

The unifying process may take several minutes (or hours) depending on the amount of information on the databases. It takes more time if there is a great amount of cases, users, plugins, and other additional information. A message will be shown after the unification is complete indicating that it was successful.

It is recommended to run the processmaker flush-cache command after the unification of the databases.

Migrating the List of Cases

ProcessMaker 3 Enterprise Edition has improved its performance since older versions by organizing the list of cases according to their status into different tables in the database. To move these cases to their corresponding tables, execute the processmaker migrate-new-cases-lists command. Then, execute the processmaker database-generate-self-service-by-value command to move the unassigned cases to a separate table in the database.

Note: This command will ONLY be used if you are migrating from a version 2.x and NOT from the versions 2.8, 2.5.2.4 to versions 3.0.x, 3.1.x or 3.2.x. It is not recommended to use this command for other versions as the data is already migrated and for version 3.3.x is deprecated.

LINUX/UNIX:

cd /opt/processmaker ./processmaker migrate-new-cases-lists ./processmaker database-generate-self-service-by-value

Windows XP/Server 2003:

cd "c:\Program Files\ProcessMaker-X_X_X\processmaker" ..\php\php.exe -f processmaker migrate-new-cases-lists ..\php\php.exe -f processmaker database-generate-self-service-by-value

Windows Vista/7/8/10/Server 2008/2012:

cd "c:\Users\USERNAME\AppData\Roaming\ProcessMaker-X_X_X\processmaker" ..\php\php.exe -f processmaker migrate-new-cases-lists ..\php\php.exe -f processmaker database-generate-self-service-value

Some Additional Configurations

Case Number for New Cases is Incorrect

ProcessMaker 3 has improved the speed of generating new cases by storing the last case number in the wf_WORKSPACE.APP_SEQUENCE.ID field in the database. However, this field did not exist in ProcessMaker 2. If upgrading from version 2 to 3, then the case number of the last case needs to be inserted into this field. If using ProcessMaker Enterprise Edition, then use the processmaker migrate-new-cases-lists command above to automatically insert the last case number into this field.

If using ProcessMaker Community Edition, then the last case number will have to be manually inserted in MySQL. First, login as the root user in MySQL:

Windows:

Go to Start > Accessories > Command Prompt and open a terminal. Then, change to the directory where MySQL is installed. For example: cd C:\Users\USERNAME\AppData\Roaming\ProcessMaker-X_X_X\processmaker\mysql

Then, login to MySQL:

mysql -u root -p Enter password: enter the root password

Linux/UNIX:

mysql -u root -p Enter password: enter the root password

Then, change to the wf_WORKSPACE database, which is named wf_workflow by default:

mysql> use wf_workflow
Note: If unable to recall the name of the workspace, then use the following command to find it: mysql> show databases;

Then, insert the last case number into the APP_SEQUENCE.ID field:

mysql> UPDATE APP_SEQUENCE SET ID=(SELECT MAX(APP_NUMBER) FROM APPLICATION); Query OK, 0 rows affected (0.00 sec) Rows matched: 1 Changed: 0 Warnings: 0

Finally, exit MySQL:

mysql> exit bye

Enabling the fileinfo Extension

The fileinfo extension in PHP must be enabled in order to upload files as input documents. In the definition of input documents, it is now possible to specify which types of files may be uploaded in the Allowed File Extensions field. Fileinfo is used to check the file extension and content of files before adding them as input document files.

The fileinfo extension is included by default in PHP 5.3.0 and later. To check whether it is enabled, issue the following command from the command line:

php -m

In Windows, it is necessary to specify the path where the php.exe file is located. For example:

C:\Users\USERNAME\AppData\Roaming\ProcessMaker-X_X_X\php\php.exe -m
[PHP Modules]
bcmath
bz2
calendar
com_dotnet
Core
ctype
date
dom
ereg
exif
fileinfo
...

If fileinfo doesn't appear in the list, then it needs to be enabled by editing the php.ini file.

Linux/UNIX:

Use a plain text editor (such as nano, vim or gedit) to edit the php.ini file, whose location depends on your distribution. Add or uncomment the following line:

extension=fileinfo.so

Windows:

Use a plain text editor (such as notepad, Notepad++ or the DOS edit command) to edit the php.ini file, which by default is located at C:\Program Files\ProcessMaker-X_X_X\php\php.ini in Windows XP/2003 or C:\Users\USERNAME\AppData\Roaming\ProcessMaker-X_X_X\php\php.ini in Windows Vista and later.

In the php.ini file, uncomment the following line by changing it from: ;extension=php_fileinfo.dll

To:

extension=php_fileinfo.dll After changing the php.ini file, then restart the Apache server for the change to take effect. To verify that the fileinfo extension is enabled, issue the php -m command again and check whether fileinfo appears in the list.

Enabling the mcrpyt Extension

The Enterprise Edition for ProcessMaker 2.8 and later needs to have the mcrypt extension enabled in PHP.

Linux/UNIX:

It is recommended to install the mcrypt module using the package from your Linux/UNIX distribution:

Red Hat/CentOS/Fedora:

yum install php-mcrypt

Debian/Ubuntu/Mint:

apt-get install php5-mycrypt

SuSE/OpenSUSE:

zypper install php5-mcrypt

Windows:

Use a plain text editor (such as notepad, Notepad++ or the DOS edit command) to edit the php.ini file, which by default is located at:

Windows XP/Server 2003:
    c:\Program Files\ProcessMaker-X_X_X\php\php.ini

Windows Vista/7/8/10/Server 2008/2012:
    c:\Users\USERNAME\AppData\Roaming\ProcessMaker-X_X_X\php\php.ini

In the php.ini file, uncomment the following line by changing it from:

;extension=php_mcrypt.dll

To:

extension=php_mcrypt.dll

Then restart the Apache server for the mycrypt extension to be enabled.

Upgrading ProcessMaker Translations

When ProcessMaker is upgraded, the command processmaker upgrade doesn't upgrade the translations file to the latest version. In this case, it is required to download the language (depending on the language used) from here and upload it into ProcessMaker.

Recommendations after upgrading

After upgrading ProcessMaker, it is recommended to Delete the ProcessMaker Compiled Cache and completely clear the cache of the browser (or use it in an incognito window in Chrome or private browsing window in Firefox) when making the upgrade.

Activating the License

Note: This step is only required when installing ProcessMaker Enterprise Edition.

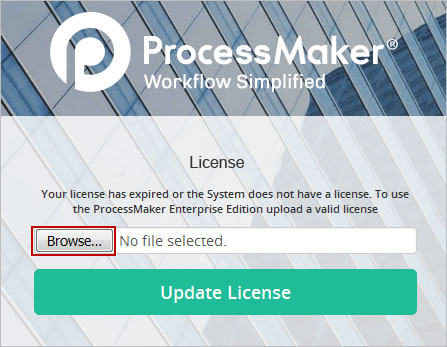
In the login page, click on Browse to upload the license.

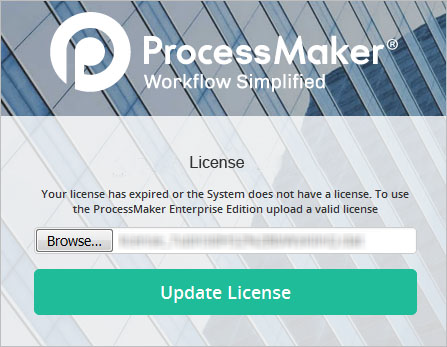
After selecting the file click on Update License to upload it.

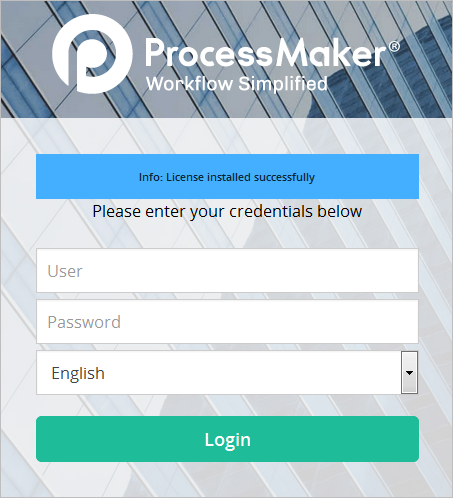
If the license is valid, after refreshing the page the following message is shown in the login page.

Insert Images: 
Version Info: 
3.3|/3.3/Upgrading_ProcessMaker;3.2|/3.2/Upgrading_ProcessMaker;*3.1|/3.0/UpgradingProcessMaker;*3.0|/3.0/UpgradingProcessMaker;2.x|/index.php/2.0/Upgrading_ProcessMaker;1.x|/index.php/Upgrading_ProcessMaker
Please rate how useful you found this document: 
Average: 3 (5 votes)
Please rate how useful you found this document: 
Average: 3 (5 votes)

ProcessMaker's API uses REST (Representational State Transfer) to allow external scripts to remotely access and control ProcessMaker. It provides a large number of endpoints so that almost any action that can be done within the ProcessMaker interface can also be done remotely using REST. ProcessMaker functionality can be reimplemented in external web pages, desktop applications and remote scripts. Using ProcessMaker's REST API, custom interfaces can be created to access ProcessMaker. The REST endpoints can also be accessed within ProcessMaker through PHP code in triggers or JavaScript code in Dynaforms.

Available Version: The REST API is available for versions 2.8 and 3.0 of ProcessMaker.

In order to use ProcessMaker's REST API, follow these steps:

  1. Register the REST Application in ProcessMaker
  2. Obtain an Access Token from OAuth 2.0
  3. Call endpoints ProcessMaker for:

Understanding REST

REST (Representational State Transfer) is a term introduced by Roy Fielding in his doctoral dissertation that strictly refers to a collection of principles for the design of network architectures. The term is frequently used to describe the direction of any interface transmitting specific data on a HTTP domain.

REST uses normal HTTP requests and responses, just like normal HTML, so it doesn't require any special protocols to function over the web. Each REST endpoint is a web address that provides access to a specific ProcessMaker service, such as getting a list of cases or creating a user. The REST endpoints are accessed using the following four HTTP methods:

Method Meaning
GET Retrieves a resource.
POST Inserts, updates, or extends a resource; may change the state of other resources.
PUT Creates, updates, or replaces a resource.
DELETE Deletes a resource.
Insert Images: 
Please rate how useful you found this document: 
Average: 3.2 (6 votes)
Please rate how useful you found this document: 
Average: 3.2 (6 votes)

Overview

ProcessMaker is a web application which normally executes actions in response to users' actions. Nonetheless, Events, the Case Scheduler and Notifications in ProcessMaker are only executed when the cron.php script is run.

For testing purposes, the cron.php script can be executed manually from the command line of the server where ProcessMaker is installed.

For production use, it is best to automate the execution of cron.php by following the instructions below to either configure a cron job in Linux/UNIX or set up a Scheduled Task in Windows. Note that it is not recommended to execute cron.php more than once every 5 minutes due to the heavy processing which it incurs.

Manually executing cron.php

The cron.php file is executed from the command line on the server where ProcessMaker is installed, which means that PHP-CLI should be installed on the server running ProcessMaker. The ProcessMaker Windows Installer automatically installed PHP-CLI, but it may not have been installed if ProcessMaker was manually installed.

To test a feature which is executed by cron.php, such as Events, Scheduled Cases, Notifications, unpausing of cases, etc., open a terminal on the server where ProcessMaker is installed. If using Windows, open a terminal can be opened by going to Start > All Programs > Accessories > Command Prompt. Then, enter the command to execute the workflow/engine/bin/cron.php file. The location of the file depends on the system. For example:

Windows XP/2003:

"C:\Program Files\ProcessMaker-X_X_X\php\php.exe" -f "C:\Program Files\ProcessMaker-X_X_X\processmaker\workflow\engine\bin\cron.php

Windows Vista/7/8/10/2008/2012:

"C:\Users\USERNAME\AppData\Roaming\ProcessMaker-X_X_X\php\php.exe" -f "C:\Users\USERNAME\AppData\Roaming\ProcessMaker-X_X_X\processmaker\workflow\engine\bin\cron.php"

Linux/UNIX:

php -f /opt/processmaker/workflow/engine/bin/cron.php

If the cron.php script is executing without any options, all pending activities will be automatically executed for all workspaces. To save processing, it may be useful to specify only certain workspaces or to specify that only certain types of activities (events, scheduled cases, notifications, etc.) be executed. For testing purposes, the +d option can be used to specify an alternative date and time for the script, so events and scheduled cases in the past or future can be executed.

Syntax of cron.php Options

cron.php [+d"YYYY-MM-DD HH:MM:SS"] [+wWORKSPACE] [+force] [ACTIVITIES]

Options:

  • +d Specify an alternative date and time for the script.

By default, the script will execute using the server's current system time. If may be useful to specify an alternative date and time when testing for past or future events or scheduled cases. Remember to use 4 digits for specifying the year and 2 digits for specifying the month, day, hour, minute and seconds. The time is on a 24 hour clock.

Ex: cron.php +d"2011-09-25 07:05:59"

  • +w Specify a workspace whose pending activities will executed.

By default, the pending activities in all workspaces are executed. To save processing, it can be useful to only execute the pending activities in a single workspace. Remember the workspace names are case sensitive.

Ex: cron.php +wworkflow

  • ACTIVITIES Define which activities should be executed:

events - Execute any pending events.

scheduler - Execute any pending scheduled cases.

unpause - Unpause cases (which are scheduled to be unpaused).

emails - Send any pending emails.

plugins - Activate plugins.

calculate - Calculate the duration of elapsed time for tasks.

unassigned-case - Available from version 2.5.0 on. Send pending notifications for unassigned cases to be claimed. This parameter is one of the actions included when the cron is executed; however, it is not possible to set this activity as a parameter when cron will be executed.

Multiple activities can be specified by separating each one with spaces:

Ex: cron.php events emails plugins

  • +force Available from version 2.5.0 on. This option ensures that the cron.php file is executed by stopping the execution of any existing cron job and deleting its temporary files, so the current cron can be executed. Remember that only one instance of cron can be executed at a time, so without the +force option, cron.php will not be executed if another instance is already being executed.

When cron.php executes, it will report which activities where executed and how many workspaces were processed:

Processing workspace: workflow * Resending emails........................................[DONE] * Unpausing applications..................................[DONE] * Calculating Duration....................................[DONE] * Calculating Duration by Application.....................[DONE] * Executing events..................................[PROCESSING] * |- End Execution events...........................[Processed 0] * Executing the scheduled starting cases............[PROCESSING] [DONE] Finished 1 workspaces processed.

Note: To cancel the execution of cron.php, press CTRL+C in the command line or use the kill command in Linux or the Task Manager in Windows to kill the process. The next time cron.php is run, an error message will be displayed. To avoid this problem, either delete the cron temporary file shared/cron or use the +force option.

Ex: Start the cron execution and before it ends press Ctrl+C to terminate it. Then try to execute it again, and the following message will be displayed:

C:\opt\processmaker\workflow\engine\bin>php -f cron.php Processing workspace: workflow ^C C:\opt\processmaker\workflow\engine\bin>php -f cron.php PHP Warning: Module 'plexcel' already loaded in Unknown on line 0 The cron is running, please wait for it to finish. Started in 2014-01-10 10:20:19 If do you want force the execution use the option '+force', example: php -f +wworkflow +force C:\opt\processmaker\workflow\engine\bin>

To be able to execute the cron.php file without errors, add the +force option.

C:\opt\processmaker\workflow\engine\bin> php -f cron.php +force Processing workspace: workflow Finished 1 workspaces processed.

cron.php Log Files

If needing to keep track of what actions have been taken by the cron.php script, check the file shared/log/cron.log which keeps a record of all its actions. Each line in the log file has the following format:

date time (action) description

If the action is "executeEvents", then the log file will list both the starting time and the ending time.

$ cat /opt/processmaker/shared/log/cron.log 2010-11-26 14:25:13(main) checking folder /opt/pm4260/shared/sites/workflow 2010-11-26 14:25:14(unpauseApplications) Unpausing Applications 2010-11-26 14:25:14(calculateDuration) Calculating Duration 2010-11-26 14:25:14(executeEvents) Executing Events 2010-11-26 14:25:13, 2010-11-26 14:25:13 2010-11-26 17:12:36(main) checking folder /opt/pm4260/shared/sites/workflow 2010-11-26 17:12:36(resendEmails) Resending Emails 2010-11-26 17:12:37(unpauseApplications) Unpausing Applications 2010-11-26 17:12:37(calculateDuration) Calculating Duration 2010-11-26 17:12:37(executeEvents) Executing Events 2010-11-26 17:12:19, 2010-11-26 17:12:36

If an error occurs in the cron.php script, the file shared/log/cronError.log will be created to record it:

$ cat /opt/processmaker/shared/log/cronError.log 2010-11-26 14:25:14(resendEmails) Error Resending Emails: The row 'Emails, , , , ' in table Configuration doesn't exists!

For example, this error message indicates that the Email Settings in ProcessMaker haven't been configured.

If needing to figure out whether the cron.php script is currently running or the last time it was executed, check the serialized contents of the shared/cron file. If the value of bCronIsRunning is "1", then the script is currently running. If it is "0", then the script is not currently running.

$ cat /opt/processmaker/shared/cron a:2:{s:14:"bCronIsRunning";s:1:"0";s:14:"sLastExecution";s:19:"2010-11-26 17:12:37";}

Alternatively, open the file with a PHP script and unserialize it:

<?php
if (file_exists("/opt/processmaker/shared/cron")) {
   $aCron = unserialize(file_get_contents("/opt/processmaker/shared/cron"));
   if ($aCron['bCronIsRunning'] == 0) { // if cron.php is NOT currently running
       ... //do something
   }
}
?>

Configuring crontab in Linux/UNIX

In Linux/UNIX, commands can be executed at scheduled times with the cron daemon. To configure cron to periodically execute ProcessMaker's cron.php file, login as the root user and edit the file /etc/crontab with your favorite plain text editor such as vim or gedit (or alternatively create the file /etc/cron.d/processmaker).

In the crontab file, the timing of commands is listed according to the format:

minute hour day-of-month month day-of-week user command

where:

FieldDescription
minuteThe minute of the hour when the command is executed. Can be between 0 and 59.
hourThe hour when the command is executed. Can be between 0 and 23. 0 is midnight.
day-of-monthDay of the month when the command is executed. For example 20 would be the 20th day in each month.
monthMonth when the command is executed. Can be a number between 1 and 12 or the first three letters of the month in English, such as jan, feb, etc.
day-of-weekDay of the week when the command is executed. Can be a number between 0 and 7, where 0 and 7 are both Sunday, 1 is Monday, 2 is Tuesday, etc. Alternatively, can be the first three letters of the day in English such as sun, mon, etc.
userThe username which will execute the command.
CommandCommand, script or program to execute.

An asterisk * in the first five columns indicates all possible values. For instance, an asterisk in the minutes column indicates all the minutes in the hour. If an asterisk is divided by a number "*/#", then it stands for any time unit which can be cleanly divided without any remainder. For instance in a day with 0-23 hours, "*/5" would execute on hours 0, 5, 10, 15 and 20.

For example to execute cron.php every 15 minutes from the command line:

*/15 * * * * apache php -f /opt/processmaker/workflow/engine/bin/cron.php

In this example, the first column "*/15" means execute the command every 15 minutes.

For more information on how to configure the crontab, see this tutorial (or this tutorial in Spanish).

Scheduling a task in Windows

The cron.php script can be periodically executed as a Windows Scheduled Task. To configure its execution, either use the SCHTASKS command in DOS or create a Scheduled Task in the graphical interface.

SCHTASKS command

The SCHTASKS command is used to create, delete, query, change, run and end Windows Scheduled Tasks. Login to Windows as an administrator and open the system command prompt. Then, create a Scheduled Task to periodically execute the cron.php script:

CHTASKS /Create /U username /P password /SC MINUTE /MO number-minutes /TR command

Where number-minutes is how often the cron.php script will be executed in minutes and command is the command to execute the cron.php script. The command should be enclosed in double quotation marks. If it contains any paths or options which contain spaces, then they should be enclosed in single quotations marks or escaped double quotation marks. (Escaping of quotation marks is done with backslashes: \"). To continue a command onto the next line, use "^" as the last character in the line.

For example, to execute the cron.php script every 15 minutes for a ProcessMaker server installed at c:\Users\Bob\AppData\Roaming\ProcessMaker-2_5_2\:

SCHTASKS /Create /U administrator /P p4s5w0rd /SC MINUTE /MO 15 /TR ^ "C:\Users\Bob\AppData\Roaming\ProcessMaker-2_5_2\php\php.exe -f ..\processmaker\workflow\engine\bin\cron.php"

For example to execute the cron.php script only on the "sales" workspace every 20 minutes for a ProcessMaker server installed at C:\Program Files\ProcessMaker-2_5_2\processmaker:

SCHTASKS /Create /U administrator /P p4s5w0rd /SC MINUTE /MO 20 /TR ^ "'C:\Program Files\ProcessMaker-2_5_2\php\php.exe' -f C:\Program Files\ProcessMaker-2_5_2\processmaker\workflow\engine\bin\cron.php +wsales"

After scheduling the periodic execution of cron.php, verify that it is in the list of Scheduled Tasks:

SCHTASKS /Query

For more information about the SCHTASKS command:

SCHTASKS /?

For more information about the options for /Create:

SCHTASKS /Create /?

Scheduled Task in Windows XP

  • On the server running ProcessMaker, open the Task Scheduler by going to Start > Programs > Accessories > System Tools > Scheduled Tasks
  • Double-click Add Scheduled Task
  • The Scheduled Task Wizard will appear. Click Next.
  • Enter a command to execute cron.php.

For example:

"C:\Program Files\ProcessMaker\php\php.exe" -f ..\processmaker\workflow\engine\bin\cron.php

Then click Next.

  • Give the task a Name, such as "ProcessMaker Cron Job", and choose the Frequency with which to perform the task (for example, Daily)). Click Next.
  • Choose specific date and time options (this step will vary, depending on the option selected in the previous step). When finished, click Next.
  • Enter your password if prompted. Change the username if required (for example, you'd like the task to run under a user with fewer privileges security reasons). Click Next.
  • On the final page, select the checkbox Open advanced properties for this task when I click Finish and click Finish.

Restart cron when it is stopped abruptly

When cron.php is executed, it checks to see whether another instance of cron.php is already running by checking whether a temporary cron file already exists. If for some reason cron is stopped abruptly, the temporary cron file needs to be manually deleted in order to be able to execute cron.php. If the temporary cron file exists, the following message will display when executing cron.php:

C:\opt\processmaker\workflow\engine\bin> php -f cron.php The cron is running, please wait for it to finish. Started in 2013-02-18 08:22:41

To solve this problem, delete the temporary file named shared/cron

Note: To avoid this issue, it is recommended to wait until cron finishes its execution or use the +force option.

Checking the Cron Log in ProcessMaker

From version 2.0.44 on, the contents of the cron log are available under the ADMIN menu. The cron log can be checked after cron is executed to see the results for a specific workspace or for all workspaces. Only users such as the "admin" who have the PM_SETUPADVANCE permission in their roles have access to the cron log.

After the cron is executed, the contents of the log can be viewed at ADMIN > Settings > Logs > Cron.

Cron log options

  • Cron Status: Displays Active when cron is currently being executed. It displays Inactive when cron is not currently being executed.
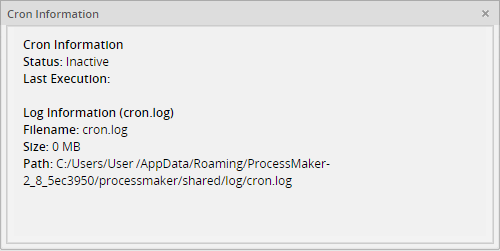
  • View information: Shows the cron information: Status, Last Execution and Log information which specifies the folder where the cron.log file is located.

  • Clear log: Click to clear the log of all workspaces where the cron is executed or just a specific one. This log is deleted in the location /shared/log/cron.log.

Search Options

  • Status: Search by cron status, Failed, Completed or all.

  • From and To: both specify the days on which the cron was executed.

Menu options

  • Date: date when the cron was executed.
  • Action: name of the action that was executed.
  • Status: Cron status.
  • Description: a brief description of what was the execution cron about.

Note: In version 2.8.0 and later, the option "Workspaces" is excluded. By default, the list shows all actions of the current Workspace.

Insert Images: 
Version Info: 
3.8|/3.2/Executing_cron.php;3.7|/3.2/Executing_cron.php;3.6|/3.2/Executing_cron.php;3.5|/3.2/Executing_cron.php;3.4|/3.2/Executing_cron.php;3.3|/3.2/Executing_cron.php;3.2|/3.2/Executing_cron.php;3.1|/3.1/Executing_cron.php;3.0|/3.0/Executing_cron.php;*2.x|/index.php/Executing_cron.php
Please rate how useful you found this document: 
Average: 2 (2 votes)
Please rate how useful you found this document: 
Average: 2 (2 votes)

ProcessMaker Mobile Edition v. 1.0 (Release date: May 12th, 2015)

The ProcessMaker team is proud to announce the release of ProcessMaker Mobile, available for Android and iOS App. These are apps based on our new HTML5 Responsive Form Designer meaning that the same forms you design for web will work out-of-the box in our native apps. Both apps also work with both the Community and Enterprise Edition.

Features

This mobile version comes with the following features:

  • Manage cases
  • Use specific fields such:
    • aBar Code Scanner.
    • Finger Signatures.
    • Geo-location tagging.
    • Audio, image, and video.
    • Grids
  • Auto save of Forms.
  • Get the case status
  • Search cases.
  • Case Notes
  • ProcessMap View.
  • Case Information.

Mobile Edition Availability

  • Download the mobile edition for Android here
  • Download the Mobile Edition for iOS here
Please rate how useful you found this document: 
Average: 1.5 (2 votes)
Please rate how useful you found this document: 
Average: 1.5 (2 votes)

Overview

Check documentation about features included in the Mobile Edition.

Managing Cases

  • Manage Cases.
  • Access Cases Inbox
    • Todo
    • Participated
    • Unassigned
    • Pause
  • Get the case status.
  • Case Information
  • Search Cases
  • ProcessMap

ProcessMaker Forms and Fields

  • Auto Save of Forms
  • Offline DynaForms
  • New Fields such us:
    • aBar code scanner
    • Finger Signature
    • Geo-Location tagging
    • Audio, Image and video
    • Grids


Please rate how useful you found this document: 
Average: 1.7 (3 votes)
Please rate how useful you found this document: 
Average: 1.7 (3 votes)

Release Notes Downloadable version


ProcessMaker v. 3.0 (Release date: May 12th, 2015)

The ProcessMaker team is proud to announce the stable release of ProcessMaker Enterprise Edition v. 3.0.  Since many versions were launched in the past months, a lot of bugs were fixed. As follows you will find a Summary of each release with its respective link to its release notes:

RC1 - Release Candidate 1
RC2 - Release Candidate 2
RC3 - Release Candidate 3

Requirements

Supported Operating System:

Supported Browsers:

  • Mozilla Firefox v. 37
  • Google Chrome v. 41
  • Internet Explorer v. 10 and v.11

For more information visit this link

New features:

  • A new powerful design for your user experience
  • A new BPMN 2.0 Designer
  • Compatibility with desktops, tablets, and mobile devices
  • A powerful RestAPI
  • Javascript support (code mirrow)
  • Javascript extensions (upload custom javascript libraries in forms)
  • Variables support (Variables are at the process level and are global. They can then be used in forms after they are created.)
  • Import/export dynaform in JSON format
  • Support to upload files in forms and grids (file field)
  • Add preview of forms in different platforms (desktop, tablet, phone)
  • Responsive forms (build once run on: desktop, tablet, phone)
  • New field container
  • New UI/UX
  • DynaForms Multilanguage support.
  • Extensive Dynaforms with panels.
  • Strategic Dashboards.
  • Multiple mail servers registration.

Improvements:

  • Improvements in datepicker control.
  • Improvements in Security.

Bug Fixes

  • PM-1992 - It is possible to access to the log files and other files located in the workflow/public_hmtl folder.
  • PM-2253 -  When creating a Custom Drill Down dashlet, the following error appears: "Your Query is not valid".
  • PM-2500 - Task Properties > Consolidated Cases Lists: It is not possible to configure the Consolidated Cases in the task Properties.
  • PM-1106 - The notice when an invalid license was uploaded is extended through the browser. This happens in IE1-IE11.
  • PM-1364 - The new designer does not validate the original size of PM Tables fields.
  • PM-1425 - It allows to create tasks and sub-process with the same name.
  • PM-1480 - Designer > Task Steps: There is no action when using the down arrow in a Dynaform - It is possible to access to the log files and other files located in the workflow/public_hmtl folder.
  • PM-1692 - When filing case notes the note is misplaced. (Mantis code 16880)
  • PM-1796 - When a dynaform has multiple columns, the format of each variable or control are being distorted.
  • PM-1874 - Refresh token duration is too short.
  • PM-1879 - Information of templates lost. (Mantis code 1608)
  • PM-1944 - Current User shows as UNASSIGNED when it is routed to a sub-process. (Mantis code 15574)
  • PM-1946 -: ProcessMaker loses connection with database. (Mantis code 17048)
  • PM-2004 -(Enterprise) If using Internet Explorer, the license information message is not aligned in the center.
  • PM-2088 - Not possible to change the order of options in DynaForm field in BPMN Editor. (Mantis code 17095)
  • PM-2194 - Variable creator in BPMN Designer should not allow variables which start with number, but should allow underscores "_". (Mantis code 17076)
  • PM-2106 - When executing the database upgrade, it always shows that one table was altered/modified.
  • PM-2124 - Change text in the first page of Manual Installer wizard. (Mantis code 16918)
  • PM-2137 - Date fields now store their values in format which isn't compatible with databases. (Mantis code 17107)
  • PM-2162 - Dynaforms: The format field o f the Datetime control cannot be set again as default.
  • PM-2166 - Designer -> In the list of processes change New menu option from a drop-down to a button.
  • PM-2209 - Admin>Settings>Login: After enabling the forgot password option, this option is not visible if entering with a different browser.
  • PM-2030 - Step 2 Installer: The body of the text license is not justify with the right margin.
  • PM-2031 - Step 3 Installer: Incorrect validation over the folders where ProcessMaker will be installed.
  • PM-2089 - Accessing Report Tables on the Designer over https. (Mantis code 16722)
  • PM-2138 - Change text "succesfully" to "successfully".  (Mantis code 16935)
  • PM-2144 - ProcessMaker error messages should distinguish between "unauthorized" and login session expired.  (Mantis code 17119)
  • PM-2167 - Designer -> Add waiting/loading icon/gif when the process is being created or loaded.
  • PM-2172 - When changing the order of the Routing Rules, the process design changes.
  • PM-2188 - "REDO action" does not have functionality when creating objects (Activity, Event, Gateway, Artifact, etc)
  • PM-2194 - Takes too long for the process map to load - need loading icon. (Mantis code 17141)
  • PM-2206 - Login> The forgot password field is not too large enough to show the email.
  • PM-2235 - Input Documents: The “Allowed file extensions” field does not have the correct syntaxis required in the required field.
  • PM-2237 - Output Documents -> Create. If the "Output Document to Generate" field has “Doc” type, the "Open Password,Owner Password" fields are enabled.
  • PM-2238 - ProcessFileManager: There isn’t a validation of an existing template if uploading one with an existing name.
  • PM-2242 - Output Documents -> Create. The "PDF security" field is enabled even though the default value is .doc.
  • PM-2251 - Admin>Settings>Plugins>Enterprise Manager: When a workspace name is different than the Database, the list of features is not displayed.
  • PM-2253 -  When creating a Custom Drill Down dashlet, the following error appears: "Your Query is not valid".
  • PM-2254 -  The Custom Cases List label is displayed only as Cases Lists.
  • PM-2263 -  A process design is unconfigured if moving all its elements to a pool.
  • PM-2270 - Triggers > Predefined Function: It does not show the icons in the predefined functions.
  • PM-2278 - Designer BPMN: The Full Size label does not change when using full screen.
  • PM-2316 - Users: When creating groups and/or department with blank space it does not validate it as a required field.
  • PM-2321 - New BPMN> When opening a BPMN process the SAVE button remains in a green color.
  • PM-2338 - PmTables: Error creating pmtables, this message is displayed: "Something was wrong". This if using the SSL protocol and FireFox.
  • PM-2339 - Create ReportTable: Error creating report tables with the SSL protocol.
  • PM-2344 - REST endpoint DELETE /cases/{app_uid} doesn't check if the user has the PM_DELETECASE permission in his role. (Mantis code 17193)
  • PM-2346 - BPMN Designer: The main page of the designer has blank spaces in the bottom side of the designer, this do not allow the correct visualization of the designer components.
  • PM-2353 - Message Type: When saving a Message type it displays an error message.
  • PM-2355 - When modifying an Intermediate message event, it displays an error message.
  • PM-2360 - BPMN Designer: Standardize typographies in all buttons and change the format to 'Capitalize each word'
  • PM-2361 - .exe installer. Misspellings when enabling/disabling the heartbeat.
  • PM-2361 - Implement a way to delete the expired access_token.
  • PM-2364 - . exe installer: When installing ProcessMaker it shows a text in English even though the installer is being executed in Spanish.
  • PM-2365 - Designer BPMN: Cancel button in the alerts are not necessary.
  • PM-2366 - Variables > Edit: It is not possible to edit a variable name with the same characteristics.
  • PM-2367 - BPMN Designer: Standardize typographies in the table headers and chante to format to “'Capitalize each word”.
  • PM-2371 - Login: When pressing the enter key, the form is not submitted if the cursor is in the workspace field.
  • PM-2373 - Login: The background image, labels and palceholders does not display if using Internet Explorer.
  • PM-2376 - New Feature: We need the ability to modify the Subject. (Mantis code 17133)
  • PM-2378 - Login > License Requirement: In the license Window it shows a label over a required field.
  • PM-2387 - Import: If using Internet Explorer, when importing a process that contains unsupported elements, it opens in the same designer.
  • PM-2381 - It shows the warning message: Wrong login credentials randomly.
  • PM-2387 - Login: After the installation, The Get Started window appears with paragraphs in different sizes and styles.
  • PM-2388 - New BPMN: If using Internet Explorer, the X button to close the process appears underlined.
  • PM-2389 - MessageType: It is not possible to order the Message Name field.
  • PM-2390 - Login: After the installation, it shows a window with a header without styles.
  • PM-2391 - Designer BPMN: It is not possible to drag and drop from certain areas the menu elements.
  • PM-2392 - ProcessFileManager: The space to design a template is short.
  • PM-2393 - Calendar > New: Name field shows in red when creating a new calendar.
  • PM-2394 - It shows a warning php" in the "web entry" when the DynaForm is empty
  • PM-2395 - Files Manager: The dropdown fields in the HTML editor remain open and active in the designer.
  • PM-2398 - Home>Cases List : The cases counter shows incorrect numbers.
  • PM-2404 - Error message when creating a flow message between an End message and a Start message event.
  • PM-2406 - Incomplete text in the DynaForm grid.
  • PM-2407 - Variables: If the 'Define accepted variable values' fields are empty in the form and variable edition, tooltips shows misaligned.
  • PM-2408 - ProcessFileManager: The Process File Manager search does not work.
  • PM-2412 -Admin>Settings>Users: If using Internet Explorer, the SAVE button does not display.
  • PM-2423 - Home: Error in the INBOX when executing the messageeventcron.php, the cases counter displays with negative numbers.
  • PM-2425 - Variables: Alert Message contains an incomplete message.
  • PM-2429 - Message Types: Alert Message contains an incomplete message.
  • PM-2424 - WebEntry: The case is not routed to the next task if the case is started from a Web Entry.
  • PM-2427 - When changing the variable name, it does not change the ID of the dynaform control.
  • PM-2428 - Variables: Placeholders has the same text used in the labels.
  • PM-2430 - Users > Authentication Sources > New: It shows the ldapadvanced option even if the this is in a Disable status in the workspace.
  • PM-2432 - DataBaseConnection: If using Internet Explorer the validation to the server is failing.
  • PM-2433 - Admin>Settings>Email Servers: In Windows Server 2012 displays a message indicating that there is a missing table when configuring an email.
  • PM-2435 - New feature request for a web method that attaches documents. (Mantis code 17206)
  • PM-2436 - WebEntry: The webentry configuration does not work with sup-process included in the design
  • PM-2437 - It is not possible to create a Web Entry. (Mantis code 17240)
  • PM-2439 - Problems with the span column in DynaForms. (Mantis code 17242)
  • PM-2441 - Dynaform: Cancel button does not work when creating a DynaForm if using Chrome.
  • PM-2442 - Designer BPMN: The group element loses all its functionality if this is placed inside a pool or a lane.
  • PM-2448 - Dynaform: Required fields in grids are not validated.
  • PM-2449 - Dynaform: Grid fields does not have identificator when they are required.
  • PM-2450 - Variables: String variables does not support Datetime controls.
  • PM-2453 - Dynaform: Required field “FILE” in grids does not change to red color when routing to next task.
  • PM-2455 - Variables: The label field is not in the DynaForms anymore.
  • PM-2456 - Variables: The Delete option does not refresh the list of variables.
  • PM-2458 - New Case > Case Notes: There is an error when attaching a case notes if the email server is configured as default.
  • PM-2460 - Variables: The Supported controls label does not show all the supported controls in a FLOAT variable.
  • PM-2461 - WebEntry: The information filled with a Web Entry is not reflected in the initial task.
  • PM-2462 - Variables: The text that list all supported controls in a Boolean variable does not have the checkbox control.
  • PM-2464 -  BPMN Designer: Change the “Full Screen” icon and the tooltip after changing from Full Screen to Reduce Screen.
  • PM-2467 -  BPMN Designer: When the Process Objects menu is collapsed the (-) icon should be (+).
  • PM-2468 -  Designer BPMN: In the gateways context menu, the Gateway type option shows the gateway type used enabled.
  • PM-2472 -  Execution: Grids in view modo does not display information filled in a previous step.
  • PM-2475 -  Triggers: There isn’t the option to add variables (@@) from a step.
  • PM-2476 -  The UID alerts are not standardized.
  • PM-2477 -  Steps: The scroll is not enabled when there is a lot of steps.
  • PM-2479 -  New Case: The sub-process value is not sent to the master process.
  • PM-2480 -  When ordering data in a Report Table the window is blocked.
  • PM-2481 -  Variables in the PMFNewCase() function are not set.
  • PM-2483 -  Process Permissions: It is not possible to edit a permission more than twice.
  • PM-2485 -  It is not possible to see the Report Table registries.
  • PM-2484 -  Variables: Align, change color and position of the Save and Cancel buttons.
  • PM-2487 -  It is not possible to change the zoom if using Internet Explorer.
  • PM-2491 -  Dynaforms: Hints in the grid affects all the control hints assigned to the grid.
  • PM-2492 -  Designer: Error when exporting a bpmn diagram if this contains flow messages.
  • PM-2493 - Home > New Case:  "The case will be paused until you receive the corresponding message" message must be displayed in the center of the container.
  • PM-2494 - Designer: Error message when moving the events connecting to different polls.
  • PM-2496 - The workspace name is not aligned to the right side of the header.
  • PM-2497 - New Case: The second task without a title shows empty when routing the case.
  • PM-2500 - Task Properties > Consolidated Cases Lists: It is not possible to configure the Consolidated Cases in the task Properties.
  • PM-2501 - Triggers: When creating a Trigger with the Copy Trigger option, the Description label is misaligned.
  • PM-2502 - BPMN Designer: Standardize the typography in the SHOW ID button in the Dynaforms, Input/Output Documents and Triggers list.
  • PM-2530 - Triggers: If using Internet Explorer, it is required to double click in the option to save the trigger.
  • PM-2531 - Text in the Get Started Interface appears in different sizes
  • PM-2532 - When pressing the Create button in the toolbox, it does not show the form, instead it shows the list of elements.
  • PM-2539 -Design: the task name is misplaced when there is a blank space.
  • PM-2540 - /{workspace}/cases/454535015553fed8da2b0a7083417966/cancel not working propertly
  • PM-2542 - Designer BPMN > Dynaforms: Dependent fields do not work if using from a dropdown to a text.
  • PM-2543 - Designer BPMN > Task Steps: When adding triggers to a DynaForm, an error message is displayed.
  • PM-2544 - Dynaforms > Preview: The fields in a colspan are misplaced.
  • PM-2545 - Designer > Designer BPMN: Report Table does not save data in a DynaForm if the Consolidated case is configured in a task.
  • PM-2567 - If having a checkbox in a DynaForm, the preview does not load.

Recommendations:

  • The directory where ProcessMaker is installed should have write permissions.
  • Dependent fields are working if they have just one dependent field, when it depends on more than one field only the dropdowns are working.
  • ProcessMaker does not support MySQL strict mode.
  • Remember that this is a release candidate. Do not use this version in a production environment.

Languages:

  • English (Default Core)

Resources

  • For a detailed description of ProcessMaker 3.0 and its new features please see our latest documentation.
  • To report any issues in ProcessMaker 3.0 please go to this page, select ProcessMaker [community] “Project” and select "ProcessMaker v3.0" in the Product version.

How to Contribute?

  • We need your help to make ProcessMaker 3.0 a better release, so please take some time to download and try out the release candidate. Your feedback is very important to us!.
  • If you are willing to help translate this version into your native language just tell us by sending an email to communityATprocessmakerDOTcom.

Don't forget that any contribution you provide us will be mentioned in our Wiki, Social Media and Forum!

Enjoy it!

Please rate how useful you found this document: 
Average: 1.5 (2 votes)
Please rate how useful you found this document: 
Average: 1.5 (2 votes)

Release Notes Downloadable version


ProcessMaker v. 3.0 (Release date: May 12th, 2015)

The ProcessMaker team is proud to announce the stable release of ProcessMaker Community Edition v. 3.0.  Since many versions were launched in the past months, a lot of bugs were fixed. As follows you will find a Summary of each release with its respective link to its release notes:

RC1 - Release Candidate 1
RC2 - Release Candidate 2
RC3 - Release Candidate 3

Requirements

Supported Operating System:

Supported Browsers:

  • Mozilla Firefox v. 37
  • Google Chrome v. 41
  • Internet Explorer v. 10 and v.11

For more information visit this link

New features:

  • A new powerful design for your user experience
  • A new BPMN 2.0 Designer
  • Compatibility with desktops, tablets, and mobile devices
  • A powerful RestAPI
  • Javascript support (code mirrow)
  • Javascript extensions (upload custom javascript libraries in forms)
  • Variables support (Variables are at the process level and are global. They can then be used in forms after they are created.)
  • Import/export dynaform in JSON format
  • Support to upload files in forms and grids (file field)
  • Add preview of forms in different platforms (desktop, tablet, phone)
  • Responsive forms (build once run on: desktop, tablet, phone)
  • New field container
  • New UI/UX
  • DynaForms Multilanguage support.
  • Extensive Dynaforms with panels.

Improvements:

  • Improvements in datepicker control.
  • Improvements in Security.
  • PM-2088 - Not possible to change the order of options in DynaForm field in BPMN Editor. (Mantis code 17095)

Bug Fixes

  • PM-1364 - The new designer does not validate the original size of PM Tables fields.
  • PM-1425 - It allows to create tasks and sub-process with the same name.
  • PM-1480 - Designer > Task Steps: There is no action when using the down arrow in a Dynaform - It is possible to access to the log files and other files located in the workflow/public_hmtl folder.
  • PM-1692 - When filing case notes the note is misplaced. (Mantis code 16880)
  • PM-1796 - When a dynaform has multiple columns, the format of each variable or control are being distorted.
  • PM-1874 - Refresh token duration is too short.
  • PM-1879 - Information of templates lost. (Mantis code 1608)
  • PM-1944 - Current User shows as UNASSIGNED when it is routed to a sub-process. (Mantis code 15574)
  • PM-1946 - ProcessMaker loses connection with database. (Mantis code 17048)
  • PM-2194 - Variable creator in BPMN Designer should not allow variables which start with number, but should allow underscores "_". (Mantis code 17076)
  • PM-2106 - When executing the database upgrade, it always shows that one table was altered/modified.
  • PM-2124 - Change text in the first page of Manual Installer wizard. (Mantis code 16918)
  • PM-2137 - Date fields now store their values in format which isn't compatible with databases. (Mantis code 17107)
  • PM-2162 - Dynaforms: The format field o f the Datetime control cannot be set again as default.
  • PM-2166 - Designer -> In the list of processes change New menu option from a drop-down to a button.
  • PM-2209 - Admin>Settings>Login: After enabling the forgot password option, this option is not visible if entering with a different browser.
  • PM-2030 - Step 2 Installer: The body of the text license is not justify with the right margin.
  • PM-2031 - Step 3 Installer: Incorrect validation over the folders where ProcessMaker will be installed.
  • PM-2089 - Accessing Report Tables on the Designer over https. (Mantis code 16722)
  • PM-2144 - ProcessMaker error messages should distinguish between "unauthorized" and login session expired.  (Mantis code 17119)
  • PM-2167 - Designer -> Add waiting/loading icon/gif when the process is being created or loaded.
  • PM-2172 - When changing the order of the Routing Rules, the process design changes.
  • PM-2188 - "REDO action" does not have functionality when creating objects (Activity, Event, Gateway, Artifact, etc)
  • PM-2194 - Takes too long for the process map to load - need loading icon. (Mantis code 17141)
  • PM-2206 - Login> The forgot password field is not too large enough to show the email.
  • PM-2235 - Input Documents: The “Allowed file extensions” field does not have the correct syntaxis required in the required field.
  • PM-2237 - Output Documents -> Create. If the "Output Document to Generate" field has “Doc” type, the "Open Password,Owner Password" fields are enabled.
  • PM-2238 - ProcessFileManager: There isn’t a validation of an existing template if uploading one with an existing name.
  • PM-2242 - Output Documents -> Create. The "PDF security" field is enabled even though the default value is .doc.
  • PM-2253 -  When creating a Custom Drill Down dashlet, the following error appears: "Your Query is not valid".
  • PM-2254 -  The Custom Cases List label is displayed only as Cases Lists.
  • PM-2263 -  A process design is unconfigured if moving all its elements to a pool.
  • PM-2270 - Triggers > Predefined Function: It does not show the icons in the predefined functions.
  • PM-2278 - Designer BPMN: The Full Size label does not change when using full screen.
  • PM-2316 - Users: When creating groups and/or department with blank space it does not validate it as a required field.
  • PM-2321 - New BPMN> When opening a BPMN process the SAVE button remains in a green color.
  • PM-2338 - PmTables: Error creating pmtables, this message is displayed: "Something was wrong". This if using the SSL protocol and FireFox.
  • PM-2339 - Create ReportTable: Error creating report tables with the SSL protocol.
  • PM-2344 - REST endpoint DELETE /cases/{app_uid} doesn't check if the user has the PM_DELETECASE permission in his role. (Mantis code 17193)
  • PM-2346 - BPMN Designer: The main page of the designer has blank spaces in the bottom side of the designer, this do not allow the correct visualization of the designer components.
  • PM-2353 - Message Type: When saving a Message type it displays an error message.
  • PM-2355 - When modifying an Intermediate message event, it displays an error message.
  • PM-2360 - BPMN Designer: Standardize typographies in all buttons and change the format to 'Capitalize each word'
  • PM-2361 - Implement a way to delete the expired access_token.
  • PM-2365 - Designer BPMN: Cancel button in the alerts are not necessary.
  • PM-2366 - Variables > Edit: It is not possible to edit a variable name with the same characteristics.
  • PM-2367 - BPMN Designer: Standardize typographies in the table headers and chante to format to “'Capitalize each word”.
  • PM-2371 - Login: When pressing the enter key, the form is not submitted if the cursor is in the workspace field.
  • PM-2373 - Login: The background image, labels and palceholders does not display if using Internet Explorer.
  • PM-2376 - New Feature: We need the ability to modify the Subject. (Mantis code 17133)
  • PM-2387 - Import: If using Internet Explorer, when importing a process that contains unsupported elements, it opens in the same designer.
  • PM-2381 - It shows the warning message: Wrong login credentials randomly.
  • PM-2387 - Login: After the installation, The Get Started window appears with paragraphs in different sizes and styles.
  • PM-2388 - New BPMN: If using Internet Explorer, the X button to close the process appears underlined.
  • PM-2389 - Message Type: It is not possible to order the Message Name field.
  • PM-2390 - Login: After the installation, it shows a window with a header without styles.
  • PM-2391 - Designer BPMN: It is not possible to drag and drop from certain areas the menu elements.
  • PM-2392 - Process File Manager: The space to design a template is short.
  • PM-2393 - Calendar > New: Name field shows in red when creating a new calendar.
  • PM-2394 - It shows a warning php" in the "web entry" when the DynaForm is empty
  • PM-2395 - Files Manager: The dropdown fields in the HTML editor remain open and active in the designer.
  • PM-2398 - Home>Cases List : The cases counter shows incorrect numbers.
  • PM-2404 - Error message when creating a flow message between an End message and a Start message event.
  • PM-2406 - Incomplete text in the DynaForm grid.
  • PM-2407 - Variables: If the 'Define accepted variable values' fields are empty in the form and variable edition, tooltips shows misaligned.
  • PM-2408 - ProcessFileManager: The Process File Manager search does not work.
  • PM-2412 -Admin>Settings>Users: If using Internet Explorer, the SAVE button does not display.
  • PM-2423 - Home: Error in the INBOX when executing the messageeventcron.php, the cases counter displays with negative numbers.
  • PM-2425 - Variables: Alert Message contains an incomplete message.
  • PM-2429 - Message Types: Alert Message contains an incomplete message.
  • PM-2424 - WebEntry: The case is not routed to the next task if the case is started from a Web Entry.
  • PM-2427 - When changing the variable name, it does not change the ID of the dynaform control.
  • PM-2428 - Variables: Placeholders has the same text used in the labels.
  • PM-2432 - DataBaseConnection: If using Internet Explorer the validation to the server is failing.
  • PM-2433 - Admin>Settings>Email Servers: In Windows Server 2012 displays a message indicating that there is a missing table when configuring an email.
  • PM-2435 - New feature request for a web method that attaches documents. (Mantis code 17206)
  • PM-2436 - WebEntry: The webentry configuration does not work with sup-process included in the design
  • PM-2437 - It is not possible to create a Web Entry. (Mantis code 17240)
  • PM-2439 - Problems with the span column in DynaForms. (Mantis code 17242)
  • PM-2441 - Dynaform: Cancel button does not work when creating a DynaForm if using Chrome.
  • PM-2442 - Designer BPMN: The group element loses all its functionality if this is placed inside a pool or a lane.
  • PM-2448 - Dynaform: Required fields in grids are not validated.
  • PM-2449 - Dynaform: Grid fields does not have identificator when they are required.
  • PM-2450 - Variables: String variables does not support Datetime controls.
  • PM-2453 - Dynaform: Required field “FILE” in grids does not change to red color when routing to next task.
  • PM-2455 - Variables: The label field is not in the DynaForms anymore.
  • PM-2456 - Variables: The Delete option does not refresh the list of variables.
  • PM-2458 - New Case > Case Notes: There is an error when attaching a case notes if the email server is configured as default.
  • PM-2460 - Variables: The Supported controls label does not show all the supported controls in a FLOAT variable.
  • PM-2461 - WebEntry: The information filled with a Web Entry is not reflected in the initial task.
  • PM-2462 - Variables: The text that list all supported controls in a Boolean variable does not have the checkbox control.
  • PM-2464 -  BPMN Designer: Change the “Full Screen” icon and the tooltip after changing from Full Screen to Reduce Screen.
  • PM-2467 -  BPMN Designer: When the Process Objects menu is collapsed the (-) icon should be (+).
  • PM-2468 -  Designer BPMN: In the gateways context menu, the Gateway type option shows the gateway type used enabled.
  • PM-2472 -  Execution: Grids in view modo does not display information filled in a previous step.
  • PM-2475 -  Triggers: There isn’t the option to add variables (@@) from a step.
  • PM-2476 -  The UID alerts are not standardized.
  • PM-2477 -  Steps: The scroll is not enabled when there is a lot of steps.
  • PM-2479 -  New Case: The sub-process value is not sent to the master process.
  • PM-2480 -  When ordering data in a Report Table the window is blocked.
  • PM-2481 -  Variables in the PMFNewCase() function are not set.
  • PM-2483 -  Process Permissions: It is not possible to edit a permission more than twice.
  • PM-2485 -  It is not possible to see the Report Table registries.
  • PM-2484 -  Variables: Align, change color and position of the Save and Cancel buttons.
  • PM-2487 -  It is not possible to change the zoom if using Internet Explorer.
  • PM-2491 -  Dynaforms: Hints in the grid affects all the control hints assigned to the grid.
  • PM-2492 -  Designer: Error when exporting a bpmn diagram if this contains flow messages.
  • PM-2493 - Home > New Case:  "The case will be paused until you receive the corresponding message" message must be displayed in the center of the container.
  • PM-2494 - Designer: Error message when moving the events connecting to different polls.
  • PM-2496 - The workspace name is not aligned to the right side of the header.
  • PM-2497 - New Case: The second task without a title shows empty when routing the case.
  • PM-2500 - Task Properties > Consolidated Cases Lists: It is not possible to configure the Consolidated Cases in the task Properties.
  • PM-2501 - Triggers: When creating a Trigger with the Copy Trigger option, the Description label is misaligned.
  • PM-2502 - BPMN Designer: Standardize the typography in the SHOW ID button in the Dynaforms, Input/Output Documents and Triggers list.
  • PM-2530 - Triggers: If using Internet Explorer, it is required to double click in the option to save the trigger.
  • PM-2531 - Text in the Get Started Interface appears in different sizes
  • PM-2532 - When pressing the Create button in the toolbox, it does not show the form, instead it shows the list of elements.
  • PM-2539 -Design: the task name is misplaced when there is a blank space.
  • PM-2540 - /{workspace}/cases/454535015553fed8da2b0a7083417966/cancel not working propertly
  • PM-2542 - Designer BPMN > Dynaforms: Dependent fields do not work if using from a dropdown to a text.
  • PM-2543 - Designer BPMN > Task Steps: When adding triggers to a DynaForm, an error message is displayed.
  • PM-2544 - Dynaforms > Preview: The fields in a colspan are misplaced.
  • PM-2545 - Designer > Designer BPMN: Report Table does not save data in a DynaForm if the Consolidated case is configured in a task.
  • PM-2567 - If having a checkbox in a DynaForm, the preview does not load.

Known Issues:

  • PM-2049 - Mejoras a la ventana de Get Started que aparece al instalar ProcessMaker.
  • PM-2068 -0017117: Error in weekly scheduled case (Mantis code 17117)
  • PM-2220 - Subprocess > Target Variable: The label column does not show the correct information.
  • PM-2245 - Improvements in the Get Started window when installing ProcessMaker
  • PM-2422 - Admin > Users > Users: When  adding a user in the Cost by hour field, it accept negative values.
  • PM-2440 - Problem with date fields.  (Mantis code 17243)
  • PM-2469 - BPMN Designer: Standardize the “Cancel” button functionality.
  • PM-2488 - File Manager: After closing the template open editor and opening it again the bullets and colors dropdowns are blocked.
  • PM-2541 -  The ProcessMap and Dynaforms toolbars have the same design.
  • PM-2546 - On Internet Explorer when using the zoom it goes up.
  • PM-2552 - Trigger > Edit: There is no validation when changes are made over the trigger fields.

Recommendations:

  • The directory where ProcessMaker is installed should have write permissions.
  • Dependent fields are working if they have just one dependent field, when it depends on more than one field only the dropdowns are working.
  • ProcessMaker does not support MySQL strict mode.
  • Remember that this is a release candidate. Do not use this version in a production environment.

Languages:

  • English (Default Core)

Stable Release Availability

ProcessMaker 3.0 version is available for Linux and Windows platforms. Download them from this site.

Resources

  • For a detailed description of ProcessMaker 3.0 and its new features please see our latest documentation.
  • To report any issues in ProcessMaker 3.0 please go to this page, select ProcessMaker [community] “Project” and select "ProcessMaker v3.0" in the Product version.

How to Contribute?

  • We need your help to make ProcessMaker 3.0 a better release, so please take some time to download and try out the release candidate. Your feedback is very important to us!.
  • If you are willing to help translate this version into your native language just tell us by sending an email to communityATprocessmakerDOTcom.

Don't forget that any contribution you provide us will be mentioned in our Wiki, Social Media and Forum!

Enjoy it!


Pages