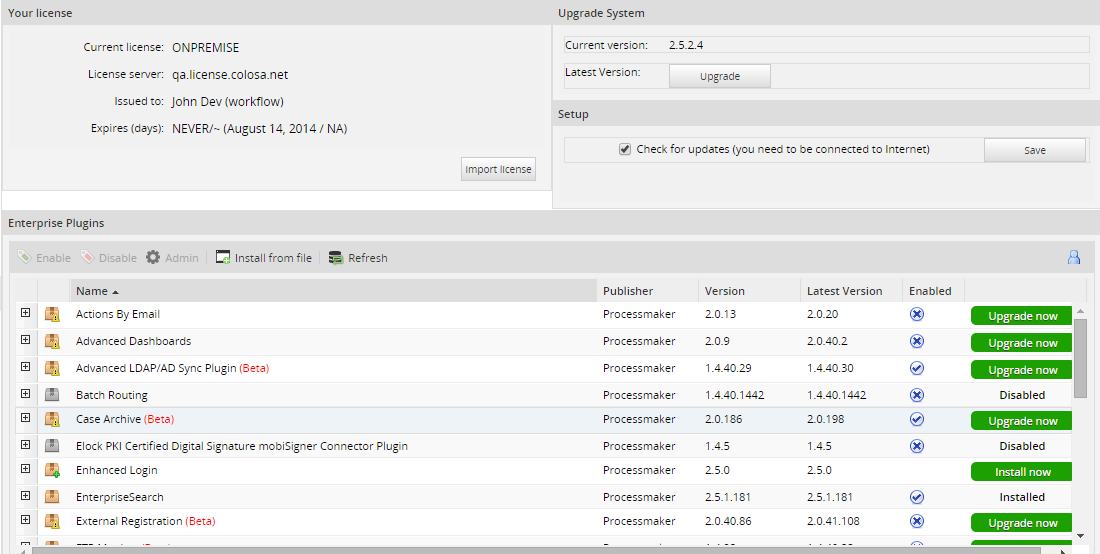
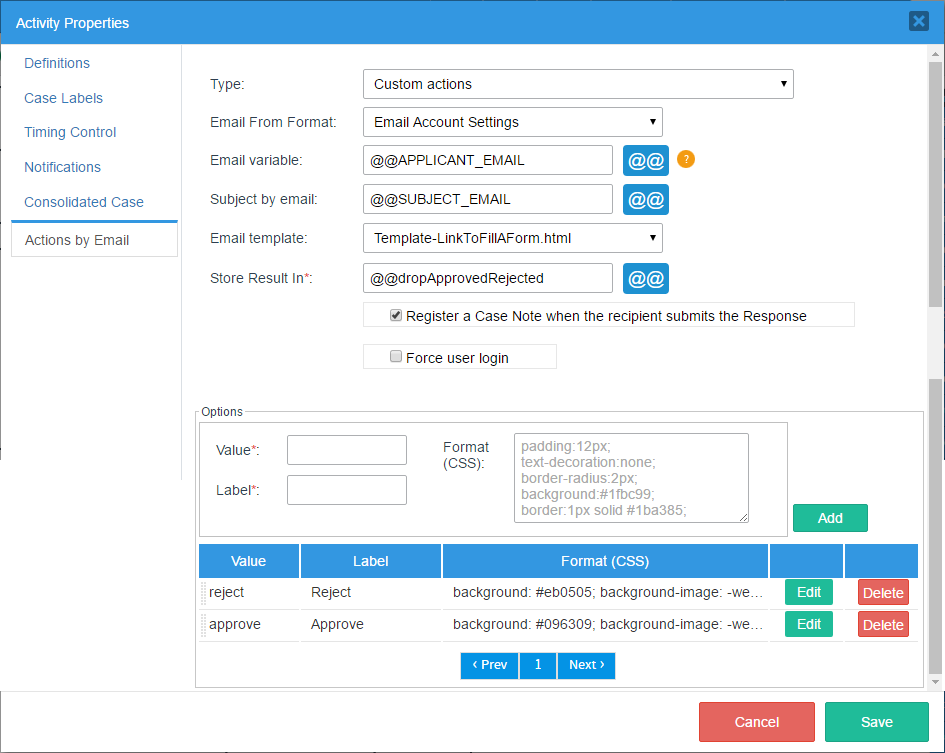
Please rate how useful you found this document: 
Average: 2.6 (9 votes)
Please rate how useful you found this document: 
Average: 2.6 (9 votes)

Overview

The ProcessMaker Mobile app provides access to cases anytime, anywhere. Create and respond to cases, while using features that are only available for mobile devices like QR scanners or Geo-localization.

Requirements

Mobile Device:

  • Android 4.4 or higher (Recommended to have a 3.7 inch screen or larger).

Server:

  • ProcessMaker 3.0.1.7 or later.

  • The ProcessMaker server must have a valid SSL certificate.

Getting ProcessMaker from the Play Store

ProcessMaker Mobile can be downloaded from:

Getting ProcessMaker from the Play Store App

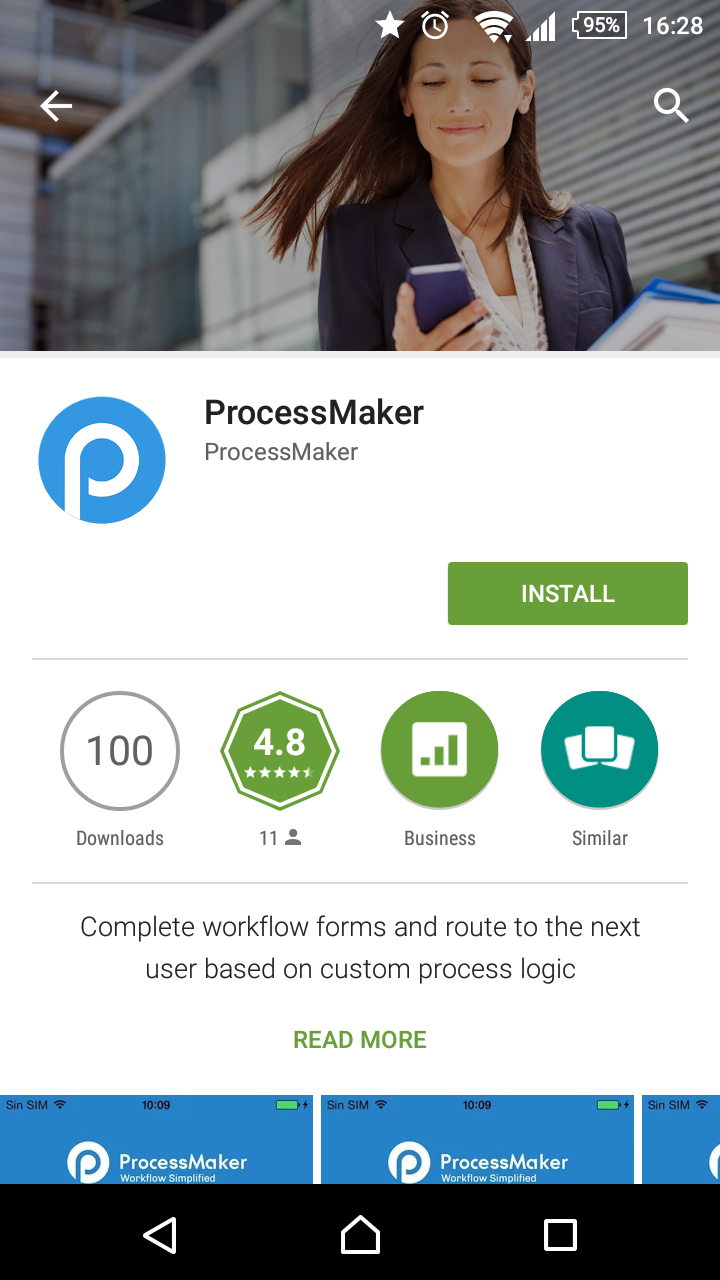
On your cellphone, go to the main screen and look for the Play Store. To get the ProcessMaker app, tap on the search bar at the top of the screen. Enter "ProcessMaker" and tap on the first search result that appears, which is the ProcessMaker app.

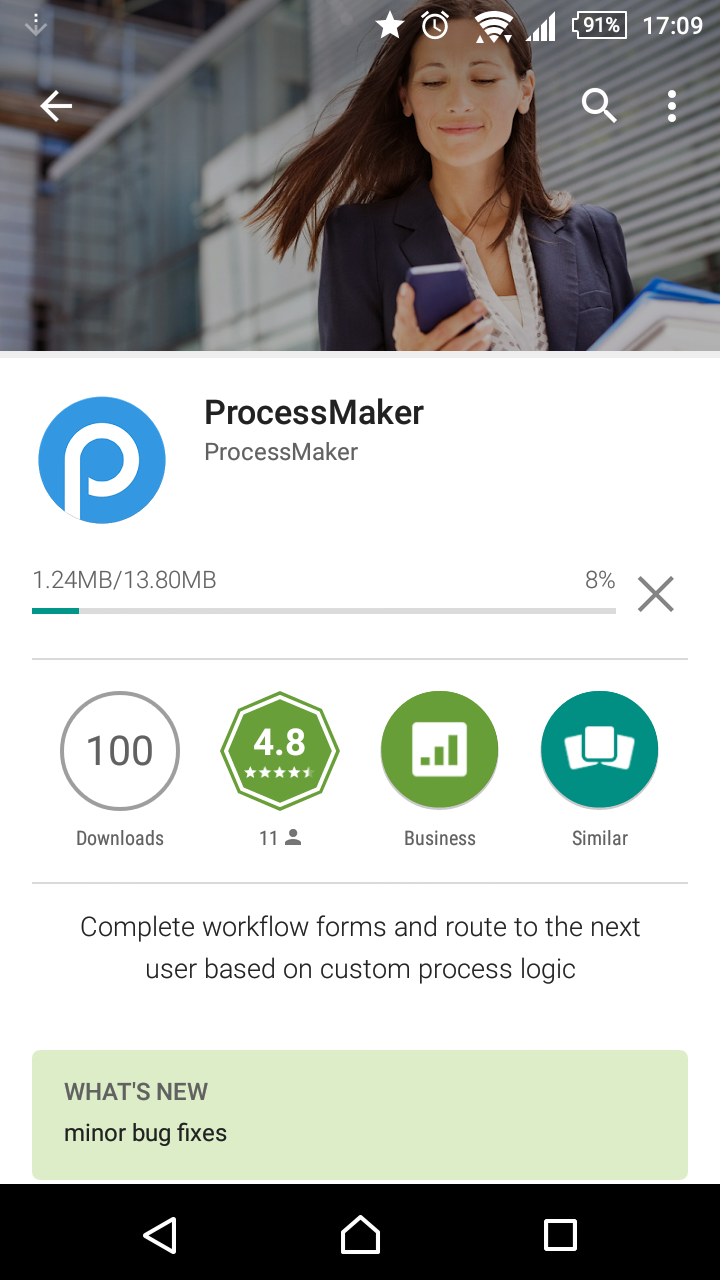
Now, it is possible to download ProcessMaker by tapping on the INSTALL button. A new window displays to select which permissions to grant the app access. Tap on the ACCEPT button to begin the process of installation. This may take a few moments.

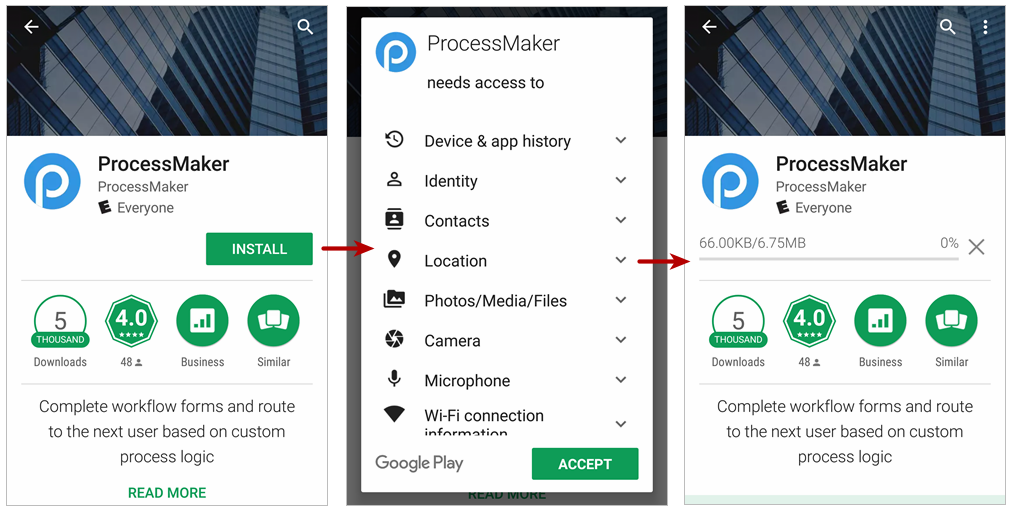
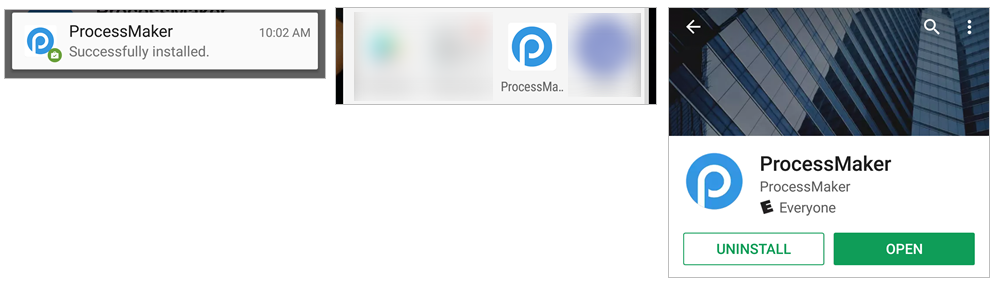
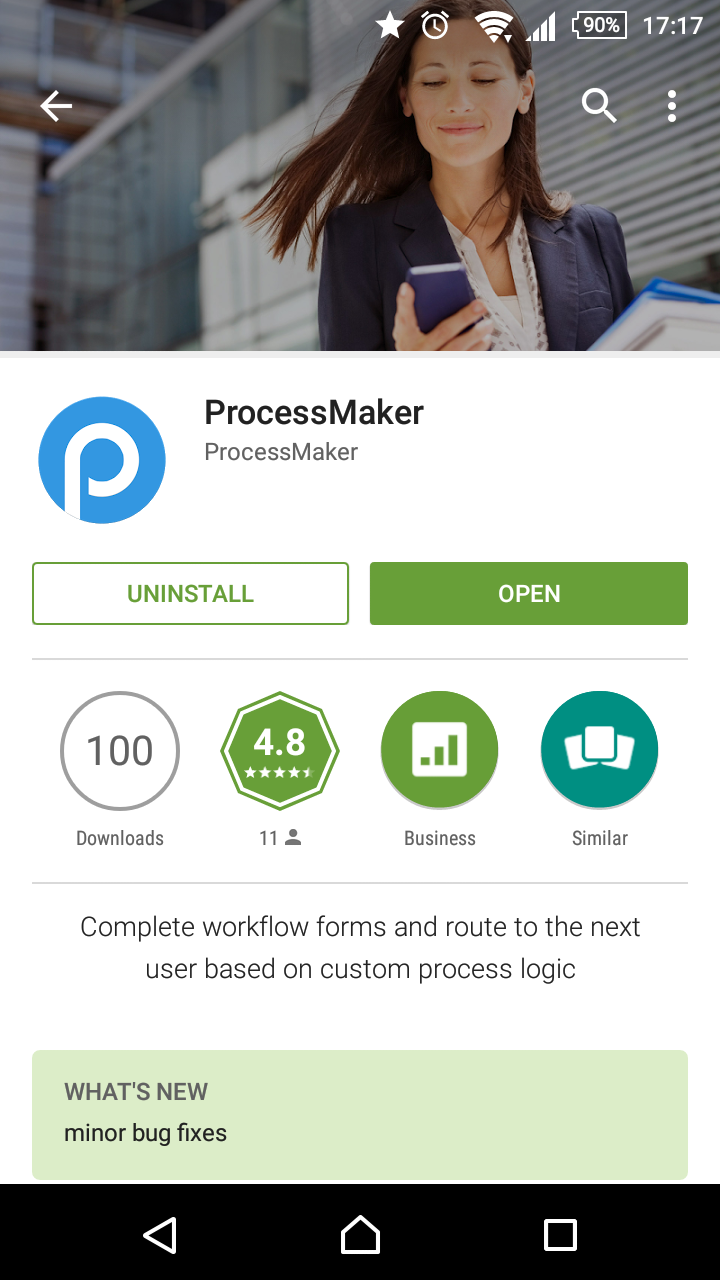
When the "ProcessMaker" app finishes installing, a notification on the cellphone shows that it has been successfully installed and a new icon appears on the main screen. Now, tap on ProcessMaker icon on the main screen to open the application.

Getting ProcessMaker from the Play Store Web Page

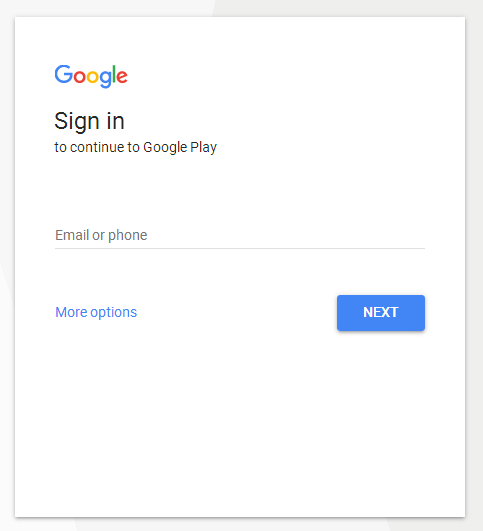
Download the ProcessMaker Mobile app by going to this link. Click on the Install button.

Note that you must be logged on to your Gmail account; otherwise, the Google Sign in page displays.

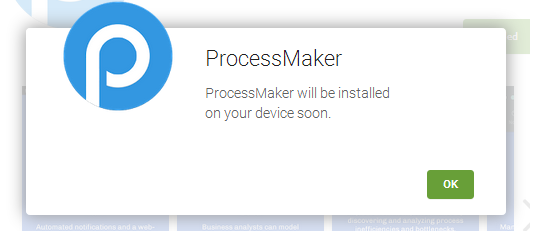
After you are logged on, select the device associated to the Gmail account where ProcessMaker Mobile will be installed, and then click on the INSTALL button.

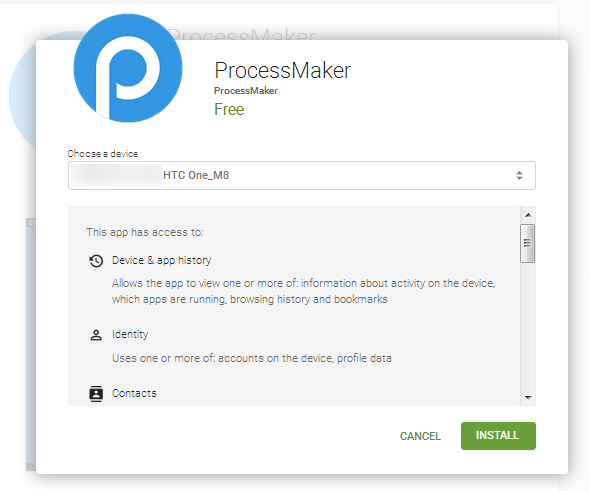
The following message displays, and ProcessMaker Mobile will download automatically to the device selected the next time the device has Internet access.

Updating ProcessMaker Mobile

The ProcessMaker Mobile application is always trying to deliver a better experience; therefore, when a new version is released, it will be necessary to update the app.

To update ProcessMaker Mobile, go to the application in the Play Store, look for ProcessMaker and the Update button will be available.

Tap on the Update button. A message appears asking to allow certain permissions, but ProcessMaker Mobile does not require any additional or special permissions.

After tapping on the ACCEPT button, the new version will start downloading.

This may take a few moments, but after the new version is downloaded a notification that the application is up to date displays.

Starting with ProcessMaker Mobile

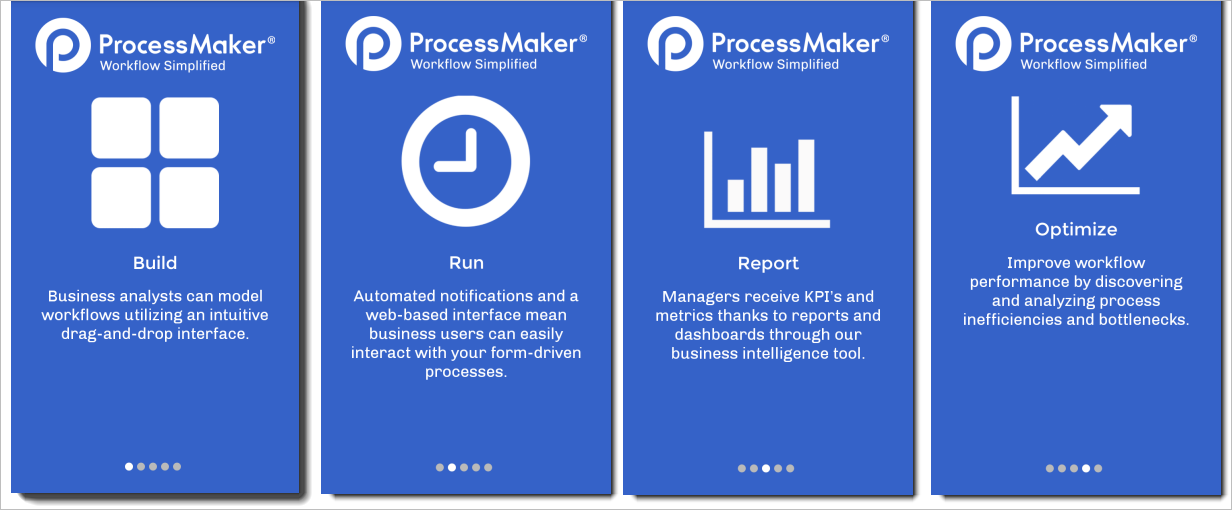
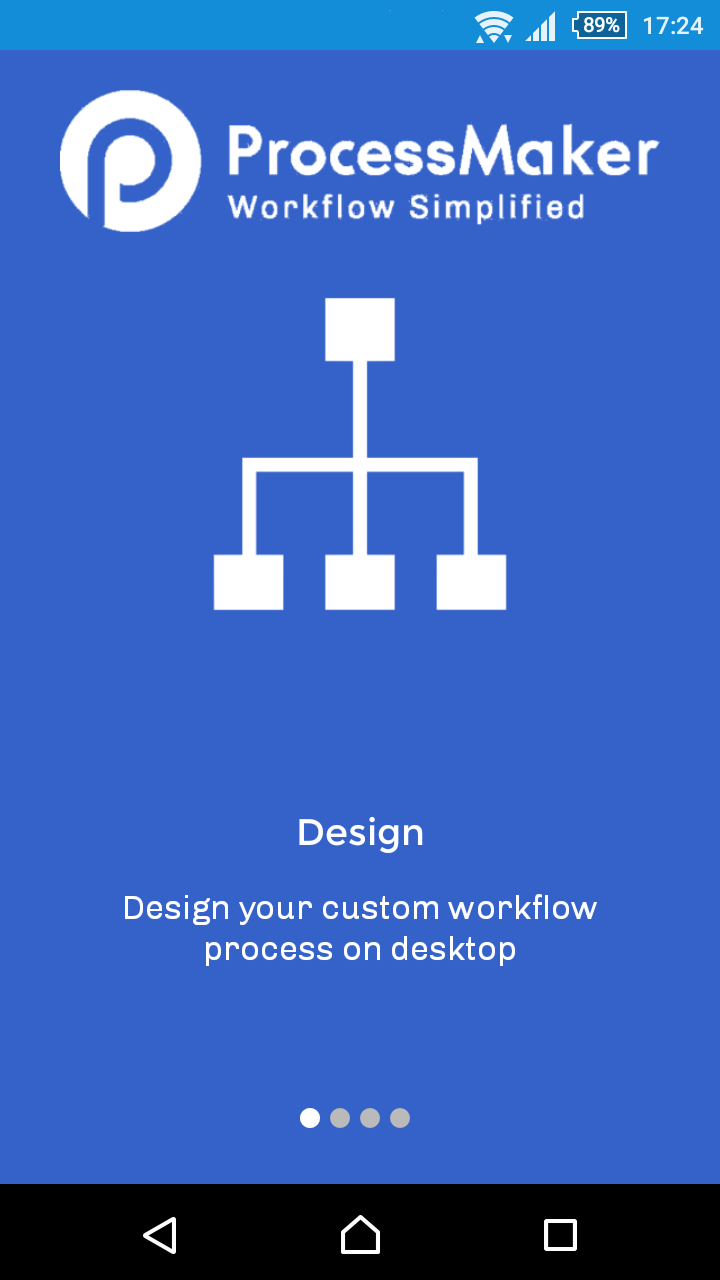
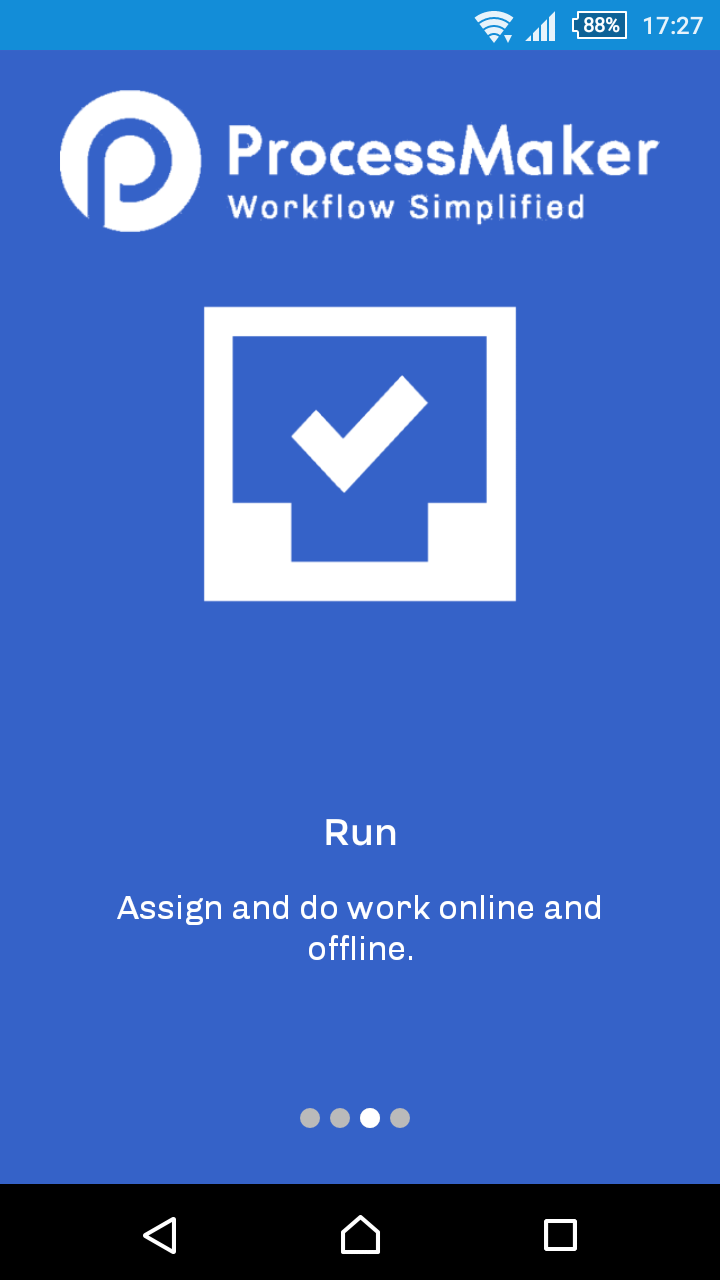
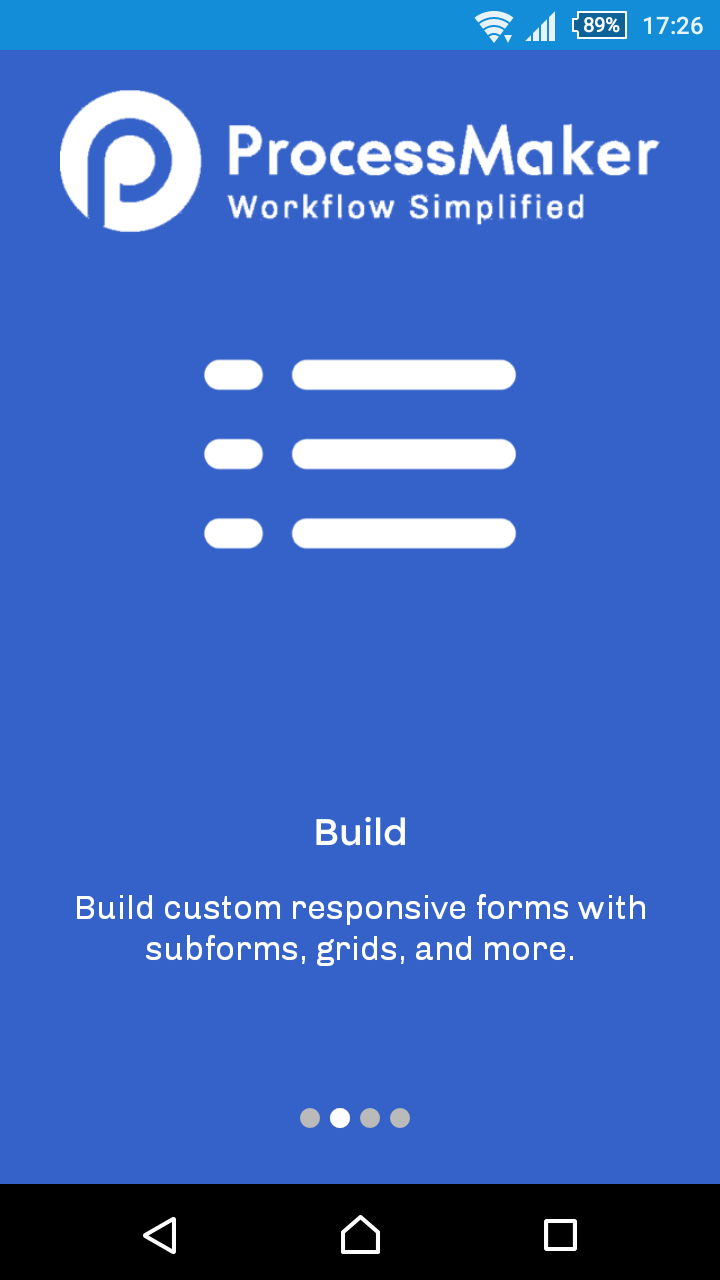
The moment "ProcessMaker" is opened, a summary of the product features appears. Each of the screens shows a brief description of a few ProcessMaker Mobile functions:

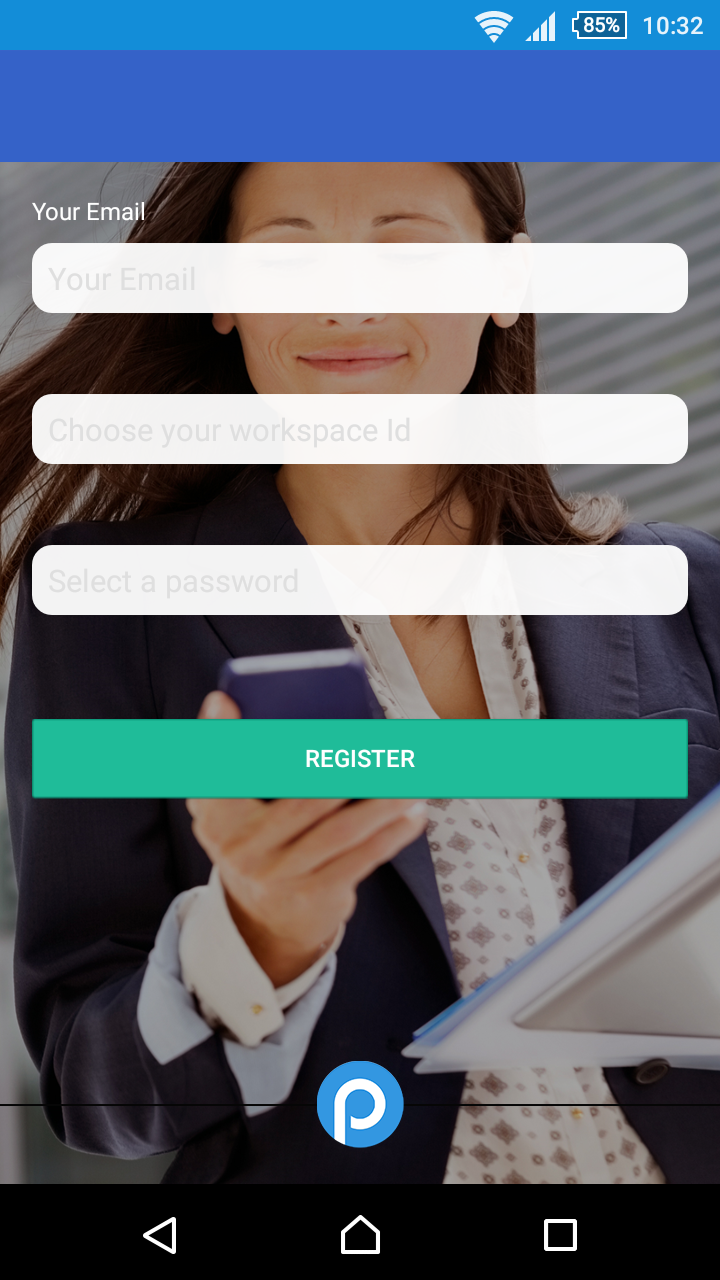
The last screen displays a login screen. Tap on the Login button if you already have credentials, otherwise click on the Register button. If you do not have credentials, tap on the Register button and fill in the information in the window that appears. Tap on Continue after all of the fields are filled in. After tapping the Login button or registering a new account, the next window displays the user(name) and password fields. Either enter your login credentials into the fields or sign in with a Google account.

Note: When updating the ProcessMaker Mobile app, remember that the application depends on the release of the new version of ProcessMaker. Many of the functionalities of the application change with the update of ProcessMaker Web Edition. This means that the ProcessMaker Mobile app must be used with the latest version of ProcessMaker. We recommend disabling automatic updates to avoid any inconvenience.

The Case List

This section discusses how to use the case list, as well as several other options when running a case on a ProcessMaker Mobile version of Android. After you log on, the Inbox screen displays.

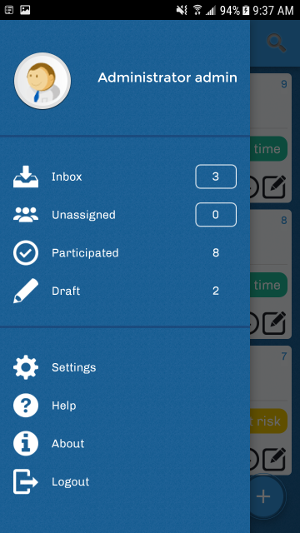
Slide the screen to the right to display a menu where all available options for the app can be found as seen in the image below.

Using the Case List

Work with cases directly from the ProcessMaker Mobile app using the Case List button. The Case List button is in the upper left side of the screen; it is the icon that has three horizontal lines.

When this button is tapped a new screen appears on the left side of the screen. Here, you can see everything happening with your processes. The options in the Case List are the following:

Each of these are explained in the following sections.
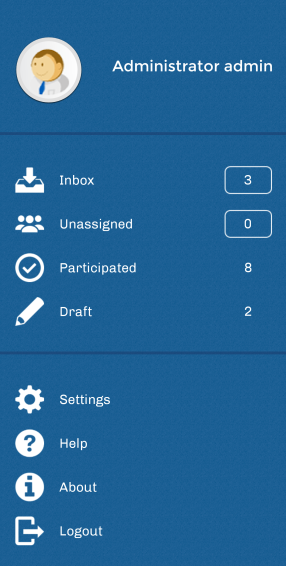
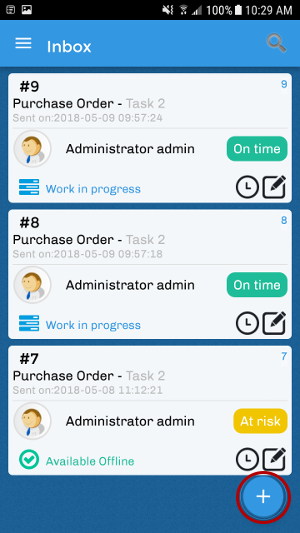
Inbox

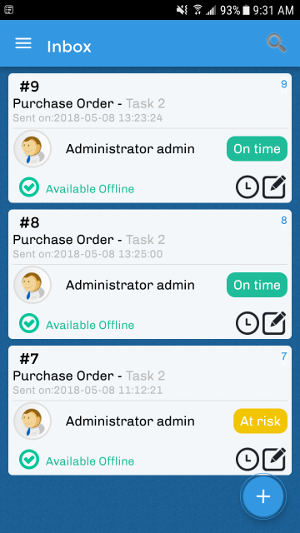
The Inbox screen displays the list of all the cases assigned to you in the ProcessMaker desktop version. The cases are initially ordered first by their case number and then by the name of the case. Choose a case in the inbox and tap on it.

Tap on a case to open it, when open the user can start working on it as in ProcessMaker web edition.

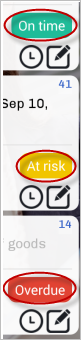
The case statuses are "On time", "At risk" or "Overdue", as seen on the image below.

Unassigned

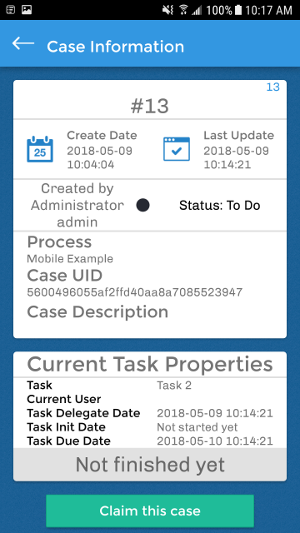
The Unassigned panel displays all cases that can be claimed by a pool of users assigned to the task. You can assign yourself a task, which then removes it from the Unassigned panel. When there are cases in the Unassigned panel, then anyone can claim the case to work on it. Work on an unassigned case by tapping on it. Once opened, details about the unassigned case, like the status, date, description and more, are shown.

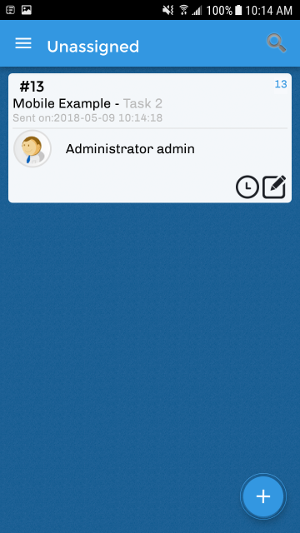
Tap on the Claim this case button to assign the case to yourself and start working on it.

Draft

The Draft panel displays cases that are being edited, but have not yet been submitted. A case becomes a draft after case data is submitted via a Dynaform, an input document is uploading, or after moving to a subsequent step in the current task.

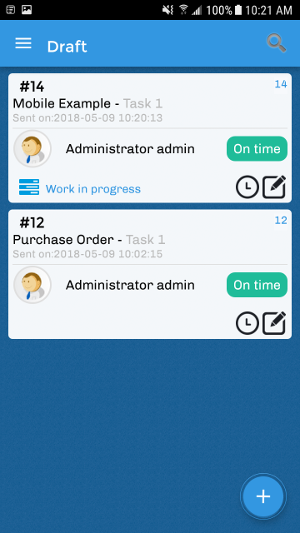
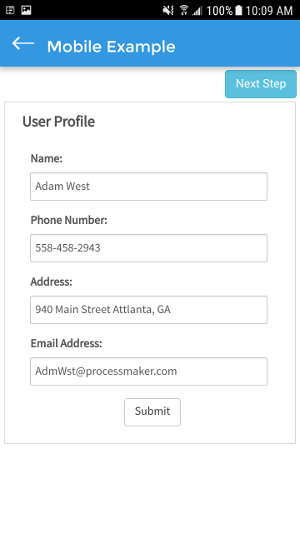
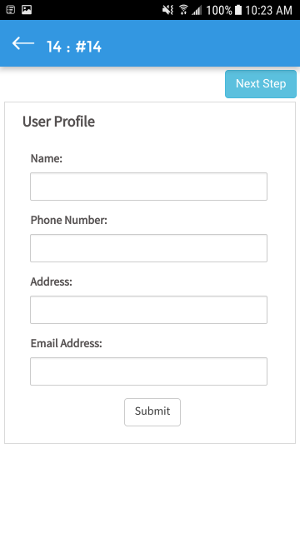
Continue working on a case draft by tapping on it. The Dynaform of that case immediately displays.

Participated

The Participated panel displays all cases in which you have participated.

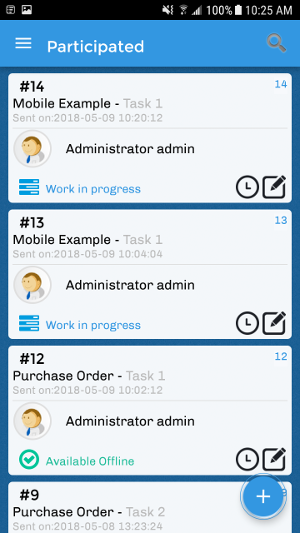
"When any "Participated" case is tapped on, the information about the case displays, including but not limited to the creation date, the last date updated, the owner, and the name of the process.

New Case

Note: The Output Document, Input Document, and External Step features are not available for ProcessMaker Mobile as step: they will not open or create the case if any of those features are on the first task of the display list. If a process has a Dynaform and then any of the features follows as step on the display list, the ProcessMaker Mobile version skips that part and continues. These features will be implemented in future versions.

The ProcessMaker Mobile app allows you to create a new case of a process previously created in the ProcessMaker Web Edition. The New Case list displays all the cases that you have been designated to participate in, but have not yet begun. To start a case, tap on the Plus Sign button located at the bottom of the screen marked with a red circle.

All of your available processes will be listed, and any of them can be started by tapping on the process.

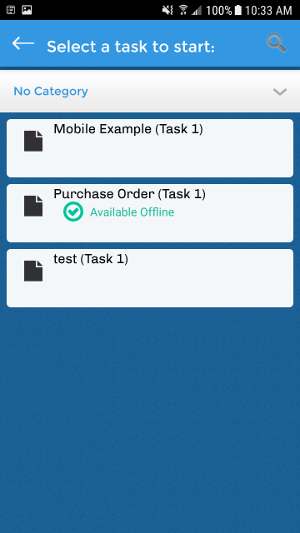
When a case is tapped, the process starts with the first task or the current task that the process is in, similarly to the standard version of ProcessMaker.

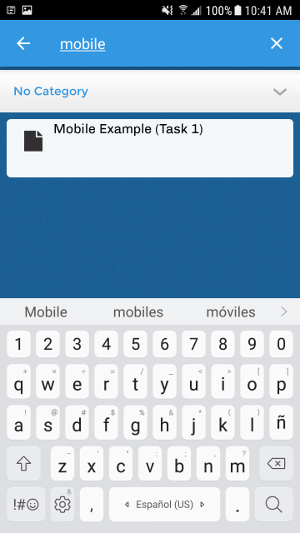
Search for a Process

The ProcessMaker Mobile app allows you to search a process in the list of processes.
Search for a process by tapping on the search box located at the top of the screen.

Type the name of a process and the processes list will be filtered based on the search input.

Additional Options

Aside from the case list, the following sections describe additional options:
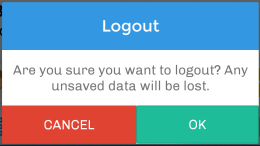
Logout

Go to the main menu by sliding the screen to the right. Locate the Logout button.

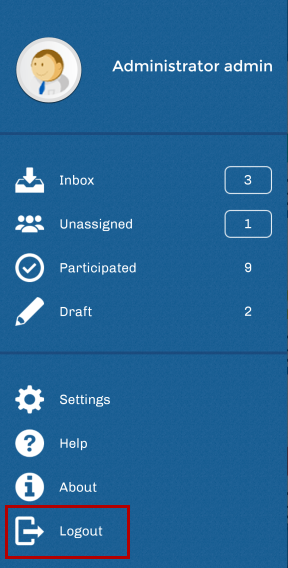
After tapping the Logout button, a screen displays to confirm you want to log out. If you log out, any unsaved case information will be erased. Tap on OK to quit the ProcessMaker Mobile app or tap on Cancel to go back to the main screen.
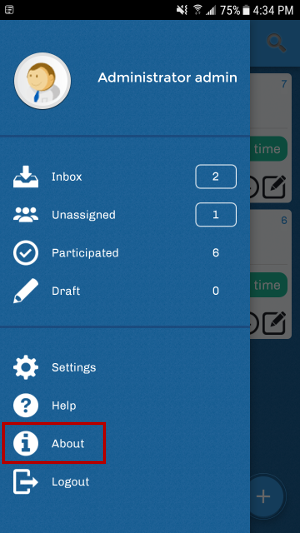
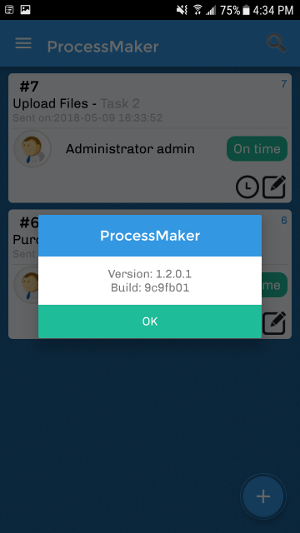
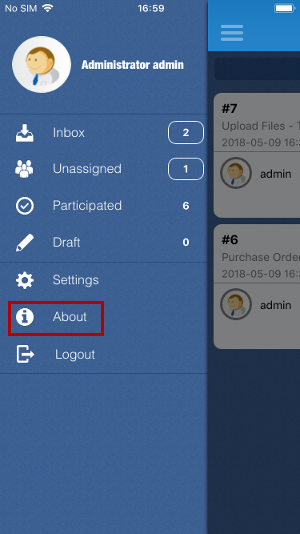
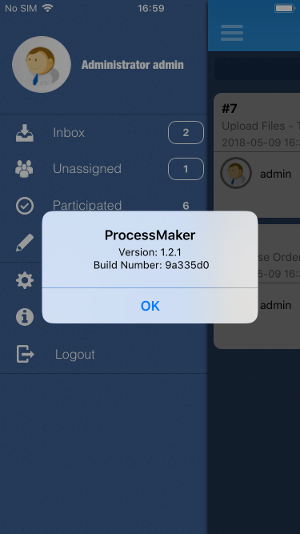
About

Go to the main menu by sliding the screen to the right. Click on the About button.

A screen displays that shows the version of the application and the code of the build. Tap on OK to quit the window and go back to the main screen.
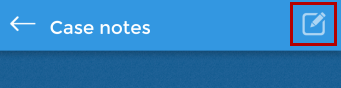
Case Notes

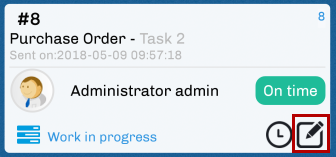
Add a case note to a case by tapping on the pencil icon in the bottom right corner of any case.

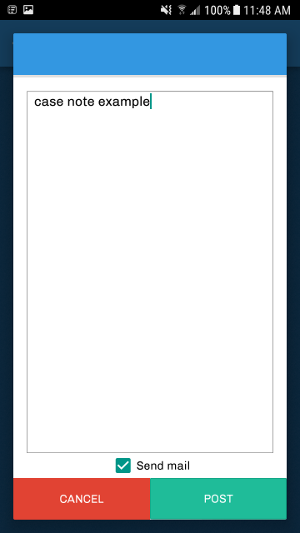
In the new window select the pencil icon in order to create a new case note.

A new window opens where notes can be added.

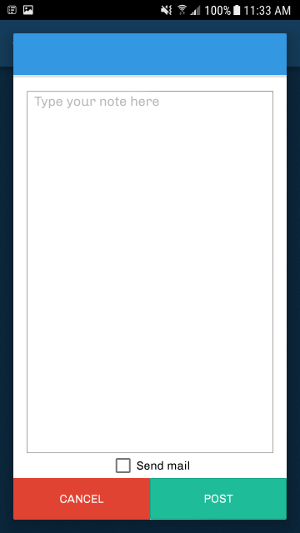
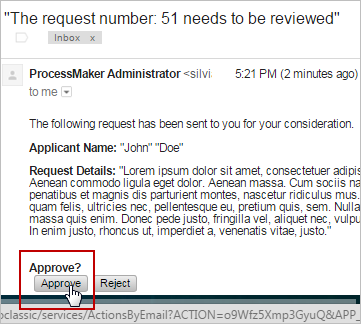
In the "Type your note here" section, add any note that applies to the case. Check the Send Mail button to send the mail. Finally, click on the Post button to store the note added.
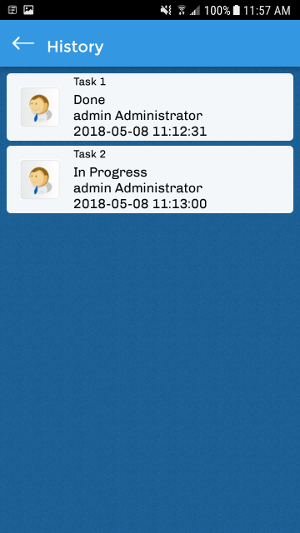
History

Observe the history of a case by tapping on the square with a clock icon in the bottom right corner of any case.

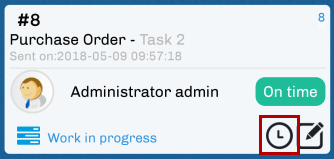
A new window wih the history of the case displays. This includes the name, the person assigned, the status and the date and time of the tasks.

Dynaform Controls on ProcessMaker Mobile

When running cases, end users only interact with Dynaforms when inputting data into the form, viewing information sent from other users or viewing information that has been automatically generated by the execution of triggers or JavaScript in the project. For more information, see Mobile Controls

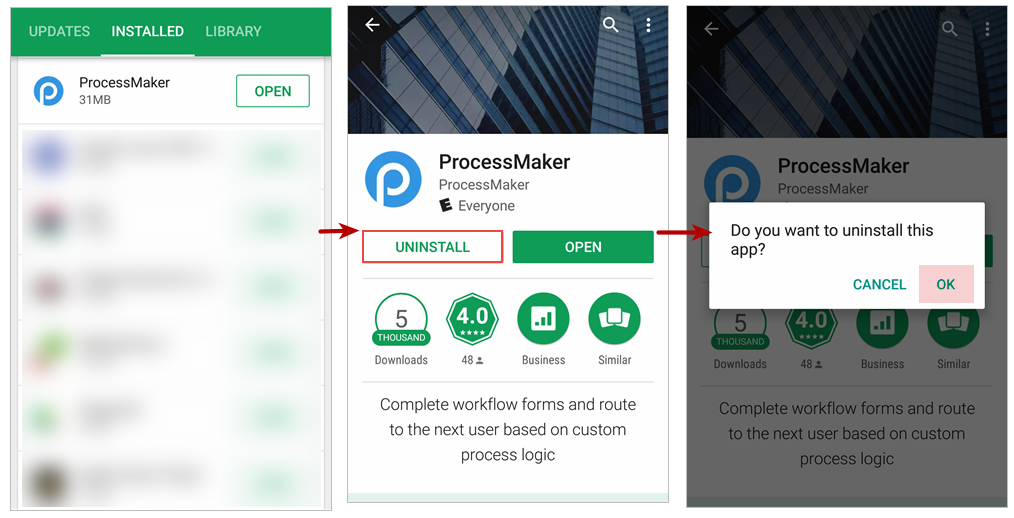
Uninstalling ProcessMaker

To uninstall ProcessMaker Mobile, either look for the application in the Google Play Store and tap on the Uninstall option, or simply drag and drop the ProcessMaker icon on your smartphone's homescreen to the recycle bin.

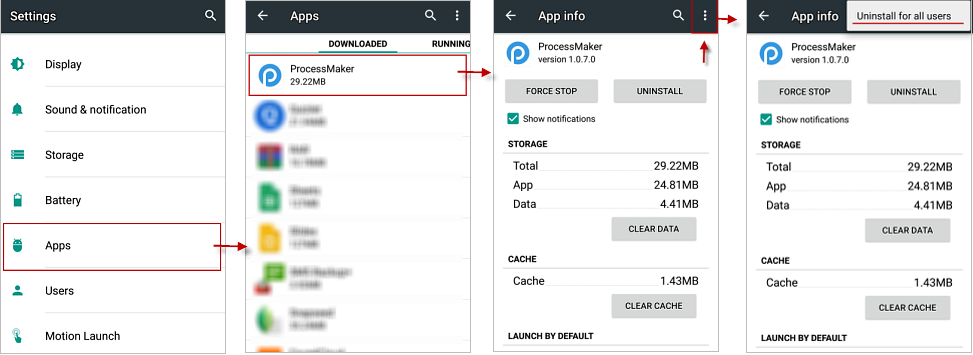
For Android Lollipop 5.X users, it is recommended to uninstall ProcessMaker Mobile by going to Settings > Applications > ProcessMaker > More, and tapping on the Uninstall for all users option to avoid possible re-installation issues.

Insert Images: 
Version Info: 
2.x|/Mobile/Get_ProcessMaker_Mobile_for_Android_2;*1.x|/Mobile/GettingProcessMakerPlayStore
Please rate how useful you found this document: 
Average: 3.2 (6 votes)
Please rate how useful you found this document: 
Average: 3.2 (6 votes)


Plugin Version: 2.0.41|Release Notes


Introduction

ProcessMaker Enterprise Edition offers additional functionality designed for demanding enterprise users. If successfully deploying the ProcessMaker Community Edition, then rest assured that the Enterprise Edition will also serve your needs, since it is built on the same open source core used by the Community Edition. It simply adds a series of proprietary plugins with functionality needed in enterprise. Like the open source core, all the source code for the Enterprise Edition plugins can be viewed, however the "shared source" license does not allow the plugin code to changed or redistributed.

Enterprise Edition brings a new design that will allow the user to have access into the plug-ins information which are included in this version Enterprise. It provides greater accessibility to Install, Upgrade or even buy plug-ins using this new interface. In addition, Enterprise Edition 2.0 includes the option to import a license for the plug-in or install plug-ins separately.

Requirements

ProcessMaker Requirements

  • ProcessMaker v2.5.0, v2.5.1 or v2.5.2 (stable version + available hotfix)
  • ProcessMaker Enterprise Edition v. 2.8.0
  • If using the Enterprise Edition v. 2.0.17 and ProcessMaker Community Edition 2.5.0, and if you are using a language different from English and you need to install Enterprise Edition plugin, you need to delete the following files in order to have your case list properly displayed on English:

/workflow/engine/templates/cases/casesListSetup.html

/workflow/engine/templates/cases/casesListSetup.js

Supported Stacks

  • Check this documentation to view the table of ProcessMaker supported stacks.

Browser Requirements

  • To view the browsers supported check the following documentation.

Recommendations

If needed to test or emulate a new installation it is recommended to delete the path_installed.php file, otherwise the installer may not appear. 

Installing Enterprise Edition 2.0.x Plug-in

Once the Enterprise Edition plug-in is downloaded, usually on .tar extension EnterpriseEditionTar.png, go to ADMIN > Plugins, click on the EnterpriseEditionPluginManagericon.png icon that is displaying:

Note: Upgrade Section if it's required to upgrade the plug-in from version 1.4 to 2.0.

Importing the plug-in

To import the plug-in click on Import and look for the plug-in that was downloaded, once it is loaded click on Import as the image below:


To apply changes, ProcessMaker will log out automatically, and it needs to log in again:

Disabling the plug-in

Enterprise Edition may be disabled, go to Plugins Manager select the plug-in and click on its icon:


Enterprise plug-in manager

Once the Enterprise Edition was installed, go to ADMIN > Plugins and a new option will display:


By clicking on this option a new window on the right side of the screen will display:

It is divided on 3 sections: Your License, Upgrade System and Enterprise Plug-ins. Below are explained each one of the sections:

Your License - Importing and checking information

Generally, licenses are generated on the server. The information of the License is displayed as follows:

  • Current License: It shows the current license that was installed on the server.
  • License Server: It shows the Server where the license was installed.
  • Issued to: It shows for whom the license was generated.
  • Expires (days): It shows how many days are left for the license to expire. The first number shows how many days are left and the second how many days is the license available.
  • Import License: Click on this option to import the license by an external file:

Note: From version 2.0.14, the enterprise plug-in has increased the size of the license to give to the user a better view of the enterprise data.

Upgrade System - Checking Information

It shows the current version of ProcessMaker. If the version is the latest it will show the following information:

Where:

  • Current Version: It shows the current version installed inlcuding hotfixes. Remeber that the fourth number including in the versions refers to the hotfix installed.
  • Latest Version: If it is required to upgrade ProcessMaker to the latest version, click on the upgrade button and the following information will display:


Finally, if needed that ProcessMaker constantly checks for updates, mark the Check for updates option.

Enterprise Plug-ins - Listing Plug-ins available

On this section, all the plug-ins available on the Enterprise Edition 2.0 are listed. Each one of them is described with different status, as it is shown on the image below:

On the left side of the top menu find the following options:

  • Enable. Enable a plug-in after installing it.
  • Disable. Disable a plug-in that was already installed. Select a plug-in form the list and click on the Disable option
  • Admin.  Some plug-ins have extra information about how they work, click on this option to see that information. This is only available if the plugin is installed. 
  • Install from file. Install plug-ins individually by uploadintg them. 
  • Refresh. Refresh the list of plug-ins information.

Below the top menu find the following columns:

  • Name. Plug-in name. Plug-ins in Beta phase will have its label enclosed in parethesis next to its name.
  • Publisher. Name of the person/company who publish the plug-in.
  • Version. Plugin current version.
  • Latest Version. Latest available version.
  • Enable. It shows if the plug-in is enabled 
  • Action. Each plug-in has a different action depending on its availability. Below there is a list of the possible actions:
    • : Upgrade the plug-in into its last current version.
    • :The plug-in is not physically installed on the list. Click on this option to install it. Once it is installed the action will change to Installed.
    • : The license does not allow to install the plug-in. Clicking on that option the user has the option to buy the plug-in sending a request to Sales Department.
    • : The latest version of the plug-in is installed on the server.

Upgrading Enterprise Edition from version 1.4 to 2.0

Follow the steps below:

  • Backup a previous version of the Enterprise Edition plug-in in a different folder, not inside plugins folder . You can use an FTP tool to download the plugins folder from the server
  • Disable the Enterprise Edition plug-in.
  • Delete form the Plugins Folder pmLicenseManager folder and file as the image below:

Those are deleted because Enterprise 2.0 plug-in comes with embedded class so it doesn't need another plug-in. This folder will only display when a the version 1.4 of the Enterprise Edition plug-in is installed.

The "ee" and "plugin.singleton" files

Once you have installed the Enterprise Edition plugin this to files will be automatically generated.

The plugin.singleton file stores all the generic information of the Enterprise plugin.

The ee file stores the information of the Enterprise plugins.

Both are located at :

Linux:

opt/processmaker/shared/sites/<workspace_name>/

Windows:

<installation_folder>/processmaker/shared/sites/<workspace_name>

Note: If you experience any kind of problem with the Enterprice plugin, you should have to Delete the plugin.singleton file. As mentioned above, this file will be generated automatically the next time you login to ProcessMaker. Instead, if you experience any kind of problem with a Plugin inside the Enterprise Plugin, you will have to delete the "ee" file and the plugin.singleton file in order to fixed the problem. In both cases, you will have to enable the Plugin again the next time you log on to your workspace.

Insert Images: 
Please rate how useful you found this document: 
Average: 3 (4 votes)
Please rate how useful you found this document: 
Average: 3 (4 votes)

Overview

Actions by Email is a feature available on ProcessMaker Enterprise Edition. This feature allows users to receive an email where they can send information to ProcessMaker cases and also route those cases onto the next task in the process. The email can contain a link to a form stored on the ProcessMaker server to be filled out and submitted, a group of links which can be clicked to accept or reject information in the email, or multiple different options customized by the designer. Actions by Email was originally created to allow people - who are not registered users in ProcessMaker -to work on cases, but it can also be used by registered users who wish to work on cases without having to log into the ProcessMaker interface.

Actions by Email used to be an Enterprise Plugin, but currently it is an integrated feature available in ProcessMaker Enterprise Edition 3.0 and later.

It comprises three options:

  • Link to fill a form: A link to a form is sent to the user's email. When the user submits the form, it saves any data entered into the form and routes the case to the next task in the process.
  • Use a field to generate actions links: The user will be able to approve or reject the information sent via email. It routes the case onto the next task depending on the link which the user clicked in the email.
  • Custom actions: This option gives designers the ability to add and customize the response options sent to users in the email by adding css code to each of these options.

Note: If working with both BPMN and classic processes, make sure that the license provided includes information of the feature as well as information of the plugin.

How the feature works

Actions by Email adds a new tab in the task properties to configure an email sent to the user. This feature allows sending email on the following cases:

  • By sending an email to the user's mail where the information of the Dynaform will be filled. This user should not be necessarily the system user.
  • By sending a field or fields as a link to the user's mail in order to approve or reject the information.
  • By sending one or more customized options (note that these options are customized by using css code to highlight them).

In the cases above the information will be recovered allowing to continue the case.

Note: Actions by Email does NOT work with tasks which have self service and self service value based assignment routing rules because the task needs to be routed to a specific user in ProcessMaker.

Note: Take into account that the configuration of Actions By Email must be done only from the second task of the process.

Note: The email sent by Actions by Email is resent when the case is unpaused, reassigned or uncancelled.

Restrictions

Please consider the following restrictions before using the Actions by Email feature:

  • As a best practice, do not configure the current task to use Actions by Email, and then route cases of this task from the email to tasks that require manual assignment. This will cause errors in case run time because there is no way in the email to manually select a user in which to assign the task.
  • As a best practice, do not configure a task to use manual timing control if that task requires Action by Email. If you do so, process users cannot change the task duration time during run time.

Requirements

  • ProcessMaker Enterprise version 3.0.0.5 or higher with a proper license .

Supported Stacks

  • See this documentation to view the server configurations which are supported.

Browser Requirements

  • See this documentation to view the browsers which are supported.

Installation and Configuration

Install the Feature in ProcessMaker

ProcessMaker Enterprise version 3.0 and later automatically includes the Actions by Email feature after the Enterprise license is activated. To check whether the Actions by Email feature is available, login to ProcessMaker as a user such as "admin" who has the PM_SETUP_ADVANCE permission in his/her role. Then, go to Admin > Plugins > Enterprise Manager and click on the Enterprise Features tab to see the list of available features.

Note: In ProcessMaker 3, this feature must be enabled to work with it inside the processes. Use the Actions by Email plugin to work only with the old processes. The plugin is not functional for new processes.

Configuring the Actions by Email Properties

To use Actions by Email, open a process for editing and go to the task which will be routed via email. Right click on the task and select Properties task context menu. Select the Actions by Email tab to configure the email that will be sent to the user:

To configure the actions sent by email, select the Type of email that will be sent to the user:

Read the following sections to learn how to work with each one of these options.

Link to Fill a Form

In this option, the email sent to the user will contain a link which will redirect to the Dynaform assigned to the task, located on the ProcessMaker server. When the user fills out the form and clicks on the submit button, any data entered in the form will be saved to the case. For this, the following fields must be completed:

The fields to be filled for both options are the following:

  1. Email Template: Select the template file which will be used as the content of the email. Actions By Email includes a default template file named actionsByEmail.html which can be used for testing purposes. To learn how to create an email template, see this documentation.
  2. Dynaform: Select one of the Dynaforms already created in the project where the information will be filled when the user sends the data.
  3. Subject by Email. Enter the text of the email's subject line. This text can include a custom variable whose content will be inserted in the subject. This variable can come from a previous Dynaform field or be created in a trigger.
  4. Email Variable. Either enter the email address of the person who will receive the email or select a variable which will hold the recipient's email address. If this field is left blank, the next assigned user's email will be used by default.
  5. Select From Email: Select the email address from which the email will be sent to the user. The options are:
    • From email server configuration: The email will be sent from the user set by default in the configuration of the Email Accounts in ProcessMaker.

      Note: If an Actions by Email step occurs after a script Task, then the log will not show any user because a user did not run the Actions by Email step.

    • From current user: The email will be sent from the user assigned in the current task.
    • Note: This field is available from version 3.0.1.5.

Finally, click on the Save button to save or modify the configuration.

Example - Link to Fill a Form

In the following process, the Support Lead must review a request sent by an Applicant. This request will be sent via email.

Create a Dynaform named "Review Request" that include following fields and their respective variables:

Field Variable
Applicant Name - Textbox APPLICANT_NAME - String
Decision - Dropdown with two options (Approve/Reject) REVIEW_STATUS - String

Don't forget to assign the variables to each Dynaform field.

Two variables will be used to set the user's email address and the email's subject: "APPLICANT_EMAIL" and "SUBJECT_EMAIL " (both strings). Now, create the following trigger which defines the two variables holding this information.

$caseId = @@APPLICATION;
//lookup the user assigned to the next task in the case:
$query = "SELECT USR_UID FROM APP_DELEGATION WHERE APP_UID='$caseId' AND
    DEL_INDEX=(SELECT MAX(DEL_INDEX) FROM APP_DELEGATION WHERE APP_UID='$caseId')"
;
$result = executeQuery($query);
$aUser = userInfo($result[1]['USR_UID']);
@@APPLICANT_EMAIL = $aUser['mail'];
//lookup the case number:
$result = executeQuery("select APP_NUMBER from APPLICATION where APP_UID='$caseId'");
@@SUBJECT_EMAIL = "The request number: {$result[1]['APP_NUMBER']} needs to be reviewed";

This trigger needs to be set to fire after routing of the previous task (i.e., the task before the task set to use Actions by Email).

Note: Triggers assigned before and after a Dynaform will not be executed in Link to Fill a Form. This because those triggers are assigned to Steps and not to Dynaforms.

Since the Support Lead will receive the form via email, the Actions by Email must be configured in the "Review Request" task. Right click on that task, go to Properties then Actions by Email tab and fill the information:

Where:

  • Dynaform. Choose the "Review Request" Dynaform.
  • Subject by Email. Choose the @@SUBJECT_EMAIL variable created in the trigger.
  • Email Variable. Choose the @@APPLICANT_EMAIL variable created in the trigger.

Save the changes and execute a case. When the Applicant sends the information to the Support Lead, this last user will receive the following email notification:

Don't forget that the template can be fully customized. Read this section in order to know how to customize the actions by email template.

Click on Please complete this form link and the Dynaform created previously will appear:

Fill out the form and click on Submit, and the information send will be confirmed with the following message:

The case will be routed to the next task, which in this example is the Review Request by Manager task.

Using a Field to Generate Actions Links

This option generates a select link in the link according to the field chosen. The options to be filled in this option are the following:

The fields to be filled for both options are the following:

  1. Email Template: Select the template file which will be used as the content of the email. Actions By Email includes a default template file named actionsByEmail.html which can be used for testing purposes. To learn how to create an email template, see this documentation.
  2. Dynaform: Select one of the Dynaforms already created in the project where the information will be filled when the user sends the data.
  3. Subject by Email. Enter the text of the email's subject line. This text can include a custom variable whose content will be inserted in the subject. This variable can come from a previous Dynaform field or be created in a trigger.
  4. Email Variable. Either enter the email address of the person who will receive the email or select a variable which will hold the recipient's email address. If this field is left blank, the next assigned user's email will be used by default.
  5. Variable Sent in Email: This option is available only if the option Use a field to generate actions link is selected. Select the variable that will be sent on the email and that will hold the value of the option selected by the user in the email. It only works for the following fields: dropdown, radiogroup and checkbox.
  6. Select From Email: Select the email address from which the email will be sent to the user. The options are:
    • From email server configuration: The email will be sent from the user set by default in the configuration of the Email Accounts in ProcessMaker.

      Note: If an Actions by Email step occurs after a script Task, then the log will not show any user because a user did not run the Actions by Email step.

    • From current user: The email will be sent from the user assigned in the current task.
    • Note: This field is available from version 3.0.1.5

  7. Register a Case Note when the recipient submit the Response: If this option is checked, a case note is added when the Dynaform is submitted.

Finally, click on the Save button to save or modify the configuration.

Example - Using a field to generate action links

Let's take the following process to exemplify this option.

Let's create the first Dynaform, where the employee will fill his or her request to submit it for review

Dynaform: Employee Support Request Form
Field Type Field Label Related Variable
title Employee Request Form -
subtitle Fill the following information -
text Employee Name empName
text Employee Last Name empLastName
textarea Request Details reqDetails
submit Submit -

The Dynaform should look like the following:

Assign this Dynaform to the first task in the process: "Fill support request"

Now, create a second Dynaform called "Review Supervisor Request". Import and export the first Dynaform to this new Dynaform and add the following field before the "Submit" button.

Dynaform: Review Supervisor Request
Field Type Field Label Related Variable
title Employee Request Form -
subtitle Fill the following information -
text Employee Name empName
text Employee Last Name empLastName
textarea Request Details reqDetails
dropdown Approve? dropApprovedRejected (Options: "Approve", "Reject")
submit Submit -

The email sent to the Supervisor to review the employee request will be based on this second Dynaform which should look like the following:

Continue by creating a new template called "tmpEmployeeSupportRequest" and add the following code in the body of the template (using the HTML editor):

<p>The following request has been sent to you for your consideration.</p>
<p><b>Applicant Name:</b>&nbsp;@@empName&nbsp;@@empLastName</p>
<p><b>Request Details:</b>&nbsp;@@reqDetails</p>
<p></p>
<p><strong>@#__ABE__</strong></p>

Do not forget to add the @#__ABE__ variable in the template. This variable allows adding the response options in the email. Now, configure the second task so this request is sent to the supervisor's email giving him or her the ability to approve or reject the request.

To fill the "@@SUBJECT_EMAIL" and "@@APPLICANT_EMAIL" variables, create a new trigger called "Fill Email Variables" with the following code:

$caseId = @@APPLICATION;
//lookup the user assigned to the next task in the case:
$query = "SELECT USR_UID FROM APP_DELEGATION WHERE APP_UID='$caseId' AND DEL_INDEX=(SELECT MAX(DEL_INDEX) FROM APP_DELEGATION WHERE APP_UID='$caseId')";
$result = executeQuery($query);
$aUser = userInfo($result[1]['USR_UID']);
@@APPLICANT_EMAIL = $aUser['mail'];
//lookup the case number:
$result = executeQuery("select APP_NUMBER from APPLICATION where APP_UID='$caseId'");
@@SUBJECT_EMAIL = "The request number: {$result[1]['APP_NUMBER']} needs to be reviewed";

Assign this trigger in the first task "Before Assignment".

Also, configure the exclusive gateway using the "dropApprovedRejected" variable sent in the mail to store the supervisor's response and decide whether the request is rejected (the flow will go the the end event) or approved (the flow will go to the "Review request by manager" task). Right click on the gateway and add the following conditions:

"Support Granted" -> @@dropApprovedRejected == "Approve"
"Review request by manager" -> @@dropApprovedRejected == "Reject"

Save the changes and execute a case. When the Employeesends the information to the Support Lead, this last user will receive the following email notification:

Notice that the content of the email sent is the content set in the template configured in the Actions by Email option of the task. Nevertheless, if the variable that includes the action links (which in this case are the options of the dropdown) is not included in the Dynaform, these options won't be sent in the email.

Users who receive the email can use these action links to submit their response directly from the email. In case of this example, the supervisor will approve the request by clicking on "Approve"

After clicking on one of the options, the case is routed to the next task (in case of the process the response is also evaluated by the gateway). The following message is shown to the user.

And, a set in the configuration, a case note is also added in the case.

Custom Actions

Available on: ProcessMaker 3.0.1.7 on

This option gives designers the ability to add and customize the response options sent to users by adding css code to each of these options. These options are added at the end of the email template to be sent and makes it easier for users to select only one choice. When selecting this option in the configuration of the Actions by Email, the following window is shown:

The information to be completed is the following:

  • Select From Email: Select the email address from which the email will be sent to the user. The options are:
    • From email server configuration: The email will be sent from the user set by default in the configuration of the Email Accounts in ProcessMaker.

      Note: If an Actions by Email step occurs after a script Task, then the log will not show any user because a user did not run the Actions by Email step.

    • From current user: The email will be sent from the user assigned in the current task.
  • Email Variable: Either enter the email address of the person who will receive the email or select a variable which will hold the recipient's email address. If this field is left blank, the next assigned user's email will be used by default.
  • Subject by Email: Enter the text of the email's subject line. This text can include a custom variable whose content will be inserted in the subject. This variable can come from a previous Dynaform field or be created in a trigger.
  • Email Template: Select the template file which will be used as the content of the email. Actions By Email includes a default template file named actionsByEmail.html which can be used for testing purposes. To learn how to create an email template, see this documentation.
  • Store Result in: Select the case variable where the value of the option selected by the user will be stored.
  • Options: Add in this section the options that will be sent in the email to the users who will receive it, and select just one of them. Each options added must have its value (which will be stored in the variable selected previously once the users selects one options and sends the response), the label with which each option will be shown to the user and finally, each option can have customized css code so it is easier for users to identify each option in the email. For example:

Example - Custom Actions

Let's take the example described before in which the supervisor whether approves or rejects the request of the employee in this section.

This was the email received by the supervisor with the action links:

Let's use the custom actions to highlight the response actions making the "Approve" button green and the "Reject" button red. To do this, let's use the following css code for the green "Approve" button

  background: #096309;
  background-image: -webkit-linear-gradient(top, #096309, #08752b);
  background-image: -moz-linear-gradient(top, #096309, #08752b);
  background-image: -ms-linear-gradient(top, #096309, #08752b);
  background-image: -o-linear-gradient(top, #096309, #08752b);
  background-image: linear-gradient(to bottom, #096309, #08752b);
  -webkit-border-radius: 28;
  -moz-border-radius: 28;
  border-radius: 28px;
  font-family: Georgia;
  color: #ffffff;
  font-size: 20px;
  padding: 10px 20px 10px 20px;
  text-decoration: none;

And let's use the following css code for the red "Reject" button.

  background: #eb0505;
  background-image: -webkit-linear-gradient(top, #eb0505, #b82b2b);
  background-image: -moz-linear-gradient(top, #eb0505, #b82b2b);
  background-image: -ms-linear-gradient(top, #eb0505, #b82b2b);
  background-image: -o-linear-gradient(top, #eb0505, #b82b2b);
  background-image: linear-gradient(to bottom, #eb0505, #b82b2b);
  -webkit-border-radius: 28;
  -moz-border-radius: 28;
  border-radius: 28px;
  font-family: Georgia;
  color: #ffffff;
  font-size: 20px;
  padding: 10px 20px 10px 20px;
  text-decoration: none;

Now, using those code lines, configure the Actions by Email property of the "Review Request" task like the following.

Use the same trigger and Dynaforms in the process, only the configuration will change for this example. Run a case of this process. The following is the email received by the supervisor using the options provided in the configuration.

The supervisor is now capable of sending the response using these buttons as in the previous case.

Customizing the actionsByEmail.html template

It is possible to customize the template by adding case variables and additional information related with the Dynaform, process, case, etc. In order to find out the actionsByEmail.html template go to Templates option, the template will be listed:

Click on Edit and the following structure will appear:

This template is characterized by having the @#__ABE__ variable where all the information related to the Actions by Email is stored. It is mandatory to keep this variable even if a new template is created.

Modify its html using Dynaform variables, the template will look something like:

When the process where the actions by email is configured, is executed, the user will receive the following custom email:

Actions by Email Log

Note: This option is not shown in last versions of ProcessMaker. It is only shown when the Actions by Email plugin is enabled. This is a Known Issue that will be solved in next versions. Thank you for your understanding.

When a case is executed, after configuring the Actions By Email options, all messages sent will be registered on the Actions by Email Log. This is very useful to have a register of which messages were send or which weren't. Login to ProcessMaker with a user such as the "admin", who has the PM_SETUP permission in his/her role. Then, go to ADMIN > Plugins and click on Actions by Email option:


A list with emails sent will display as follows:

Where:

  • Resend Email: By selecting an email from the list and clicking on this button at the top left-hand side of the list, the email will be resent. If the task is closed the following message will display:

  • Date: it's the date on which the email was sent.
  • Case Number: it's the case number in which the message was sent.
  • Subject: it will display the subject of the email.
  • From: email address from which the email was sent.
  • To: user who receives the email.
  • Sent: state of the email. If it was sent state will be SENT on the contrary it will display an ERROR status.
  • Answered: if the message is answered, in other words, whether the form is filled or clicked on the link options, on this row the message will be YES on the contrary, if the email is not answered, the message will be NO.
  • View Response: by clicking on the icon, the email answered will open in a new window, with the fields which were filled during the process. This have a relation with the field Answered if in that field the Answer is YES, the window will display the message that will be the form filled or the link option.

    However, if the answer on the Answered field is NO, the window will display the following message:

  • Message: if any error occurs while it is sending a message, it will be described on this row.
Insert Images: 
Version Info: 
3.8|/3.7/Actions_by_Email;3.7|/3.7/Actions_by_Email;3.6|/3.3/Actions_by_Email;3.5|/3.3/Actions_by_Email;3.4|/3.3/Actions_by_Email;3.3|/3.3/Actions_by_Email;3.2|/3.2/Actions_by_Email;3.1|/3.1/ProcessMaker_-_Actions_by_email;*3.0|/3.0/ProcessMaker_-_Actions_by_email;2.x|/index.php/ProcessMaker_-_Actions_by_email
Please rate how useful you found this document: 
Average: 2.3 (3 votes)
Please rate how useful you found this document: 
Average: 2.3 (3 votes)

Overview

In ProcessMaker a workspace allows a group of processes and their cases to be managed as a cohesive unit. The data for each workspace is stored in one database in MySQL and its files are located in a separate directory, so there is no contamination of data between workspaces. Because the data is in separate databases and directories, workspaces can be separately backed up and restored.

Workspaces allow complex organizations to divide up their processes and users into separate groupings for easier data management. For example, the Human Resources, Accounting and Sales departments might all have their own separate workspaces which are accessed by different sets of users.

Businesses which offer ProcessMaker as a hosted service can create a separate workspace for each of its clients. The Enterprise Edition facilitates the hosting of workspaces by providing a user-friendly Multitenant Workspace Management, where workspaces can be easily managed with options to create, enable, clone, restore, backup, enable and disable workspaces, view statistics about multiple workspaces at a glance.

PHP Configuration

Before creating a workspace, it may be necessary to modify the file configuration of PHP. The location of the php.ini file depends on your operating system:

Red Hat/CentOS/Fedora:
/etc/php.ini
Debian/Ubuntu/Mint/SuSE/openSUSE:
/etc/php5/apache2/php.ini
In Debian/Ubuntu systems with multiple web servers:
/etc/php5/cgi/php.ini
FreeBSD:
/usr/local/etc/php.ini
Windows:
C:\Users\USERNAME\AppData\Roaming\ProcessMaker-X_X_X\php\php.ini

Open the file with a plain editor and set the max_execution_time value to 60 seconds or more. For example:

max_execution_time = 180

Save and close the file.

Creating Workspaces

The "workflow" workspace is create by default when ProcessMaker is first installed. This workspace is specified inside the URL when accessing ProcessMaker through a web browser:

Additional workspaces can be added either by changing the URL in the web browser in the Community Edition or through the Multi-tenant Workspace Management in the Enterprise Edition.

Creating Workspaces in the Community Edition

Login to ProcessMaker with a user who has the PM_SETUP_ADVANCE permission in his/her role. Then edit the URL in the web browser to redirect to the form to create a new workspace:

http://<IP-ADDRESS>:<PORT>/sys<CURRENT-WORKSPACE>/en/neoclassic/install/newSite

Replace <IP-ADDRESS>:<PORT> and <CURRENT-WORKSPACE> for your setup. For instance, if currently running ProcessMaker on a server at 192.168.1.100 on the default port 80 in the default workspace named "workflow", then use the address:

http://192.168.1.100/sysworkflow/en/neoclassic/install/newSite

Then, fill out the Form for a New Workspace.

New Workspace Form

In the form which appears, enter information about the new workspace.

New Workspace

  • Name: The name of the new workspace, which can contain a maximum of 13 characters.

    Warning: Until ProcessMaker 3.0.1.7, don't use a similar or the same name of an existing workspace. For example, workflow, WORKFLOW, WorkFlow, wORFloW, etc. In the case of having workspaces with similar names, please delete one of them in order to avoid conflicts when restoring or logging in to the workspace.

Database Options: Unlike older ProcessMaker versions, the workspace data will be created just in one database:

  • Workflow Database: The name of the database, which will hold processes data, cases, users, PM Tables, etc.
  • Drop database if exists: Check this option to delete any existing databases which have the same names as specified above. It is not recommended to check this option in most cases.

Workspace Administrator: Defines the credentials of the administrator user for the workspace that will be created. This user will have the PROCESSMAKER_ADMIN role by default.

  • Username: The username for the administrator of the new workspace. By default, the username is "admin".
  • Password: The password of the administrator of the new workspace. The password must be entered twice to avoid careless typos. By default, the password is "admin".

After filling out the form, click on Test to check whether the entered values are valid and don't conflict with the names of existing MySQL databases. If there are no conflicts with any existing site, a message window will open asking if the new site should be created:

Click Yes to create the new site, or click No to close the window and return to the form.

To be redirected to the login screen of the new workspace, click on Accept. To stay in the same workspace, click on Cancel; then use the web browser's back button (or ALT+BACKARROW) to return to the previous page.

Switching Workspaces

After the workspace creation, access to the new workspace at any time by changing the web browser URL.

Setting a Default Workspace

If only one ProcessMaker workspace is being used, it may be a good idea to add that workspace to the URL to make it the default workspace. If a default workspace is set, after entering the domain (e.g. http://127.0.0.1:8081), the system reads the configuration and redirects to the default workspace (e.g. http://127.0.0.1:8081/sysworkflow/en/neoclassic/login/login).

To set a default workspace, edit the file index.html with a plain text editor. The index.html file is generally found at the following location:

Linux/UNIX:
/opt/processmaker/workflow/public_html/index.html
Windows:
\workflow\public_html\index.html

Add the workspace name in line 6 of the code:

<html> <head> <title>Redirector</title> <meta http-equiv="PRAGMA" content="NO-CACHE" /> <meta http-equiv="CACHE-CONTROL" content="NO-STORE" /> <meta http-equiv="REFRESH" content="0;URL=sysworkspace/en/neoclassic/login/login" /> </head> </html>

For example, if the default "workflow" workspace is being used, this line will look like:

<meta http-equiv="REFRESH" content="0;URL=/sysworkflow/es/green/login/login.html" />

Warning: These changes to the source code will be overwritten each time ProcessMaker is upgraded, or when the system properties are modified, so they will have to be reapplied after each upgrade or setup modification.

Insert Images: 
Version Info: 
3.8|/3.1/Workspaces;3.7|/3.1/Workspaces;3.6|/3.1/Workspaces;3.5|/3.1/Workspaces;3.4|/3.1/Workspaces;3.3|/3.1/Workspaces;3.2|/3.1/Workspaces;3.1|/3.1/Workspaces;*3.0|/3.0/Workspaces;2.x|/index.php/Workspaces
Please rate how useful you found this document: 
Average: 3 (2 votes)
Please rate how useful you found this document: 
Average: 3 (2 votes)


Plugin Version: 1.4.42 | Release Notes


Introduction

The Advanced LDAP/AD Sync plugin allows ProcessMaker users to login by authenticating directly in an LDAP server or Microsoft Active Directory server, unlike the LDAP community version that only imports users. It also enables synchronization with LDAP or Active Directory to update user information.

Requirements

  • ProcessMaker Enterprise version 2.9 or higher with the corresponding license .

Supported Stacks

  • Check this documentation to view the table of ProcessMaker supported stacks.

Browser Requirements

  • To view the browsers supported check the following documentation.

How the plugin works

The Advanced LDAP/AD Sync plugin is used to compare the user's list in ProcessMaker against the user's list in LDAP or Active Directory. Users in Active Directory which haven't been imported or synchronized in ProcessMaker will not be created. However, if the option Enable automatic registration is activated, users will automatically be imported from Active Directory the first time they log into ProcessMaker.

The Lightweight Directory Access Protocol (LDAP) uses distinguished names (dn) to identify users, groups, and other types of entities. In LDAP and Active Directory, which is Microsoft's extension of LDAP, distinguished names are constructed hierarchically using:

  • dn - domain components, such as: dc=acme,dc=com
  • ou - organizational units, such as: ou=managers,ou=regionalbranch
  • cn - common names, such as: cn=John Doe

Other naming attributes described in RFC 2253, such as o= for organization name and c= for country/region name, are not used in Active Directory, although they are recognized by LDAP.

The distinguished name describes entities starting from the specific and moving to the general in the hierarchy of entities.
For example: cn=John Doe,ou=managers,ou=regionalbranch,dc=acme,dc=com


Recommendations

Note: Take into consideration that ProcessMaker does NOT support sub-groups. Therefore, user groups cannot be organized hierarchically, and nested groups can not be created.

  • Verify that the file ldapadvanced.php, which is located at workflow/engine/bin/plugins/ldapadvanced/ldapadvanced.php, does NOT exist on the ProcessMaker server. If this file exists, it needs to be deleted. Otherwise, the ProcessMaker cron will execute it, and the task synchronization of the elements will be executed twice.
  • If there are thousands of users to import, the max_page_size variable should be set in the Active Directory. If this setting is not configured, the Advanced LDAP plugin may not return all users. See this documentation.
  • Due to security reasons, it is NOT recommended to use Anonymous connections.

Setup

  • Export the Directory CA Certificate. Follow these instructions to export the certificate from Active Directory
  • Import the certificate to the following path in the server: /etc/openldap/cacerts/
  • Create a TLS connection, by adding the following line to the Apache configuration file (which is generally named httpd.conf, but is named apache2.conf on Debian/Ubuntu systems):
LDAPTrustedGlobalCert CA_BASE64 /etc/openldap/cacerts/neonet.cer

This line tells Apache the path of CA certificate to verify the domain neonetda.org. After changing the Apache configuration file, restart Apache for the change to take effect.

Note: The TLS connection was tested with version 1.4.22 of the "ldapAdvanced" plugin and the Softerra LDAP Browser 4.5.

Note: When configuring the connection in ProcessMaker to the LDAP/Active Directory server, it is strongly recommended to use port 389 and not the 636. The PHP LDAP module creates a normal connection to the server through the default port and then executes a command that makes the connection secure via TLS (ldap_start_tls).


Finally, verify that the following directory has read and write permissions:

workflow/engine/xmlform/authSources

(If the normal installation procedure was followed, all subdirectories under workflow/engine/xmlform/ should be readable and writable by Apache.)

Authentication Sources

Go to ADMIN > Users and click on Authentication Sources

In the right panel, a list of existing authentication sources is displayed, with a button to create a new authentication source.

New Authentication Source

Click on New to create an authentication source. Then select the Provider, which can be the normal ldap importer or the ldapAdvanced plugin, which is recommended because it offers synchronization to update the user information and the ability to import groups and departments from Active Directory.

Then, define how to connect to the authentication source:

This new interface appears in version 1.4.40.

  • Name: Enter a label which will identify the Authentication Source.
  • Type: Select whether using LDAP or Active Directory. Moreover, if using version 1.4.40, there is the option to connect to 389 Directory Server
  • Enable Automatic Register: If Yes is selected, when a new user tries to login, ProcessMaker will connect to the LDAP or Active Directory server and verify whether the user exists in the authentication source. Users which exist in LDAP or Active Directory will automatically by imported into ProcessMaker and be able to login.
  • Server Address: Enter the IP address or domain name of the LDAP or Active Directory server. If located on the same machine, then enter "localhost".
  • Port: Enter the port number for the LDAP or Active Directory service. By default, LDAP and Active Directory use port 389. If unsure, use the netstat -l and netstat -lnp commands in Linux/UNIX or netstat -a and netstat -ab commands in Windows to determine which port is being used.
  • Enabled TLS: Select "Yes" if using Transport Security Layer (TLS) or Secure Socket Layer (SSL) to connect to the Authentication Source. Otherwise, select "No".
  • Base DN: Enter the Distinguished Name from the Base object. In most cases this will be the domain components (dc) of the Distinguished Name. For example, the Base DN for processmaker.com would be "dc=processmaker,dc=com". For more information on constructing DN chains, see this LDAP guide.
  • Anonymous: If the LDAP or Active Directory server accepts anonymous searches for users, then select "Yes". If a login is required, then select "No". It is not recommended to use this type connection in version 1.4.40.
    • Username: This field appears if not using anonymous logins. Enter a username to login to the LDAP or Active Directory server.
    • Password: This field appears if not using anonymous logins. Enter a password to login to the LDAP or Active Directory server.
  • User identifier: Enter the object to identify users, which will be their username in ProcessMaker. For Active Directory, enter "samaccountname". For Open LDAP, enter "uid".
  • User Identifier: Enter the object classes where ProcessMaker will look for users. By default, the object class for Active Directory is "user" and for Open LDAP is "inetOrgPerson". If unsure which object class to use, enter "*", which is slower because it will cause ProcessMaker to look in all object classes.
Note: In previous versions of the Advanced LDAP plugin, the User Identifier field was named Object Classes.
  • Filter to search users Enter a filter which will be used when searching for users in the the authentication source.
  • OU for retired Employees: Specify the DN of an Organizational Unit where users who have been removed or retired from the Authentication Source are placed.
  • Match attributes to sync: Available on: ProcessMaker 1.4.29 and later. Mark this checkbox to map user attributes in the authentication source to fields in ProcessMaker's USERS table in the MySQL database. This option only supports existing fields in Active Directory.

Find the interface where the fields will be added:

Where:
  • Add: Add a new field.
  • Remove: Remove an existing field.
  • LDAP Field: Pick a name for the field that will be synched.
  • User Field: Choose a user field from the dropdown where the new LDAP field will be stored.
Note: This feature only works if the authentication source is Active Directory and ProcessMaker is version 2.5.0 or later. If using a previous version of ProcessMaker, elements in the User Field dropdown won't be listed, so it is recommended to update ProcessMaker to version 2.5.0 or later.

When done defining the new authentication source, click on Save to create it. To cancel the creation of a new authentication source (or discard any changes if editing an existing authentication source), click on Cancel. To check whether the configuration to connect to the authentication source is correct, click on Test Connection. If the configuration is correct, the following message will display:

Otherwise, the following message will appear:

When the new authentication source is created, it will be displayed on the list of existing Authentication Sources:

Authentication Sources list

This list displays the name, provider, server address and port for the authentication sources and provides the following options to use the authentication sources:

  • New: Click this button to create a new authentication source.
  • Edit: Select an authentication source in the list and then click this button to edit it.
  • Delete: Select an authentication source in the list and then click this button to delete an authentication source.
  • Import Users: Select an authentication source in the list and then click this button to import ussers from that authentication source.
  • Synchronize Departments: This option is only enabled for Advanced LDAP. It imports new departments from the selected authentication source and synchronizes the information about existing departments.
  • Synchronize Groups: This option is only enabled for Advanced LDAP. It imports new user groups from the selected authentication source and synchronizes the information about existing groups.

Note: Before doing synchronization users must be assigned to a group or a department in the authentication source.

Importing Users

After configuring the authentication sources, go to ADMIN > Users > Authentication Sources. Select an authentication source in the list and click on its Import Users button.

In the panel Search for user, enter text in the Keyword field to do a case-insensitive search for users in the full name, username, email or distinguished name (dn) of users in the authentication source. Use * (asterisk) to do a wildcard search for any number of characters (including zero characters). For instance jo*n would find johan@colosa.com, Joe Norris and Jonson. Enter * to return all users in the authentication source.

Importing users v. 1.4.29

Importing users v. 1.4.40

WARNING: If the LDAP server has a large number of users in the thousands, searches may not show any users if the search returns too many results. In this case, narrow the search. For example, searches for "*" (all users) or "e" (all users with the vowel "e") may not work, but narrowed searches such as "er" or "kat*e" may work.

The following information will be displayed about the users in the authentication source:

  • Username:(Formerly named Name) This field shows the username.
  • First Name: This fields show the user's first name.
  • Last Name: This fields show the user's last name.
  • E-Mail: This field shows the user's email.
  • Distinguished Name: The DN is a chain of information needed to identify a user, such as the common name (cn=), organizational units (ou=) and domain components (dc=), etc.
  • Status: Available on: ProcessMaker 1.4.40 on. It shows whether the user was IMPORTED or NOT IMPORTED:

After finding users, then select which ones will be imported by marking the checkbox next to their names.

To select all the users in the list, click on the [SELECT-ALL] button in version 1.4.29 or mark the checkbox in the upper left-hand corner in version 1.4.40:

Then click on the Import button to import the selected users into ProcessMaker.

After importing user(s), a confirmation message will be displayed. Click on Yes to import the user(s); otherwise, the importation of user(s) will be canceled.

When done importing users, click on the Back button to return to the list of Authentication Sources.

Synchronization

The Advanced LDAP plugin can be used to update the information about users which are imported from an authentication source. The plugin can also import both departments and groups into ProcessMaker from LDAP and Active Directory. After importing groups and departments, the Advanced LDAP plugin can be used to synchronize the information about the departments and groups and their users, so the information in ProcessMaker is the same as in the authentication source. The group and department names are immediately imported after selecting which groups and departments will be synchronized, but the members are only imported and synchronized when cron.php is executed in version 1.4.29 and earlier or when ldapcron.php is executed in version 1.4.40 and later.

Warning: The Advanced LDAP plugin will only import members of a group or an organizational unit from an LDAP server if those users were created as child objects under the group or organizational unit. (Note that ProcessMaker treats organizational units as departments). If the users were assigned to the group or organizational unit through its membersUid property, then the users will not be imported. Future versions of the Advanced LDAP plugin will fix this problem.

To configure which departments and groups will be synchronized, go to ADMIN > Users > Authentication Sources and select an authentication source in the list which uses Advanced LDAP. The Synchronize Departments and Synchronize Groups options will be enabled:

Note: In ProcessMaker both groups and departments can contain users, but groups are not hierarchical and users can be members of multiple groups. In contrast, departments are hierarchical with parent departments and child departments and a manager for each department. Users can only be members of one department.

Synchronizing Departments

To configure which departments will be synchronized when cron is executed, click 
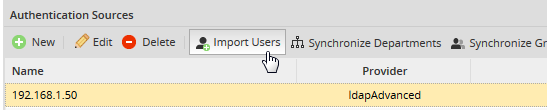
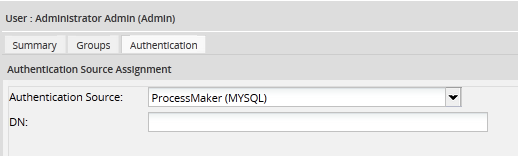
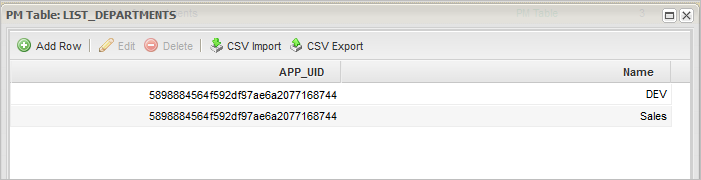
to display a list of departments and their subdepartments. If the authentication source is LDAP, all organizational units (ou) are considered departments and will be listed.

Warning: If the LDAP server has a large number of records in the thousands, the first time ProcessMaker tries to show its list of departments, it may appear that there are no departments in the authentication source because ProcessMaker spends several minutes constructing the list.

Select the departments to import or synchronize if already imported. The department along with all its members will be imported and the information in ProcessMaker about the department and its members will be synchronized each time that cron is executed. Note that in order to select a department, all its parent departments must also be selected.

After selecting the departments and subdepartments to synchronize, then click on Save Changes. The Departments which were selected will immediately be created in ProcessMaker, but the members of the departments will not imported/synchronized until the cron is executed.

Note: If using LDAP, the Reports To field of imported users will be left blank and there will be no supervisors assigned for imported departments. If using Active Directory, the Advanced LDAP plugin will assign the manager for each user, by inserting the manager's UID in the wf_.USERS.USR_REPORTS_TO field in the MySQL database, but it doesn't assign supervisors to imported departments. After importing a department from LDAP or Active Directory, the supervisor must be manually assigned for the department.

Synchronizing Groups

To configure which groups will be synchronized when cron is executed, click 
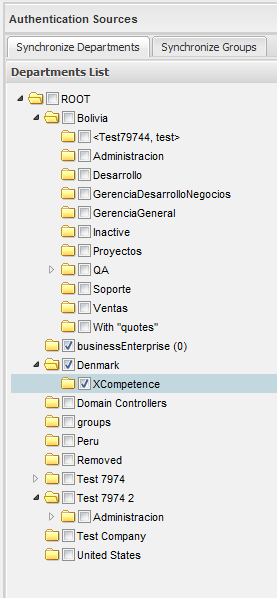
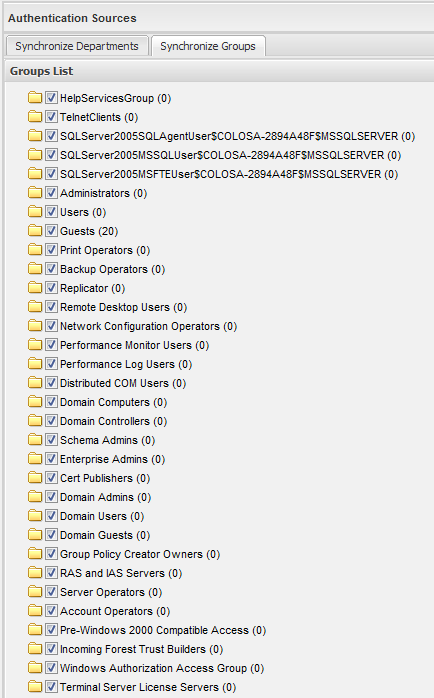
to display a list of groups from the selected authentication source.

WARNING: If the LDAP server has a large number of records in the thousands, the first time ProcessMaker tries to show its list of groups, it may appear that there are no groups in the authentication source because ProcessMaker spends several minutes constructing the list.

Select the groups to synchronize and then click on Save Changes. The groups which were selected will immediately be created in ProcessMaker, but the members of the groups will not imported/synchronized until cron is executed.

Executing cron.php in version 1.4.29 and earlier

To synchronize the information about imported users and update the members of departments and groups in version 1.4.29 and earlier of the Advanced LDAP plugin, execute ProcessMaker's cron.php file, either from the command line or as a cron job in Linux/UNIX or as a Scheduled Task in Windows. For more information, see: Executing cron.php

When cron.php is executed, the managers assignments for departments will be displayed:

The cron.php file imports the users who are members of the selected groups and departments:

Note: When a user, who is inactive in Active Directory, is imported in ProcessMaker his status will be Active; however, if the user tries to login ProcessMaker, it will show a message that he is inactive and the status will be updated automatically.
Note: In order for the Advanced LDAP synchronization to work correctly when cron is run, make sure that the following files are present: /workflow/engine/bin/plugins/ldapadvanced.php and /rbac/engine/classes/plugins/class.ldap.php

Executing ldapcron.php in version 1.4.40 and later

Synchronize users, groups and departments by using the Advanced LDAP cron file, which is located at workflow\engine\plugins\ldapAdvanced\bin\ldapcron.php in version 1.4.40 and later. This file will be executed independently, meaning that the ProcessMaker cron file won't execute the LDAP synchronization.

To execute the ldpacron.php file from the command line:

Windows:

Change to the directory where the php.exe file is located to run PHP and then issue the command to execute the ldapcron.php file:

cd <INSTALL-DIRECTORY>\php
php -f "<INSTALL-DIRECTORY>\processmaker\workflow\engine\plugins\ldapAdvanced\bin\ldapcron.php"

Linux/UNIX:

php -f <INSTALL-DIRECTORY>/workflow/engine/plugins/ldapAdvanced/bin/ldapcron.php

If the ldapcron.php script is executed without any options, the imported users and selected departments and groups will be synchronized for all workspaces.

Note: The Advanced LDAP plugin takes roughly an hour to import 20,000 new users from LDAP and 25 minutes to update 20,000 user profiles from LDAP, so it is recommended to use the +force option to prevent problems with large authentication sources if executing the ldapcron.php file as a cron job in Linux/UNIX or a Scheduled Task in Windows.

If executed from the command line, the following information is displayed about the users, departments and groups which were synchronized:

To see more detailed information about the synchronization, check the contents of the /shared/log/ldapAdvanced.log file.

Hint: ldapcron.php appends new information to the ldapAdvanced.log file each time the script is executed. If ldapcron.php will be executed periodically as a cron job or scheduled task, it is recommended to also periodically delete the ldapAdvanced.log file to save disk space on the ProcessMaker server and improve the processing time of the ldapcron.php script.
ldapcron.php Options
php ldapcron.php [+d"YYYY-MM-DD HH:MM:SS"] [+wWORKSPACE] [+debug]

Options:

  • +d Specify an alternative date and time for the script.
By default, the script will execute using the server's current system time. If may be useful to specify an alternative date and time when testing for past or future events. Remember to use 4 digits for specifying the year and 2 digits for specifying the month, day, hour, minute and seconds. The time is on a 24 hour clock.
Ex: php ldapcron.php +d"2011-09-25 07:05:59"
  • +w Specify a workspace whose imported users and selected departments and groups will be synchronized.
By default, the pending activities in all workspaces are executed. To save processing, it can be useful to only execute the pending activities in a single workspace. Remember the workspace names are case sensitive.
Ex: php ldapcron.php +wworkflow
  • +force This option ensures that the ldapcron.php file is executed by stopping the execution of any existing ldapcron job and deleting its temporary files, so the current ldapcron can be executed. Remember that only one instance of ldapcron can be executed at a time, so without the +force option, ldapcron.php will not be executed if another instance is already being executed.
Ex: php ldapcron.php +force
Note: If not using the +force option, to cancel the execution of ldapcron.php, press CTRL+C in the command line or use the kill command in Linux or the Task Manager in Windows to kill the process. Also delete the temporary file located at: /shared/ldapcron
  • +debug Inserts more detailed information in the /shared/log/ldapadvance.log file. It lists the properties used to connect to the authentication sources and lists the users, groups and departments which were created, updated, moved or deleted. Use this option to investigate any errors that may occur during the synchronization.
Ex: php ldapcron.php +debug

If some users can't be imported from an authentication source, they will be listed as impossible. To see which users couldn't be imported, run ldapcron.php again with the +debug option. Then, search in the ldapadvance.log file for the users listed in the line after "Impossible Users:".

For example, the following commands could be used in Linux/UNIX to find the users which can't be imported:

# php /opt/processmaker/workflow/engine/plugins/ldapAdvanced/bin/ldapcron.php Processing workspace: workflow +--------------------------------------------------------------------------------------------------+ | Authentication Source: Example Company LDAP Server | - Departments -> Existing users: 0, moved: 2, impossible: 3, created: 0, removed: 0 | - Groups -> Existing users: 0, moved: 0, impossible: 0, created: 0, removed: 0 | - Deleted/Removed Users: 0 | - Managers assignments: created 0, moved 0, removed 0 +--------------------------------------------------------------------------------------------------+ Finished 1 workspaces processed Done!

The output of ldapcron.php shows that 3 users couldn't be imported, so run ldapcron.php again with the +debug option:

# <strong>php /opt/processmaker/workflow/engine/plugins/ldapAdvanced/bin/ldapcron.php <font color="green">+debug</font></strong>

Then use the grep command to find the usernames of the 3 users:

# <strong>grep -A 1 "Impossible Users:" shared/log/ldapadvanced.log</strong>
2014-11-28 09:34:04  workflow 0 Impossible Users:  
2014-11-28 09:34:04  workflow 0 <strong><font color="green">liliana fernando eric</font></strong>

Mapping user's information between Active Directory and ProcessMaker

Available on: AdvancedLDAP 1.4.29 and later; ProcessMaker 2.5.1 and later

When importing users, information about the user in Active Directory can be mapped to fields about the user in the ProcessMaker database. To map information between the authentication source and the ProcessMaker database, mark the Match attributes to sync checkbox and a section will appear to link fields in the authentication source to fields in the ProcessMaker database.

  • LDAP Field: Enter an LDAP field name. The Softerra LDAP Browser can be used to find the LDAP field names. The field names must not contain spaces. For example, the field "Telephone Number" would be defined as "telephoneNumber" in LDAP.
  • User field: Enter one of the following fields in the wf_.USERS table:
USR_FIRSTNAME: User's first name.
USR_LASTNAME: User's last name.
USR_DUE_DATE: The date when the user account is set to expire in YYYY-MM-DD format. Ex: 2020-12-31
USR_STATUS: The user's status, which can be: ACTIVE, INACTIVE, or VACATION
USR_ADDRESS: The user's address.
USR_PHONE: The user's phone number.
USR_FAX: The user's fax number.
USR_CELLULAR: The user's cellular phone number.
USR_ZIP_CODE: The user's zip or postal code.
USR_POSITION: The user's position, which can be any value such as "Accountant", "Human resources manager", etc.
USR_BIRTHDAY: The user's birthday in YYYY-MM-DD format. Ex: 1970-04-21.

As many fields as needed can be added to the list.

For example, inside your Active Directory server, choose a user to import. Go to his/her properties and add a job title inside Organization - Title:

After adding the field, login to ProcessMaker and go to ADMIN > Users > Authentication Sources. Select the Active Directory server and click on Edit and map the "Title" field in Active Directory to the USR_POSITION field in the ProcessMaker database.

Then, click on Import Users:

Search for the user who will be imported in ProcessMaker. Select the user and click Import:

Finally, go to ADMIN > Users and look for the imported user:

In this example, the position field has been updated with the title information added in Active Directory

Note: If the field in Active Directory or LDAP is greater in size than the field in the ProcessMaker database, then the value will be truncated to the maximum number of characters allowed for the field in ProcessMaker.

Changing user password after importing and synchronization

During login, the authentication of imported users occurs in Active Directory, not in ProcessMaker.

After users are imported from Active Directory, their passwords can NOT be changed in ProcessMaker, Instead, their passwords need to be changed inside Active Directory. Password must meet the following requirements:

  • The password must be at least six characters long.
  • The password must contain characters from at least three of the following five categories:
    • English uppercase characters (A - Z)
    • English lowercase characters (a - z)
    • Base 10 digits (0 - 9)
    • Non-alphanumeric (For example: !, $, #, or %)
    • Unicode characters
  • Do NOT use spaces after and before the password

Warning: If the password is changed in ProcessMaker, the user cannot login.

To check whether a user was imported from Active Directory, go to ADMIN > Users. Select the user in the list and click on Authentication. If the Authentication Source option is an Active Directory connection, the password must be changed in Active Directory.

If the the Authentication Source option is "ProcessMaker (MYSQL)", the password must be changed in ProcessMaker:

Insert Images: 
Please rate how useful you found this document: 
Average: 2.4 (17 votes)
Please rate how useful you found this document: 
Average: 2.4 (17 votes)

Overview

Dynaforms can be customized in style and color giving them an appeareance according to the user's needs. The responsive forms cannot be customized directly from its interface, instead it is necessary to create a css file in order to add in it the corresponding classes. Either all DynaForms in a process can have the same style or different styles depending how many files are managed.

The following elements can be customized:

  • Form Background.
  • Title and subtitle label.
  • Title and subtitle background.
  • Buttons.
  • Grids.
  • Grid Title
  • Message Errors.

Recommendations

It is not recommended to create the css file in any directory of ProcessMaker, because upgrading ProcessMaker will overwrite this file and any changes will be lost. Instead, create a custom ProcessMaker skin and copy the CSS file in the direcory:

<install_directory>/shared/skins/skin-name/

ProcessMaker Classes

  • pmdynaform-form
  • pmdynaform-label-title
  • pmdynaform-label-subtitle
  • pmdynaform-field .control-label.pmdynaform-label
  • pmdynaform-field-button
  • pmdynaform-message-error
  • pmdynaform-field-grid
  • pmdynaform-grid-tbody
  • pmdynaform-field-grid .pmdynaform-grid-fields .form-group
  • pmdynaform-grid-thead
  • form-control
  • pmdynaform-grid-title


Please rate how useful you found this document: 
Average: 3.3 (3 votes)
Please rate how useful you found this document: 
Average: 3.3 (3 votes)

Overview

The Case List Builder is a feature designed to allow users to customize the content that is available in their case list. Using this feature, the columns in the case list can be customized to display information from Dynaform fields and case variables that are stored in report tables or PM tables. New columns can be added to the Inbox, Draft, Participated, Unassigned, Pause or Cancelled filters. Moreover, it is also possible to change the labels and alignment of the columns.

Custom Case Lists used to be an Enterprise Plugin, but currently it is an integrated feature available in ProcessMaker Enterprise Edition 3.0.0.5 and later.

An example of a customized case list is shown in the following image:

Requirements

  • ProcessMaker Enterprise version 3.0 or higher with the corresponding license.

Supported Stacks

The stacks supported by this feature are the same as those supported in ProcessMaker version 3.0. See this documentation to view the stacks supported by ProcessMaker.

Browser Compatibility

The browsers supported by this feature are the same as the features supported by ProcessMaker version 3.0. To view the browsers supported check the following documentation.

Note: For the moment, the Case List Builder feature doesn't work on Solr Servers.

Installation and Configuration

Once the Enterprise Edition is installed and activated, the Case List Builder should be available to be used without any additional configuration.

Go to Admin > Settings to access the Custom Cases Lists option in the left panel:

A list of columns in the case list will be displayed:

Case List Builder Interface

In the tabs at the top, select which case folders to customize: Inbox, Draft, Participated, Unassigned or Paused. Each case folder has an individual configuration. If three new columns are added to the inbox, those columns will not appear in the other case folders.

Under these tabs, find the following options:

  • PM Table: Select a report table to be queried for information to be displayed in the case list. Note that only tables that have an APP_UID field to hold the unique case ID will be displayed, because each record in the table has to be linked to a particular case.

    Note: The fields from only one report table can be used to populate a case list. To use fields from multiple tables, combine those fields into one table.

  • Available Fields: The report table fields.

  • Case List Fields: Displays the fields used as columns in the case list. The fields order can be changed by clicking on a field and dragging it up or down.

    Where:

    • Label: Gives a custom name to the column by changing its label.

    • Align: Select the alignment of the column. The column label may be aligned left, center or right.

Case List Options

The Options dropdown box located in the upper right corner of the case list allows the user to restore the list to its original state or restore the original labels:

  • Restart everything with the system fields: Removes all custom fields included in the Available Fields list and restores the system fields to their original order.
  • Restart everything with the system fields, with the ID of the label for its translation: Removes all custom fields and restores the system fields to their original order with their label IDs for its translation. Double click the label text to see the label ID.

  • Complete all system fields: Adds any system fields that were removed to the end of the Case List Fields list.
  • Complete all system fields, with the ID of the label for its translation: Adds any system fields that were removed to the end of the Case List Fields list and restores the labels of those system fields. Each System Field label will show the ID of the label for its translation.
  • Restart labels with system fields: Restores the original labels to all system fields. Custom fields that do not have a label will have their field names inserted in the labels.

  • Restart labels with system fields, with the ID of the label for its translation: Restores the original labels and IDs of system fields only. Each System Field label will show the ID of the label for its translation. Custom fields that do not have a label will have their field names inserted in the labels. Double click on the label to see the label ID.

In the following example, APP_DEL_PREVIOUS_USER and the custom field CASHAMOUNT do not have labels:

Select the Restart labels with system fields option and labels will be:

Adding Fields from a Table

To add a field from the selected table to the case list, select the field in the left panel and then drag it to the right panel while holding down on the mouse button, then release the mouse button to drop the field in the Case List Field.

The field will then be added to the Case List Fields column:

More than one field can be selected at a time. To select multiple fields, hold down the SHIFT key while clicking on a second field. The UP and DOWN arrow keys can also be used to select multiple fields while holding down on the SHIFT key. To select fields that are not together in the list, hold down on the CTRL key while clicking one field first, then click on the second one.

Once the fields are selected, drag them as a group from the left panel and drop them into the right panel.

Removing Fields from the Case List Fields

To remove fields from the case list, simply drag them from the Cases List Fields panel and drop them in the Available Fields panel.

Example: Add an Extra Column to the Case List

In this example, a report table is created and one of its fields are added to the Inbox case list.

Creating a Report Table

First, create a Report Table named PMT_EXAMPLE_CLB, which will hold a list of departments. Go to ADMIN > Settings > PM Tables. Click on New and select New Report Table. Then add the fields DEPT and DEPT_LABEL to the Report Table, which will be populated by fields from a DynaForm when cases are run.

Adding the Field to the Cases List

After creating the new report table, go to ADMIN > Setting > Custom Cases Lists and select the Inbox tab at the top to customize it:

Then select the PMT_EXAMPLE_CLB table from the list of available tables in the PM Table dropdown:

The fields in the PMT_EXAMPLE_CLB table will appear in the list of Available Fields.

Select the DEPT_LABEL field and drag it to the Cases List Field panel on the right.

Using the Customized Cases List

When new cases are created, their data will automatically be added to the TMP_EXAMPLE_CLB table. In this particular example, the cases contain a dropdown box to select a department.

Once a department is selected in the DynaForm and the DynaForm is submitted, a record will be written to the TMP_EXAMPLE_CLB table with the department's data. When users go to HOME > Draft, they will see the department selected for each case in the case list.

Using a PM Table

A PM table can be used to populate custom columns in the cases list when:

  1. The PM table exists in the workflow database of the current workspace, which is named  wf_<WORKSPACE>.
  2. The PM Table has an APP_UID field, which holds the unique IDs for cases from the current workspace.

The unique IDs for the cases can be obtained in the wf_<WORKSPACE>.APPLICATION.APP_UID fields as new cases are run in ProcessMaker. An external program or a MySQL trigger can be used to update the PM table as new cases are added to the wf_<WORKSPACE>.APPLICATION table.

Another way to update the PM table is to create a trigger in ProcessMaker that will write the case ID and other data from the current case to a PM table while cases are being run. For example, the following trigger code writes the unique ID of the current case, which is stored in the @@APPLICATION system variable, to a PM table named PMT_CLIENTS. It also writes data from the FirstName, LastName and Amount fields from a DynaForm to the PMT_CLIENTS table:

$returnVal = executeQuery("INSERT INTO PMT_CLIENTS (APP_UID, FIRSTNAME, LASTNAME, AMOUNT) VALUES ('" .
   @@APPLICATION . "', '" . @@FirstName . "', '" . @@LastName . "', " . @@Amount . ")");

Note that the case ID in the APP_UID field is a string of 32 characters, so it must be enclosed in single quotation marks in the SQL INSERT statement. In contrast, the AMOUNT field is a number field, so it does not need to be enclosed in single quotation marks.

Insert Images: 
Version Info: 
3.8|/3.7/Cases_List_Builder;3.7|/3.7/Cases_List_Builder;3.5|/3.2/Cases_List_Builder;3.4|/3.2/Cases_List_Builder;3.3|/3.2/Cases_List_Builder;3.2|/3.2/Cases_List_Builder;*3.1|/3.0/Cases_List_Builder;*3.0|/3.0/Cases_List_Builder;2.x|/index.php/Cases_List_Builder

Pages