Overview
Each control available in the designer has properties that give designers the ability to customize the Dynaform layout besides having more control over the behavior, functionality and the use of resources. By customizing the properties of a control, designers can easily create dynamic forms without the necessity of adding extra code. These properties vary according to the control, since they are tailored toward the specific functions of each control.
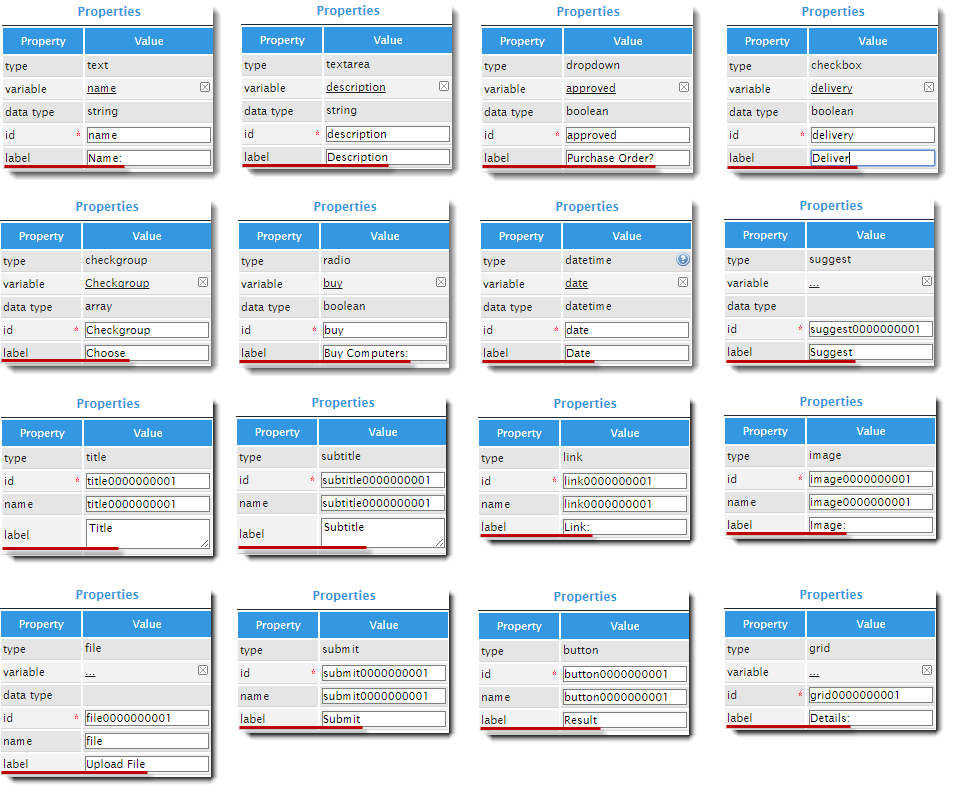
Type
| Available in Controls: All controls |
This property simply describes what type of control it is, and is automatically set when the control is added to the design. The value of the Type property is always the name of the control (in the image, the control is "text area", therefore, the value in the Type property is "text"), and cannot be changed by the user.

Variable
| Available in Controls: Text and TextArea, Dropdown, Checkbox, Checkgroup, Radio , Datetime, Suggest, Hidden, Grid |
This property belongs to all controls that can be related to a variable. The value of the Variable property simply shows the name of the variable related to the control.
To relate a variable in the project to a control added to the Dynaform, go to the Variable property of the control.
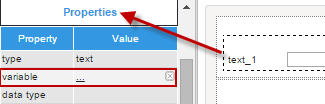
Click on the ellipsis ... and a window listing the available variables to relate to the control will be listed.
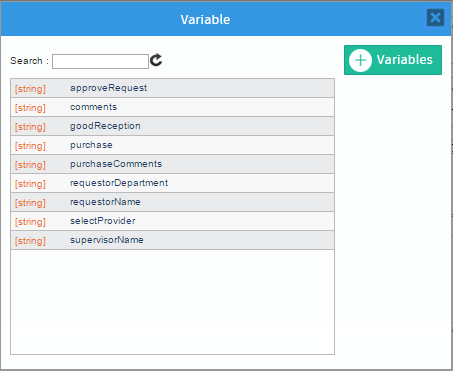
Select the variable from the list and the window will close automatically. The Variable, Data Type, and the ID properties of the control will all be based on the selected variable.
To remove the variable from the control, click on the 'X' option on the right side of the variable name. To change the variable related to the control, click on the name of the variable and the window listing the available variables will be displayed again.
The controls Text and TextArea, Dropdown, Checkbox, Checkgroup, Radio, Datetime, Suggest, Hidden and Grid will have different variable types.
The table below explains which variables are supported by each control in ProcessMaker version 3.2.
| String | Integer | Float | Boolean | Datetime | Grid | Array | File | Multiple File | Object | |
| Text | ||||||||||
| Textarea | ||||||||||
| Dropdown | ||||||||||
| Checkbox | ||||||||||
| Checkgroup | ||||||||||
| Radio | ||||||||||
| Datetime | ||||||||||
| Suggest | ||||||||||
| Hidden | ||||||||||
| File | ||||||||||
| Multiple File | ||||||||||
| Grid | ||||||||||
| Geomap | ||||||||||
| QRCode |
Data Type
| Available in controls: Text and TextArea, Dropdown, Checkbox, Checkgroup, Radio, Datetime, Suggest, Hidden |
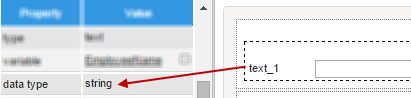
The Data Type property displays the type of variable that has been related to the control. It is worth mentioning that only certain variable types will be available depending on the control. For example, the String variable type is not available for Datetime controls. If no variable is related to the control, then the value of this property will be empty. The Data Type of the variable will be the same as the Variable Type chosen when creating a variable; this property only for identification purposes.
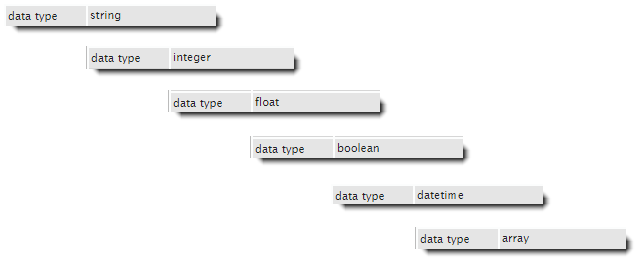
The data type of all available variables will be shown as in the images below:
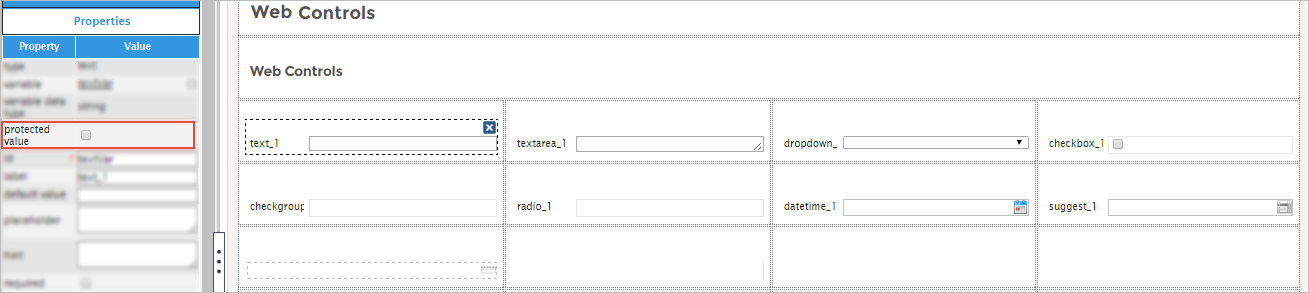
Protected Value
| Available in controls: Text and TextArea, Dropdown, Checkbox and Checkgroup, Radio, Datetime, Suggest and Hidden |
The Protected Value property is set to protect the information stored in variables. If the Protected Value field is checked, the variable won't be able to be modified or changed, protecting the value that has been entered. This property helps avoid security issues with the data, and safeguards the integrity of the values in the case an SQL, HTML or Javascript injection needs to be used.
Considerations before using the property:
- The value that Protected Value is holding can be modified with a Trigger
- The property only applies to form controls related to a variable, i.e. it is only used with forms that send data to the server, the rest of the elements do not take into account this property. For the last reason, the Protected Value property works in the grid control definition, not for every field of the grid.
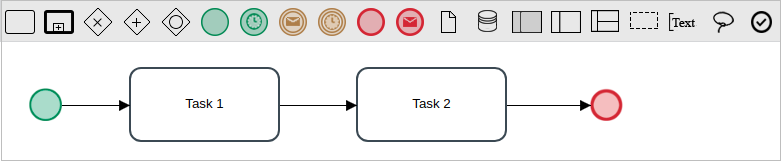
Example: Follow these steps to create a process with two Dynaforms:
- Create a process with two tasks called Task 1 and Task 2. The tasks are designed sequentially as follows:
- Create a Dynaform called "d1" with a Texbox and a Submit control. The variable and id texbox is "mount".
- Export the dynaform into a Json file.
- Create three more Dynaforms ("d2", "d3" y "d4") and then import the Json file previously exported into these Dynaforms.
- In the Dynaform "d2", check the protected value property of the amount field, and then add the following JavaScript code:
This code assign to the mount field the "1000" value.$("#mount").setValue("1000"); - In the Dynaform "d4", check the protected value property of the amount field.
- Create a trigger, "Assign value", with the following code:
This code assign to the mount variable the "5000" value.@@mount = "5000"; - Assign the same user through the cyclical assigment rule to the three tasks.
- Assign d1, d2 and d3 to the Task1 steps.
- Assign d1, d4 and d3 to the Task2 steps. Assign the Assign value trigger before the d4 Dynaform.
Follow these steps to run a case and view the Protected Value behavior:
- Enable the debug mode of the process.
- To run a case of the process created, login as the user assigned to the tasks, go to Home > New case and click on the process.
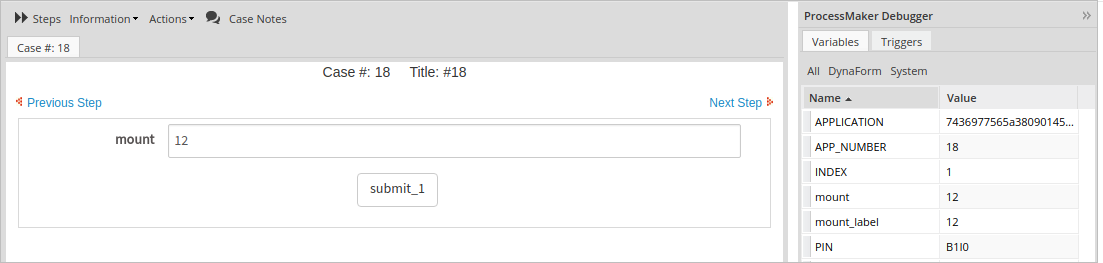
- In the d1 Dynaform, fill out the mount field and then click on the submit button.
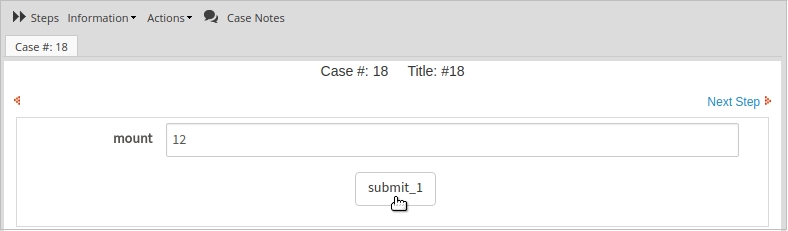
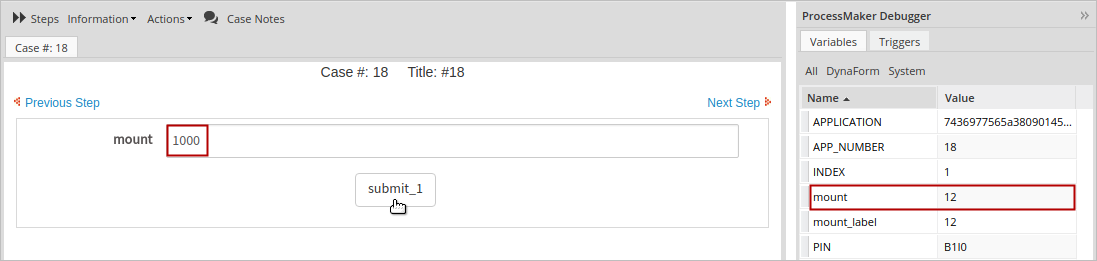
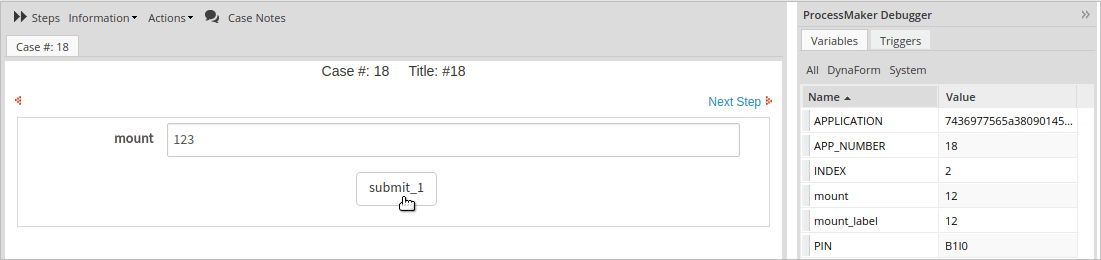
- The next Dynaform d2 is displayed. In the mount control that has protected value, displays the "1000" value assigned in the JavaScript code. Note that the original value, 12, is in the variable.
- After the submit button is clicked, the original value is displayed in the next Dynaform, d3, assigned to the Task1.
- Click on the submit button, to go to the next task, Task2.
- Locate the case in the Inbox tray of the user assigned to the Task2 task and open the case.
- The d1 Dynaform is displayed. The previous value sets in the mount field. Modify or leave the mount value and then click on Submit.
- The d4 Dynaform is displayed. The mount variable is set in the mount field that its value is assigned in the trigger before the Dynaform. Note that the mount labes is still with the previous value assigned in the previous Dynaform.
Click on submit to go to the next Dynaform.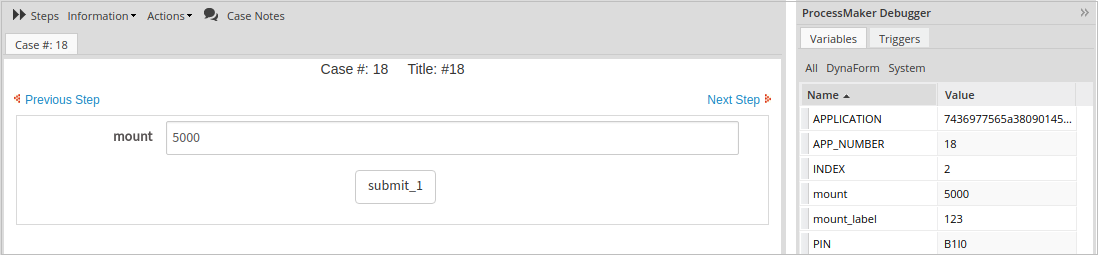
- The d3 is displayed. Modify or leave the mount value and then click on Submit.
- Note that after clicking on submit, the mount variable and the mount label has the same value assigned in the Dynaform.
Until this point, the process has been finished.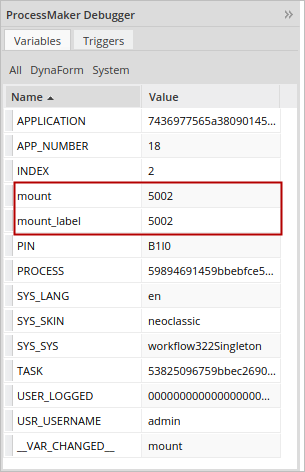
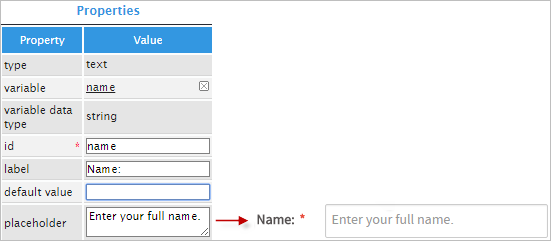
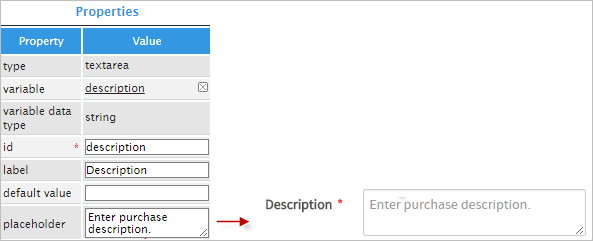
ID
| Available in controls: All controls |
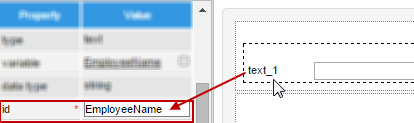
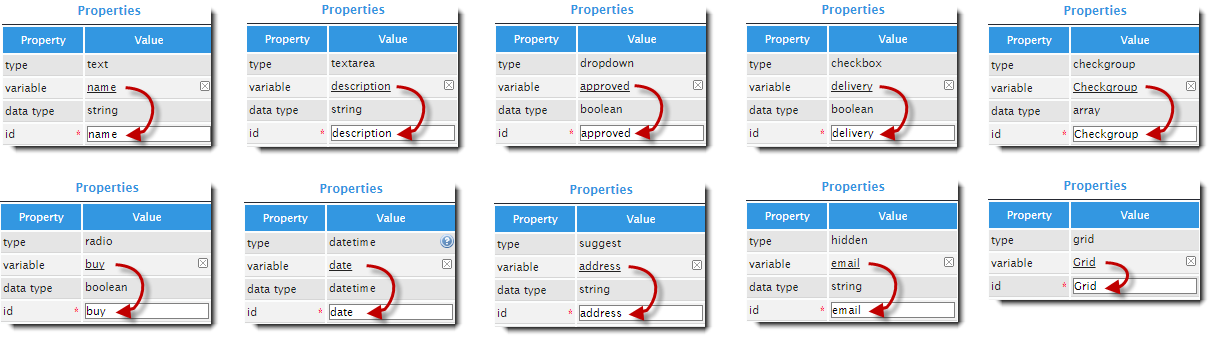
All controls must have a unique identifier, which is set in this property. By default, the IDs of all the controls have the ControlTypexxxxxxxxxx format, where xxxxxxxxxx represents the relative number of the control inside the designer. For example, when adding the first text control to the designer the ID set will be Text0000000001.
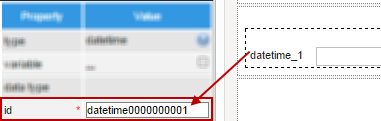
When a variable has been related to the control, the ID will be set to the name of the variable.
However, in both cases this ID can be edited by entering the new ID in the text field of the property. Take into account that two controls can not have the same ID inside the design.
The ID will change when a variable is added; it will acquire the name of the variable as it's unique identifier. See the images below:
Name
| Available in controls: Link, Image, File, Submit and Button |
It is possible to add a name to some of the controls managed inside the designer. By default, this property has the same value as the default ID property. When the ID property is changed by the user, the Name property does not change and keeps its original configuration. The Name property can be changed by entering a new value into the value field.
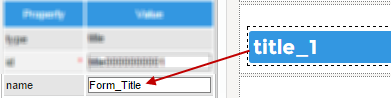
The images below show the results of changing the Name property of all available controls:

Label
| Available in controls: Text and TextArea, Dropdown, Checkbox, Checkgroup, Radio, Datetime, Suggest, Title and Subtitle, Link, Image, File, Submit and Button, Grid |
This property sets up the text that will label the control in the Dynaform. The label should clearly identify the purpose of the field so users know what data to input into the field. The label is set up in the format ControlType_x, where x represents the relative number of the control in the design.
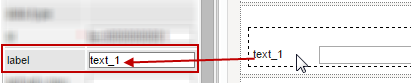
Note: Changing the Label property in a Dynaform will not change the name of the variable.
For the Title, Subtitle, Button and Submit controls, this property is used to customize the control field labels within the Dynaform. For example, the Label property of the Title control is changed as displayed below:

When the Label property of the control is changed, the new label can be seen in the control field in the Dynaform.
As of ProcessMaker 3.5.0, when adding a control to a Dynaform, the label takes the form of the ID variable assigned. To change the label, relate another variable to the control. However, it does not work with the Title, Subtitle, Link, Image, Submit, Button and Grid controls.
The label takes a space as an underscore (_), maintains the capital letters of the ID variable and changes to capital letters after the underscore. For example:
If the name of the variable is all in capitals or all in lowercase, the label only keeps the first letter in capitals and the rest of the content in lowercase:
Tab Index
Available Version: As of ProcessMaker 3.4.5
| Available in Web controls: Text and TextArea, Dropdown, Checkbox and Checkgroup, Radio, Datetime, Suggest, Link, Image, File, Multiple File, Submit and Button. |
Use the tab index attribute to explicitly define the navigation order for controls within the Dynaform. It can also be used to define whether elements should be focusable or not.
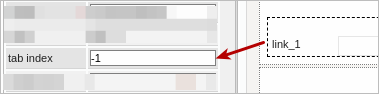
The tab index attribute value accepts integer values as of -1. There is no default value defined in the attribute.
HTML Running Time
Take into account the following points when running HTML files with the tab index property:
- When the tab index is set within a Dynaform that opens for the first time, it should force to set focus in that minor tab index such as 1 or greater.
- The tab index attribute is visible and has a value if the field control property is present.
- The available values to enter in the tab index are -1, 0 and any integer positive value.
- Sequence and unique numbers are the responsibility of the process designer.
- For controls where there are multiple tags (radio buttons, check groups) the tab index is the same for all elements.
The code looks like:
<a href="/" tabindex="1" />
<link href="/" tabindex="1" />
<select tabindex="1" />
<textarea type="text" tabindex="1" />
Compatibility
The tab index attribute does not include the following:
- JS Helpers to set this attribute.
- Mobile controls compatibility.
- Translations are not supported.
- Datepicker is not compatible.
- Not applicable to Grid controls.
Running Cases In The Browser
It is important to have in mind that when starting or opening a case, the browser engine has a defined sequence of the tab index before it accesses to the Dynaform. The browser accesses the following elements before the Dynaform:
Aria Label
Available Version: As of ProcessMaker 3.4.5
| Available in Web controls: Text and TextArea, Dropdown, Checkbox and Checkgroup, Radio, Datetime, Suggest, Title and Subtitle, Label, Link, Image, File, Multiple File, Submit and Button. |
Use the aria label attribute to define a string that labels a Dynaform control that does not have a visible label. For more information about aria label, see aria-label (W3C). The aria label attribute allows you to enter any string value. There is no default value defined for this attribute.

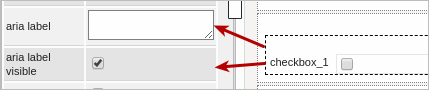
For Radio, Checkbox and Checkgroup, the aria label visible checkbox property is also available below the aria label attribute to make visible in the previous mentioned controls. This property is checked by default.
HTML Running Time:
Take into account the following points when running HTML files with the aria label property:
- The aria label attribute is visible and has a value if the field control property is present.
- The available values to enter are only strings.
- For controls with multiple elements (radio buttons, checkbox, and check groups), the aria label attribute is associated with the label for the field in the case this is enabled.
For the Add New Row and Delete Row buttons in Grid controls, which have generic aria-labels: Add a new row to grid and Remove row # {row-number}.
The code looks like:
<a href="/" aria-label="Text explaining control behavior" />
The aria label attribute does not include the following:
- JS Helpers to set this attribute.
- Mobile controls compatibility.
- Translations are not supported.
- Datepicker is not compatible.
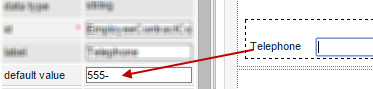
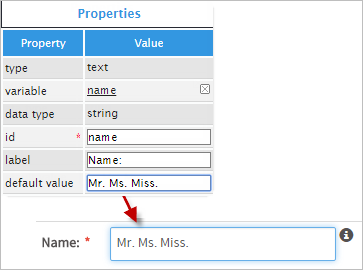
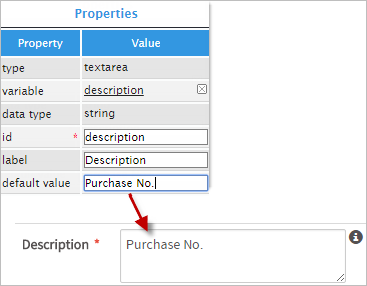
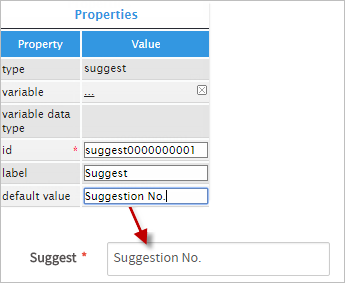
Default Value
| Available in controls: Text and TextArea, Dropdown, Checkbox, Checkgroup, Radio, Suggest, Hidden, Link |
The Default Value property sets the value in the control field if it doesn’t contain any previous value. The value of the Default Value property will also be displayed in the control field on the Dynaform when the value in the control field is null (no value set by the user even if the value is an empty string). Default values also override the SQL and Options properties. This is the order in which the values in the field are set, from lowest to highest priority:
- First SQL value (minor priority).
- First Option Value.
- Default Value (maximum priority)
If the default value is defined, it overrides the Option or SQL property values. If the default value is not set, the value in the Options property overrides the value set by the SQL property.
When the Dynaform is submitted, the default value acts as the input value if nothing was entered into the control field by the user.
The user may alter the default value when filling out the form.
Default values work best for Textbox, TextArea and Suggest controls.
Note: Take into account these rules for variables when working with default values inside Dynaforms.
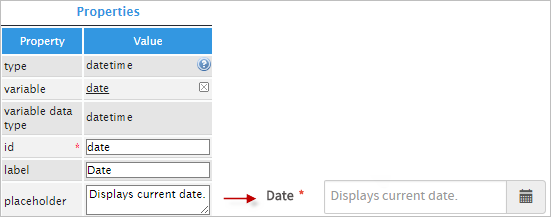
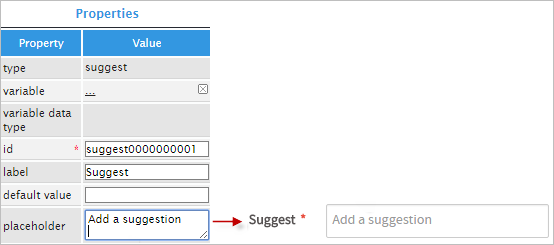
Placeholder
| Available in controls: Text and TextArea, Dropdown, Datetime, Suggest |
This property is text set by the designer that usually indicates what should be input inside the field. This text is shown in a lighter color inside This text is shown in a lighter color inside the control field and does not act as input text if the form is submitted and no value is entered by the user into the control field. It just acts as a hint.

When rendering the form, the value of the Placeholder property is shown in the control field as seen in the image below:
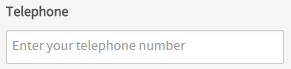
Users who enter data into the field do not need to erase the placeholder text. By simply clicking inside the field and starting to type text, the placeholder text disappears.
Here are some examples of how the Placeholder property works with the available controls.
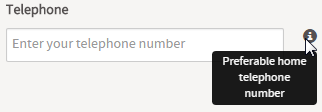
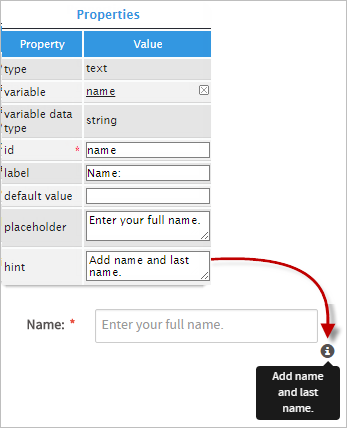
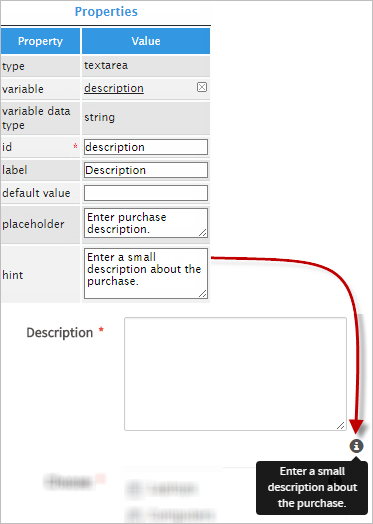
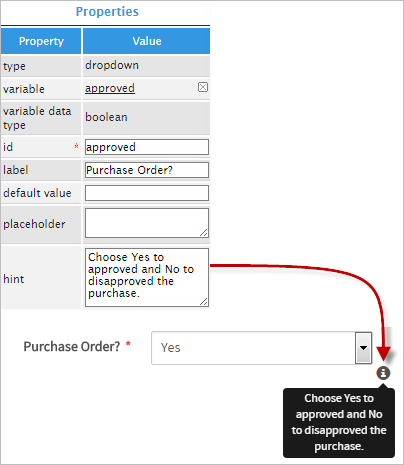
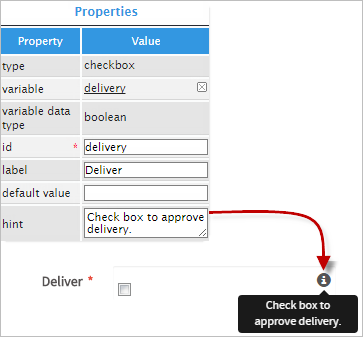
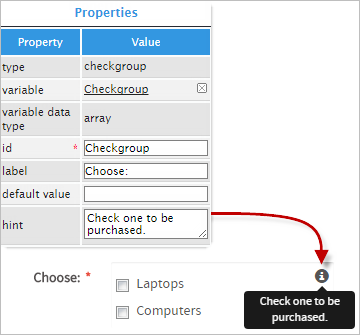
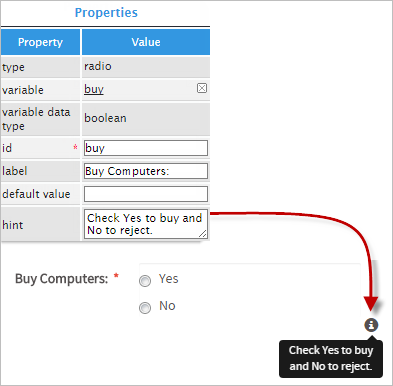
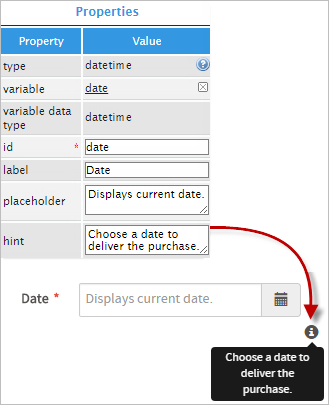
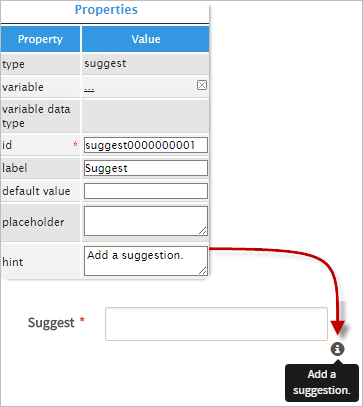
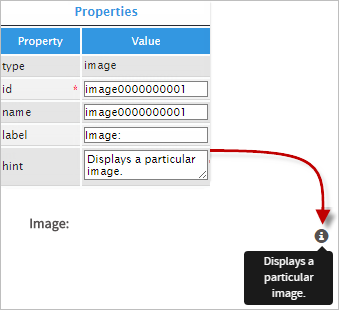
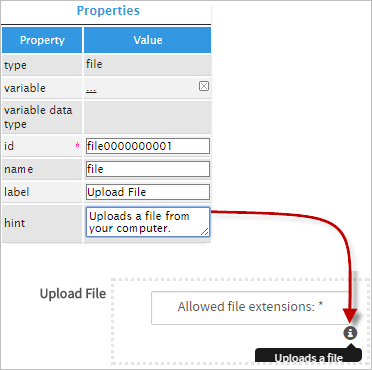
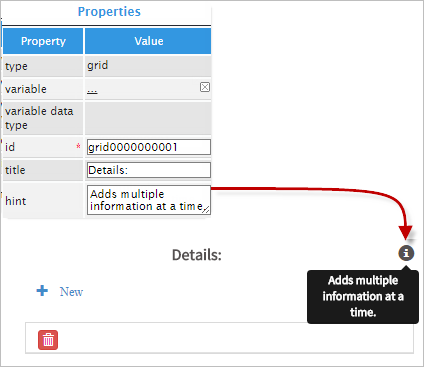
Hint
| Available in controls: Textbox, Textarea, Dropdown, Checkbox, Checkgroup, Radio, Datetime, Suggest, Image, File, Grid |
This property displays helpful hints to guide users when entering values into the control fields. A hint can be used to provide a fuller explanation of the field or to indicate what values are acceptable for the field. When a field has this property enabled, an ? icon appears to the right of the field when the form is rendered. The hint message pops up when the arrow hovers over the icon.
Define its value by clicking on its text area:

The Hint icon will be only visible in preview mode or while running a case:
Here are some examples of controls with the Hint property activated.
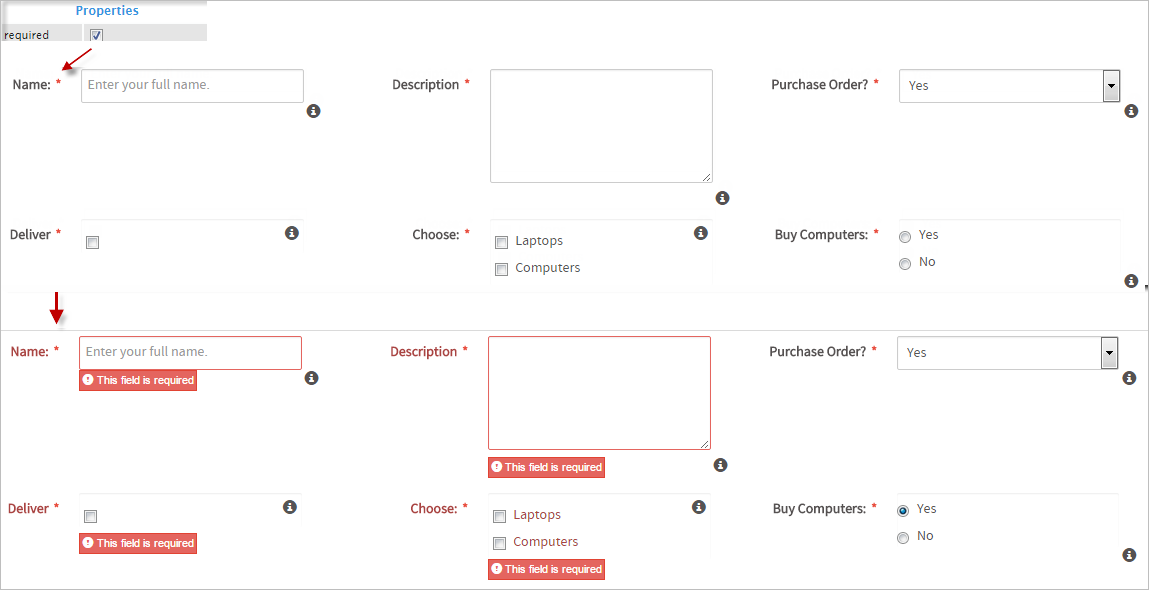
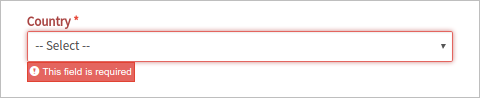
Required
| Available in controls: Text and Textarea, Dropdown, Checkbox, Checkgroup , Radio, Datetime, Suggest, File |
If the Required property is checked, the user must fill in the control field before submitting the Dynaform. A red asterisk * will be displayed at the right side of the label to indicate that the field is required.

As of ProcessMaker 3.2.2, if the Required property is checked, a second property the Required field error message is enabled to fill in a customized message.

When running a case or viewing the preview of a Dynaform, all required fields will be checked to ensure they are not empty before the Dynaform is submitted. In the case only the Required property is checked and a user tries to submit a Dynaform without filling in a required field, a message is shown indicating that the field is required and the form is not submitted.
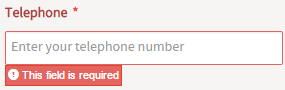
In the case the customized message is filled in, this message will be displayed below the field, as follows:
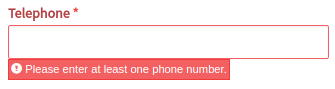
For example, the image below shows how controls that have the Required property enabled will notify the user that the field needs to be filled in. If a required field is not filled in, then a message saying that the field is required will appear and the user will not be able to submit the Dynaform until the field is filled in.
Display Mode
| Available in controls: Text and Textarea, Dropdown, Checkbox, Checkgroup, Radio), Datetime, Suggest, File Image Grid |
This property determines whether the end user will be able to edit the control field or only view it. The modes available in the designer are the following:
- Parent. This mode inherits the display mode set for the entire Dynaform. Since the display mode hierarchy starts with the properties set for the entire Dynaform, the "parent" display mode is not available in the properties of the entire Dynaform. For example, if the Display Mode property for the entire Dynaform has been set to "disabled", but the display mode in the control is set to "view", the control will be disabled when the Dynaform is rendered by the end user.
- Edit. The Display Mode property is set to "edit" by default when the control is added. When the Dynaform is rendered, the "edit" display mode allows the user to enter text into the control fields.
- View. This display mode only shows the label of the control field, and replaces the input box with white space.
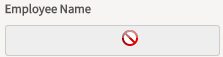
- Disabled. This displaying mode disables the input box, meaning that the user cannot enter any text into the field. For dropdown, radio, checkbox and checkgroup controls it also disables the selection of options within the control fields. For the Suggest control, it disables the input of text and shows "Untitled" inside the control field.

The Display Mode property also affects the field appearance, so the end user can see whether a field is in edit, view or disabled mode. Controls in view mode only have a label, and do not display the outline of the input field. For example, when dropdown controls are in view mode, the default or the first option label displays, but the user cannot see the outline of the dropdown box, nor any of the other available options. Radio, Checkbox and Suggest controls display all their available options, but their borders are slightly grayer to indicate that they are in view mode. Controls that have been disabled have the same appearance as controls in the mode, but when the cursor hovers over them, the shape of the cursor changes to a prohibited sign.
The images below show what the control fields look like when the Display Mode property is set to edit, view or disabled:
| Edit Mode | View Mode | Disabled Mode |
|
|
|


Datasource
| Available in Controls: Dropdown, Checkgroup, Radiogroup, Suggest. Text, TextArea, and Hidden controls only counts with DB Connection and SQL properties as datasource. |
The Datasource property defines the origin of the values in the control. This property has the following available options:
Database
The database option displays the DB connection and SQL properties.
DB Connection
| Available in controls: Text and Textarea, Dropdown, Checkgroup, Radio, Suggest, Hidden |
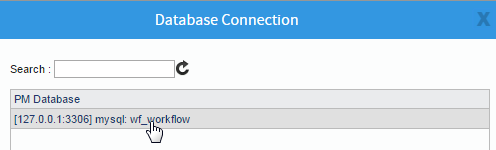
This property shows the name of the connection to the ProcessMaker database ("PM Database") or of an existing connection inside the process to an external database. If the connection has been previously set inside the variable related to the control, it will already be set in the DB Connection property, but can be changed by clicking on the name of the database set by default.

A modal window will open listing the existing database connections inside the project. To change the default connection, simply select one of the connections from the list
When the connection changes in the DB Connection property, and the control is related to a variable, the configuration of the variable does not change outside the Dynaform. This property only applies to the current design. Also, if the configuration of the variable changes, that change will not be reflected inside the Dynaform.
This property is directly related to the SQL property, where the query to retrieve the data is set. See the example in the next section to learn about how the DB Connection and SQL properties work together to populate the control field.
SQL
| Available in controls: Text and Textarea, Dropdown, Checkgroup, Radio, Suggest, Hidden |
This property sets the SQL query that will populate the control field using data from the database chosen in the DB Connection property.

When the value of this property and the control is related to a variable, the configuration of the variable will not change outside the form. The changes in this property will only be applied to the current Dynaform. Also, if the configuration of the variable changes outside the Dynaform, that change will not be reflected inside the Dynaform.
The SQL query must use the following syntax:
SQL keywords such as SELECT, FROM and WHERE are case insensitive, so they can be spelled in upper or lowercase.
Rules to Correctly Create a SQL Query
Before typing a query into the SQL property read the following rules:
- Do NOT set a SQL query that retrieves an excessively large amount of data: it will affect the loading performance of the Dynaform.
Fields and table names are case insensitive by default in Windows, but case sensitive by default in Linux. To avoid problems caused by using the wrong case, write the table name exactly as it is in the database.
ProcessMaker tables and databases are always created using UPPERCASE letters, and should always be referred to using uppercase letters as well. If creating cross platform processes that will reference ProcessMaker databases, it is recommended to always use table and field names in UPPERCASE, so the query will work in both Windows and Linux.
In MySQL, the lower_case_table_names system variable also affects how the server handles identifier case sensitivity; please double-check the value configured in your MySQL to avoid problems.
- Do NOT include the database name in the SQL SELECT statement.
- Do NOT end queries with a semicolon character (
;) when using a connection to Microsoft SQL Server or PostgreSQL. Queries that include ProcessMaker variables or string values must use single quotes
' 'to specify that the variable used is a string. To include a single quote inside a string, precede it with a backslash. For example: 'You can\'t say \'hello\'?'SELECT column1, column2 FROM table1 WHERE column1 = '@=variable' The use of double quotes,
" "is not supported in Microsoft SQL Server, PostgreSQL and ORACLE.If the variable is a number, do not use quotes.
SELECT column1, column2 FROM table1 WHERE column1 = @=variableNumber To specify a date, time or datetime literal, use one of the following formats:
SELECT column FROM table WHERE column = 'yyyy-mm-dd' //DATE SELECT column FROM table WHERE column = 'hh:mm:ss[.fff]' //TIME SELECT column FROM table WHERE column = 'yyyy-mm-dd hh:mm:ss[.fff]' //TIMESTAMP - If querying a PM Table, remember that ProcessMaker automatically prepends PMT_ to the names of PM Tables when creating them, so the table CLIENT_NAMES is stored as PMT_CLIENT_NAMES in the database and it needs to referred to that way in the SQL SELECT statement.
To learn how to create SQL SELECT statements, see this basic tutorial or this more advanced one. To query ProcessMaker's internal databases, see these examples.
SQL Queries that Return Two Values
If the field is a Dropdown, Checkgroup, Radio button, or Suggest, the SQL query must return two fields to populate the list of options.
Where:
- value column: The value field, which is the value that will be stored when the user selects an option.
- label column: The label field, which is the text that will be displayed when the user selects an option.
- table name: The name of the table in the database.
- condition: A condition for the SQL query.
All additional fields returned by the SQL query will be ignored. To display multiple fields in the label, use concatenation to join the fields into a single string.
If there are already existing options for the field, the results of the SQL query will be added to the end of the existing list of options. The options will be displayed in the order in which they are returned by the SQL SELECT query, so add ORDER BY and/or GROUP BY clauses to the query to specify the order.
The first option in dropdown fields will be automatically selected, unless a value is specified in the Default Value property. To force the user to manually select an option, make the dropdown field required and set text, such as "--Select--", in the Placeholder property. If the user tries to submit the form without selecting an option, a message box will be displayed.
SQL Queries that Return One Value
If the field is a Textbox, Textarea or Hidden field, the SQL query must have the following syntax:
Where:
- value column: The value field, which is the text that will be displayed and stored when the user selects an option.
- table name: The name of the table in the database.
- condition: A condition for the SQL query.
The SQL query sets the initial value (text) of the field when the Dynaform is displayed. The user is free to change that value, if the field is not set to Read-only or View mode.
If the SQL query selects more than one column, the value displayed in the field will be the first column defined in the SQL query, and if the SQL query returns more than one record, only the first record will be used to set the field's value. All other columns and records will be ignored. To obtain more than one field, use the CONCAT() function to concatenate the fields into a single string.
If the Default Value property of the field is also set, read the rules in the Default value section to know which value will be displayed as the control's value.
Note: Any changes made to the value in a Dynaform field will not be written back to the original database (since SELECT statements are read-only). If you want the changes entered into a Dynaform field to be written back to the original database, write a custom trigger to be fired after the Dynaform using the executeQuery() function to send an SQL UPDATE or INSERT statement to the original database.
String Concatenation
The concatenation operator varies according to the type of database:
| DataBase | Operator | Example |
|---|---|---|
| MySQL | CONCAT() | SELECT ID, CONCAT(FIRSTNAME, ' ', LASTNAME) FROM CLIENTS |
| PosgreSQL | || | SELECT ID, FIRSTNAME || ' ' || LASTNAME FROM CLIENTS |
| SQL Server | + | SELECT ID, FIRSTNAME + ' ' + LASTNAME FROM CLIENTS |
| Oracle | CONCAT() or || | SELECT ID, CONCAT(FIRSTNAME, ' ', LASTNAME) FROM CLIENTS SELECT ID, FIRSTNAME || ' ' || LASTNAME FROM CLIENTS |
ProcessMaker Variables in SQL Queries
SQL queries can work with:
Variables that are not assigned to any control in the Dynaform, such as:
SELECT IC_UID, IC_NAME FROM ISO_COUNTRY WHERE IC_UID = @@COUNTRYWhere
@@COUNTRYis not assigned to any control in the Dynaform but its value is set using a trigger.System variables, such as @@USER_LOGGED
SELECT USR_UID, USR_USERNAME FROM USERS WHERE USR_UID = @@USER_LOGGEDVariables assigned and not assigned in the Dynaform to set dependent fields.
SELECT IC_UID, IC_NAME FROM ISO_COUNTRY WHERE IC_UID <> @@COUNTRY1 AND IC_UID <> @@COUNTRY2Where
@@COUNTRY1is the variable assigned to an independent field and@@COUNTRY2is not assigned in the Dynaform.- A Grid control, if the variables used in the SQL query are used in the current grid control. Also a grid control can work with the following system variables:
@@APPLICATION,@@PROCESS,@@TASK,@@INDEX,@@USER_LOGGEDor@@USR_USERNAME.
Considerations When Creating a SQL Query Using ProcessMaker Variables
Available Version: As of ProcessMaker 3.3.0
When using ProcessMaker variables, it is important to have in mind the following considerations to avoid issues:
-
ProcessMaker uses the sqlsrv driver that does not natively support queries with double quotes on MSSQL servers, which is standard with other database drivers such as MySQL, Oracle and PostgreSQL. For example, check the following query implemented on a MSSQL database engine with the mentioned driver:
SELECT * FROM MyTable WHERE field1 = "stringValue"The example above displays an error. To correct this, the query should be with single quotes:
SELECT * FROM MyTable WHERE field1 = 'stringValue' -
At the moment of using prefixes on queries, you must consider only the typing rules for ProcessMaker variables and not the type of the variable. It is recommended to use variables with
@=prefix (for character, string and numeric data types) on queries and depending on the data type, enclose it with single quotes. -
Not recommended, but in the case of using
@@or@#prefixes on queries, use always single quote delimiters. This is because these prefixes enclose variables with double quotes. As mentioned database engines support only the use of single quotes.
Example: List All Countries with the Exception of Two
Show the complete list of countries inside a dropdown control with the exception of two countries: one exception set by the user and one set in a trigger.
Create a Dynaform and place:
- A textbox assigned to a string variable named "COUNTRY1"
- A dropdown box assigned to a string variable named "Countries"
Click on the dropdown control field in the Dynaform, go to the SQL property and click on the ellipses ... to set an SQL query.
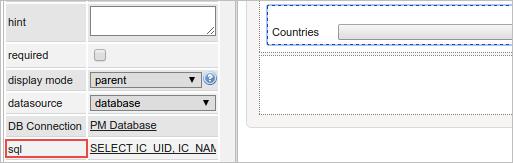
Set the following query:

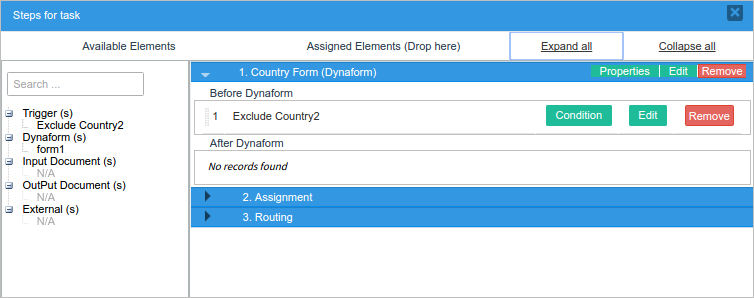
Now, create a trigger named "Exclude Country2" with the following code:
Assign the Dynaform as a step in the task and set the trigger to be fired BEFORE Dynaform.
When a case is run, the control will be populated with a list of all countries, excluding "Argentina", because the value of the variable @@COUNTRY2 was set to "AR" in the trigger.
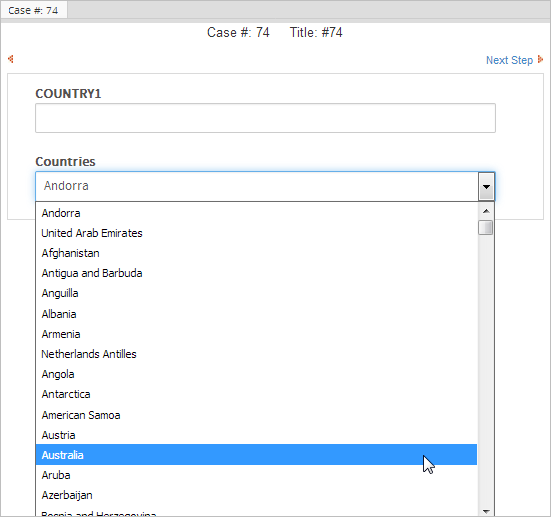
To exclude one more country, write a country's UID in the COUNTRY1 textbox. For example, if "AU" is typed in, Australia won't be listed.

As of ProcessMaker 3.5.0, there are four scenarios of ProcessMaker variables in the SQL property:
- Use
@=or@#to refer to the variable as a simple relation.SELECT table.ID, table.NAME
FROM PMTABLE as table
WHERE table.ID = @#CASE_ID - PM Table relation with a variable. Variable values work in Grids with Dynaform variables and case variables.
SELECT PMTB.ID, PMTB.NAME
FROM PMT_TABLE_@=VARIABLE PMTB - Dependent field of a PM Table using variables.
SELECT TB.ID, TB.NAME
FROM
PMT_TABLE_@=DROP_DOWN_TABLE_VALUE TB
WHERE
TB.STATUS = 'ACTIVE' - In case of variables referred in Grids, use
@?for a correct use. Use it when the variable is outside the Grid. The variable type does not change and it is parsed as its original type.SELECT ID_TIPO FROM PMT_@?nameTable;
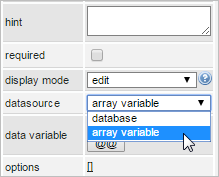
Array Variable
This option assigns the values of a control using a defined array variable. It is suggested to use array variables for controls that need to be populated dynamically. When the "Array Variable" option is selected, the Data Variable property is displayed and the SQL and DB Connection properties are hidden.
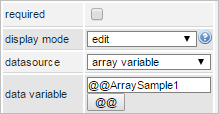
Data Variable
The Data Variable property sets the array variable used to obtain the control values.
Array Variable
The array variable used in this property has the following characteristics:
- The array variable values must be set using a Trigger placed before the Dynaform.
- Any value defined in the lower part of the Create Variable window will be ignored. This means that neither of these values will be added to the pool of the control options.
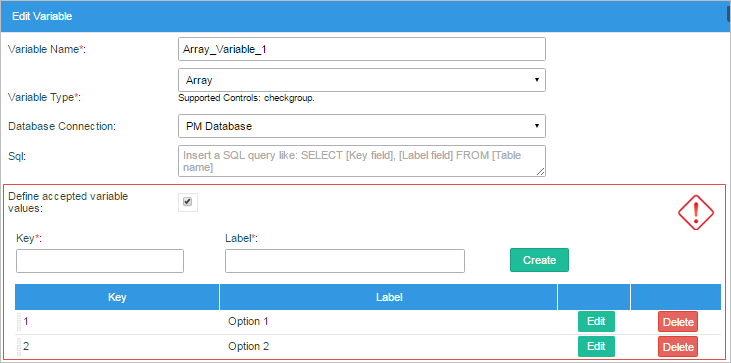
- If the variable assigned to the control in the Variable property has defined values, they will be displayed before the array variable values.

- Like in the Database property, the first column of the array is used as the value of each row, and the second column as the label.
Assigning the Array Variable
Assign the array variable using the @@ button.
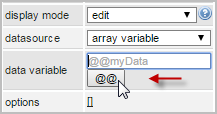
Once clicked, a window will open listing all existing array variables.
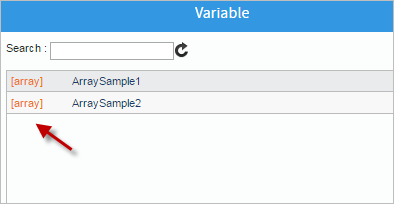
Once the array variable is selected, it will be set into the Data Variable field.
Remember that any value defined in this array variable through the Create Variable window will be ignored.
Example
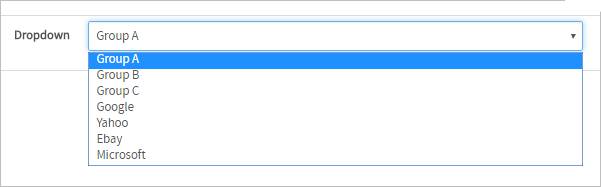
Let's combine the values of a string variable assigned to a Dropdown control with array values defined through a Custom Trigger.
Create a Dynaform and drop a Dropdown control inside it. In the Create/Select Variable window, create a string variable named "groupDropdownVar" and define some options. These options will be displayed before the ones assigned in the array variable.
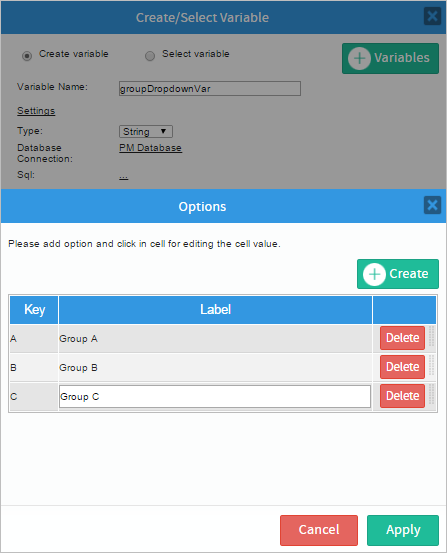
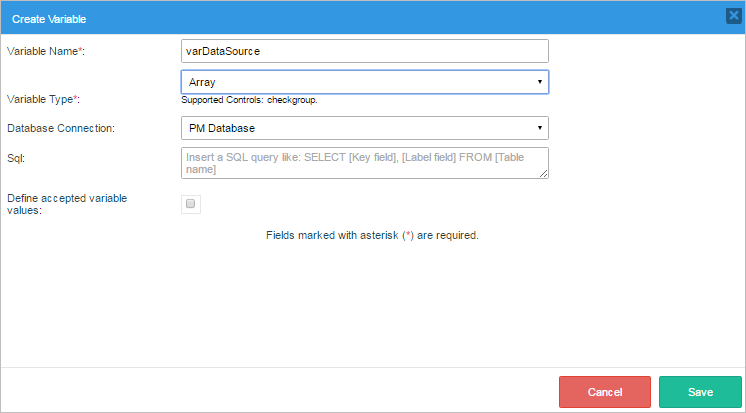
Then, create the array variable that will be assigned in the Datasource property. In this case, this variable will be named "varDataSource".
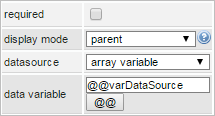
Go back to the Dynaform and click on the Dropdown control. In its properties, select the option "Array Variable" inside the Datasource property and choose the variable varDataSource from the window list.
Save and close the Dynaform.
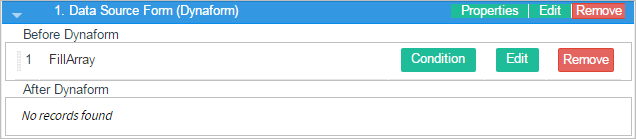
Now, create a custom trigger with the name "FillArray" and inside the code assign an array of values to the varDataSource variable.
Place the trigger before the Dynaform.
Finally, start a case. The dropdown will display the values defined in the string variable plus the ones that were assigned to the array variable in the Trigger.
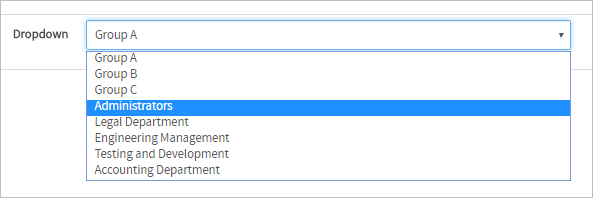
SQL queries can be used inside the trigger to retrieve array values. For example, to retrieve a list of the current workspace groups:
The dropdown will display the values assigned to its string variable plus the values retrieved from the SQL query in the trigger:
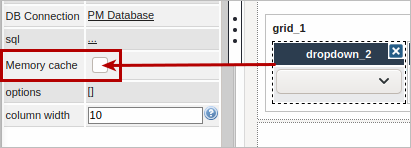
Memory Cache
Available Version: As of ProcessMaker 3.5.0
| Available in controls: Text, Textarea, Dropdown, Suggest, Radio, Checkgroup |
Note: This property is also available for controls in a Grid, except for the Radio and Checkgroup.
If the Memory cache property is checked, it allows Dependent Field values cache their results in the memory. Then, the dependency values use the stored values in the memory instead of running queries.
Options
| Available in controls: Text and Textarea, Dropdown, Radio, Datetime, Suggest, File Hidden |
This property shows, edits and/or adds options to the control that may be related to a variable or not.

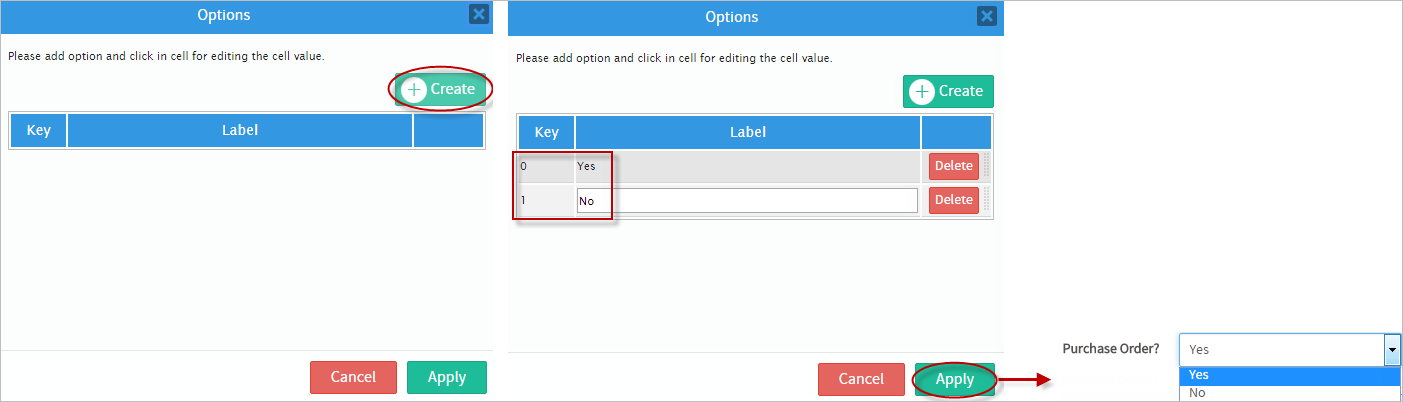
A window opens that contains the options set by the variable (if they exist), or, as in the figure below, add options to the control by clicking on Create.
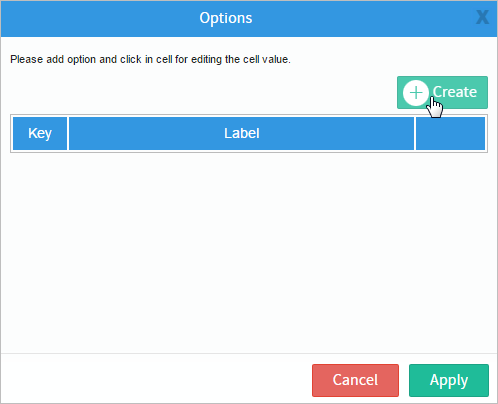
A row with fields enabled to add the options appears below. After setting the key and the label, simply press Enter to add the option.

Click on Apply to save and add the options to the control.
For example, when there is a dropdown control and the values have not been assigned in code, click on Options to populate the dropdown. In this case, the dropdown will be populated by "Yes" and "No" options. See the image below for guidance.
When the options of the control change in this property and the control has been related to a variable, the configuration of the variable does not change outside the form. This property only applies to the current design. Also, if the configuration of the variable changes outside the Dynaform, that change will not be reflected inside the Dynaform.
Note: Take these rules for variables into account when working with this control inside a Dynaform.
Using Variables to Set Dynamic Properties
The following table describes which controls support variables to set dynamic properties:
| Label | Default Value | Placeholder | Hint | Validate | Error Message | Max Length | Title | Format | Min Date | Max Date | Default Date | Href | |
|---|---|---|---|---|---|---|---|---|---|---|---|---|---|
| Textbox |  |
|
|
|
|
|
|
||||||
| Textarea | |
|
|
|
|
|
|||||||
| Dropdown | |
|
|
|
|||||||||
| Checkbox | |
|
|
||||||||||
| Checkgroup | |
|
|
||||||||||
| Radio | |
|
|
||||||||||
| Datetime | |
|
|
|
|
|
|
||||||
| Suggest | |
|
|
|
|||||||||
| Hidden | |
||||||||||||
| Title | |
||||||||||||
| Subtitle | |
||||||||||||
| Label | |
||||||||||||
| Link | |
|
|
|
|||||||||
| Image | |
|
|||||||||||
| File | |
|
|||||||||||
| Submit | |
||||||||||||
| Button | |
|
|||||||||||
| Grid | |
|
|
|
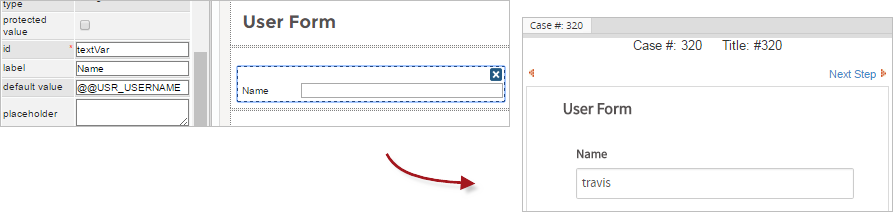
For example, the variable @@USR_USERNAME can be assigned to the Default Value property of a Textbox control. When running the case, the Textbox field will display the name of the current user as the default value.
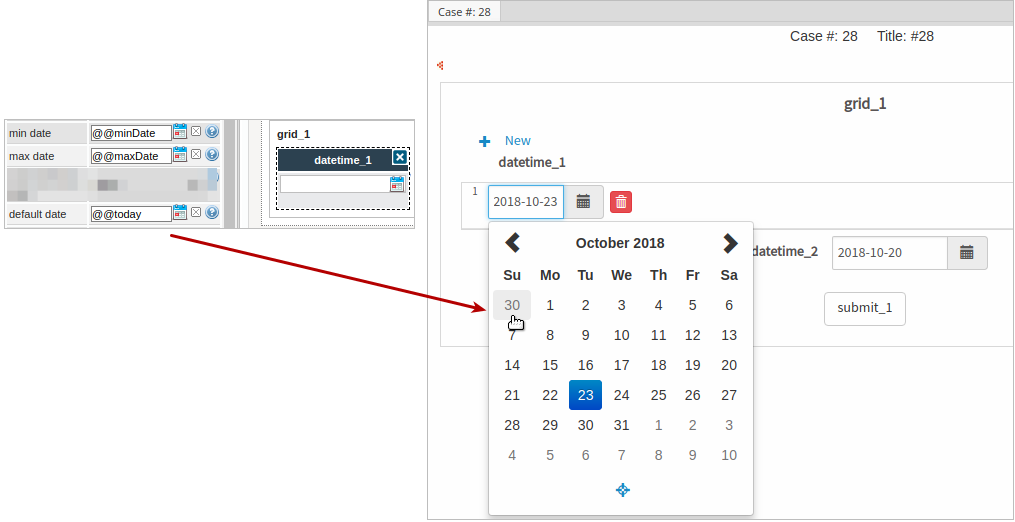
Note: Fields inside the grid cannot set dynamic properties. For example, the following trigger is before a Dynaform:
These variables are assigned to the min date, max date, and default date properties of a Datetime control inside a Grid control. When running the case, the Datetime field does not display the values defined in the trigger.
Variables Auto Completion
Available Version: As of ProcessMaker 3.5.0
The default value, datetime, min date, max date, and default date control properties have an auto-completion functionality when adding variables:
- After entering
@@,@#, or@=if they are String variables with a Textbox, Textarea, Dropdown, Checkgroup, Radio, Suggest, or Hidden controls: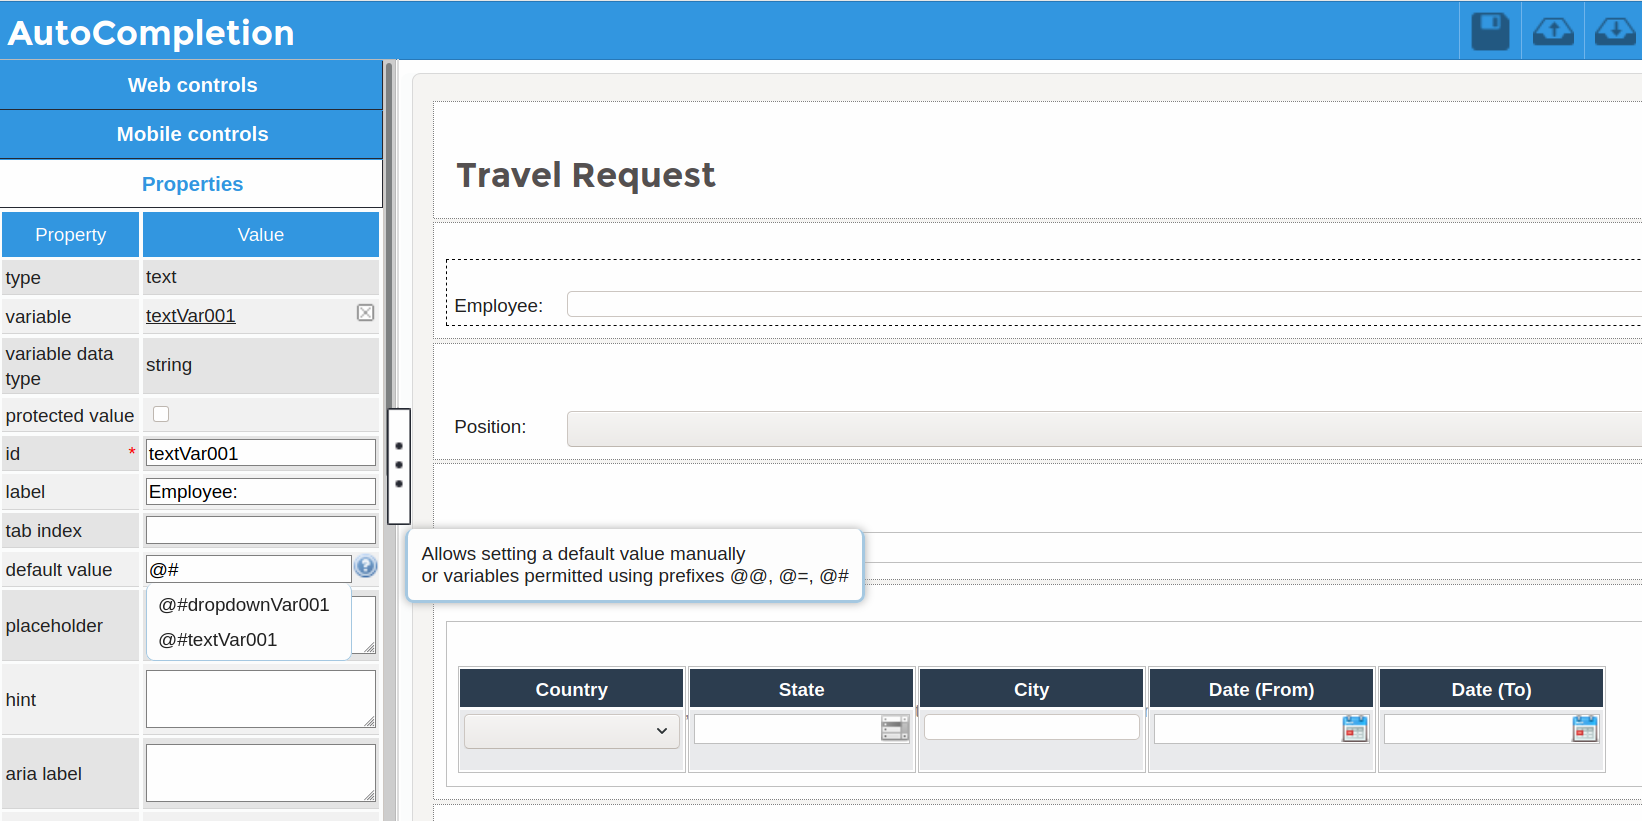
- After entering
@@, or@=if they are Datetime variables with a Datetime control: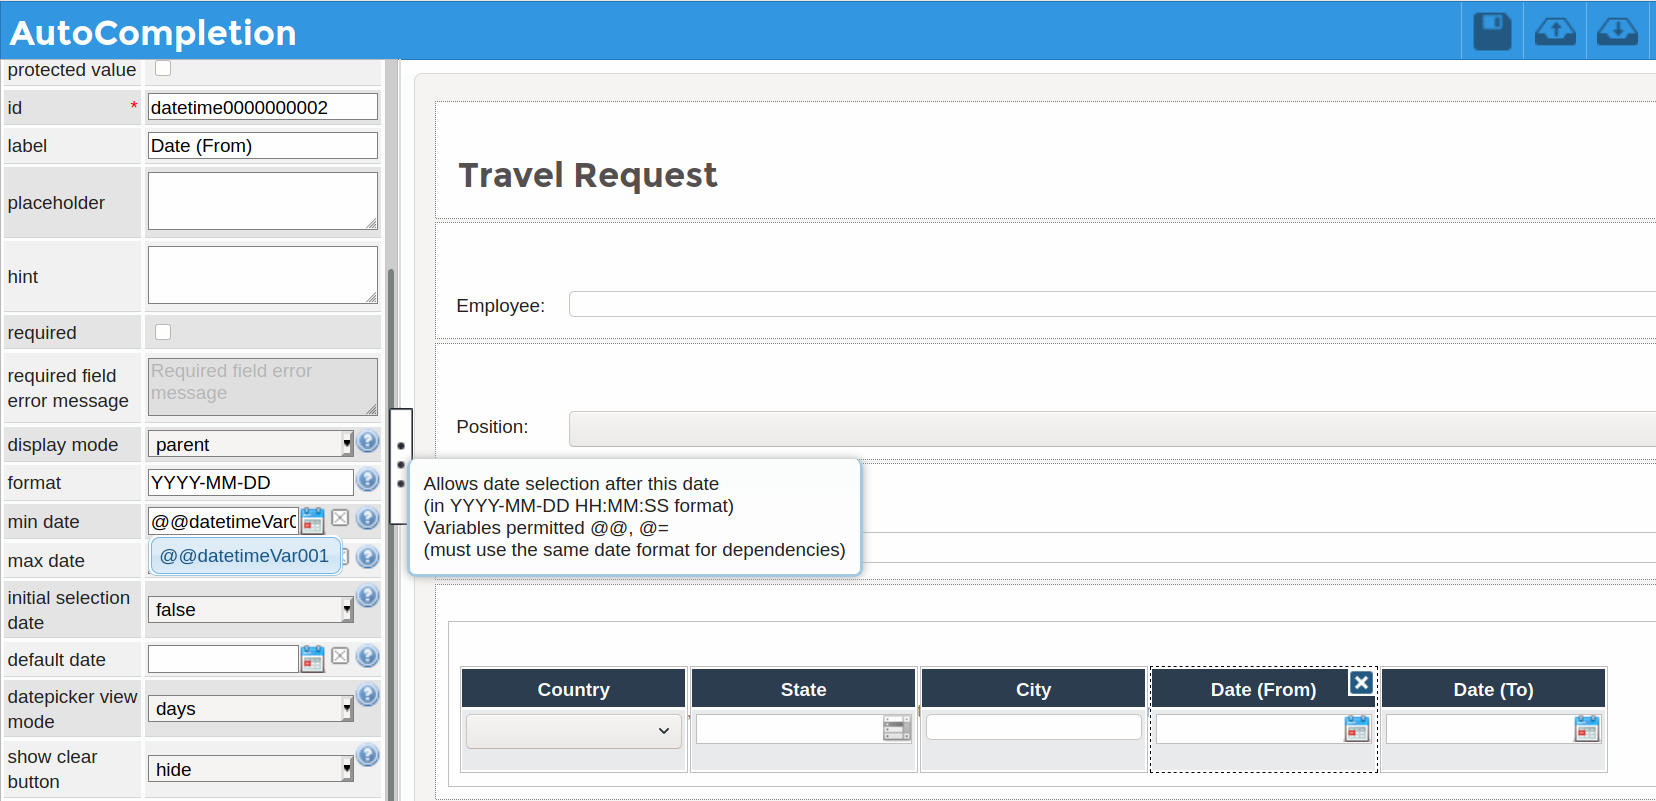
The ProcessMaker variables previously created display according to the type of variable configured in the control that could be String or Datetime. Variables display the corresponding type and property in getValue().
The search criteria updates every time that a character is entered to narrow the results prioritizing the first words entered.

